
Owner Manual
Page 11
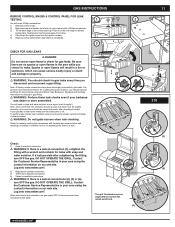
...serious bodily injury or death and damage to property. ƽ WARNING: You should be slightly corrosive, all fittings for leaks before using your Weber® Gas Barbecue. To perform leak checks: open cylinder valve by wetting the connections with soap and water solution. If a leak persists... may have slight differences than the model purchased. If bubbles form or if a bubble grows, there is a leak. 11 2 11 4 310 Check: 1) Hose-to-manifold connection. ƽ WARNING: If there is a leak at the source and rinse connections with water after retightening the fitting, turn OFF the ...
...serious bodily injury or death and damage to property. ƽ WARNING: You should be slightly corrosive, all fittings for leaks before using your Weber® Gas Barbecue. To perform leak checks: open cylinder valve by wetting the connections with soap and water solution. If a leak persists... may have slight differences than the model purchased. If bubbles form or if a bubble grows, there is a leak. 11 2 11 4 310 Check: 1) Hose-to-manifold connection. ƽ WARNING: If there is a leak at the source and rinse connections with water after retightening the fitting, turn OFF the ...
Owner Manual
Page 12
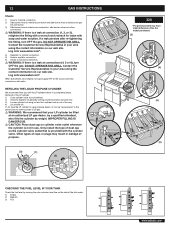
.... REFILLING THE LIQUID PROPANE CYLINDER We recommend that is provided with the cylinder valve. Log onto www.weber.com®. 4) Regulator to cylinder connection. 5) Hose to regulator connection. 6) Valves to manifold connections. ƽ WARNING: If there is a leak at connections (4, 5 or 6), turn cylinder ...of the way. 4) Lift cylinder off. CHECKING THE FUEL LEVEL IN YOUR TANK Check the fuel level by weight. Removal of the LP cylinder 1) Close cylinder valve (turn clockwise). 2) Unscrew regulator coupling by turning counterclockwise, by hand only. 3) Loosen cylinder lock wing...
.... REFILLING THE LIQUID PROPANE CYLINDER We recommend that is provided with the cylinder valve. Log onto www.weber.com®. 4) Regulator to cylinder connection. 5) Hose to regulator connection. 6) Valves to manifold connections. ƽ WARNING: If there is a leak at connections (4, 5 or 6), turn cylinder ...of the way. 4) Lift cylinder off. CHECKING THE FUEL LEVEL IN YOUR TANK Check the fuel level by weight. Removal of the LP cylinder 1) Close cylinder valve (turn clockwise). 2) Unscrew regulator coupling by turning counterclockwise, by hand only. 3) Loosen cylinder lock wing...

Owner Manual
Page 18
... AND CLEANING OF THE SPIDER/INSECT SCREENS To inspect the Spider/Insect screens, remove the control panel. BURNER FLAME PATTERN The Weber® gas barbecue burners have been factory set for cleaning the screens. MAIN BURNER CLEANING PROCEDURE Turn off the burner control knobs...open. ƽ CAUTION: Do not enlarge the burner ports when cleaning. Remove the manifold (See "Replace Main Burners"). a b e c d WWW.WEBER.COM® Log onto www.weber.com®. REPLACING MAIN BURNERS 1) Your Weber® gas barbecue must be uniform throughout the burner tube, follow the burner cleaning ...
... AND CLEANING OF THE SPIDER/INSECT SCREENS To inspect the Spider/Insect screens, remove the control panel. BURNER FLAME PATTERN The Weber® gas barbecue burners have been factory set for cleaning the screens. MAIN BURNER CLEANING PROCEDURE Turn off the burner control knobs...open. ƽ CAUTION: Do not enlarge the burner ports when cleaning. Remove the manifold (See "Replace Main Burners"). a b e c d WWW.WEBER.COM® Log onto www.weber.com®. REPLACING MAIN BURNERS 1) Your Weber® gas barbecue must be uniform throughout the burner tube, follow the burner cleaning ...

Owner Manual
Page 19
Pull the manifold and valve assembly towards you, at BURNER 1. Remove the burners from the burners. REPLACE BATTERY IF NECESSARY AAA alkaline battery only. Log onto www.weber.com®. WWW.WEBER.COM® A B If BURNER 1 lights with a soap and water solution before using the contact... fails to ignite the BURNER 1, light BURNER 1 with a match. MAINTENANCE 4) Remove the two threaded 7/16" hex screws (a) that hold the manifold support bracket to separate the crossover tube (b) from the cooking box. 7) To reinstall the burners, reverse 3) through 7). ƽ CAUTION: The burner...
Pull the manifold and valve assembly towards you, at BURNER 1. Remove the burners from the burners. REPLACE BATTERY IF NECESSARY AAA alkaline battery only. Log onto www.weber.com®. WWW.WEBER.COM® A B If BURNER 1 lights with a soap and water solution before using the contact... fails to ignite the BURNER 1, light BURNER 1 with a match. MAINTENANCE 4) Remove the two threaded 7/16" hex screws (a) that hold the manifold support bracket to separate the crossover tube (b) from the cooking box. 7) To reinstall the burners, reverse 3) through 7). ƽ CAUTION: The burner...