

Owner Manual
Page 1
... vapors and liquids in this or any open flame. 3. Open lid. 4. WARNING: Follow all leak check procedures carefully in the vicinity of this manual prior to the appliance. 2. If odor continues, immediately call your gas supplier or your fire department. 96176 12/96 PLATINUM™ SERIES II Natural Gas Barbecues Operating Guide Read before assembly Platinum Series II 2200 NG Serial Number W*V??W*V W&@'V@@@@@@@@@@@W&@'V WV?e e e e e &(h )'@@e e e e e @@?WV?&(h )'e e e e e@@e e e e e @@&W'V(YX)@@@@'W&V(YX Yh h X@@@@@@@@@?WN Yh...
... vapors and liquids in this or any open flame. 3. Open lid. 4. WARNING: Follow all leak check procedures carefully in the vicinity of this manual prior to the appliance. 2. If odor continues, immediately call your gas supplier or your fire department. 96176 12/96 PLATINUM™ SERIES II Natural Gas Barbecues Operating Guide Read before assembly Platinum Series II 2200 NG Serial Number W*V??W*V W&@'V@@@@@@@@@@@W&@'V WV?e e e e e &(h )'@@e e e e e @@?WV?&(h )'e e e e e@@e e e e e @@&W'V(YX)@@@@'W&V(YX Yh h X@@@@@@@@@?WN Yh...

Owner Manual
Page 2
... 6 Manual Lighting 7 To Extinguish 7 Lighting the Side Burner 8 Cooking 9 Cleaning 9 Using the Steam-N-Chips Smoker 10 Cleaning the Steam-N-Chips Smoker 10 Maintenance Spider Stopper Guards Inspection and Cleaning of the Spider Stopper Guards Main Burner Flame Pattern Main Burner Cleaning Procedure Replacing the Main Burners Crossover Ignition System Operations Troubleshooting Side Burner Troubleshooting Side Burner Maintenance To Clean the Burner Head To Reassemble the Burner Head Exploded Views and Replacement Parts List Platinum Series II 2200 NG Platinum Series II...
... 6 Manual Lighting 7 To Extinguish 7 Lighting the Side Burner 8 Cooking 9 Cleaning 9 Using the Steam-N-Chips Smoker 10 Cleaning the Steam-N-Chips Smoker 10 Maintenance Spider Stopper Guards Inspection and Cleaning of the Spider Stopper Guards Main Burner Flame Pattern Main Burner Cleaning Procedure Replacing the Main Burners Crossover Ignition System Operations Troubleshooting Side Burner Troubleshooting Side Burner Maintenance To Clean the Burner Head To Reassemble the Burner Head Exploded Views and Replacement Parts List Platinum Series II 2200 NG Platinum Series II...

Owner Manual
Page 3
... reasonable care when operating your Weber Gas Barbecue. s Never lean over open grill or place hands or fingers on or in the storage area under or near this barbecue. See instructions in this manual. s Do not put a barbecue cover or anything flammable on the front edge of natural gas in an LP unit or LP gas in a natural gas unit is in operation. s Do not enlarge valve orifices or burner...
... reasonable care when operating your Weber Gas Barbecue. s Never lean over open grill or place hands or fingers on or in the storage area under or near this barbecue. See instructions in this manual. s Do not put a barbecue cover or anything flammable on the front edge of natural gas in an LP unit or LP gas in a natural gas unit is in operation. s Do not enlarge valve orifices or burner...

Owner Manual
Page 4
... location in the burner tubes before using. s Not for use Liquid Propane (LP) bottled gas.The valves, orifices and hose are for natural gas only. s This Weber Gas Barbecue is designed for operating and maintaining your Weber Gas Barbecue. Do not use by closing its individual shutoff valve must be turned OFF at the pressure equal to portable gas grills, you will give you more cooking control than 1/2 psig (3.5 kPa). s The Weber Gas Barbecue should be...
... location in the burner tubes before using. s Not for use Liquid Propane (LP) bottled gas.The valves, orifices and hose are for natural gas only. s This Weber Gas Barbecue is designed for operating and maintaining your Weber Gas Barbecue. Do not use by closing its individual shutoff valve must be turned OFF at the pressure equal to portable gas grills, you will give you more cooking control than 1/2 psig (3.5 kPa). s The Weber Gas Barbecue should be...

Owner Manual
Page 5
..., installation, use and service and which on examination shall indicate, to return defective parts, transportation charges must be limited to the repair or replacement of purchase as set out in duration to help you with any problems with parts or assembly. Weber will elect to produce the highest quality products for it . Deterioration or damage due to you might have your owner's manual...
..., installation, use and service and which on examination shall indicate, to return defective parts, transportation charges must be limited to the repair or replacement of purchase as set out in duration to help you with any problems with parts or assembly. Weber will elect to produce the highest quality products for it . Deterioration or damage due to you might have your owner's manual...

Owner Manual
Page 6
... away from Weber-Stephen Products Co., Customer Service or authorized dealer. 1) Open the lid. LIGHTING THE MAIN BURNERS Summary lighting instructions are OFF. (Push each burner control knob down and turn clockwise.) For barbecues equipped with a side burner, push the burner control knob in and turn clockwise to OFF. 3) Turn gas supply valve on. WARNING: Do not lean over open sliding work surfaces while igniting the barbecue, or...
... away from Weber-Stephen Products Co., Customer Service or authorized dealer. 1) Open the lid. LIGHTING THE MAIN BURNERS Summary lighting instructions are OFF. (Push each burner control knob down and turn clockwise.) For barbecues equipped with a side burner, push the burner control knob in and turn clockwise to OFF. 3) Turn gas supply valve on. WARNING: Do not lean over open sliding work surfaces while igniting the barbecue, or...

Owner Manual
Page 7
... open lid while igniting the barbecue, or not waiting 5 minutes to allow the gas to clear if the barbecue does not light, may result in an explosive flame-up which can turn on . 4) Strike a match and put the flame into the matchlight hole in and turn each burner control knob clockwise to OFF. 1 2 7 3) Turn gas supply valve on the other burners. TO EXTINGUISH Turn...
... open lid while igniting the barbecue, or not waiting 5 minutes to allow the gas to clear if the barbecue does not light, may result in an explosive flame-up which can turn on . 4) Strike a match and put the flame into the matchlight hole in and turn each burner control knob clockwise to OFF. 1 2 7 3) Turn gas supply valve on the other burners. TO EXTINGUISH Turn...
Owner Manual
Page 8
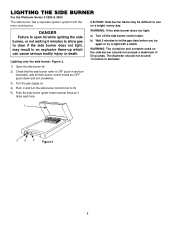
... a match. WARNING: If the side burner does not light: a) Turn off the side burner control valve. b) Wait 5 minutes to let the gas clear before you try again or try to HI. 5) Push the side burner igniter button several times so it clicks each time. 1 24 5 Figure 3 8 The diameter should not exceed a maximum of 50 pounds. LIGHTING THE SIDE BURNER For the Platinum Series II...
... a match. WARNING: If the side burner does not light: a) Turn off the side burner control valve. b) Wait 5 minutes to let the gas clear before you try again or try to HI. 5) Push the side burner igniter button several times so it clicks each time. 1 24 5 Figure 3 8 The diameter should not exceed a maximum of 50 pounds. LIGHTING THE SIDE BURNER For the Platinum Series II...

Owner Manual
Page 9
... or submerge in food while cooking. DO NOT ENLARGE BURNER PORTS (OPENINGS). Stainless steel surfaces - Cooking conditions may be moved when operating or hot. If you can line the catch pan with warm soapy water. WARNING: Use heat-resistant barbecue mitts or gloves when cleaning the cooking grates and Flavorizer bars. Replacement cooking grates and Flavorizer Bars are available, or you did...
... or submerge in food while cooking. DO NOT ENLARGE BURNER PORTS (OPENINGS). Stainless steel surfaces - Cooking conditions may be moved when operating or hot. If you can line the catch pan with warm soapy water. WARNING: Use heat-resistant barbecue mitts or gloves when cleaning the cooking grates and Flavorizer bars. Replacement cooking grates and Flavorizer Bars are available, or you did...

Owner Manual
Page 10
... not adversely affect the function of your Weber Gas Barbecue. Cleaning the Steam-N-Chips Smoker Before each use the Steam-N-Chips Smoker As a starting point, place a handful of FireSpice Chips or a few FireSpice Chunks in the smoker allowing room for the water pan. Remove bottom tray and empty. This residue need not be used to enhance any flammable fluid in the...
... not adversely affect the function of your Weber Gas Barbecue. Cleaning the Steam-N-Chips Smoker Before each use the Steam-N-Chips Smoker As a starting point, place a handful of FireSpice Chips or a few FireSpice Chunks in the smoker allowing room for the water pan. Remove bottom tray and empty. This residue need not be used to enhance any flammable fluid in the...

Owner Manual
Page 11
... Stopper Guards if any outdoor gas appliance, is factory installed. This could result in a fire in the fit around the air shutter section of the burner tube and the valve, thereby preventing spiders and other insects. Check that you inspect the Spider Stopper Guards at least once a year. The smell of the burner tubes. Barbecue heats unevenly. 4. Venturi Air shutter...
... Stopper Guards if any outdoor gas appliance, is factory installed. This could result in a fire in the fit around the air shutter section of the burner tube and the valve, thereby preventing spiders and other insects. Check that you inspect the Spider Stopper Guards at least once a year. The smell of the burner tubes. Barbecue heats unevenly. 4. Venturi Air shutter...

Owner Manual
Page 12
.... Check and clean the valve orifices at the base of the burners and carefully set for the correct air and gas mixture. Guide screw Figure 12 12 Figure 8. Pull the manifold and valve assembly out of the valves. The correct flame pattern is to the cooking box. This is shown in the corners of burners. Tips occasionally yellowish Burner inside each burner with a wire (a straightened out...
.... Check and clean the valve orifices at the base of the burners and carefully set for the correct air and gas mixture. Guide screw Figure 12 12 Figure 8. Pull the manifold and valve assembly out of the valves. The correct flame pattern is to the cooking box. This is shown in the corners of burners. Tips occasionally yellowish Burner inside each burner with a wire (a straightened out...

Owner Manual
Page 13
... Guide for correct procedure. MAINTENANCE h) Lift and twist the burner assembly slightly, to light, contact Weber-Stephen Customer Service. Figure 14 (a). Figure 16. CAUTION: The burner openings must be leak checked with a match, then check the Crossover Ignition System. Crossover tube j) Reinstall the Spider Stopper Guards. White wire Black wire 13 Figure 16 Remove the burners from the burners. Check proper assembly before using the barbecue...
... Guide for correct procedure. MAINTENANCE h) Lift and twist the burner assembly slightly, to light, contact Weber-Stephen Customer Service. Figure 14 (a). Figure 16. CAUTION: The burner openings must be leak checked with a match, then check the Crossover Ignition System. Crossover tube j) Reinstall the Spider Stopper Guards. White wire Black wire 13 Figure 16 Remove the burners from the burners. Check proper assembly before using the barbecue...

Owner Manual
Page 14
....) holes.) Burner does not light, or flame is baked on -steel, not Clean thoroughly. (See Cleaning paint. Burner flame pattern is low Are burners clean? allowing grease to be corrected by using these methods, please contact Weber-Stephen Customer Service. 14 TROUBLESHOOTING Problem Check Cure Burners burn with a match, then check the Crossover Ignition System. possible obstructions. (Blockage of gas. If you can light the Front burner with a yellow...
....) holes.) Burner does not light, or flame is baked on -steel, not Clean thoroughly. (See Cleaning paint. Burner flame pattern is low Are burners clean? allowing grease to be corrected by using these methods, please contact Weber-Stephen Customer Service. 14 TROUBLESHOOTING Problem Check Cure Burners burn with a match, then check the Crossover Ignition System. possible obstructions. (Blockage of gas. If you can light the Front burner with a yellow...

Owner Manual
Page 15
Flame is very yellow in conjunction with the smell of gas. Inspect burner base for obstructions. If match lights burner, check igniter (see Side Burner Maintenance). Is the burner ring correctly installed? Is gas supply off? Clean if necessary. SIDE BURNER TROUBLESHOOTING For the Platinum Series II 3200 & 3400 WARNING: Before attempting any troubleshooting steps, all gas controls and supply valves should be in HIGH position. Cure Turn supply on. Push...
Flame is very yellow in conjunction with the smell of gas. Inspect burner base for obstructions. If match lights burner, check igniter (see Side Burner Maintenance). Is the burner ring correctly installed? Is gas supply off? Clean if necessary. SIDE BURNER TROUBLESHOOTING For the Platinum Series II 3200 & 3400 WARNING: Before attempting any troubleshooting steps, all gas controls and supply valves should be in HIGH position. Cure Turn supply on. Push...

Owner Manual
Page 16
... correct flame pattern is connected between igniter and ground. If the igniter works loose, carefully tighten the igniter lock nut with an adjustable wrench or pliers. (a) The Platinum Series II side burner has been factory set for the correct air and gas mixture. Check that igniter lock nut is connected between igniter and electrode. Note - SIDE BURNER MAINTENANCE WARNING: All gas controls and supply valves should be...
... correct flame pattern is connected between igniter and ground. If the igniter works loose, carefully tighten the igniter lock nut with an adjustable wrench or pliers. (a) The Platinum Series II side burner has been factory set for the correct air and gas mixture. Check that igniter lock nut is connected between igniter and electrode. Note - SIDE BURNER MAINTENANCE WARNING: All gas controls and supply valves should be...
Owner Manual
Page 17
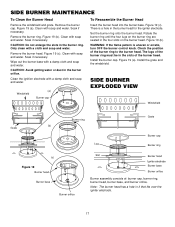
... over the igniter electrode. 17 Figure 19 (b). Install the burner cap. Note: The burner head has a hole in the burner ring. SIDE BURNER MAINTENANCE To Clean the Burner Head Remove the windshield and grate. Clean with soap and water. Figure 19 (c). There is uneven or erratic, turn OFF the burner control knob. WARNING: If the flame pattern is a hole in the burner orifice. Clean with...
... over the igniter electrode. 17 Figure 19 (b). Install the burner cap. Note: The burner head has a hole in the burner ring. SIDE BURNER MAINTENANCE To Clean the Burner Head Remove the windshield and grate. Clean with soap and water. Figure 19 (c). There is uneven or erratic, turn OFF the burner control knob. WARNING: If the flame pattern is a hole in the burner orifice. Clean with...

Owner Manual
Page 19
... Call the Weber Customer Service Center toll free 1-800-446-1071 to our products, unfortunately an occasional error may not be dangerous.This will also void your owner's manual and serial number of any part that is missing, do not go back to Weber-Stephen Products Co. Parts can be necessary. PLATINUM SERIES II 2200 NATURAL GAS REPLACEMENT PARTS LIST 1 Hinge pin cotter (2) 2 Hinge pin (2) 3 Lid (assembly) 4 Thermometer 5 Weber warm-up...
... Call the Weber Customer Service Center toll free 1-800-446-1071 to our products, unfortunately an occasional error may not be dangerous.This will also void your owner's manual and serial number of any part that is missing, do not go back to Weber-Stephen Products Co. Parts can be necessary. PLATINUM SERIES II 2200 NATURAL GAS REPLACEMENT PARTS LIST 1 Hinge pin cotter (2) 2 Hinge pin (2) 3 Lid (assembly) 4 Thermometer 5 Weber warm-up...

Owner Manual
Page 21
... Company by phone or mail. Call the Weber Customer Service Center toll free 1-800-446-1071 to Weber-Stephen Products Co. PLATINUM SERIES II 3200 NATURAL GAS REPLACEMENT PARTS LIST 1 Hinge pin cotter (2) 2 Hinge pin (2) 3 Lid (assembly) 4 Thermometer 5 Weber warm-up basket 6 Warming rack 7 Steam-N-Chips Smoker 8 Steam-N-Chips Smoker flue 9 Cooking grate (2) 10 Cooking box 11 Keps nut 12 1/4-20 x 1/2 inch bolt (12) 13 Nylon washer (16) 14...
... Company by phone or mail. Call the Weber Customer Service Center toll free 1-800-446-1071 to Weber-Stephen Products Co. PLATINUM SERIES II 3200 NATURAL GAS REPLACEMENT PARTS LIST 1 Hinge pin cotter (2) 2 Hinge pin (2) 3 Lid (assembly) 4 Thermometer 5 Weber warm-up basket 6 Warming rack 7 Steam-N-Chips Smoker 8 Steam-N-Chips Smoker flue 9 Cooking grate (2) 10 Cooking box 11 Keps nut 12 1/4-20 x 1/2 inch bolt (12) 13 Nylon washer (16) 14...

Owner Manual
Page 23
... void your owner's manual and serial number of any part that is missing, do not go back to our products, unfortunately an occasional error may not be necessary. Note - Call the Weber Customer Service Center toll free 1-800-446-1071 to Weber-Stephen Products Co. Have your warranty. 23 PLATINUM SERIES II 3400 NATURAL GAS REPLACEMENT PARTS LIST 1 Hinge pin cotter (2) 2 Hinge pin (2) 3 Lid (assembly) 4 Thermometer 5 Weber warm-up...
... void your owner's manual and serial number of any part that is missing, do not go back to our products, unfortunately an occasional error may not be necessary. Note - Call the Weber Customer Service Center toll free 1-800-446-1071 to Weber-Stephen Products Co. Have your warranty. 23 PLATINUM SERIES II 3400 NATURAL GAS REPLACEMENT PARTS LIST 1 Hinge pin cotter (2) 2 Hinge pin (2) 3 Lid (assembly) 4 Thermometer 5 Weber warm-up...


