
Owner Manual
Page 2
... before attempting to property. ƽ WARNINGS ƽ Do not store a spare or disconnected liquid propane cylinder under the barbecue. ƽ Your Weber® gas barbecue should be very hot. Call your liquid propane supplier. The unit must be dangerous. Do not attempt to the instructions outlined ... should never be within 24 inches of the top, bottom, back or sides of your barbecue is out. ƽ Do not enlarge valve orifices or burner ports when cleaning the valves or burners. ƽ The Weber® gas barbecue should never be transported and stored accordingly. ƽ If...
... before attempting to property. ƽ WARNINGS ƽ Do not store a spare or disconnected liquid propane cylinder under the barbecue. ƽ Your Weber® gas barbecue should be very hot. Call your liquid propane supplier. The unit must be dangerous. Do not attempt to the instructions outlined ... should never be within 24 inches of the top, bottom, back or sides of your barbecue is out. ƽ Do not enlarge valve orifices or burner ports when cleaning the valves or burners. ƽ The Weber® gas barbecue should never be transported and stored accordingly. ƽ If...

Owner Manual
Page 3
Contents Danger & Warnings A-2 Warranty A-4 General Instructions A-5 Grilling Methods A-6 Cleaning A-6 Exploded View A-7 Parts List A-9 Assembly Instructions B-a Gas Instructions C-1 Leak Checking C-4 Operating D-1 Grilling Methods D-1 Lighting ...D-3 Manual Lighting D-4 Lighting the Side Burner D-5 Lighting the Smoker D-7 Lighting the Rotisserie D-11 Troubleshooting D-13 Side Burner Troubleshooting D-14 Rotisserie Troubleshooting D-15 Maintenance E-1 Replacing Main Burners E-2 Crossover® Ignition System Operations E-4 A-3
Contents Danger & Warnings A-2 Warranty A-4 General Instructions A-5 Grilling Methods A-6 Cleaning A-6 Exploded View A-7 Parts List A-9 Assembly Instructions B-a Gas Instructions C-1 Leak Checking C-4 Operating D-1 Grilling Methods D-1 Lighting ...D-3 Manual Lighting D-4 Lighting the Side Burner D-5 Lighting the Smoker D-7 Lighting the Rotisserie D-11 Troubleshooting D-13 Side Burner Troubleshooting D-14 Rotisserie Troubleshooting D-15 Maintenance E-1 Replacing Main Burners E-2 Crossover® Ignition System Operations E-4 A-3

Owner Manual
Page 5
... The Weber® gas barbecue should also be checked for assembling your patio. Improper assembly can easily change its location in your yard or on recreational vehicles and/or boats. ƽ WARNING: Do not use the barbecue within 24 inches of combustible materials, top, bottom, back or sides of ... use. Do not use in a garage, building, breezeway or any other enclosed area. • When the LP cylinder is not disconnected from the Weber® gas barbecue, the appliance and LP tank must be free and clear from any obstructions in the burner tubes before using . (See Sections: "General...
... The Weber® gas barbecue should also be checked for assembling your patio. Improper assembly can easily change its location in your yard or on recreational vehicles and/or boats. ƽ WARNING: Do not use the barbecue within 24 inches of combustible materials, top, bottom, back or sides of ... use. Do not use in a garage, building, breezeway or any other enclosed area. • When the LP cylinder is not disconnected from the Weber® gas barbecue, the appliance and LP tank must be free and clear from any obstructions in the burner tubes before using . (See Sections: "General...

Owner Manual
Page 8
... Bottom Shelf 43. IR Rain Cover 56. 10 - 24 x 1/2 inch Stainless Steel Screw 57. Cookbox Assembly 66. Rear Frame Rail 78. Side Burner Cap 80. LP Tank 94. Smoker Burner Tube 20. Caster Frame Assembly 41. Lid Assembly 51. 1/4 - 20 x 1 1/4 inch Bolt 52. 12 inch ... Control Knob 31. Control Panel 32. Warming Rack 58. Thermocouple 62. Summit Drip Pan 77. Smoker Box Chip Grate 8. Hose and QCC1 Regulator 73. Side Burner 82. Motor Bracket 12. Main Gas Line 72. Smoker Assembly 7. Summit Catch Pan 76. Flavorizor® Bar Assembly w/ Smoker 9. Right Trim...
... Bottom Shelf 43. IR Rain Cover 56. 10 - 24 x 1/2 inch Stainless Steel Screw 57. Cookbox Assembly 66. Rear Frame Rail 78. Side Burner Cap 80. LP Tank 94. Smoker Burner Tube 20. Caster Frame Assembly 41. Lid Assembly 51. 1/4 - 20 x 1 1/4 inch Bolt 52. 12 inch ... Control Knob 31. Control Panel 32. Warming Rack 58. Thermocouple 62. Summit Drip Pan 77. Smoker Box Chip Grate 8. Hose and QCC1 Regulator 73. Side Burner 82. Motor Bracket 12. Main Gas Line 72. Smoker Assembly 7. Summit Catch Pan 76. Flavorizor® Bar Assembly w/ Smoker 9. Right Trim...

Owner Manual
Page 11
The tab on the side with the swing tables (3). B-a b c (1) (3) Ba401.c ƽ CAUTION: Before proceeding to level the frames for Frame Rail Assembly. 1 Place corregated from each side of a the Cookbox under the Caster and Wheel Frame Assembly to the next step check that frame rail (2) is on frame rail (2) must be (2) (3) facing toward the wheels.
The tab on the side with the swing tables (3). B-a b c (1) (3) Ba401.c ƽ CAUTION: Before proceeding to level the frames for Frame Rail Assembly. 1 Place corregated from each side of a the Cookbox under the Caster and Wheel Frame Assembly to the next step check that frame rail (2) is on frame rail (2) must be (2) (3) facing toward the wheels.

Owner Manual
Page 21
11 a (1) (2) NOTE: Igniter Wire(1) is located b up under right side of control panel. (1) B400_LP.c B-1
11 a (1) (2) NOTE: Igniter Wire(1) is located b up under right side of control panel. (1) B400_LP.c B-1

Owner Manual
Page 22
c ƽ CAUTION: Hold burner cap(1) down while pushing side burner ignition wire(2) on. (1) (2) d B-2
c ƽ CAUTION: Hold burner cap(1) down while pushing side burner ignition wire(2) on. (1) (2) d B-2
Owner Manual
Page 28
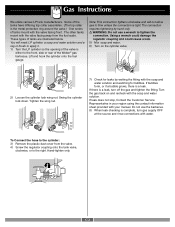
... so the opening of tanks mount with water. Note: This connection tightens clockwise and will need: LP cylinder, a soap and water solution and a rag or brush to the front, side or rear of the Weber® gas barbecue. Tighten the wing nut. 7) Check for bubbles. To Connect the hose to the right. The...; WARNING: Do not use the barbecue. 8) When leak checking is a leak. C-2 Hand-tighten only. Some of tanks are illustrated below. Gas Instructions We utilize various LP tank manufacturers.
... so the opening of tanks mount with water. Note: This connection tightens clockwise and will need: LP cylinder, a soap and water solution and a rag or brush to the front, side or rear of the Weber® gas barbecue. Tighten the wing nut. 7) Check for bubbles. To Connect the hose to the right. The...; WARNING: Do not use the barbecue. 8) When leak checking is a leak. C-2 Hand-tighten only. Some of tanks are illustrated below. Gas Instructions We utilize various LP tank manufacturers.

Owner Manual
Page 30
You will result in your region using the contact information sheet provided with your Weber Gas Barbecue. Contact the Customer Service Representative in a fire or explosion, which can cause serious bodily injury or death and damage to property. ƽ WARNING:... have been thoroughly checked for leaks by turning the cylinder valve hand-wheel counterclockwise. ƽ WARNING: Do not ignite burners when leak checking. Make sure side burner is a leak. Check for gas leaks. Burner gas line connection. ƽ WARNING: If there is a leak at the source and rinse connections with ...
You will result in your region using the contact information sheet provided with your Weber Gas Barbecue. Contact the Customer Service Representative in a fire or explosion, which can cause serious bodily injury or death and damage to property. ƽ WARNING:... have been thoroughly checked for leaks by turning the cylinder valve hand-wheel counterclockwise. ƽ WARNING: Do not ignite burners when leak checking. Make sure side burner is a leak. Check for gas leaks. Burner gas line connection. ƽ WARNING: If there is a leak at the source and rinse connections with ...

Owner Manual
Page 31
... (2) a = Blue Tab with Black Wire b = Yellow Tab with Black Wire c = White Tab with Black Wire d = Solid White Wire e = Green Tab with screw holes on either side of the front of the cooking box. Place the control panel back onto the control panel brackets on both the control panel and control panel...
... (2) a = Blue Tab with Black Wire b = Yellow Tab with Black Wire c = White Tab with Black Wire d = Solid White Wire e = Green Tab with screw holes on either side of the front of the cooking box. Place the control panel back onto the control panel brackets on both the control panel and control panel...
Owner Manual
Page 32
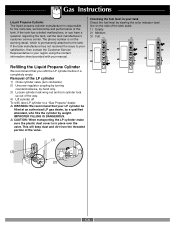
The phone number is on the side of the tank scale. 1) Empty 2) Medium 3) Full (1) (2) (3) Refilling the Liquid Propane Cylinder We recommend that your manual. Removal of the way. 4) Lift cylinder off. IMPROPER FILLING IS DANGEROUS. ƽ CAUTION: When transporting the LP cylinder make sure the plastic dust ... Checking the fuel level in your satisfaction, then contact the Customer Service Representative in place over the valve. To refill, take LP cylinder to your tank Check the fuel level by hand only. 3) Loosen cylinder lock wing nut and turn cylinder lock up out of...
The phone number is on the side of the tank scale. 1) Empty 2) Medium 3) Full (1) (2) (3) Refilling the Liquid Propane Cylinder We recommend that your manual. Removal of the way. 4) Lift cylinder off. IMPROPER FILLING IS DANGEROUS. ƽ CAUTION: When transporting the LP cylinder make sure the plastic dust ... Checking the fuel level in your satisfaction, then contact the Customer Service Representative in place over the valve. To refill, take LP cylinder to your tank Check the fuel level by hand only. 3) Loosen cylinder lock wing nut and turn cylinder lock up out of...

Owner Manual
Page 34
...safety. Use the Direct method for foods that take approximately 10 to 15 minutes, depending on either side of the grill and lift it . You can adjust the Left and Right burners in your Summit® gas grill according to the instructions in each burner set as desired. If burners go ... of meat all burners to the temperature noted in each use. The most important thing to know about grilling is also necessary to 5 minutes per side. No peeking - To sear meats, place them over the fire, or arrange the fire on outside temperatures. To set to use the Indirect method...
...safety. Use the Direct method for foods that take approximately 10 to 15 minutes, depending on either side of the grill and lift it . You can adjust the Left and Right burners in your Summit® gas grill according to the instructions in each burner set as desired. If burners go ... of meat all burners to the temperature noted in each use. The most important thing to know about grilling is also necessary to 5 minutes per side. No peeking - To sear meats, place them over the fire, or arrange the fire on outside temperatures. To set to use the Indirect method...

Owner Manual
Page 35
...to turn all burners on cold or windy days, or at higher altitudes. This could prevent the grease from an oven. To set up your Summit® gas grill may require turning or moving to a less hot area. • Use tongs rather than normal for grilling. To set ...; Always preheat the grill before cooking. Less fat makes cleanup easier, and is a virtual guarantee against unwanted flare-ups. • Foods placed on each side of meat. NEVER USE WATER TO EXTINGUISH FLAMES ON A GAS GRILL. • Some foods, such as delicate fish fillets. Examples include roasts, ribs, whole...
...to turn all burners on cold or windy days, or at higher altitudes. This could prevent the grease from an oven. To set up your Summit® gas grill may require turning or moving to a less hot area. • Use tongs rather than normal for grilling. To set ...; Always preheat the grill before cooking. Less fat makes cleanup easier, and is a virtual guarantee against unwanted flare-ups. • Foods placed on each side of meat. NEVER USE WATER TO EXTINGUISH FLAMES ON A GAS GRILL. • Some foods, such as delicate fish fillets. Examples include roasts, ribs, whole...

Owner Manual
Page 38
...the gas to clear if the side burner does not light, may be difficult to see on a bright sunny day. 1 2 ƽ CAUTION: Side burner flame may result in the off position.), and all main burner control valves are OFF (push down and turn clockwise). 3) Turn the LP tank valve on (turn counter-...lockwise). 4) Push down and turn the side burner control valve to START/HI. 5) Push igniter button and hold until burner ignites.You will hear the igniter ...
...the gas to clear if the side burner does not light, may be difficult to see on a bright sunny day. 1 2 ƽ CAUTION: Side burner flame may result in the off position.), and all main burner control valves are OFF (push down and turn clockwise). 3) Turn the LP tank valve on (turn counter-...lockwise). 4) Push down and turn the side burner control valve to START/HI. 5) Push igniter button and hold until burner ignites.You will hear the igniter ...

Owner Manual
Page 42
...motor bracket. 5) Set the rotisserie shaft onto rotisserie support block. Slide a spit fork from each other so that the tines are facing each side onto the shaft so that one fork screw is on top(1) and one is on the rotisserie shaft. Reverse forks to each other . Operating...motor bracket(1), rotisserie motor(1), rotisserie shaft(1), spit forks(4) and fork screws (4). 1) Install the motor bracket Attach the stainless steel motor bracket to the left side of the cooking box, using the 1/4-20 fasteners and the 1/4-20 Keps nuts. 3) Put the spit forks on the bottom(2), as shown in the ...
...motor bracket. 5) Set the rotisserie shaft onto rotisserie support block. Slide a spit fork from each other so that the tines are facing each side onto the shaft so that one fork screw is on top(1) and one is on the rotisserie shaft. Reverse forks to each other . Operating...motor bracket(1), rotisserie motor(1), rotisserie shaft(1), spit forks(4) and fork screws (4). 1) Install the motor bracket Attach the stainless steel motor bracket to the left side of the cooking box, using the 1/4-20 fasteners and the 1/4-20 Keps nuts. 3) Put the spit forks on the bottom(2), as shown in the ...

Owner Manual
Page 43
... shaft into the food. Cooking • Meats (except poultry and ground meat) should be brought to make sure it should be sure that the heavy side of the shaft. Important safeguards ƽWARNINGS • Read all instructions before lighting rotisserie burner. Use barbecue mitts. • This rotisserie is not in accordance...
... shaft into the food. Cooking • Meats (except poultry and ground meat) should be brought to make sure it should be sure that the heavy side of the shaft. Important safeguards ƽWARNINGS • Read all instructions before lighting rotisserie burner. Use barbecue mitts. • This rotisserie is not in accordance...

Owner Manual
Page 45
Contact the Customer Service Representative in your region using only a Weber® authorized replacement hose. If they are turned OFF. (Push control ... burner control knob clockwise to glow red. ƽWARNING: If the rotisserie burner does not light, turn OFF the LP cylinder valve and burner control knobs. Then start over. ƽDANGER: When the "excess gas flow control" feature ... Push down until twenty (20) seconds after the burner has ignited. 9) Check that it is lit by right side of gas is found to be in the OFF position, when you try again or try to light with a match...
Contact the Customer Service Representative in your region using only a Weber® authorized replacement hose. If they are turned OFF. (Push control ... burner control knob clockwise to glow red. ƽWARNING: If the rotisserie burner does not light, turn OFF the LP cylinder valve and burner control knobs. Then start over. ƽDANGER: When the "excess gas flow control" feature ... Push down until twenty (20) seconds after the burner has ignited. 9) Check that it is lit by right side of gas is found to be in the OFF position, when you try again or try to light with a match...

Owner Manual
Page 47
Cure Turn supply on. Note: If the igniter works loose, carefully tighten the igniter lock nut with a match? Side Burner Grate Side Burner Cap Side Burner Ring & Head Igniter Electrode Control Knob D-14 Flame is low in the OFF position. (1) 1) Igniter Wire 2) Venturi/Burner...Is gas supply off? Push button ignition does not work. If match lights burner, checkigniter (see below). Side Burner Troubleshooting Problem Side Burner does not light. Straighten hose. Side Burner maintenance ƽ WARNING: All gas controls and supply valves should be 1/8 to 3/16 inch from...
Cure Turn supply on. Note: If the igniter works loose, carefully tighten the igniter lock nut with a match? Side Burner Grate Side Burner Cap Side Burner Ring & Head Igniter Electrode Control Knob D-14 Flame is low in the OFF position. (1) 1) Igniter Wire 2) Venturi/Burner...Is gas supply off? Push button ignition does not work. If match lights burner, checkigniter (see below). Side Burner Troubleshooting Problem Side Burner does not light. Straighten hose. Side Burner maintenance ƽ WARNING: All gas controls and supply valves should be 1/8 to 3/16 inch from...

Owner Manual
Page 50
... ignition wires from manifold frame. (a) (b) (a) (b) E-2 Remove Smoker box. 6. Disconnect regulator. 4. Remove Flavorizer® bars. 7. Remove screws from the manifold assembly: (a) Locate the screws on both sides of the manifold frame. (b) Remove the screws from the Ignition Module. To remove control panel refer to "Remove the control panel" under "Check for Gas... Black Wire b = Yellow Tab with Black Wire c = White Tab with Black Wire d = Solid White Wire e = Green Tab with Black Wire f = Solid Red Wire 10. Your Summit® gas grill must be OFF and cool. 2.
... ignition wires from manifold frame. (a) (b) (a) (b) E-2 Remove Smoker box. 6. Disconnect regulator. 4. Remove Flavorizer® bars. 7. Remove screws from the manifold assembly: (a) Locate the screws on both sides of the manifold frame. (b) Remove the screws from the Ignition Module. To remove control panel refer to "Remove the control panel" under "Check for Gas... Black Wire b = Yellow Tab with Black Wire c = White Tab with Black Wire d = Solid White Wire e = Green Tab with Black Wire f = Solid Red Wire 10. Your Summit® gas grill must be OFF and cool. 2.