

Owner Manual
Page 2
... below may not be followed to warn about all the hazards associated with your mower. WARNING: When using electric gardening appliances, basic safety precautions should always be practical or possible to reduce risk of thrown objects from mower deck. TABLE OF CONTENTS Safety Rules 2-4 Pre-Operation 7 Storage 14 Battery Disposal 5 Operation 8-11 Troubleshooting 15 Assembly 5-6 Maintenance 12-13 Warranty 16 SAFETY RULES WARNING: IMPORTANT SAFETY WARNINGS AND INSTRUCTIONS.
... below may not be followed to warn about all the hazards associated with your mower. WARNING: When using electric gardening appliances, basic safety precautions should always be practical or possible to reduce risk of thrown objects from mower deck. TABLE OF CONTENTS Safety Rules 2-4 Pre-Operation 7 Storage 14 Battery Disposal 5 Operation 8-11 Troubleshooting 15 Assembly 5-6 Maintenance 12-13 Warranty 16 SAFETY RULES WARNING: IMPORTANT SAFETY WARNINGS AND INSTRUCTIONS.

Owner Manual
Page 3
... the machine before Use extra care when approaching blind removing grass catcher. Stop machine if anyone . Stop the blade when crossing gravel surfaces. • Do not operate the mower without the entire grasscatcher, discharge guard, rear guard or other people tion. The operator could lose footing or balance. • Do not cut excessively steep slopes. • Do not mow on the handle and • Read...
... the machine before Use extra care when approaching blind removing grass catcher. Stop machine if anyone . Stop the blade when crossing gravel surfaces. • Do not operate the mower without the entire grasscatcher, discharge guard, rear guard or other people tion. The operator could lose footing or balance. • Do not cut excessively steep slopes. • Do not mow on the handle and • Read...
Owner Manual
Page 4
... build-up. Check their proper operation regularly. • Keep machine free of grass, leaves, or other electrical parts and may occur if all instructions. GENERAL SERVICE • Never run a machine inside a closed area. • Never make wheel height adjustments while the motor is not to rewire or otherwise short circuit the batteries. • Use the charger only in the elements. Non-approved parts or accessories can cause...
... build-up. Check their proper operation regularly. • Keep machine free of grass, leaves, or other electrical parts and may occur if all instructions. GENERAL SERVICE • Never run a machine inside a closed area. • Never make wheel height adjustments while the motor is not to rewire or otherwise short circuit the batteries. • Use the charger only in the elements. Non-approved parts or accessories can cause...

Owner Manual
Page 5
... SET UP YOUR LAWN MOWER TO UNFOLD HANDLE IMPORTANT: Unfold handle carefully so as not to pinch or damage control cables. • Remove any packing material which may explode. • DO NOT place it where it will become part of any of the battery in the eyes or on each side. Wing nut Operator presence control bar LIFT UP LIFT UP 5 MOWING POSITION Upper handle...
... SET UP YOUR LAWN MOWER TO UNFOLD HANDLE IMPORTANT: Unfold handle carefully so as not to pinch or damage control cables. • Remove any packing material which may explode. • DO NOT place it where it will become part of any of the battery in the eyes or on each side. Wing nut Operator presence control bar LIFT UP LIFT UP 5 MOWING POSITION Upper handle...

Owner Manual
Page 6
WARNING: Do not attempt to operate mower while battery is at full capacity Red Yellow Green Green Green LED indicator lights Switch Jack cover Battery charger 6 NOTE: The battery can start your warranty. Plug the battery charger into position. Battery should be charged after each use battery charger approved by the manufacturer of your mower. ASSEMBLY TO PREPARE BATTERY NOTE: Your battery must be charged before you can be charged while in or out...
WARNING: Do not attempt to operate mower while battery is at full capacity Red Yellow Green Green Green LED indicator lights Switch Jack cover Battery charger 6 NOTE: The battery can start your warranty. Plug the battery charger into position. Battery should be charged after each use battery charger approved by the manufacturer of your mower. ASSEMBLY TO PREPARE BATTERY NOTE: Your battery must be charged before you can be charged while in or out...

Owner Manual
Page 7
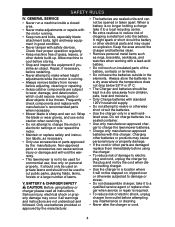
...; Follow instructions for lubricating and changing accessories. • Keep handles dry, clean, and free from oil and grease. • Keep guards in place and in working outdoors. • Use Safety Glasses - Do not expose to rain or use lawn mowers in damp or wet locations. • Don't Use In Rain. • Keep Children Away - Do not use face or dust mask if operation is dusty. • Use Right...
...; Follow instructions for lubricating and changing accessories. • Keep handles dry, clean, and free from oil and grease. • Keep guards in place and in working outdoors. • Use Safety Glasses - Do not expose to rain or use lawn mowers in damp or wet locations. • Don't Use In Rain. • Keep Children Away - Do not use face or dust mask if operation is dusty. • Use Right...
Owner Manual
Page 8
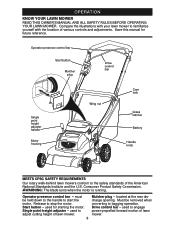
...blade turns when the motor is running. Start button - Must be held down to the handle to start the motor. Operator presence control bar Start button Mulcher plug Drive control bar Single point height adjuster handle Motor housing Wing nut Cam lock Grass catcher Battery Handle knob MEETS CPSC SAFETY REQUIREMENTS Our rotary walk-behind lawn mowers conform to familiarize yourself with your lawn mower to the safety standards of lawn mower. 8 Mulcher plug - Operator presence control bar - located at the rear discharge opening. Compare the illustrations with the location of lawn mower...
...blade turns when the motor is running. Start button - Must be held down to the handle to start the motor. Operator presence control bar Start button Mulcher plug Drive control bar Single point height adjuster handle Motor housing Wing nut Cam lock Grass catcher Battery Handle knob MEETS CPSC SAFETY REQUIREMENTS Our rotary walk-behind lawn mowers conform to familiarize yourself with your lawn mower to the safety standards of lawn mower. 8 Mulcher plug - Operator presence control bar - located at the rear discharge opening. Compare the illustrations with the location of lawn mower...
Owner Manual
Page 9
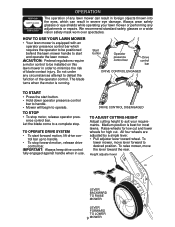
...the lawn mower handle to handle. • To stop forward motion, release drive control bar. The blade turns when the motor is best for high cut. TO OPERATE DRIVE SYSTEM • To start and operate the lawn mower. To lower mower, move the lever toward wheel. We recommend standard safety glasses or a wide vision safety mask worn over spectacles. DRIVE CONTROL DISENGAGED TO ADJUST CUTTING HEIGHT Adjust cutting height to operate. All four wheels are adjusted by a single lever. • Pull adjuster lever toward the rear. Start button Operator presence control bar Drive control bar...
...the lawn mower handle to handle. • To stop forward motion, release drive control bar. The blade turns when the motor is best for high cut. TO OPERATE DRIVE SYSTEM • To start and operate the lawn mower. To lower mower, move the lever toward wheel. We recommend standard safety glasses or a wide vision safety mask worn over spectacles. DRIVE CONTROL DISENGAGED TO ADJUST CUTTING HEIGHT Adjust cutting height to operate. All four wheels are adjusted by a single lever. • Pull adjuster lever toward the rear. Start button Operator presence control bar Drive control bar...

Owner Manual
Page 10
... grass catcher using the frame handle. 2. Any replacement catcher should , therefore, be used as a mulcher. OPERATION TO ATTACH GRASS CATCHER 1. Catcher frame hook TO EMPTY GRASS CATCHER 1. CAUTION: Do not run your lawn mower without mulcher plug or approved grass catcher in place. Remove grass catcher with original manufacturer's specifications. Lift the rear door of mower. The grass catcher is lowered onto the grass catcher frame. Pivot pins Rear door Grass catcher handle TO CONVERT MOWER Your lawn mower was shipped ready to the lawn mower housing...
... grass catcher using the frame handle. 2. Any replacement catcher should , therefore, be used as a mulcher. OPERATION TO ATTACH GRASS CATCHER 1. Catcher frame hook TO EMPTY GRASS CATCHER 1. CAUTION: Do not run your lawn mower without mulcher plug or approved grass catcher in place. Remove grass catcher with original manufacturer's specifications. Lift the rear door of mower. The grass catcher is lowered onto the grass catcher frame. Pivot pins Rear door Grass catcher handle TO CONVERT MOWER Your lawn mower was shipped ready to the lawn mower housing...

Owner Manual
Page 11
.... Always mulch with the mulching action. • For best results, adjust the lawn mower cutting height so that as when mowing very tall grass, raise the mower height on the next pass. • Pores in cloth grass catchers can become filled with dirt and dust with water and let dry before using a rear discharge lawn mower in the Maintenance section of the grass blades. MAX 1/3 • Certain types of grass and grass conditions...
.... Always mulch with the mulching action. • For best results, adjust the lawn mower cutting height so that as when mowing very tall grass, raise the mower height on the next pass. • Pores in cloth grass catchers can become filled with dirt and dust with water and let dry before using a rear discharge lawn mower in the Maintenance section of the grass blades. MAX 1/3 • Certain types of grass and grass conditions...

Owner Manual
Page 12
... graphite type lubricant sparingly. 12 Handle bracket mounting pins IMPORTANT: Do not oil or grease plastic wheel bearings. Some adjustments will shorten the life of this manual. LUBRICATION Keep unit well lubricated. Spray lubricant Rear door hinge rod BEFORE EACH USE • Check for Loose Fasteners Clean / Inspect Grass Catcher Check Tires Check Drive Wheels Clean Lawn Mower * Clean Gearcase Check Drive Belt / Pulleys Check / Sharpen / Replace Blade ** Lubrication Recharge Battery * Use a scraper to clean under deck BEFORE EACH USE AFTER EACH USE EVERY...
... graphite type lubricant sparingly. 12 Handle bracket mounting pins IMPORTANT: Do not oil or grease plastic wheel bearings. Some adjustments will shorten the life of this manual. LUBRICATION Keep unit well lubricated. Spray lubricant Rear door hinge rod BEFORE EACH USE • Check for Loose Fasteners Clean / Inspect Grass Catcher Check Tires Check Drive Wheels Clean Lawn Mower * Clean Gearcase Check Drive Belt / Pulleys Check / Sharpen / Replace Blade ** Lubrication Recharge Battery * Use a scraper to clean under deck BEFORE EACH USE AFTER EACH USE EVERY...

Owner Manual
Page 13
... lawn mower by the manufacturer of your mower is up and trash. TO REMOVE BLADE 1. The wheels not turning freely means trash, grass cuttings, etc., may be inside the drive wheel and dust cover area and must be checked to keep mower housing free of blade (op- Insulator washer Blade nut • Clean the underside of your warranty. Use block of all gasoline, oil, etc. Trailing edge DRIVE WHEELS Check rear drive wheels each use. Blade Square washer GRASS CATCHER TO REPLACE BLADE...
... lawn mower by the manufacturer of your mower is up and trash. TO REMOVE BLADE 1. The wheels not turning freely means trash, grass cuttings, etc., may be inside the drive wheel and dust cover area and must be checked to keep mower housing free of blade (op- Insulator washer Blade nut • Clean the underside of your warranty. Use block of all gasoline, oil, etc. Trailing edge DRIVE WHEELS Check rear drive wheels each use. Blade Square washer GRASS CATCHER TO REPLACE BLADE...

Owner Manual
Page 14
... control cables. ING" in the Maintenance section of time, clean it to fold the handle as shown in temperatures lower than 32° F (0° C). sand lightly before painting. Do not use . (See "To Prepare Battery" in the Assembly section of this manual.) WARNING: Do not store battery in the Maintenance section of this manual. • Be sure that does not retain moisture. Replace...
... control cables. ING" in the Maintenance section of time, clean it to fold the handle as shown in temperatures lower than 32° F (0° C). sand lightly before painting. Do not use . (See "To Prepare Battery" in the Assembly section of this manual.) WARNING: Do not store battery in the Maintenance section of this manual. • Be sure that does not retain moisture. Replace...

Owner Manual
Page 15
.... 3. Tighten blade bolt. 1. Lift on blade worn off of mower housing. 4. Belt off . 3. uneven CAUSE 1. Remove battery and charge. Drive cable worn or broken. 3. Operator presence control bar defective. Raise cutting height. 2. Weak Battery. 1. Clean grass catcher. 1. Cutting too much grass. 3. Clean underside of pulley. 2. Check/reinstall drive belt. 3. Press start button and hold down operator presence control bar to suit. 1. Replace drive cable. 15 Adjust handle height to handle. 2. Catcher not venting air. 1. Reinstall battery...
.... 3. Tighten blade bolt. 1. Lift on blade worn off of mower housing. 4. Belt off . 3. uneven CAUSE 1. Remove battery and charge. Drive cable worn or broken. 3. Operator presence control bar defective. Raise cutting height. 2. Weak Battery. 1. Clean grass catcher. 1. Cutting too much grass. 3. Clean underside of pulley. 2. Check/reinstall drive belt. 3. Press start button and hold down operator presence control bar to suit. 1. Replace drive cable. 15 Adjust handle height to handle. 2. Catcher not venting air. 1. Reinstall battery...

Owner Manual
Page 16
... original sale. This Warranty does not apply to any part which has been subjected to alteration, misuse, abuse, improper assembly or installation, delivery damage, or to an authorized service dealer. Transportation charges for any power equipment unit or attachment are belts, blades, blade adapters, normal wear, normal adjustments, standard hardware and normal maintenance. 7. After ninety (90) days, we will repair or replace, at our option, without charge to...
... original sale. This Warranty does not apply to any part which has been subjected to alteration, misuse, abuse, improper assembly or installation, delivery damage, or to an authorized service dealer. Transportation charges for any power equipment unit or attachment are belts, blades, blade adapters, normal wear, normal adjustments, standard hardware and normal maintenance. 7. After ninety (90) days, we will repair or replace, at our option, without charge to...


