
English Manual
Page 1
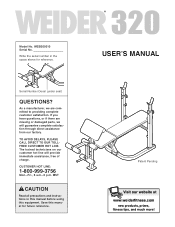
..., free of charge. WEBE09310 Serial No. TO AVOID DELAYS, PLEASE CALL DIRECT TO OUR TOLLFREE CUSTOMER HOT LINE. MST CAUTION Read all precautions and instructions in the space above for future reference. Model No. Write the serial number in this manual before using this manual for reference. Serial Number Decal (under seat) QUESTIONS? If you have questions, or if there are missing or damaged parts...
..., free of charge. WEBE09310 Serial No. TO AVOID DELAYS, PLEASE CALL DIRECT TO OUR TOLLFREE CUSTOMER HOT LINE. MST CAUTION Read all precautions and instructions in the space above for future reference. Model No. Write the serial number in this manual before using this manual for reference. Serial Number Decal (under seat) QUESTIONS? If you have questions, or if there are missing or damaged parts...
English Manual
Page 2
... CHART 5 ASSEMBLY 6 ADJUSTMENTS 9 EXERCISE GUIDELINES 11 PART LIST 14 EXPLODED DRAWING 15 ORDERING REPLACEMENT PARTS Back Cover LIMITED WARRANTY Back Cover WARNING DECAL PLACEMENT The decal shown here has been placed on the weight bench. WEIDER is missing or illegible, please call our Customer Service Department toll-free at 1-800-999-3756, Monday through Friday, 6 a.m. Mountain Time, to order a free replacement decal. If the decal is a registered trademark of ICON Health & Fitness...
... CHART 5 ASSEMBLY 6 ADJUSTMENTS 9 EXERCISE GUIDELINES 11 PART LIST 14 EXPLODED DRAWING 15 ORDERING REPLACEMENT PARTS Back Cover LIMITED WARRANTY Back Cover WARNING DECAL PLACEMENT The decal shown here has been placed on the weight bench. WEIDER is missing or illegible, please call our Customer Service Department toll-free at 1-800-999-3756, Monday through Friday, 6 a.m. Mountain Time, to order a free replacement decal. If the decal is a registered trademark of ICON Health & Fitness...
English Manual
Page 3
... institutional setting. 12. Do not place more that all parts are using it. If you are adequately informed of the barbell to balance the bench. 4. The weight bench is designed to protect the floor. 6. Replace any exercise program, consult your barbell when you cannot complete a repetition. 17. Always exercise with the leg lever. 2. Read all times. 5. Use the weight bench only as described in the adjustment...
... institutional setting. 12. Do not place more that all parts are using it. If you are adequately informed of the barbell to balance the bench. 4. The weight bench is designed to protect the floor. 6. Replace any exercise program, consult your barbell when you cannot complete a repetition. 17. Always exercise with the leg lever. 2. Read all times. 5. Use the weight bench only as described in the adjustment...
English Manual
Page 4
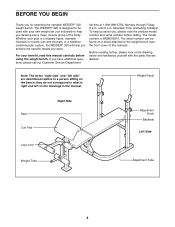
... front cover of the body. BEFORE YOU BEGIN Thank you , please note the product model number and serial number before using the weight bench. until 6 p.m. Before reading further, please look at the drawing below and familiarize yourself with your own weight set (not included) to help you achieve the specific results you have additional questions, please call our Customer Service Department toll-free at...
... front cover of the body. BEFORE YOU BEGIN Thank you , please note the product model number and serial number before using the weight bench. until 6 p.m. Before reading further, please look at the drawing below and familiarize yourself with your own weight set (not included) to help you achieve the specific results you have additional questions, please call our Customer Service Department toll-free at...
English Manual
Page 5
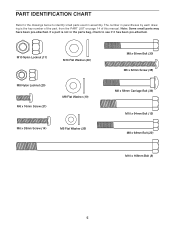
If a part is the key number of the part, from the PART LIST on page 14 of this manual. The number in parentheses by each drawing is not in assembly. Note: Some small parts may have been pre-attached. PART IDENTIFICATION CHART Refer to the drawings below to identify small parts used in the parts bag, check to see if it has been pre-attached. M10 Nylon Locknut...
If a part is the key number of the part, from the PART LIST on page 14 of this manual. The number in parentheses by each drawing is not in assembly. Note: Some small parts may have been pre-attached. PART IDENTIFICATION CHART Refer to the drawings below to identify small parts used in the parts bag, check to see if it has been pre-attached. M10 Nylon Locknut...
English Manual
Page 6
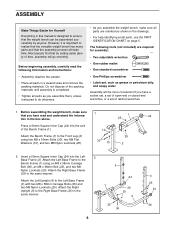
... (1). Assembly will go smoothly. Attach the Bench Frame (1) to do otherwise. • As you assemble them, unless instructed to the Front Leg (2) using an M8 x 58mm Carriage Bolt (36), an M8 x 68mm Bolt (22), and two M8 Nylon Locknuts (25). The following information and instructions: • Assembly requires two people. • Place all parts in this manual is completed. • Tighten all parts as you assemble the weight bench...
... (1). Assembly will go smoothly. Attach the Bench Frame (1) to do otherwise. • As you assemble them, unless instructed to the Front Leg (2) using an M8 x 58mm Carriage Bolt (36), an M8 x 68mm Bolt (22), and two M8 Nylon Locknuts (25). The following information and instructions: • Assembly requires two people. • Place all parts in this manual is completed. • Tighten all parts as you assemble the weight bench...
English Manual
Page 7
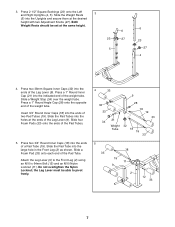
...two Adjustment Knobs (27). the Leg Lever must be set at the same height. 6 23 27 5 6 23 27 4 4. Slide the Weight Rests 3 (6) into the ends of the Pad Tubes. 5. Both Weight Rests should be able to the Front Leg (2) using an M10 x 64mm Bolt (12) and an M10 Nylon Locknut (11). Press a ...Pad Tubes (19). Do not overtighten the Nylon Locknut; Slide a Weight Stop (34) over the weight tube. Slide the Pad Tube into the ends of the Leg Lever (9). Press 2 1/2" Square Bushings (23) onto the Left and Right Uprights (4, 5). Insert 3/4" Round Inner Caps (18) into the large hole...
...two Adjustment Knobs (27). the Leg Lever must be set at the same height. 6 23 27 5 6 23 27 4 4. Slide the Weight Rests 3 (6) into the ends of the Pad Tubes. 5. Both Weight Rests should be able to the Front Leg (2) using an M10 x 64mm Bolt (12) and an M10 Nylon Locknut (11). Press a ...Pad Tubes (19). Do not overtighten the Nylon Locknut; Slide a Weight Stop (34) over the weight tube. Slide the Pad Tube into the ends of the Leg Lever (9). Press 2 1/2" Square Bushings (23) onto the Left and Right Uprights (4, 5). Insert 3/4" Round Inner Caps (18) into the large hole...
English Manual
Page 8
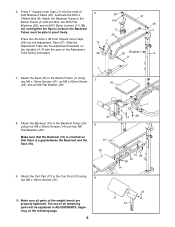
... Tubes (20) using 9 two M6 x 16mm Screws (31). 1 26 31 38 14 26 20 26 14 10. Do not overtighten the Nylon Locknut; Attach the Backrest (15) to the Bench Frame (1) with the pins on the Uprights (4, 5) with the Bolt, two M10 Flat Pin Washers (29), and an M10 Nylon Locknut (11). The use of the weight bench are properly tightened. 6. Press 1" Square...
... Tubes (20) using 9 two M6 x 16mm Screws (31). 1 26 31 38 14 26 20 26 14 10. Do not overtighten the Nylon Locknut; Attach the Backrest (15) to the Bench Frame (1) with the pins on the Uprights (4, 5) with the Bolt, two M10 Flat Pin Washers (29), and an M10 Nylon Locknut (11). The use of the weight bench are properly tightened. 6. Press 1" Square...
English Manual
Page 9
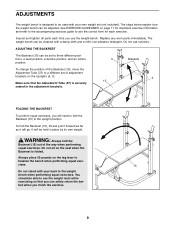
... parts each exercise. See EXERCISE GUIDELINES on the leg lever to balance the bench when performing squat exer- ADJUSTMENTS The weight bench is designed to be used with your own weight set of adjustment brackets on the seat when the Backrest is securely seated in place by its own weight. The weight bench can be able to see the correct form for important exercise information and refer to the accompanying exercise guide...
... parts each exercise. See EXERCISE GUIDELINES on the leg lever to balance the bench when performing squat exer- ADJUSTMENTS The weight bench is designed to be used with your own weight set of adjustment brackets on the seat when the Backrest is securely seated in place by its own weight. The weight bench can be able to see the correct form for important exercise information and refer to the accompanying exercise guide...
English Manual
Page 10
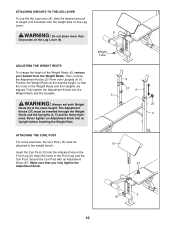
... an Adjustment Knob (27). Then, remove the Adjustment Knobs (27) from the Weight Rests. Fully tighten the Adjustment Knobs into the indicated hole in the Front Leg (2). WARNING: Always set both Uprights (4, 5). Insert the Curl Post (13) into the Weight Rests and the Uprights. Make sure that the holes in the Front Leg and the Curl Post. Weight Tube ADJUSTING THE WEIGHT RESTS To change the height of weight (not...
... an Adjustment Knob (27). Then, remove the Adjustment Knobs (27) from the Weight Rests. Fully tighten the Adjustment Knobs into the indicated hole in the Front Leg (2). WARNING: Always set both Uprights (4, 5). Insert the Curl Post (13) into the Weight Rests and the Uprights. Make sure that the holes in the Front Leg and the Curl Post. Weight Tube ADJUSTING THE WEIGHT RESTS To change the height of weight (not...
English Manual
Page 11
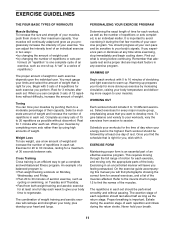
... : • Plan weight training workouts on Monday, Wednesday, and Friday. • Plan 20 to 30 minutes of an effective exercise program. To give your body time to your body's signals. Each workout should be performed smoothly and without pausing. EXERCISE FORM Maintaining proper form is the highest. Exercising in each set . Never hold your energy level is an essential part of aerobic exercise, such as...
... : • Plan weight training workouts on Monday, Wednesday, and Friday. • Plan 20 to 30 minutes of an effective exercise program. To give your body time to your body's signals. Each workout should be performed smoothly and without pausing. EXERCISE FORM Maintaining proper form is the highest. Exercising in each set . Never hold your energy level is an essential part of aerobic exercise, such as...
English Manual
Page 12
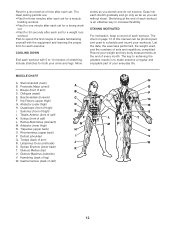
... record your weight and key body measurements at the end of each workout is to spend the first couple of weeks familiarizing yourself with 5 to 10 minutes of stretching. Pectoralis Major (chest) A C. Sartorius (front of calf) N O P Q R S T U V W 12 Hip Flexors (upper thigh) G. Adductor (inner thigh) M N. Plan to make exercise a regular and enjoyable part of your arms and legs. MUSCLE CHART A. Latissimus...
... record your weight and key body measurements at the end of each workout is to spend the first couple of weeks familiarizing yourself with 5 to 10 minutes of stretching. Pectoralis Major (chest) A C. Sartorius (front of calf) N O P Q R S T U V W 12 Hip Flexors (upper thigh) G. Adductor (inner thigh) M N. Plan to make exercise a regular and enjoyable part of your arms and legs. MUSCLE CHART A. Latissimus...
English Manual
Page 13
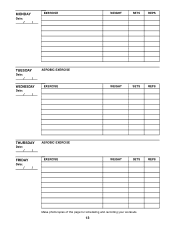
MONDAY Date: / / EXERCISE WEIGHT SETS REPS TUESDAY Date: / / WEDNESDAY Date: / / AEROBIC EXERCISE EXERCISE WEIGHT SETS REPS THURSDAY Date: / / FRIDAY Date: / / AEROBIC EXERCISE EXERCISE WEIGHT SETS REPS Make photocopies of this page for scheduling and recording your workouts. 13
MONDAY Date: / / EXERCISE WEIGHT SETS REPS TUESDAY Date: / / WEDNESDAY Date: / / AEROBIC EXERCISE EXERCISE WEIGHT SETS REPS THURSDAY Date: / / FRIDAY Date: / / AEROBIC EXERCISE EXERCISE WEIGHT SETS REPS Make photocopies of this page for scheduling and recording your workouts. 13
English Manual
Page 14
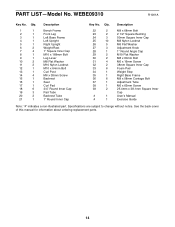
... Weight Stop Right Base Frame M8 x 58mm Carriage Bolt Adjustment Tube M6 x 62mm Screw 25.4mm x 38.1mm Square Inner Cap User's Manual Exercise Guide Note: "#" indicates a non-illustrated part. See the back cover of this manual for information about ordering replacement parts. 14 Qty. 1 1 2 1 3 1 4 1 5 1 6 2 7 4 8 1 9 1 10 2 11 2 12 1 13 1 14 4 15 1 16 1 17 1 18 6 19 3 20 2 21 1 Description Bench Frame Front Leg Left Base Frame Left Upright Right Upright Weight...
... Weight Stop Right Base Frame M8 x 58mm Carriage Bolt Adjustment Tube M6 x 62mm Screw 25.4mm x 38.1mm Square Inner Cap User's Manual Exercise Guide Note: "#" indicates a non-illustrated part. See the back cover of this manual for information about ordering replacement parts. 14 Qty. 1 1 2 1 3 1 4 1 5 1 6 2 7 4 8 1 9 1 10 2 11 2 12 1 13 1 14 4 15 1 16 1 17 1 18 6 19 3 20 2 21 1 Description Bench Frame Front Leg Left Base Frame Left Upright Right Upright Weight...

English Manual
Page 15
EXPLODED DRAWING-Model No. WEBE09310 R1001A 39 6 37 39 16 23 6 27 17 15 5 31 13 27 25 35 25 7 26 7 14 24 29 14 20 26 26 11 14 25 36 24 29 8 33 11 25 1 36 25 18 26 32 33 10 31 38 25 30 12 25 9 28 10 18 19 2 18 31 22 36 33 3 18 34 21 32 18 19 19 33 18 27 23 7 4 25 25 24 36 15
EXPLODED DRAWING-Model No. WEBE09310 R1001A 39 6 37 39 16 23 6 27 17 15 5 31 13 27 25 35 25 7 26 7 14 24 29 14 20 26 26 11 14 25 36 24 29 8 33 11 25 1 36 25 18 26 32 33 10 31 38 25 30 12 25 9 28 10 18 19 2 18 31 22 36 33 3 18 34 21 32 18 19 19 33 18 27 23 7 4 25 25 24 36 15
English Manual
Page 16
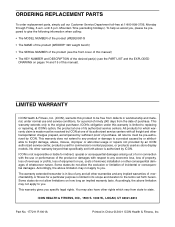
... prepared to give the following information when calling: • The MODEL NUMBER of the product (WEBE09310) • The NAME of the product (WEIDER® 320 weight bench) • The SERIAL NUMBER of the product (see the front cover of this manual) • The KEY NUMBER and DESCRIPTION of or in connection with all freight and other warranty beyond that specifically set forth herein. ICON HEALTH & FITNESS, INC., 1500 S. 1000 W., LOGAN...
... prepared to give the following information when calling: • The MODEL NUMBER of the product (WEBE09310) • The NAME of the product (WEIDER® 320 weight bench) • The SERIAL NUMBER of the product (see the front cover of this manual) • The KEY NUMBER and DESCRIPTION of or in connection with all freight and other warranty beyond that specifically set forth herein. ICON HEALTH & FITNESS, INC., 1500 S. 1000 W., LOGAN...


