

English Manual
Page 2
... if it is shown at 90% of Contents WARNING DECAL PLACEMENT 2 IMPORTANT PRECAUTIONS 3 BEFORE YOU BEGIN 4 PART IDENTIFICATION CHART 5 ASSEMBLY 6 USING THE WEIGHT BENCH 10 EXERCISE GUIDELINES 13 PART LIST 18 EXPLODED DRAWING 19 ORDERING REPLACEMENT PARTS Back Cover FULL 90 DAY WARRANTY Back Cover Warning Decal Placement The decal shown at 1-800...
... if it is shown at 90% of Contents WARNING DECAL PLACEMENT 2 IMPORTANT PRECAUTIONS 3 BEFORE YOU BEGIN 4 PART IDENTIFICATION CHART 5 ASSEMBLY 6 USING THE WEIGHT BENCH 10 EXERCISE GUIDELINES 13 PART LIST 18 EXPLODED DRAWING 19 ORDERING REPLACEMENT PARTS Back Cover FULL 90 DAY WARRANTY Back Cover Warning Decal Placement The decal shown at 1-800...
English Manual
Page 3
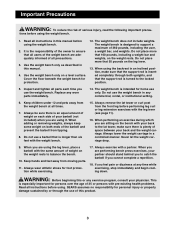
...18. Always exercise with pre-existing health problems. Read all users of the barbell and prevent the barbell from moving parts. 11. Use the weight bench only as described in any worn parts immediately. 14. Do not place more that 50 pounds on the bench with the leg lever (see page 11...use the weight bench in this manual before performing leg curl or leg extension exercises with your back to balance the bench. 10. Read all parts each side of this or any time while exercising, stop immediately and begin cooling down. If you use of your physician. The weight bench ...
...18. Always exercise with pre-existing health problems. Read all users of the barbell and prevent the barbell from moving parts. 11. Use the weight bench only as described in any worn parts immediately. 14. Do not place more that 50 pounds on the bench with the leg lever (see page 11...use the weight bench in this manual before performing leg curl or leg extension exercises with your back to balance the bench. 10. Read all parts each side of this or any time while exercising, stop immediately and begin cooling down. If you use of your physician. The weight bench ...

English Manual
Page 4
...and strength, or a healthier cardiovascular system, the WEIDER¨ 500 will help us assist you for selecting the WEIDER¨ 500 weight bench. Before You Begin Thank you , please note the product model number and serial number before using the WEIDER¨ 500. Whether your benefit, read this manual). Central ... to the weight bench (see the front cover of the body. The serial number can be used with the parts that are labeled. The versatile WEIDER¨ 500 weight bench is designed to be found on a decal attached to develop every major muscle group of this manual ...
...and strength, or a healthier cardiovascular system, the WEIDER¨ 500 will help us assist you for selecting the WEIDER¨ 500 weight bench. Before You Begin Thank you , please note the product model number and serial number before using the WEIDER¨ 500. Whether your benefit, read this manual). Central ... to the weight bench (see the front cover of the body. The serial number can be used with the parts that are labeled. The versatile WEIDER¨ 500 weight bench is designed to be found on a decal attached to develop every major muscle group of this manual ...

English Manual
Page 5
...16)Ñ4 M10 Nylon Locknut (19)Ñ2 5 The number in assembly. Important: Some parts may have been pre-assembled for assembly. Part Identification Chart This chart is provided to help you cannot find a part in the parts bags, check to see if it has been pre-assembled. If you identify the small... parts used in parenthesis below each part refers to the key number of the part, from the PART LIST on page...
...16)Ñ4 M10 Nylon Locknut (19)Ñ2 5 The number in assembly. Important: Some parts may have been pre-assembled for assembly. Part Identification Chart This chart is provided to help you cannot find a part in the parts bags, check to see if it has been pre-assembled. If you identify the small... parts used in parenthesis below each part refers to the key number of the part, from the PART LIST on page...
English Manual
Page 6
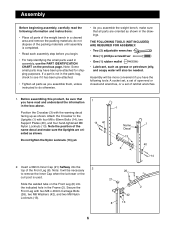
...packing materials until assembly is completed. ¥ Read each assembly step before you have the following information and instructions: ¥ Place all parts as shown in the drawings. Assembly Before beginning assembly, carefully read and understand the information in the box above. Before assembling this product..., be necessary 2 to see if it has been pre-attached. ¥ Tighten all parts of the Front Leg (8). Note the position of the name decal and make sure that you have been pre-attached for shipping purposes. ...
...packing materials until assembly is completed. ¥ Read each assembly step before you have the following information and instructions: ¥ Place all parts as shown in the drawings. Assembly Before beginning assembly, carefully read and understand the information in the box above. Before assembling this product..., be necessary 2 to see if it has been pre-attached. ¥ Tighten all parts of the Front Leg (8). Note the position of the name decal and make sure that you have been pre-attached for shipping purposes. ...

English Manual
Page 9
...), two M10 Washers (24), two Pulley Spacers (31), and an M10 Nylon Locknut (19). Insert the M8 x 16mm Bolt (45) into each end of all parts are properly tightened before you use of the Weight Carriage (33). Place the Cable (35) in the same way as the Lat Tower (27). 28... 36 19 27 27 32 45 33 23 45 33 14. The use the weight bench. Locate the Cable (35) and note that all remaining parts will be turned as shown. 13.
...), two M10 Washers (24), two Pulley Spacers (31), and an M10 Nylon Locknut (19). Insert the M8 x 16mm Bolt (45) into each end of all parts are properly tightened before you use of the Weight Carriage (33). Place the Cable (35) in the same way as the Lat Tower (27). 28... 36 19 27 27 32 45 33 23 45 33 14. The use the weight bench. Locate the Cable (35) and note that all remaining parts will be turned as shown. 13.

English Manual
Page 10
.... Using the Weight Bench The weight bench is designed to be used in a decline position, three incline positions, or a level position. Inspect and tighten all parts each exercise. Rotate the locking clip into place around the right Upright. See EXERCISE GUIDELINES on page 13 for important exercise information and refer to...
.... Using the Weight Bench The weight bench is designed to be used in a decline position, three incline positions, or a level position. Inspect and tighten all parts each exercise. Rotate the locking clip into place around the right Upright. See EXERCISE GUIDELINES on page 13 for important exercise information and refer to...

English Manual
Page 13
.... (A ÒrepetitionÓ is the answer. Maintaining proper form means moving through the full range of motion for each exercise, and moving only the appropriate parts of rest.
.... (A ÒrepetitionÓ is the answer. Maintaining proper form means moving through the full range of motion for each exercise, and moving only the appropriate parts of rest.

English Manual
Page 14
... (outer thigh) DD H. STAYING MOTIVATED For motivation, keep a record of each set if you can be photocopied and used to make exercise a regular and enjoyable part of your everyday life. Tibialis Anterior (front of thigh) I. Latissimus Dorsi (mid back) S. Spinae Erectors (lower back) KK T. Rest for both your workouts. MUSCLE CHART...
... (outer thigh) DD H. STAYING MOTIVATED For motivation, keep a record of each set if you can be photocopied and used to make exercise a regular and enjoyable part of your everyday life. Tibialis Anterior (front of thigh) I. Latissimus Dorsi (mid back) S. Spinae Erectors (lower back) KK T. Rest for both your workouts. MUSCLE CHART...
English Manual
Page 18
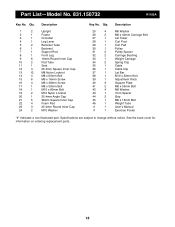
... Cap 38mm Square Inner Cap Foam Pad 25.4mm Round Inner Cap M10 Washer Key No. See the back cover for information on ordering replacement parts. 18 Part ListÑModel No. 831.150732 R1100A Key No. Qty. 25 4 26 2 27 1 28 1 29 1 30 1 31 2 32 2 33 1 34 2 35 1 36 1 37 1 38... Support Plate M8 x 55mm Bolt M8 Washer 7mm Spacer Grip M8 x 16mm Bolt Weight Tube UserÕs Manual Exercise Poster Ò#Ó Indicates a non-illustrated part.
... Cap 38mm Square Inner Cap Foam Pad 25.4mm Round Inner Cap M10 Washer Key No. See the back cover for information on ordering replacement parts. 18 Part ListÑModel No. 831.150732 R1100A Key No. Qty. 25 4 26 2 27 1 28 1 29 1 30 1 31 2 32 2 33 1 34 2 35 1 36 1 37 1 38... Support Plate M8 x 55mm Bolt M8 Washer 7mm Spacer Grip M8 x 16mm Bolt Weight Tube UserÕs Manual Exercise Poster Ò#Ó Indicates a non-illustrated part.

English Manual
Page 20
... listed on pages 18 and 19 of this manual to find that: ¥ you need help assembling or operating the WEIDER¨ 500 ¥ a part is used commercially or for immediate purchase or special order when you need to schedule repair service call our toll-free HELPLINE 1-800-736-..., call the following information: ¥ The MODEL NUMBER of the product (831.150732) ¥ The NAME of the product (WEIDER¨ 500 weight bench) ¥ The PART NUMBER of the PART (see the PART LIST and the EXPLODED DRAWING on pages 18 and 19 of this manual) ¥ The DESCRIPTION of charge. SEARS, ROEBUCK...
... listed on pages 18 and 19 of this manual to find that: ¥ you need help assembling or operating the WEIDER¨ 500 ¥ a part is used commercially or for immediate purchase or special order when you need to schedule repair service call our toll-free HELPLINE 1-800-736-..., call the following information: ¥ The MODEL NUMBER of the product (831.150732) ¥ The NAME of the product (WEIDER¨ 500 weight bench) ¥ The PART NUMBER of the PART (see the PART LIST and the EXPLODED DRAWING on pages 18 and 19 of this manual) ¥ The DESCRIPTION of charge. SEARS, ROEBUCK...


