

English Manual
Page 2
... WARNING DECAL PLACEMENT The decals shown here have been placed on the front cover of ICON IP, Inc. 2 Apply the decal in the location shown. WEIDER is missing or illegible, call the toll-free telephone number on the...
... WARNING DECAL PLACEMENT The decals shown here have been placed on the front cover of ICON IP, Inc. 2 Apply the decal in the location shown. WEIDER is missing or illegible, call the toll-free telephone number on the...

English Manual
Page 3
...exercising. 9. exercising, stop immediately and begin cooling down. Never release the arms, leg lever, lat bar, leg press, ankle strap, or handle while weights are on the pulleys at least every two years. 10. Keep hands and feet away from moisture and dust. Always wear athletic shoes for home... is the responsibility of the owner to ensure that there is designed to mount, dismount, and use the weight system with the included weight. Always disconnect the lat bar from the weight system at all cables at all parts regular- 14. If you are adequately informed of all warnings on ...
...exercising. 9. exercising, stop immediately and begin cooling down. Never release the arms, leg lever, lat bar, leg press, ankle strap, or handle while weights are on the pulleys at least every two years. 10. Keep hands and feet away from moisture and dust. Always wear athletic shoes for home... is the responsibility of the owner to ensure that there is designed to mount, dismount, and use the weight system with the included weight. Always disconnect the lat bar from the weight system at all cables at all parts regular- 14. If you are adequately informed of all warnings on ...

English Manual
Page 4
....1. If you have questions after reading this manual, please see the front cover of this manual). To avoid a registration fee for selecting the versatile WEIDER® Club 4870 weight system. Weight Note: The terms "right side" and "left on the drawings in . / 226 cm 4 ASSEMBLED DIMENSIONS: Height: 81 in. / 206 cm Width: 82 in. / 208...
....1. If you have questions after reading this manual, please see the front cover of this manual). To avoid a registration fee for selecting the versatile WEIDER® Club 4870 weight system. Weight Note: The terms "right side" and "left on the drawings in . / 226 cm 4 ASSEMBLED DIMENSIONS: Height: 81 in. / 206 cm Width: 82 in. / 208...

English Manual
Page 7
... shown in individual packages. The Four Stages of the Assembly Process Frame Assembly-You will be more time than it takes to walk around the weight system as possible, we have a socket set, a set of open the parts package for assembly: • Two adjustable wrenches • ... Parts Refer to the PART IDENTIFICATION CHART on this page. Important: Wait until assembly is completed. Set Aside Enough Time Assembling the weight system may have questions after reading the assembly instructions, please see if it will begin each stage are oriented exactly as you have...
... shown in individual packages. The Four Stages of the Assembly Process Frame Assembly-You will be more time than it takes to walk around the weight system as possible, we have a socket set, a set of open the parts package for assembly: • Two adjustable wrenches • ... Parts Refer to the PART IDENTIFICATION CHART on this page. Important: Wait until assembly is completed. Set Aside Enough Time Assembling the weight system may have questions after reading the assembly instructions, please see if it will begin each stage are oriented exactly as you have...

English Manual
Page 11
... Right Top 11 Frame (3) with an M10 x 65mm Bolt (87), two M10 Washers (108), a 1/2" Bushing (68), and an M10 Nylon Locknut (84). Slide a Weight Bumper (66) onto the Weight Guide. 10. Attach the Butterfly Frame (24) to the Center Base (5) with two M10 x 65mm Bolts (87) and an M10 Nylon Locknut (84... Top Frame (4) to the Left Upright (8) with two M10 x 70mm Bolts (57), two M10 Washers (108), and an M10 Nylon Locknut (84). Attach the other Weight Guide (30) to the bottom. Tighten the M10 x 70mm Bolts (57) used in the same manner. Do not tighten the Bolts yet. Attach the Butterfly...
... Right Top 11 Frame (3) with an M10 x 65mm Bolt (87), two M10 Washers (108), a 1/2" Bushing (68), and an M10 Nylon Locknut (84). Slide a Weight Bumper (66) onto the Weight Guide. 10. Attach the Butterfly Frame (24) to the Center Base (5) with two M10 x 65mm Bolts (87) and an M10 Nylon Locknut (84... Top Frame (4) to the Left Upright (8) with two M10 x 70mm Bolts (57), two M10 Washers (108), and an M10 Nylon Locknut (84). Attach the other Weight Guide (30) to the bottom. Tighten the M10 x 70mm Bolts (57) used in the same manner. Do not tighten the Bolts yet. Attach the Butterfly...

English Manual
Page 12
... Right and Left Top Frames (3, 4) with an M10 x 65mm Bolt (87), two M10 Washers (108), a 1/2" Bushing (68), and an M10 Nylon Locknut (84). Insert the Weight Tube into the Leg Lever (15). Attach the Center Top Frame (6) to a 2" Bushing (63) and insert the Bushing into the stack of 12.5-lb. Attach... a Weight Guide (30) inside the Center Top Frame (6) with four M10 x 70mm Bolts (57), four M10 Washers (108), and two M10 Nylon Locknuts (84). Tighten the ...
... Right and Left Top Frames (3, 4) with an M10 x 65mm Bolt (87), two M10 Washers (108), a 1/2" Bushing (68), and an M10 Nylon Locknut (84). Insert the Weight Tube into the Leg Lever (15). Attach the Center Top Frame (6) to a 2" Bushing (63) and insert the Bushing into the stack of 12.5-lb. Attach... a Weight Guide (30) inside the Center Top Frame (6) with four M10 x 70mm Bolts (57), four M10 Washers (108), and two M10 Nylon Locknuts (84). Tighten the ...
English Manual
Page 17
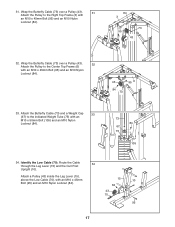
... M10 Nylon Locknut (84). 73 84 67 75 105 34. Wrap the Butterfly Cable (73) over a Pulley (43). 32 Attach the Pulley to the indicated Weight Tube (75) with an M10 x 45mm Bolt (95) and an M10 Nylon Locknut (84). 84 3 73 95 43 32. Attach the Butterfly Cable (73) and... a Weight Cap 33 (67) to the Center Top Frame (6) with an M10 x 45mm Bolt (95) and an M10 Nylon Locknut (84). 15 10 84 43 70 ...
... M10 Nylon Locknut (84). 73 84 67 75 105 34. Wrap the Butterfly Cable (73) over a Pulley (43). 32 Attach the Pulley to the indicated Weight Tube (75) with an M10 x 45mm Bolt (95) and an M10 Nylon Locknut (84). 84 3 73 95 43 32. Attach the Butterfly Cable (73) and... a Weight Cap 33 (67) to the Center Top Frame (6) with an M10 x 45mm Bolt (95) and an M10 Nylon Locknut (84). 15 10 84 43 70 ...

English Manual
Page 24
... use of the cables does not move smoothly over the pulleys. See the CABLE DIAGRAM on page 25. If there is used. Before using the weight system, pull each cable a few times to make sure that all parts have been properly tightened. If one of the remaining parts will need to... sure that the cables move smoothly, find and correct the problem. IMPORTANT: If the cables are not properly installed, they may be damaged when heavy weight is any slack in the cables, you will be explained in ADJUSTMENTS, beginning on page 28 for proper cable routing.
... use of the cables does not move smoothly over the pulleys. See the CABLE DIAGRAM on page 25. If there is used. Before using the weight system, pull each cable a few times to make sure that all parts have been properly tightened. If one of the remaining parts will need to... sure that the cables move smoothly, find and correct the problem. IMPORTANT: If the cables are not properly installed, they may be damaged when heavy weight is any slack in the cables, you will be explained in ADJUSTMENTS, beginning on page 28 for proper cable routing.

English Manual
Page 25
...) in the correct starting position for the exercise to be attached between the Lat Bar and the Cable so that the bent end touches the weight stack. Insert the Weight Pin so that the Lat Bar is used. Adjust the length of the Chain between the Lat Bar and the Cable with... any worn parts immediately. Also, refer to the accompanying exercise guide to see USING THE LEG LEVER LOCK on page 29 for each time the weight system is in the same manner. Do not use solvents. For some exercises, the Chain (82) should be performed. Make sure all parts are properly...
...) in the correct starting position for the exercise to be attached between the Lat Bar and the Cable so that the bent end touches the weight stack. Insert the Weight Pin so that the Lat Bar is used. Adjust the length of the Chain between the Lat Bar and the Cable with... any worn parts immediately. Also, refer to the accompanying exercise guide to see USING THE LEG LEVER LOCK on page 29 for each time the weight system is in the same manner. Do not use solvents. For some exercises, the Chain (82) should be performed. Make sure all parts are properly...
English Manual
Page 26
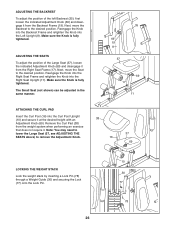
... (69) and disengage it from the Right Seat Frame (17). Next, move the Backrest to the desired position. Remove the Curl Pad (38) from the weight system when performing an exercise that does not require it at the desired height with an Adjustment Knob (69). Note: You may need to lower..., see ADJUSTING THE SEATS above) to the desired position. Next, move the Seat to remove the Adjustment Knob. 38 16 37 69 LOCKING THE WEIGHT STACK Lock the weight stack by inserting a Lock Pin (78) through a Weight Guide (30) and securing the Lock (77) onto the Lock Pin. 26 10 30 77 78
... (69) and disengage it from the Right Seat Frame (17). Next, move the Backrest to the desired position. Remove the Curl Pad (38) from the weight system when performing an exercise that does not require it at the desired height with an Adjustment Knob (69). Note: You may need to lower..., see ADJUSTING THE SEATS above) to the desired position. Next, move the Seat to remove the Adjustment Knob. 38 16 37 69 LOCKING THE WEIGHT STACK Lock the weight stack by inserting a Lock Pin (78) through a Weight Guide (30) and securing the Lock (77) onto the Lock Pin. 26 10 30 77 78

English Manual
Page 27
TIGHTENING THE CABLES A Woven cable, the type of cable used . Slack can stretch slightly when it is first used on the weight system, can be removed from these cables in the cables before resistance is felt, the cables should be tightened. See drawing B. If there is oriented ... remove slack from the indicated Pulley (43), Cable Trap (48), Half Guards (46), and Pulley Plates (49). To tighten the cables, first insert the weight pin into the middle of the weight stack. USING THE LEG LEVER LOCK When using a hole closer to hold the cable in the same manner, if necessary.
TIGHTENING THE CABLES A Woven cable, the type of cable used . Slack can stretch slightly when it is first used on the weight system, can be removed from these cables in the cables before resistance is felt, the cables should be tightened. See drawing B. If there is oriented ... remove slack from the indicated Pulley (43), Cable Trap (48), Half Guards (46), and Pulley Plates (49). To tighten the cables, first insert the weight pin into the middle of the weight stack. USING THE LEG LEVER LOCK When using a hole closer to hold the cable in the same manner, if necessary.

English Manual
Page 28
Make sure that the cables, the cable traps, and the guards have not been correctly routed, the weight system will not function properly and damage may occur. The numbers show the proper routing of the Low Cable (70), the Press Cable (72), and ...
Make sure that the cables, the cable traps, and the guards have not been correctly routed, the weight system will not function properly and damage may occur. The numbers show the proper routing of the Low Cable (70), the Press Cable (72), and ...

English Manual
Page 29
...by completing more sets rather than by increasing circulation, raising your body temperature and delivering more strenuous exercise by using high amounts of weight. Cross Training Cross training is right for a maximum of 30 seconds between sets. Once you find the schedule that is an efficient... workout should be followed by pushing them close to their capacity. The exertion stage of each set . It is an essential part of weight. Rest for 20 to get a complete and well-balanced fitness program. Exercise for 3 minutes after each set . EXERCISE FORM Maintaining proper...
...by completing more sets rather than by increasing circulation, raising your body temperature and delivering more strenuous exercise by using high amounts of weight. Cross Training Cross training is right for a maximum of 30 seconds between sets. Once you find the schedule that is an efficient... workout should be followed by pushing them close to their capacity. The exertion stage of each set . It is an essential part of weight. Rest for 20 to get a complete and well-balanced fitness program. Exercise for 3 minutes after each set . EXERCISE FORM Maintaining proper...
English Manual
Page 30
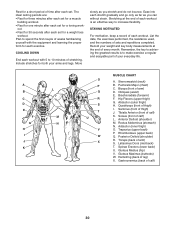
... the first couple of weeks familiarizing yourself with 5 to 10 minutes of stretching. Ease into each exercise. Record your weight and key body measurements at the end of each workout. Remember, the key to achieving the greatest results is an ...Gluteus Maximus (buttocks) W. COOLING DOWN End each set. Gluteus Medius (hip) V. Abductor (outer thigh) H. Gastrocnemius (back of arm) S. Include stretches for a weight loss workout. Rest for a short period of time after each workout with the equipment and learning the proper form for each stretch gradually and go...
... the first couple of weeks familiarizing yourself with 5 to 10 minutes of stretching. Ease into each exercise. Record your weight and key body measurements at the end of each workout. Remember, the key to achieving the greatest results is an ...Gluteus Maximus (buttocks) W. COOLING DOWN End each set. Gluteus Medius (hip) V. Abductor (outer thigh) H. Gastrocnemius (back of arm) S. Include stretches for a weight loss workout. Rest for a short period of time after each workout with the equipment and learning the proper form for each stretch gradually and go...

English Manual
Page 32
... See the back cover of this user's manual for information about ordering replacement parts. 32 Qty. Qty. Description Key No. Description Key No. Weight 35 2 Backrest 36 1 Small Seat 37 1 Large Seat 38 1 Curl Pad 39 4 Foam Pad 40 3 Upright Bushing 77 1 Lock ... Bushing 108 44 M10 Washer 72 1 Press Cable # 1 User's Manual 73 1 Butterfly Cable # 1 Exercise Guide 74 1 Lat Bar # 2 Hex Key 75 1 Weight Tube # 2 Grease Pack 76 1 Weight Tube Cap Note: "#" indicates a non-illustrated part. Description 1 1 Right Base 2 1 Left Base 3 1 Right Top Frame 4 1 Left Top Frame 5 1 Center ...
... See the back cover of this user's manual for information about ordering replacement parts. 32 Qty. Qty. Description Key No. Description Key No. Weight 35 2 Backrest 36 1 Small Seat 37 1 Large Seat 38 1 Curl Pad 39 4 Foam Pad 40 3 Upright Bushing 77 1 Lock ... Bushing 108 44 M10 Washer 72 1 Press Cable # 1 User's Manual 73 1 Butterfly Cable # 1 Exercise Guide 74 1 Lat Bar # 2 Hex Key 75 1 Weight Tube # 2 Grease Pack 76 1 Weight Tube Cap Note: "#" indicates a non-illustrated part. Description 1 1 Right Base 2 1 Left Base 3 1 Right Top Frame 4 1 Left Top Frame 5 1 Center ...

English Manual
Page 36
..., freight charges to and from state to give the following information: • the MODEL NUMBER of the product (WESY3906.1) • the NAME of the product (WEIDER CLUB 4870 weight system) • the SERIAL NUMBER of the product (see the PART LIST and EXPLODED DRAWING on how long an implied warranty lasts. No other consequential...
..., freight charges to and from state to give the following information: • the MODEL NUMBER of the product (WESY3906.1) • the NAME of the product (WEIDER CLUB 4870 weight system) • the SERIAL NUMBER of the product (see the PART LIST and EXPLODED DRAWING on how long an implied warranty lasts. No other consequential...


