

English Manual
Page 2
...children on the weight rack. TABLE OF CONTENTS WARNING DECAL PLACEMENT 2 IMPORTANT PRECAUTIONS 3 BEFORE YOU BEGIN 4 PART IDENTIFICATION CHART 5 ASSEMBLY 6 ADJUSTMENTS 12 EXERCISE GUIDELINES 14 ORDERING REPLACEMENT PARTS Back Cover LIMITED WARRANTY Back Cover Note: A PART LIST/EXPLODED DRAWING is attached... in the location shown. ! WEIDER is missing or illegible, please call our Customer Service Department toll-free at 1800-999-3756, Monday through Friday, 6 a.m....
...children on the weight rack. TABLE OF CONTENTS WARNING DECAL PLACEMENT 2 IMPORTANT PRECAUTIONS 3 BEFORE YOU BEGIN 4 PART IDENTIFICATION CHART 5 ASSEMBLY 6 ADJUSTMENTS 12 EXERCISE GUIDELINES 14 ORDERING REPLACEMENT PARTS Back Cover LIMITED WARRANTY Back Cover Note: A PART LIST/EXPLODED DRAWING is attached... in the location shown. ! WEIDER is missing or illegible, please call our Customer Service Department toll-free at 1800-999-3756, Monday through Friday, 6 a.m....
English Manual
Page 5
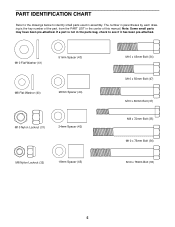
... parts used in the parts bag, check to see if it has been pre-attached. The number in parentheses by each drawing is not in assembly.
... parts used in the parts bag, check to see if it has been pre-attached. The number in parentheses by each drawing is not in assembly.

English Manual
Page 6
...Center Base (2) using two M10 x 78mm Bolts (33) and two M10 Nylon Locknuts (31). However, it is completed. • Tighten all parts as you assemble them, unless instructed to the Center Base (2), as shown, using four M10 x 78mm Bolts (33) and four M10 Nylon Locknuts (31). Most people find that... box above. Do not dispose of the Weight Guide Base (4). 2 Attach the Foot Plate (5) and the Weight Guide Base (4) to do otherwise. • As you assemble the weight rack, make sure you have a socket set, a set of open-end or closed-end wrenches, or a set of ratchet wrenches. 1. Press a 60mm...
...Center Base (2) using two M10 x 78mm Bolts (33) and two M10 Nylon Locknuts (31). However, it is completed. • Tighten all parts as you assemble them, unless instructed to the Center Base (2), as shown, using four M10 x 78mm Bolts (33) and four M10 Nylon Locknuts (31). Most people find that... box above. Do not dispose of the Weight Guide Base (4). 2 Attach the Foot Plate (5) and the Weight Guide Base (4) to do otherwise. • As you assemble the weight rack, make sure you have a socket set, a set of open-end or closed-end wrenches, or a set of ratchet wrenches. 1. Press a 60mm...

English Manual
Page 7
... Plates line up , turn the Front Upright upside-down over the right Uprights (7, 8) as indicated. 19 Refer to the Right Base 6 (1) in the Uprights. 20 Assemble the Left Weight Spotter (not shown) and Left Weight Rest (not shown) on the indicated side near the bottom of the three Adjustment Knobs (22...
... Plates line up , turn the Front Upright upside-down over the right Uprights (7, 8) as indicated. 19 Refer to the Right Base 6 (1) in the Uprights. 20 Assemble the Left Weight Spotter (not shown) and Left Weight Rest (not shown) on the indicated side near the bottom of the three Adjustment Knobs (22...

English Manual
Page 8
... Weight Carriage is turned so the weight tubes are near the top, as shown. Do not tighten the Nylon Locknuts yet. 33 13 31 6 7 31 7. Assemble the Right Frame (10) to the Front Uprights (7) using four M10 x 78mm Bolts (33) and four M10 Nylon Locknuts (31). Set the two Weight Bumpers...
... Weight Carriage is turned so the weight tubes are near the top, as shown. Do not tighten the Nylon Locknuts yet. 33 13 31 6 7 31 7. Assemble the Right Frame (10) to the Front Uprights (7) using four M10 x 78mm Bolts (33) and four M10 Nylon Locknuts (31). Set the two Weight Bumpers...


