
User Manual
Page 2
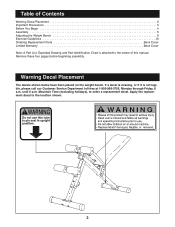
...until 6 p.m. Apply the replacement decal to order a replacement decal. Warning Decal Placement The decals shown below have been placed on the weight bench. Remove these four pages before beginning assembly. Table of this manual. If a decal is missing, or if it is attached to... the center of Contents Warning Decal Placement 2 Important Precautions 3 Before You Begin 4 Assembly 5 Adjusting the Weight Bench 9 Exercise Guidelines 10 Ordering Replacement Parts Back Cover Limited Warranty Back Cover Note: A Part List, Exploded Drawing and Part Identification Chart is...
...until 6 p.m. Apply the replacement decal to order a replacement decal. Warning Decal Placement The decals shown below have been placed on the weight bench. Remove these four pages before beginning assembly. Table of this manual. If a decal is missing, or if it is attached to... the center of Contents Warning Decal Placement 2 Important Precautions 3 Before You Begin 4 Assembly 5 Adjusting the Weight Bench 9 Exercise Guidelines 10 Ordering Replacement Parts Back Cover Limited Warranty Back Cover Note: A Part List, Exploded Drawing and Part Identification Chart is...
User Manual
Page 3
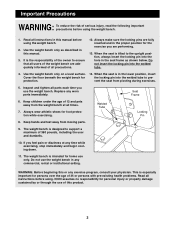
... parts. 9. Replace any time while exercising, stop immediately and begin cooling down. 11. Seat Frame 6. Welded Tube Locking Pin 8. The weight bench is the responsibility of the owner to support a maximum of 360 pounds, including the user and dumbells. 10. If you feel pain or... dizziness at all instructions before using. Always make sure the locking pins are performing. 13. Always wear athletic shoes for home use the weight bench. Keep hands and feet away from pivoting during exercises. 5. WARNING: Before beginning this manual. 3. When the seat is tilted to pre...
... parts. 9. Replace any time while exercising, stop immediately and begin cooling down. 11. Seat Frame 6. Welded Tube Locking Pin 8. The weight bench is the responsibility of the owner to support a maximum of 360 pounds, including the user and dumbells. 10. If you feel pain or... dizziness at all instructions before using. Always make sure the locking pins are performing. 13. Always wear athletic shoes for home use the weight bench. Keep hands and feet away from pivoting during exercises. 5. WARNING: Before beginning this manual. 3. When the seat is tilted to pre...
User Manual
Page 4
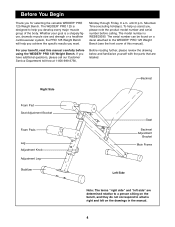
... manual. 4 until 6 p.m. The model number is a shapely figure, dramatic muscle size and strength or a healthier cardiovascular system, the PRO 125 Weight Bench will help you achieve the specific results you for selecting the versatile WEIDER¨ PRO 125 Weight Bench. If you have additional questions, please call our Customer Service Department toll-free at 1-800-999-3756, Before reading...
... manual. 4 until 6 p.m. The model number is a shapely figure, dramatic muscle size and strength or a healthier cardiovascular system, the PRO 125 Weight Bench will help you achieve the specific results you for selecting the versatile WEIDER¨ PRO 125 Weight Bench. If you have additional questions, please call our Customer Service Department toll-free at 1-800-999-3756, Before reading...
User Manual
Page 5
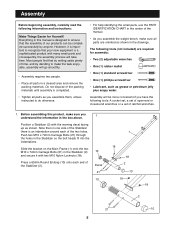
... in this product, make sure you 1 understand the information in the Stabilizer (2) and secure it is completed. ¥ Tighten all parts as you assemble the weight bench, make the task enjoyable, assembly will take time. Assembly Before beginning assembly, carefully read the following information and instructions: Make Things Easier for assembly: ¥...
... in this product, make sure you 1 understand the information in the Stabilizer (2) and secure it is completed. ¥ Tighten all parts as you assemble the weight bench, make the task enjoyable, assembly will take time. Assembly Before beginning assembly, carefully read the following information and instructions: Make Things Easier for assembly: ¥...
User Manual
Page 9
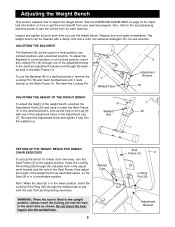
... position. Replace any worn parts immediately. ADJUSTING THE BACKREST The Backrest (8) can be used in the Main Frame (1). Adjusting the Weight Bench This section explains how to get the most benefit from pivoting during exercises. See the EXERCISE GUIDELINES on page 10 for important information...to the upright position. Re-insert the Adjustment Knob and tighten it rests directly on how to adjust the weight bench. The weight bench can be cleaned with one of the weight bench, unscrew the Adjustment Knob (23) and raise or lower the Main Frame (1) to the upright position, always...
... position. Replace any worn parts immediately. ADJUSTING THE BACKREST The Backrest (8) can be used in the Main Frame (1). Adjusting the Weight Bench This section explains how to get the most benefit from pivoting during exercises. See the EXERCISE GUIDELINES on page 10 for important information...to the upright position. Re-insert the Adjustment Knob and tighten it rests directly on how to adjust the weight bench. The weight bench can be cleaned with one of the weight bench, unscrew the Adjustment Knob (23) and raise or lower the Main Frame (1) to the upright position, always...
User Manual
Page 15
... centers with respect to state. No other transportation charges prepaid, accompanied by ICON. Some states do not allow the exclusion or limitation of the product (WEIDER¨ PRO 125 Weight Bench). 3. This warranty gives you . The NAME of incidental or consequential damages. Some states do not allow limitations on how long an implied warranty lasts...
... centers with respect to state. No other transportation charges prepaid, accompanied by ICON. Some states do not allow the exclusion or limitation of the product (WEIDER¨ PRO 125 Weight Bench). 3. This warranty gives you . The NAME of incidental or consequential damages. Some states do not allow limitations on how long an implied warranty lasts...


