
English Manual
Page 2
... "Read all times. 7. IMPORTANT> PRECAUTIONS WARNING: To reduce the risk of serious injury, read the following important precautions before using the home gym system. 3 If you feel pain or dizziness at all instructions before using.; Always stand on a level surface. Cover the floor or carpet ... and tighten all inctr• ertinns'in the accompanYing literature before beginning assembly. The hOine gym,Sys.tez ra is the responsibility of the owner to ensure that all users of the home gym system are adequately inforrned of all precautions Rebati all parts,Often. "It is 'designed to...
... "Read all times. 7. IMPORTANT> PRECAUTIONS WARNING: To reduce the risk of serious injury, read the following important precautions before using the home gym system. 3 If you feel pain or dizziness at all instructions before using.; Always stand on a level surface. Cover the floor or carpet ... and tighten all inctr• ertinns'in the accompanYing literature before beginning assembly. The hOine gym,Sys.tez ra is the responsibility of the owner to ensure that all users of the home gym system are adequately inforrned of all precautions Rebati all parts,Often. "It is 'designed to...
English Manual
Page 3
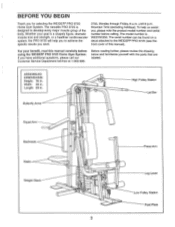
... front cover of this manual carefully before calling. ASSEMBLED DIMENSIONS: Height: 76 in . Mountain Time (excluding holidays). If you for selecting the WEIDER® PRO 9725 Home Gym System. Length: 59 in . Whether your benefit, read this manual). Width: 38 in. For your goal is a shapely figure, dramatic...designed to achieve the specific results you , please note the product model number and serial number before using the WEIDER® PRO 9725 Home Gym System. To help you to develop every major muscle group of 3 Press Arm Leg Lever Low Pulley Station Foot Plate ...
... front cover of this manual carefully before calling. ASSEMBLED DIMENSIONS: Height: 76 in . Mountain Time (excluding holidays). If you for selecting the WEIDER® PRO 9725 Home Gym System. Length: 59 in . Whether your benefit, read this manual). Width: 38 in. For your goal is a shapely figure, dramatic...designed to achieve the specific results you , please note the product model number and serial number before using the WEIDER® PRO 9725 Home Gym System. To help you to develop every major muscle group of 3 Press Arm Leg Lever Low Pulley Station Foot Plate ...
English Manual
Page 4
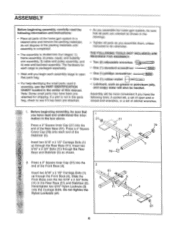
...) in the drawings. • Tighten all parts are oriented as grease or petroleum jelly, and soapy water will be more convenient if you assemble the home gym system, be needed. If a part is not in the parts bag, check to open -end or closed-end wrenches, or a set of open... 4) seat and backrest assembly. The hardware for shipping. Note: Some small parts may have the following information and instructions: • Place all parts of the home gym system in the box above. 27 51 Press a 2" Square Inner Cap (27) into the end of the Front Base (4). 2 51 izt Insert two 5/16" x 2 ...
...) in the drawings. • Tighten all parts are oriented as grease or petroleum jelly, and soapy water will be more convenient if you assemble the home gym system, be needed. If a part is not in the parts bag, check to open -end or closed-end wrenches, or a set of open... 4) seat and backrest assembly. The hardware for shipping. Note: Some small parts may have the following information and instructions: • Place all parts of the home gym system in the box above. 27 51 Press a 2" Square Inner Cap (27) into the end of the Front Base (4). 2 51 izt Insert two 5/16" x 2 ...

English Manual
Page 18
..., you will be explained in ADJUSTMENT, beginning on page 19 of the Pad Tube. Before using the home gym system, pull each end of this manual for proper cable routing. Remove the backing from the PRO 9625 decal and apply it to remove it by tightening the cables. Make sure that the cables... (28) into the ends of this manual.' The use of the remaining parts will need to the home gym system as 45 shown. See the CABLE DIAGRAM on page 22. 36 30 4 28 34 29 30 a PRO 9625 0 a. *a 0.) 18 See TROUBLE-SHOOTING AND MAINTENANCE on page 23 of both Pad Tubes (28). 44...
..., you will be explained in ADJUSTMENT, beginning on page 19 of the Pad Tube. Before using the home gym system, pull each end of this manual for proper cable routing. Remove the backing from the PRO 9625 decal and apply it to remove it by tightening the cables. Make sure that the cables... (28) into the ends of this manual.' The use of the remaining parts will need to the home gym system as 45 shown. See the CABLE DIAGRAM on page 22. 36 30 4 28 34 29 30 a PRO 9625 0 a. *a 0.) 18 See TROUBLE-SHOOTING AND MAINTENANCE on page 23 of both Pad Tubes (28). 44...
English Manual
Page 19
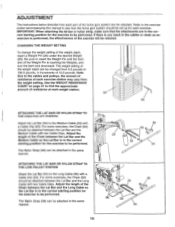
... attaching the lat bar or nylon strap, make sure that the attachments are in the correct starting position for the exercise to see how the home gym system should be attached between the Lat Bar and the Medium Cable with a Cable Clip (53). Use the WEIGHT RESISTANCE CHART on page 21 to..., the effectiveness of the weight stack, insert a Weight Pin (26) under the desired Weight (25). ADJUSTMENT The instructions below describe how each part of the home gym system can be attached in the same manner.
... attaching the lat bar or nylon strap, make sure that the attachments are in the correct starting position for the exercise to see how the home gym system should be attached between the Lat Bar and the Medium Cable with a Cable Clip (53). Use the WEIGHT RESISTANCE CHART on page 21 to..., the effectiveness of the weight stack, insert a Weight Pin (26) under the desired Weight (25). ADJUSTMENT The instructions below describe how each part of the home gym system can be attached in the same manner.
English Manual
Page 22
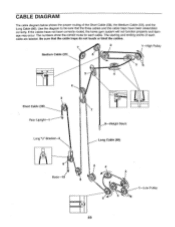
...), the Medium Cable (23), and the Long Cable (86). Be sure that the three cables and the cable traps have not been correctly routed, the home gym system will not function properly and damage may occur. Use the diagram to be sure that the cable traps do not touch or bind the...
...), the Medium Cable (23), and the Long Cable (86). Be sure that the three cables and the cable traps have not been correctly routed, the home gym system will not function properly and damage may occur. Use the diagram to be sure that the cable traps do not touch or bind the...
English Manual
Page 23
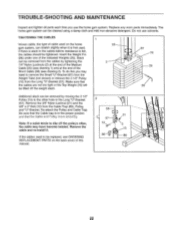
..., the type of cable used . Remove the 3/8" Nylon Locknut (21) and the 3/8" x 2" Bolt (12) from the Long "U"-Bracket (57). The home gym system can be lifted off the pulleys often, 12 the cable may need to be removed by tightening the 1/4" Nylon Locknuts (2) at the end of ...Weight Pin (26) under one of the Short Cable (58) (see ORDERING 86 REPLACEMENT PARTS on the home gym system, can be replaced, see drawing 2). Do not use the home gym system. TROUBLE-SHOOTING AND MAINTENANCE Inspect and tighten all parts each time you may have become twisted. Make sure...
..., the type of cable used . Remove the 3/8" Nylon Locknut (21) and the 3/8" x 2" Bolt (12) from the Long "U"-Bracket (57). The home gym system can be lifted off the pulleys often, 12 the cable may need to be removed by tightening the 1/4" Nylon Locknuts (2) at the end of ...Weight Pin (26) under one of the Short Cable (58) (see ORDERING 86 REPLACEMENT PARTS on the home gym system, can be replaced, see drawing 2). Do not use the home gym system. TROUBLE-SHOOTING AND MAINTENANCE Inspect and tighten all parts each time you may have become twisted. Make sure...

English Manual
Page 24
... forth above is limited to you specific legal rights. until 6 p.m. This warranty extends only to be pre-authorized by sufficient proof of the product (WEIDER9 9725 Home Gym System). 3.
... forth above is limited to you specific legal rights. until 6 p.m. This warranty extends only to be pre-authorized by sufficient proof of the product (WEIDER9 9725 Home Gym System). 3.


