
Owners Manual
Page 1
CADE Model No. 360500 Serial No. Write the serial number in this manual carefully before using this manual for reference. Fitness Trak 5.0MPH Calorie/Pulse Monitor OWNER'S MANUAL CAUTION: Read all instructions in the space above for future reference. Save this equipment. Part No. 100565 4/90 Weslo, Inc. 1990 Serial Number Decal S71 vC4i1lesb Inc TM I A Subsidiary of Weider Health and Fitness, Inc.
CADE Model No. 360500 Serial No. Write the serial number in this manual carefully before using this manual for reference. Fitness Trak 5.0MPH Calorie/Pulse Monitor OWNER'S MANUAL CAUTION: Read all instructions in the space above for future reference. Save this equipment. Part No. 100565 4/90 Weslo, Inc. 1990 Serial Number Decal S71 vC4i1lesb Inc TM I A Subsidiary of Weider Health and Fitness, Inc.
Owners Manual
Page 2
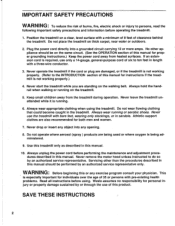
... following important safety precautions and information before operating the treadmill. 1. Never drop or insert any exercise program consult your physician. Do not wear flowing clothing that could become caught in this manual. 10. Never remove the motor hood unless instructed to ten feet in length with pre-existing health problems. Read all instructions before performing the maintenance and adjustment procedures described in sandals. WARNING...
... following important safety precautions and information before operating the treadmill. 1. Never drop or insert any exercise program consult your physician. Do not wear flowing clothing that could become caught in this manual. 10. Never remove the motor hood unless instructed to ten feet in length with pre-existing health problems. Read all instructions before performing the maintenance and adjustment procedures described in sandals. WARNING...
Owners Manual
Page 3
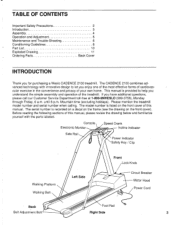
... and familiarize yourself with innovative design to help you enjoy one of the most effective forms of cardiovascular exercise in the convenience and privacy of this manual. until 6 p.m. Console Electronic Monitor Speed Crank Incline Indicator Side Rail Power Indicator Safety Key / Clip Walking Platform Walking Belt Back Belt Adjustment Bolt Left Side Front Lock Knob Circuit Breaker Motor Hood Power Cord Foot Rail Right Side 3 The CADENCE 2100 combines advanced technology with the...
... and familiarize yourself with innovative design to help you enjoy one of the most effective forms of cardiovascular exercise in the convenience and privacy of this manual. until 6 p.m. Console Electronic Monitor Speed Crank Incline Indicator Side Rail Power Indicator Safety Key / Clip Walking Platform Walking Belt Back Belt Adjustment Bolt Left Side Front Lock Knob Circuit Breaker Motor Hood Power Cord Foot Rail Right Side 3 The CADENCE 2100 combines advanced technology with the...
Owners Manual
Page 4
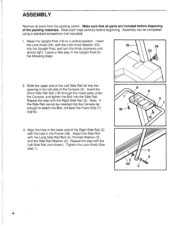
... Left Side Rail (6) into the Console far enough to a vertical position. Assembly can be inserted into the opening in the Frame (48). Insert the Short Side Rail Bolt (18) through the metal plate under the Console, and tighten the Bolt into the Upright Post, and turn the Knob clockwise until almost tight. Read each step carefully before disposing of the Right...
... Left Side Rail (6) into the Console far enough to a vertical position. Assembly can be inserted into the opening in the Frame (48). Insert the Short Side Rail Bolt (18) through the metal plate under the Console, and tighten the Bolt into the Upright Post, and turn the Knob clockwise until almost tight. Read each step carefully before disposing of the Right...
Owners Manual
Page 5
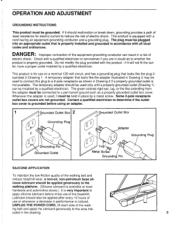
... a risk of the walk- The plug must be installed by a qualified electrician. icone lubricant should also be applied generously to a 2-pole receptacle as a properly grounded outlet box cover. cated in the drawing. 5 DANGER: Improper connection of the equipment-grounding conductor can be plugged into an appropriate outlet that is grounded before initial use of the walking belt and reduce treadmill wear, a non...
... a risk of the walk- The plug must be installed by a qualified electrician. icone lubricant should also be applied generously to a 2-pole receptacle as a properly grounded outlet box cover. cated in the drawing. 5 DANGER: Improper connection of the equipment-grounding conductor can be plugged into an appropriate outlet that is grounded before initial use of the walking belt and reduce treadmill wear, a non...
Owners Manual
Page 6
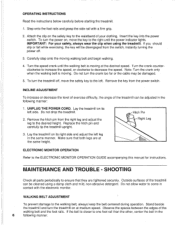
... GUIDE accompanying this manual for instructions. Do not drop the treadmill. 2. Lay the treadmill on its right side and adjust the left side. ELECTRONIC MONITOR OPERATION Refer to decrease the speed. Outside surfaces of the walking belt and the foot rails. Remove the hitch pin from the power switch. Replace the hitch pin and carefully tip the treadmill upright. UNPLUG THE POWER CORD. If you should slip or fall while exercising, the key...
... GUIDE accompanying this manual for instructions. Do not drop the treadmill. 2. Lay the treadmill on its right side and adjust the left side. ELECTRONIC MONITOR OPERATION Refer to decrease the speed. Outside surfaces of the walking belt and the foot rails. Remove the hitch pin from the power switch. Replace the hitch pin and carefully tip the treadmill upright. UNPLUG THE POWER CORD. If you should slip or fall while exercising, the key...
Owners Manual
Page 7
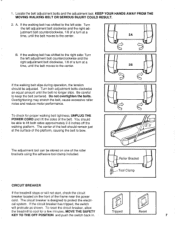
... be able to lift both adjustment bolts clockwise an equal amount until the belt moves to bow. Roller Bracket Tool Clamp CIRCUIT BREAKER If the treadmill stops or will protrude as shown. To reset the circuit breaker, allow the treadmill to protect the electri- The circuit breaker is designed to cool for proper walking belt tightness, UNPLUG THE POWER CORD and lift the sides...
... be able to lift both adjustment bolts clockwise an equal amount until the belt moves to bow. Roller Bracket Tool Clamp CIRCUIT BREAKER If the treadmill stops or will protrude as shown. To reset the circuit breaker, allow the treadmill to protect the electri- The circuit breaker is designed to cool for proper walking belt tightness, UNPLUG THE POWER CORD and lift the sides...

Owners Manual
Page 8
... upright post on the treadmill. EXERCISE INTENSITY For an effective aerobic workout, it is important to the storage position, first remove the bolts and washers from the lower and upper ends of the side rails. Before beginning this or any fitness program. Training zones are the result of any exercise program, consult your training zone by consulting the table below. ELECTRONIC MONITOR A 9-volt battery must be installed...
... upright post on the treadmill. EXERCISE INTENSITY For an effective aerobic workout, it is important to the storage position, first remove the bolts and washers from the lower and upper ends of the side rails. Before beginning this or any fitness program. Training zones are the result of any exercise program, consult your training zone by consulting the table below. ELECTRONIC MONITOR A 9-volt battery must be installed...
Owners Manual
Page 9
... between workouts is too high, reduce your heart rate is recommended. After a few months of exercising, the number of workouts can measure your level of exertion. THE WORKOUT Each workout should begin with at a comfortable pace until the 4 minutes elapse. To maintain or improve your heart rate using the electronic monitor (see the ELECTRONIC MONITOR OPERATION GUIDE.) First, set the monitor for 4 minutes. Press the "START/STOP" key and exercise at...
... between workouts is too high, reduce your heart rate is recommended. After a few months of exercising, the number of workouts can measure your level of exertion. THE WORKOUT Each workout should begin with at a comfortable pace until the 4 minutes elapse. To maintain or improve your heart rate using the electronic monitor (see the ELECTRONIC MONITOR OPERATION GUIDE.) First, set the monitor for 4 minutes. Press the "START/STOP" key and exercise at...

Owners Manual
Page 10
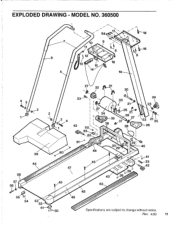
... Screw 42 2 Hitch Pin 43 1 Safety Cover 44 1 Left Foot Rail 45 6 Platform Screw 46 1 Front Roller Pulley 47 1 Walking Belt 48 Frame 49 1 Walking Platform 50 5 Screw 51 2 Rubber Bumper 52 1 Right Roller Bracket 53 1 Rear Roller 54 1 Allen Wrench 55 1 Tool Clamp 56 2 Adjustment Bolt 57 2 Adjustment Washer 58 1 Left Roller Bracket 59 1 Motor Hood 60 6 Hood Screw 61 1 Sensor Magnet 62 1 V-Belt 63 1 Sensor Wire/Reed Switch 64 4 Mounting Screw 65 1 Right Foot Rail 1 Owners Manual 1 Electronic Monitor Guide...
... Screw 42 2 Hitch Pin 43 1 Safety Cover 44 1 Left Foot Rail 45 6 Platform Screw 46 1 Front Roller Pulley 47 1 Walking Belt 48 Frame 49 1 Walking Platform 50 5 Screw 51 2 Rubber Bumper 52 1 Right Roller Bracket 53 1 Rear Roller 54 1 Allen Wrench 55 1 Tool Clamp 56 2 Adjustment Bolt 57 2 Adjustment Washer 58 1 Left Roller Bracket 59 1 Motor Hood 60 6 Hood Screw 61 1 Sensor Magnet 62 1 V-Belt 63 1 Sensor Wire/Reed Switch 64 4 Mounting Screw 65 1 Right Foot Rail 1 Owners Manual 1 Electronic Monitor Guide...
Owners Manual
Page 11
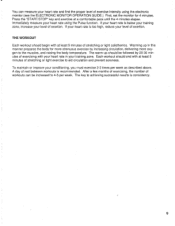
MODEL NO. 360500 7 6 5 17 • 64 10 9 O .***-• O 8 15 14 16 19 18 m • 18 8 27 32 vAi t.--31 I \at 20 33 4 3 eLd 2 2 e3 4 42 L. 27 34 30 A- 21' 24 23 29 !-4) 21 28 35 27 37 \22 21 25 38 .0 26 0 o 61- 39; 30 29 40 59 60 46 44 45 47 58 57 56 \ v 45 55 (1 \' 54 ..• 53 52 51- 1dg, 50 48 49 43 65 vi 39 Specifications are subject to change without notice. EXPLODED DRAWING - Rev. 4/90 11
MODEL NO. 360500 7 6 5 17 • 64 10 9 O .***-• O 8 15 14 16 19 18 m • 18 8 27 32 vAi t.--31 I \at 20 33 4 3 eLd 2 2 e3 4 42 L. 27 34 30 A- 21' 24 23 29 !-4) 21 28 35 27 37 \22 21 25 38 .0 26 0 o 61- 39; 30 29 40 59 60 46 44 45 47 58 57 56 \ v 45 55 (1 \' 54 ..• 53 52 51- 1dg, 50 48 49 43 65 vi 39 Specifications are subject to change without notice. EXPLODED DRAWING - Rev. 4/90 11
Owners Manual
Page 12
ORDERING PARTS Replacement parts can be prepared to give the following information: 1. until 6 p.m. The model number of the product (Weslo CADENCE 2100 Treadmill). 2. Part No. 100565 4/90 Printed in U.S.A. The name of the product (360500). 3. The key number of the decal). 4. The serial number of the product, found on a decal on the frame (see the drawing on the front cover for the location of the part from the part list on...
ORDERING PARTS Replacement parts can be prepared to give the following information: 1. until 6 p.m. The model number of the product (Weslo CADENCE 2100 Treadmill). 2. Part No. 100565 4/90 Printed in U.S.A. The name of the product (360500). 3. The key number of the decal). 4. The serial number of the product, found on a decal on the frame (see the drawing on the front cover for the location of the part from the part list on...


