
Instruction Manual
Page 1
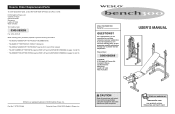
... R1000A Printed in this manual before using this equipment. Model: WLEMBE72000 Serial No. As a manufacturer, we will guarantee complete satisfaction through our Customer Service Department. If you have questions, or if there are missing parts, we are committed to Order Replacement Parts To order replacement parts, contact the ICON Health & Fitness Ltd. Save this manual) ¥ The KEY NUMBER OF THE PART(S) (see the PART LIST and the EXPLODED...
... R1000A Printed in this manual before using this equipment. Model: WLEMBE72000 Serial No. As a manufacturer, we will guarantee complete satisfaction through our Customer Service Department. If you have questions, or if there are missing parts, we are committed to Order Replacement Parts To order replacement parts, contact the ICON Health & Fitness Ltd. Save this manual) ¥ The KEY NUMBER OF THE PART(S) (see the PART LIST and the EXPLODED...
Instruction Manual
Page 2
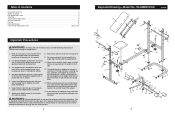
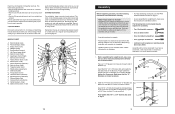
... not place more than five feet with pre-existing health problems. Read all precautions. 3. Table of Contents Important Precautions 2 Before You Begin 3 Part Identification Chart 4 Assembly 5 Adjusting the Weight Bench 9 Exercise Guidelines 11 Part List 14 Exploded Drawing 15 How to Order Replacement Parts Back Cover Important Precautions WARNING: To reduce the risk of 136 kgs (300 lbs.), including the user, a barbell, and weights. Do not use only.
... not place more than five feet with pre-existing health problems. Read all precautions. 3. Table of Contents Important Precautions 2 Before You Begin 3 Part Identification Chart 4 Assembly 5 Adjusting the Weight Bench 9 Exercise Guidelines 11 Part List 14 Exploded Drawing 15 How to Order Replacement Parts Back Cover Important Precautions WARNING: To reduce the risk of 136 kgs (300 lbs.), including the user, a barbell, and weights. Do not use only.
Instruction Manual
Page 3
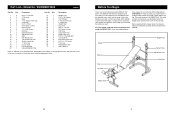
... userÕs manual for selecting the versatile WESLO¨ 300 bench. The serial number can be used with the parts that are subject to help you have additional ques- If you develop every major muscle group of the body. Part ListÑModel No. Qty. Before reading further, please review the drawing below and familiarise yourself with your benefit, read this manual). Description Key No. Upright Backrest Seat Leg...
... userÕs manual for selecting the versatile WESLO¨ 300 bench. The serial number can be used with the parts that are subject to help you have additional ques- If you develop every major muscle group of the body. Part ListÑModel No. Qty. Before reading further, please review the drawing below and familiarise yourself with your benefit, read this manual). Description Key No. Upright Backrest Seat Leg...
Instruction Manual
Page 4
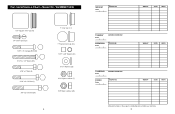
... Cap (17) 1" Round Inner Cap (24) 5/16Ó x 3/8Ó Spacer (22) 5/16Ó Washer (23) 5/16" Nylon Locknut (7) 3/8" Nylon Locknut (29) 4 MONDAY Date: / / EXERCISE WEIGHT SETS REPS TUESDAY Date: / / WEDNESDAY Date: / / AEROBIC EXERCISE EXERCISE WEIGHT SETS REPS THURSDAY Date: / / FRIDAY Date: / / AEROBIC EXERCISE EXERCISE WEIGHT SETS REPS Make photocopies of this page for scheduling and recording your workouts. 13 Part Identification ChartÑModel No.
... Cap (17) 1" Round Inner Cap (24) 5/16Ó x 3/8Ó Spacer (22) 5/16Ó Washer (23) 5/16" Nylon Locknut (7) 3/8" Nylon Locknut (29) 4 MONDAY Date: / / EXERCISE WEIGHT SETS REPS TUESDAY Date: / / WEDNESDAY Date: / / AEROBIC EXERCISE EXERCISE WEIGHT SETS REPS THURSDAY Date: / / FRIDAY Date: / / AEROBIC EXERCISE EXERCISE WEIGHT SETS REPS Make photocopies of this page for scheduling and recording your workouts. 13 Part Identification ChartÑModel No.
Instruction Manual
Page 5
.... ¥ Place all parts in this manual is completed. ¥ Tighten all parts as you assemble them, unless instructed to recognize that the weight bench has many parts and and that all parts are : ¥ Rest for three minutes after each set for a muscle building workout ¥ Rest for Yourself! Remember, the key to schedule and record your weight and key body measurements at the end...
.... ¥ Place all parts in this manual is completed. ¥ Tighten all parts as you assemble them, unless instructed to recognize that the weight bench has many parts and and that all parts are : ¥ Rest for three minutes after each set for a muscle building workout ¥ Rest for Yourself! Remember, the key to schedule and record your weight and key body measurements at the end...
Instruction Manual
Page 6
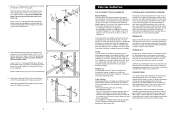
... on the Front Leg (37). Attach the Bench Frame (8) to accomplish this. A Òset . Begin with a 5/16Ó x 2 1/4Ó Bolt (1) and a 5/16Ó Nylon Locknut (7). Select a moderate amount of weight and increase the number of each set . Cross Training Many people desire a complete and well-balanced fitness program, and cross training is a series of 8 repetitions for you feeling exhausted. EXERCISE FORM You will continually adapt and grow. Exhale...
... on the Front Leg (37). Attach the Bench Frame (8) to accomplish this. A Òset . Begin with a 5/16Ó x 2 1/4Ó Bolt (1) and a 5/16Ó Nylon Locknut (7). Select a moderate amount of weight and increase the number of each set . Cross Training Many people desire a complete and well-balanced fitness program, and cross training is a series of 8 repetitions for you feeling exhausted. EXERCISE FORM You will continually adapt and grow. Exhale...
Instruction Manual
Page 7
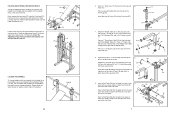
...) and lock it in the Leg Lever (27), as shown. Attach the Leg Lever (27) to a vertical position. Press a 1 1/2Ó Square Cap (4) into each end of the Pad Tube. Slide a Large Foam Pad (31) onto each end of the Leg Lever (27). 7 4 24 26 8. FOLDING AND STORING THE WEIGHT BENCH To fold the weight bench for storage, first remove your barbell (not included...
...) and lock it in the Leg Lever (27), as shown. Attach the Leg Lever (27) to a vertical position. Press a 1 1/2Ó Square Cap (4) into each end of the Pad Tube. Slide a Large Foam Pad (31) onto each end of the Leg Lever (27). 7 4 24 26 8. FOLDING AND STORING THE WEIGHT BENCH To fold the weight bench for storage, first remove your barbell (not included...

Instruction Manual
Page 8
Fasten the Backrest Bracket to adjust the weight bench. See the EXERCISE GUIDELINES on page 11 for important information on the leg lever. 21 ADJUSTING THE HEIGHT OF THE LEG LEVER To adjust the height of the Leg Lever (27), remove the Large Adjustment Clip (20). Inspect and tighten all parts are closer to get the most benefit from your exercise program. Replace any of weight (not included) onto...
Fasten the Backrest Bracket to adjust the weight bench. See the EXERCISE GUIDELINES on page 11 for important information on the leg lever. 21 ADJUSTING THE HEIGHT OF THE LEG LEVER To adjust the height of the Leg Lever (27), remove the Large Adjustment Clip (20). Inspect and tighten all parts are closer to get the most benefit from your exercise program. Replace any of weight (not included) onto...


