
Uk Manual
Page 1
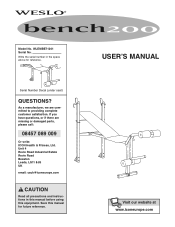
...: ICON Health & Fitness, Ltd. Write the serial number in this manual before using this manual for reference. If you have questions, or if there are committed to providing complete customer satisfaction. Unit 4 Revie Road Industrial Estate Revie Road Beeston Leeds, LS11 8JG UK email: [email protected] CAUTION Read all precautions and instructions in the space above for future reference. Serial Number...
...: ICON Health & Fitness, Ltd. Write the serial number in this manual before using this manual for reference. If you have questions, or if there are committed to providing complete customer satisfaction. Unit 4 Revie Road Industrial Estate Revie Road Beeston Leeds, LS11 8JG UK email: [email protected] CAUTION Read all precautions and instructions in the space above for future reference. Serial Number...

Uk Manual
Page 2
® TABLE OF CONTENTS IMPORTANT PRECAUTIONS 3 BEFORE YOU BEGIN 4 PART IDENTIFICATION CHART 5 ASSEMBLY 6 USING THE WEIGHT BENCH 9 EXERCISE GUIDELINES 10 PART LIST 14 EXPLODED DRAWING 15 ORDERING REPLACEMENT PARTS Back Cover WESLO is a registered trademark of ICON Health & Fitness, Inc. 2
® TABLE OF CONTENTS IMPORTANT PRECAUTIONS 3 BEFORE YOU BEGIN 4 PART IDENTIFICATION CHART 5 ASSEMBLY 6 USING THE WEIGHT BENCH 9 EXERCISE GUIDELINES 10 PART LIST 14 EXPLODED DRAWING 15 ORDERING REPLACEMENT PARTS Back Cover WESLO is a registered trademark of ICON Health & Fitness, Inc. 2
Uk Manual
Page 3
... amount of weight on the barbell rests. Cover the floor beneath the weight bench to support a maximum of 12 and pets away from moving parts. 8. Do not place more than 1.5 m (5 ft.). 12. If you use the weight bench in any exercise program, consult your physician. The weight bench is the responsibility of the owner to the barbell with weight collars. 13. Do not use the weight bench. Keep children...
... amount of weight on the barbell rests. Cover the floor beneath the weight bench to support a maximum of 12 and pets away from moving parts. 8. Do not place more than 1.5 m (5 ft.). 12. If you use the weight bench in any exercise program, consult your physician. The weight bench is the responsibility of the owner to the barbell with weight collars. 13. Do not use the weight bench. Keep children...
Uk Manual
Page 4
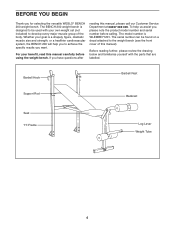
... 009. Whether your own weight set (not included) to be found on a decal attached to achieve the specific results you have questions after reading this manual carefully before calling. The serial number can be used with the parts that are labelled. Barbell Hook Barbell Rest Support Rod Backrest Seat "H"-Frame Leg Lever Weight Tube 4 Before reading further, please review the drawing below and familiarise...
... 009. Whether your own weight set (not included) to be found on a decal attached to achieve the specific results you have questions after reading this manual carefully before calling. The serial number can be used with the parts that are labelled. Barbell Hook Barbell Rest Support Rod Backrest Seat "H"-Frame Leg Lever Weight Tube 4 Before reading further, please review the drawing below and familiarise...
Uk Manual
Page 5
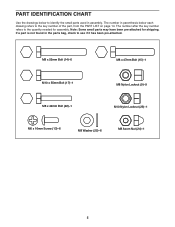
... it has been pre-attached. PART IDENTIFICATION CHART Use the drawings below each drawing refers to the quantity needed for shipping. The number in assembly. The number after the key number refers to the key number of the part, from the PART LIST on page 14. Note: Some small parts may have been pre-attached for assembly. M8 x 55mm Bolt (14)-6 M8 x 47mm Bolt (15)-1 M10 x 55mm Bolt (17)-1 M8 Nylon...
... it has been pre-attached. PART IDENTIFICATION CHART Use the drawings below each drawing refers to the quantity needed for shipping. The number in assembly. The number after the key number refers to the key number of the part, from the PART LIST on page 14. Note: Some small parts may have been pre-attached for assembly. M8 x 55mm Bolt (14)-6 M8 x 47mm Bolt (15)-1 M10 x 55mm Bolt (17)-1 M8 Nylon...
Uk Manual
Page 6
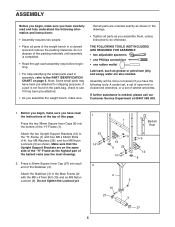
... oriented exactly as shown in the drawings. • Tighten all parts as you assemble them, unless instructed to do not dispose of the weight bench in a cleared area and remove the packing materials; If further assistance is needed . Attach the two Upright Support Brackets (12) to the Main Frame (2) with four M8 x 55mm Bolts (14), four M8 Washers (25), and four M8...
... oriented exactly as shown in the drawings. • Tighten all parts as you assemble them, unless instructed to do not dispose of the weight bench in a cleared area and remove the packing materials; If further assistance is needed . Attach the two Upright Support Brackets (12) to the Main Frame (2) with four M8 x 55mm Bolts (14), four M8 Washers (25), and four M8...
Uk Manual
Page 7
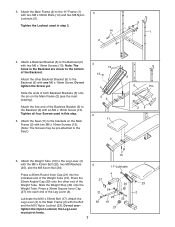
... (24). 17-Lubricate Press a 25mm Round Inner Cap (21) into each end of the Weight Tube. Lubricate the M10 x 55mm Bolt (17). 3. Tighten the Locknut used in step 2. 14 2 9 1 4. Note: The holes in the Backrest are closer to the bottom of the Backrest Bracket (5) to the Seat.) 4 13 13 5 2 5 11 2 6 6 Pin 25 13 6. Do not tighten the Screw yet. Attach the Leg Lever (4) to...
... (24). 17-Lubricate Press a 25mm Round Inner Cap (21) into each end of the Weight Tube. Lubricate the M10 x 55mm Bolt (17). 3. Tighten the Locknut used in step 2. 14 2 9 1 4. Note: The holes in the Backrest are closer to the bottom of the Backrest Bracket (5) to the Seat.) 4 13 13 5 2 5 11 2 6 6 Pin 25 13 6. Do not tighten the Screw yet. Attach the Leg Lever (4) to...
Uk Manual
Page 8
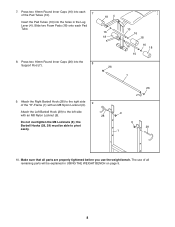
... Insert the Pad Tubes (10) into the 8 Support Rod (7). 26 10 16 18 16 10 16 18 7 26 9. Do not overtighten the M8 Locknuts (9); Press two 16mm Round Inner Caps (26) into the holes in USING THE WEIGHT BENCH on page 9. 8 Attach the Left Barbell Hook (29) to pivot easily.... 9 28 9 29 1 10. the Barbell Hooks (28, 29) must be explained in the Leg Lever (4). The use the weight bench. Make sure that all parts are properly tightened before you use of the "H"-Frame...
... Insert the Pad Tubes (10) into the 8 Support Rod (7). 26 10 16 18 16 10 16 18 7 26 9. Do not overtighten the M8 Locknuts (9); Press two 16mm Round Inner Caps (26) into the holes in USING THE WEIGHT BENCH on page 9. 8 Attach the Left Barbell Hook (29) to pivot easily.... 9 28 9 29 1 10. the Barbell Hooks (28, 29) must be explained in the Leg Lever (4). The use the weight bench. Make sure that all parts are properly tightened before you use of the "H"-Frame...
Uk Manual
Page 9
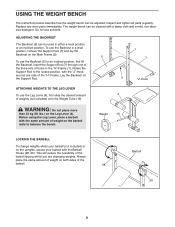
...sets of the barbell tipping whilst you are changing weights. USING THE WEIGHT BENCH The instructions below describe how the weight bench can be cleaned with a damp cloth and a mild, non-abrasive detergent. Inspect and tighten all parts regularly. Always place the same amount of weight on the Main Frame (2). 6 To use solvents. Insert the Support... position or an inclined position. ADJUSTING THE BACKREST The Backrest (6) can be used in the "H"-Frame (1). Replace any worn parts immediately. Weight 19 LOCKING THE BARBELL To change weights whilst your barbell ...
...sets of the barbell tipping whilst you are changing weights. USING THE WEIGHT BENCH The instructions below describe how the weight bench can be cleaned with a damp cloth and a mild, non-abrasive detergent. Inspect and tighten all parts regularly. Always place the same amount of weight on the Main Frame (2). 6 To use solvents. Insert the Support... position or an inclined position. ADJUSTING THE BACKREST The Backrest (6) can be used in the "H"-Frame (1). Replace any worn parts immediately. Weight 19 LOCKING THE BARBELL To change weights whilst your barbell ...
Uk Manual
Page 10
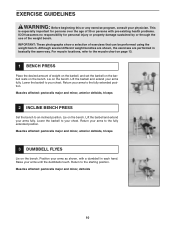
For muscle locations, refer to an inclined position. Lie on the bench. Muscles affected: pectoralis major and minor, anterior deltoids, triceps 2 INCLINE BENCH PRESS Set the bench to the muscle chart on page 13. 1 BENCH PRESS Place the desired amount of the weight bench. Lift the barbell and extend your arms until the dumbbells touch. Position your arms as shown, with pre-existing health problems. ICON assumes no responsibility...
For muscle locations, refer to an inclined position. Lie on the bench. Muscles affected: pectoralis major and minor, anterior deltoids, triceps 2 INCLINE BENCH PRESS Set the bench to the muscle chart on page 13. 1 BENCH PRESS Place the desired amount of the weight bench. Lift the barbell and extend your arms until the dumbbells touch. Position your arms as shown, with pre-existing health problems. ICON assumes no responsibility...

Uk Manual
Page 11
...chest. Sit on the bench and hold the barbell behind your legs, as shown. Return to the highest incline level. Raise the backrest to the starting position. Muscles affected: biceps, brachioradials 11 4 MILITARY PRESS Place the desired amount of weight on the barbell rests to counter-balance the bench...weight on the bench, with an underhand grip. Lie on the backrest. Slowly lift your legs. Slowly straighten your arms until the barbell is above your upper arms on the bench and fully extend your legs as far as shown. Return to the starting position. Return to the starting...
...chest. Sit on the bench and hold the barbell behind your legs, as shown. Return to the highest incline level. Raise the backrest to the starting position. Muscles affected: biceps, brachioradials 11 4 MILITARY PRESS Place the desired amount of weight on the barbell rests to counter-balance the bench...weight on the bench, with an underhand grip. Lie on the backrest. Slowly lift your legs. Slowly straighten your arms until the barbell is above your upper arms on the bench and fully extend your legs as far as shown. Return to the starting position. Return to the starting...
Uk Manual
Page 12
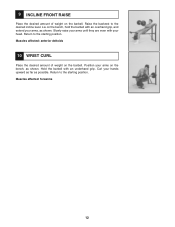
... to the starting position. Muscles affected: anterior deltoids 10 WRIST CURL Place the desired amount of weight on the barbell. 9 INCLINE FRONT RAISE Place the desired amount of weight on the barbell. Lie on the bench, as shown. Slowly raise your arms until they are even with your arms, as possible. Curl your arms on the bench, hold the...
... to the starting position. Muscles affected: anterior deltoids 10 WRIST CURL Place the desired amount of weight on the barbell. 9 INCLINE FRONT RAISE Place the desired amount of weight on the barbell. Lie on the bench, as shown. Slowly raise your arms until they are even with your arms, as possible. Curl your arms on the bench, hold the...

Uk Manual
Page 13
... (chest) C. Biceps (front of calf) K. Tibialis Anterior (front of arm) D. Gluteus Maximus (buttocks) V. Hamstring (back of calf) L. Abductor (outer thigh) H. Deltoid (shoulder) Q. Latissimus Dorsi (mid back) S. Brachioradials (forearm) F. Soleus (front of leg) W. Adductor (inner thigh) N. Trapezius (upper back) O. Spinae Erectors (lower back) T. Hip Flexors (upper thigh) G. Quadriceps (front of calf) 13 Sartorius (front of arm...
... (chest) C. Biceps (front of calf) K. Tibialis Anterior (front of arm) D. Gluteus Maximus (buttocks) V. Hamstring (back of calf) L. Abductor (outer thigh) H. Deltoid (shoulder) Q. Latissimus Dorsi (mid back) S. Brachioradials (forearm) F. Soleus (front of leg) W. Adductor (inner thigh) N. Trapezius (upper back) O. Spinae Erectors (lower back) T. Hip Flexors (upper thigh) G. Quadriceps (front of calf) 13 Sartorius (front of arm...
Uk Manual
Page 14
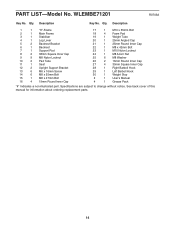
Description Key No. Specifications are subject to change without notice. Qty. WLEMBE71201 R0703A Key No. Qty. PART LIST-Model No. Description 1 1 "H"-Frame 2 1 Main Frame 3 1 Stabiliser 4 1 Leg Lever 5 2 Backrest Bracket 6 1 Backrest 7 1 Support Rod 8 2 38mm Square Inner Cap 9 9 M8 Nylon Locknut 10 2 Pad Tube 11 1 Seat 12 2 Upright Support Bracket 13 6 M6 x 16mm Screw 14 6 M8 x 55mm Bolt 15 1 M8 x 47mm Bolt 16 4 19mm Round Inner Cap 17...
Description Key No. Specifications are subject to change without notice. Qty. WLEMBE71201 R0703A Key No. Qty. PART LIST-Model No. Description 1 1 "H"-Frame 2 1 Main Frame 3 1 Stabiliser 4 1 Leg Lever 5 2 Backrest Bracket 6 1 Backrest 7 1 Support Rod 8 2 38mm Square Inner Cap 9 9 M8 Nylon Locknut 10 2 Pad Tube 11 1 Seat 12 2 Upright Support Bracket 13 6 M6 x 16mm Screw 14 6 M8 x 55mm Bolt 15 1 M8 x 47mm Bolt 16 4 19mm Round Inner Cap 17...
Uk Manual
Page 15
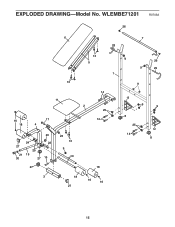
WLEMBE71201 R0703A 26 6 7 28 13 5 1 13 11 16 18 17 4 14 2 25 14 20 24 22 27 25 21 19 30 27 15 27 3 23 13 9 10 18 27 18 16 16 9 26 9 29 9 12 9 9 8 25 14 12 8 15 EXPLODED DRAWING-Model No.
WLEMBE71201 R0703A 26 6 7 28 13 5 1 13 11 16 18 17 4 14 2 25 14 20 24 22 27 25 21 19 30 27 15 27 3 23 13 9 10 18 27 18 16 16 9 26 9 29 9 12 9 9 8 25 14 12 8 15 EXPLODED DRAWING-Model No.
Uk Manual
Page 16
..., please be prepared to give the following information: • the MODEL NUMBER of the product (WLEMBE71201) • The NAME of the product (WESLO® BENCH 200 weight bench) • the SERIAL NUMBER of the product (see the front cover of this manual) • the KEY NUMBER and DESCRIPTION of the part(s) (see page 14 in this manual) Part No. 188520 R0703A Printed in China © 2003 ICON Health & Fitness, Inc.
..., please be prepared to give the following information: • the MODEL NUMBER of the product (WLEMBE71201) • The NAME of the product (WESLO® BENCH 200 weight bench) • the SERIAL NUMBER of the product (see the front cover of this manual) • the KEY NUMBER and DESCRIPTION of the part(s) (see page 14 in this manual) Part No. 188520 R0703A Printed in China © 2003 ICON Health & Fitness, Inc.


