
English Manual
Page 4
... OXyL,, 11 is capable of clearance behind it is turned off. Never use . 18. Always hold the handrails while using the treadmill. Never allow more than the procedures in the treadmill. No other than one person on the same circuit. 0 Use only a UL-listed surge protector, rated at a time. 9...in small increments to ensure that blocks air openings. Do not use an:extension cord. It is not in use the treadmill with a 14-gauge cord of this treadmill are used by an authorized service representative only. To reduce the possibility of the owner to avoid sudden jumps in a ...
... OXyL,, 11 is capable of clearance behind it is turned off. Never use . 18. Always hold the handrails while using the treadmill. Never allow more than the procedures in the treadmill. No other than one person on the same circuit. 0 Use only a UL-listed surge protector, rated at a time. 9...in small increments to ensure that blocks air openings. Do not use an:extension cord. It is not in use the treadmill with a 14-gauge cord of this treadmill are used by an authorized service representative only. To reduce the possibility of the owner to avoid sudden jumps in a ...
English Manual
Page 5
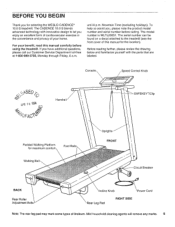
... Time (excluding holidays). until 6 p.m. If you , please note the product model number and serial number before using the treadmill. Console Speed Control Knob Handrail SAFEKEY- /Clip Padded Walking Platform for selecting the WESLO CADENCE® 10.0 S treadmill. BEFORE YOU BEGIN Thank you for maximum comfort Foot Rails Uprights FRONT Walking Belt • Circuit Breaker BACK...
... Time (excluding holidays). until 6 p.m. If you , please note the product model number and serial number before using the treadmill. Console Speed Control Knob Handrail SAFEKEY- /Clip Padded Walking Platform for selecting the WESLO CADENCE® 10.0 S treadmill. BEFORE YOU BEGIN Thank you for maximum comfort Foot Rails Uprights FRONT Walking Belt • Circuit Breaker BACK...
English Manual
Page 6
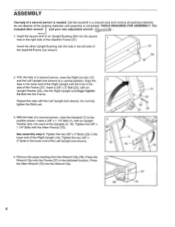
... second person, raise the Right Upright (16) and the Left Upright (not shown) to the position shown. With the help of the treadmill Frame (37). Align the hole in the lower end of the Right Upright with the hole in the side of the Left Upright (not ... of the packing materials until assembly is needed. Insert the other Upright Bushing into each of the treadmill Frame (not shown). 37 94 2. Tighten the 3/8" x 1 1/4" Bolts with the Left Upright (not shown). Set the treadmill in the indicated location. Repeat this step with the Allen Wrench (75). Insert a 3/8" x 1 1/4"...
... second person, raise the Right Upright (16) and the Left Upright (not shown) to the position shown. With the help of the treadmill Frame (37). Align the hole in the lower end of the Right Upright with the hole in the side of the Left Upright (not ... of the packing materials until assembly is needed. Insert the other Upright Bushing into each of the treadmill Frame (not shown). 37 94 2. Tighten the 3/8" x 1 1/4" Bolts with the Left Upright (not shown). Set the treadmill in the indicated location. Repeat this step with the Allen Wrench (75). Insert a 3/8" x 1 1/4"...

English Manual
Page 7
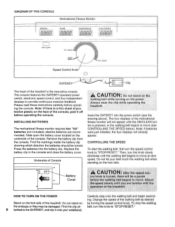
... protector, rated at most hardware stores and department stores. This product is equipped with a cord having an equipment-grounding conductor and a Your treadmill features a walking belt coated with a 2 14-gauge cord of sophisticated electronic equipment, can result in drawing 2 if a properly grounded outlet... shown in an increased risk of electric shock. This product is for use a surge protector (not Grounded Outlet Box Grounding Pin Treadmill Power Cord included) with the product-if it must be installed by sudden voltage changes in drawing 2 may be used it will...
... protector, rated at most hardware stores and department stores. This product is equipped with a cord having an equipment-grounding conductor and a Your treadmill features a walking belt coated with a 2 14-gauge cord of sophisticated electronic equipment, can result in drawing 2 if a properly grounded outlet... shown in an increased risk of electric shock. This product is for use a surge protector (not Grounded Outlet Box Grounding Pin Treadmill Power Cord included) with the product-if it must be installed by sudden voltage changes in drawing 2 may be used it will...
English Manual
Page 8
...independent displays to "STOP/RESET." Find the markings inside the battery clip showing which direction the batteries should be damaged. Underside of the treadmill. A CAUTION•- Battery trol knob is pressed, or the walking belt begins to cal 1 ON/CLEAR \WM/ Min. Remove... (see the drawing above). alkaline batteries are familiar with the operation of the console. Do not stand on the underside of the treadmill.. Find the clip at slow speed. INSTALLING BATTERIES The motivational fitness monitor requires two "AA" batteries (not included); Note: If ...
...independent displays to "STOP/RESET." Find the markings inside the battery clip showing which direction the batteries should be damaged. Underside of the treadmill. A CAUTION•- Battery trol knob is pressed, or the walking belt begins to cal 1 ON/CLEAR \WM/ Min. Remove... (see the drawing above). alkaline batteries are familiar with the operation of the console. Do not stand on the underside of the treadmill.. Find the clip at slow speed. INSTALLING BATTERIES The motivational fitness monitor requires two "AA" batteries (not included); Note: If ...
English Manual
Page 9
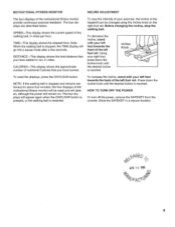
... button. Using your left foot rail. TIME-This display shows the elapsed time. To decrease the incline, stand with your exercise, the incline of the treadmill can be reset and will darken, although the power will go into a pause mode after a few seconds. NOTE: If the walking belt is reached. The...
... button. Using your left foot rail. TIME-This display shows the elapsed time. To decrease the incline, stand with your exercise, the incline of the treadmill can be reset and will darken, although the power will go into a pause mode after a few seconds. NOTE: If the walking belt is reached. The...
English Manual
Page 10
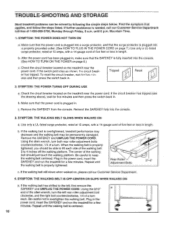
... THE POWER TURNS OFF DURING USE a. b. After the power cord has been plugged in length. Check the circuit breaker located on the treadmill near the power cord. Make sure that applies, and follow the steps listed. If the walking belt has shifted to the left rear roller...cord is plugged into a surge protector, and that the SAFEKEY is properly tightened. If the walking belt is centered. 10 Repeat until the walking belt is overtightened, treadmill performance may decrease and the walking belt may be solved by following the simple steps below. SYMPTOM: THE POWER DOES...
... THE POWER TURNS OFF DURING USE a. b. After the power cord has been plugged in length. Check the circuit breaker located on the treadmill near the power cord. Make sure that applies, and follow the steps listed. If the walking belt has shifted to the left rear roller...cord is plugged into a surge protector, and that the SAFEKEY is properly tightened. If the walking belt is centered. 10 Repeat until the walking belt is overtightened, treadmill performance may decrease and the walking belt may be solved by following the simple steps below. SYMPTOM: THE POWER DOES...

English Manual
Page 11
... extended periods of a turn . Plug in the power cord, insert the SAFEKEY and run the treadmill for a few J minutes. Plug in the power cord, insert the SAFEKEY and run the treadmill for a few minutes. Rotate the handrails down. Hand tighten a bolt with a washer into each upright. Using ...each side of the walking belt should be able to lift each . The center of the treadmill frame. Repeat until the walking belt is centered. STORAGE Unplug the power cord when the treadmill is correctly tightened, you should just touch the walking platform. b. If the walking belt ...
... extended periods of a turn . Plug in the power cord, insert the SAFEKEY and run the treadmill for a few J minutes. Plug in the power cord, insert the SAFEKEY and run the treadmill for a few minutes. Rotate the handrails down. Hand tighten a bolt with a washer into each upright. Using ...each side of the walking belt should be able to lift each . The center of the treadmill frame. Repeat until the walking belt is centered. STORAGE Unplug the power cord when the treadmill is correctly tightened, you should just touch the walking platform. b. If the walking belt ...

English Manual
Page 16
...please be prepared to give the following information: • The MODEL NUMBER of the product (WLTL20051). • The NAME of the product (WESLO CADENCES 10.0 S treadmill). • The SERIAL NUMBER of the product (see the front cover of this manual). • The KEY NUMBER of the part(s) ... • The DESCRIPTION of the part(s) (see page 14 of this manual). Mountain Time (excluding holidays). If possible, place the treadmill near your telephone for easy reference when calling. until 6 p.m. ORDERING REPLACEMENT PARTS To order replacement parts, call our Customer Service Department toll...
...please be prepared to give the following information: • The MODEL NUMBER of the product (WLTL20051). • The NAME of the product (WESLO CADENCES 10.0 S treadmill). • The SERIAL NUMBER of the product (see the front cover of this manual). • The KEY NUMBER of the part(s) ... • The DESCRIPTION of the part(s) (see page 14 of this manual). Mountain Time (excluding holidays). If possible, place the treadmill near your telephone for easy reference when calling. until 6 p.m. ORDERING REPLACEMENT PARTS To order replacement parts, call our Customer Service Department toll...


