

English Manual
Page 1
... or damaged parts, we are committed to you complete satisfaction through direct assistance from our factory. CUSTOMER HOT LINE: 1-800-999-3756 Mon.-Fri., 6 a.m.-6 p.m. As a manufacturer, we will provide immediate assistance, free of charge to providing complete customer satisfaction. The trained technicians on our Customer Hot Line will guarantee you . p rtent Save ... r...e....n....c....e a OWNER'S MANUAL WLTL21051 Serial No...
... or damaged parts, we are committed to you complete satisfaction through direct assistance from our factory. CUSTOMER HOT LINE: 1-800-999-3756 Mon.-Fri., 6 a.m.-6 p.m. As a manufacturer, we will provide immediate assistance, free of charge to providing complete customer satisfaction. The trained technicians on our Customer Hot Line will guarantee you . p rtent Save ... r...e....n....c....e a OWNER'S MANUAL WLTL21051 Serial No...

English Manual
Page 2
... abnormal usage or repairs not provided by an ICON authorized service center, to products used as store display models. ACCORDINGLY, THE ABOVE LIMITATION MAY NOT APPLY TO YOU. All products for commercial or rental purposes, or to products used for which vary from the date of purchase. This warranty gives you specific legal rights. No other warranty beyond that specifically set forth above...
... abnormal usage or repairs not provided by an ICON authorized service center, to products used as store display models. ACCORDINGLY, THE ABOVE LIMITATION MAY NOT APPLY TO YOU. All products for commercial or rental purposes, or to products used for which vary from the date of purchase. This warranty gives you specific legal rights. No other warranty beyond that specifically set forth above...

English Manual
Page 3
WESLO CADENCE® TABLE OF CONTENTS LIMITED WARRANTY IMPORTANT PRECAUTIONS BEFORE YOU BEGIN ASSEMBLY OPERATION AND ADJUSTMENT TROUBLE-SHOOTING AND STORAGE CONDITIONING GUIDELINES PART LIST EXPLODED DRAWING ORDERING REPLACEMENT PARTS 2 4 5 6 8 12 15 18 19 Back Cover HARNINOti:it: any exercise program, consult yoOt: s:estiei01011if:*tiOitOtit feir.p4i0000.!-oviee.100 age of 35 or persons with.pre existing health prob em Read at.16.#00,$u#taines0by::or,Atiougkheitioeatthis roduct: .. ... . 3
WESLO CADENCE® TABLE OF CONTENTS LIMITED WARRANTY IMPORTANT PRECAUTIONS BEFORE YOU BEGIN ASSEMBLY OPERATION AND ADJUSTMENT TROUBLE-SHOOTING AND STORAGE CONDITIONING GUIDELINES PART LIST EXPLODED DRAWING ORDERING REPLACEMENT PARTS 2 4 5 6 8 12 15 18 19 Back Cover HARNINOti:it: any exercise program, consult yoOt: s:estiei01011if:*tiOitOtit feir.p4i0000.!-oviee.100 age of 35 or persons with.pre existing health prob em Read at.16.#00,$u#taines0by::or,Atiougkheitioeatthis roduct: .. ... . 3

English Manual
Page 4
... is not a medical device. Never remove the motor hood unless Instructed to avoid sudden jumps in this treadmill are used only by persons weighing 250 pounds or less. Use the treadmill only as an exercise aid in determining heart rate trends in use a 14gauge general-purpose cord of high speeds. Athletic support clothes are standing on a surface that manual. Adjust the speed in small increments to do not...
... is not a medical device. Never remove the motor hood unless Instructed to avoid sudden jumps in this treadmill are used only by persons weighing 250 pounds or less. Use the treadmill only as an exercise aid in determining heart rate trends in use a 14gauge general-purpose cord of high speeds. Athletic support clothes are standing on a surface that manual. Adjust the speed in small increments to do not...
English Manual
Page 5
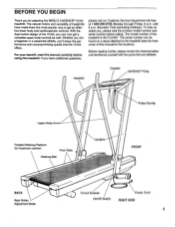
... popular way to the treadmill (see the front cover of the treadmill is WLTL21051. The model number of this manual carefully before calling. air BACK Rear Roller Adjustment Bolts 11111110 (41111111W Circuit Breaker Power Cord On/Off Switch RIGHT SIDE 5 BEFORE YOU BEGIN Thank you for maximum comfort Foot Rails Walking Belt Uprights FRONT OK? For your benefit, read this manual for the location). until 6 p.m. To help us...
... popular way to the treadmill (see the front cover of the treadmill is WLTL21051. The model number of this manual carefully before calling. air BACK Rear Roller Adjustment Bolts 11111110 (41111111W Circuit Breaker Power Cord On/Off Switch RIGHT SIDE 5 BEFORE YOU BEGIN Thank you for maximum comfort Foot Rails Walking Belt Uprights FRONT OK? For your benefit, read this manual for the location). until 6 p.m. To help us...
English Manual
Page 6
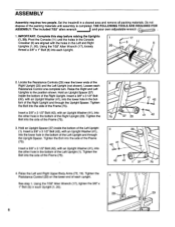
... 75 4. Set the treadmill in the Console Crossbar (6) are aligned with an Upright Washer (41), into the side of the Right Upright. Locate the Resistance Controls (29) near the lower ends of the Left Upright (1). Raise the Left and Right Upper Body Arms (72, 19). See step 1. Pivot the Console (11) until assembly is completed. Tighten the Bolt into the side of each Resistance Control one complete turn. THE FOLLOWING...
... 75 4. Set the treadmill in the Console Crossbar (6) are aligned with an Upright Washer (41), into the side of the Right Upright. Locate the Resistance Controls (29) near the lower ends of the Left Upright (1). Raise the Left and Right Upper Body Arms (72, 19). See step 1. Pivot the Console (11) until assembly is completed. Tighten the Bolt into the side of each Resistance Control one complete turn. THE FOLLOWING...
English Manual
Page 7
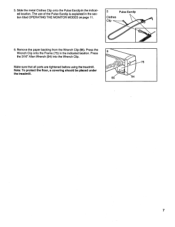
Press the Wrench Clip onto the Frame (75) in the section titled OPERATING THE MONITOR MODES on page 11. 5 Pulse Earclip Clothes Clip 6. Press the 3/16" Allen Wrench (94) into the Wrench Clip. Make sure that all parts are tightened before using the treadmill. The use of the Pulse Earclip is explained in the indicated location. Remove the paper backing from the Wrench Clip (95). Slide the metal Clothes Clip onto the Pulse Earclip in the indicated location. Note: To protect the floor, a covering should be placed under the treadmill. 6 95 75 4 7 5.
Press the Wrench Clip onto the Frame (75) in the section titled OPERATING THE MONITOR MODES on page 11. 5 Pulse Earclip Clothes Clip 6. Press the 3/16" Allen Wrench (94) into the Wrench Clip. Make sure that all parts are tightened before using the treadmill. The use of the Pulse Earclip is explained in the indicated location. Remove the paper backing from the Wrench Clip (95). Slide the metal Clothes Clip onto the Pulse Earclip in the indicated location. Note: To protect the floor, a covering should be placed under the treadmill. 6 95 75 4 7 5.
English Manual
Page 8
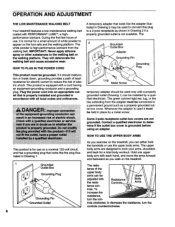
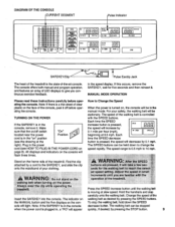
OPERATION AND ADJUSTMENT THE LOW-MAINTENANCE WALKING BELT Your treadmill features a low-maintenance walking belt coated with the resis- The white powder is high-performance lubricant from the adapter must be used to connect this plug to determine if the outlet box cover is equipped with a cord having an equipment-grounding conductor and a grounding plug. IMPORTANT: Never apply silicone spray or other substances to decrease the resistance, turn the...
OPERATION AND ADJUSTMENT THE LOW-MAINTENANCE WALKING BELT Your treadmill features a low-maintenance walking belt coated with the resis- The white powder is high-performance lubricant from the adapter must be used to connect this plug to determine if the outlet box cover is equipped with a cord having an equipment-grounding conductor and a grounding plug. IMPORTANT: Never apply silicone spray or other substances to decrease the resistance, turn the...
English Manual
Page 9
... time the SPEED decrease button is pressed, SPEED n n the speed will decrease by 0.1 mile per hour (mph), w OHIO SPEED A beginning at the right). Stand on the ed speed setting: Adjust the speed in the console, remove it off switch located near the power "On" 6 Position cord is turned on the power. it . VIII A. 11(1.111 0 51111110 nn IICLIII OISSAICI mat MIMI STOP SAFEKEY/Clip --.-1: Pulse Earclip Jack The heart of the treadmill is...
... time the SPEED decrease button is pressed, SPEED n n the speed will decrease by 0.1 mile per hour (mph), w OHIO SPEED A beginning at the right). Stand on the ed speed setting: Adjust the speed in the console, remove it off switch located near the power "On" 6 Position cord is turned on the power. it . VIII A. 11(1.111 0 51111110 nn IICLIII OISSAICI mat MIMI STOP SAFEKEY/Clip --.-1: Pulse Earclip Jack The heart of the treadmill is...
English Manual
Page 10
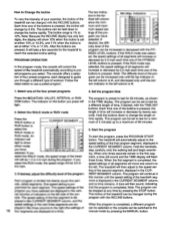
... the treadmill automatically according to guide you select. The buttons can be increased only until the top indicator in the TIME display. Note: Because the INCLINE display has only two digits, the display will control the speed of the FITNESS LEVEL buttons is set at a time). PROGRAM OPERATION In the program mode, the console will show 10% when the incline is pressed. The console offers a selection of the buttons is set - The...
... the treadmill automatically according to guide you select. The buttons can be increased only until the top indicator in the TIME display. Note: Because the INCLINE display has only two digits, the display will control the speed of the FITNESS LEVEL buttons is set at a time). PROGRAM OPERATION In the program mode, the console will show 10% when the incline is pressed. The console offers a selection of the buttons is set - The...
English Manual
Page 11
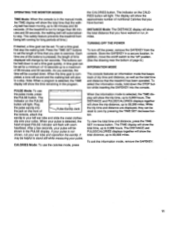
... the treadmill has been operated. CALORIES Mode: To use the pulse mode, press the PULSE button. The display will show the time remaining in the program. While the trip time and distance are displayed, they can be set a time goal, first stop . The DISTANCE and PULSE/CALORIES displays together will show the total distance, up to zero by ten seconds. OPERATING THE MONITOR MODES TIME Mode: When the console is in the manual mode...
... the treadmill has been operated. CALORIES Mode: To use the pulse mode, press the PULSE button. The display will show the time remaining in the program. While the trip time and distance are displayed, they can be set a time goal, first stop . The DISTANCE and PULSE/CALORIES displays together will show the total distance, up to zero by ten seconds. OPERATING THE MONITOR MODES TIME Mode: When the console is in the manual mode...

English Manual
Page 12
... stand on the side rails of the walking belt is plugged into the console. Mountain Time. 1. If the switch protrudes as an exercise aid in determining heart rate trends in , make sure the on/off switch located on /off switch is needed , call our Customer Service Department. Check the on the treadmill near the power cord. SYMPTOM: THE POWER TURNS OFF DURING USE "On" Position a. b. Reinsert the SAFEKEY fully...
... stand on the side rails of the walking belt is plugged into the console. Mountain Time. 1. If the switch protrudes as an exercise aid in determining heart rate trends in , make sure the on/off switch located on /off switch is needed , call our Customer Service Department. Check the on the treadmill near the power cord. SYMPTOM: THE POWER TURNS OFF DURING USE "On" Position a. b. Reinsert the SAFEKEY fully...

English Manual
Page 13
... reinsert the SAFEKEY. Plug in the SPEED display if the walking belt is moving at a slow speed, and there is corrected. utes. If the walking belt slips when walked on the motor. Remove the SAFEKEY, wait for a few minutes. If an extension cord is centered. b. Repeat until the walking belt is needed, use only a 14-gauge general-purpose cord of the treadmill. The center of the walking belt should just touch the...
... reinsert the SAFEKEY. Plug in the SPEED display if the walking belt is moving at a slow speed, and there is corrected. utes. If the walking belt slips when walked on the motor. Remove the SAFEKEY, wait for a few minutes. If an extension cord is centered. b. Repeat until the walking belt is needed, use only a 14-gauge general-purpose cord of the treadmill. The center of the walking belt should just touch the...
English Manual
Page 14
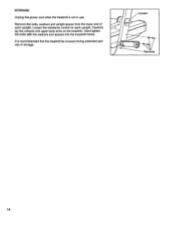
Loosen the resistance control on the treadmill. It is not in use. Hand tighten the bolts with the washers and spacers into the treadmill frame. Loosen (1) Remove 14 STORAGE Unplug the power cord when the treadmill is recommended that the treadmill be covered during extended periods of each upright. Carefully lay the console and upper body arms on each upright. Remove the bolts, washers and upright spacer from the lower end of storage.
Loosen the resistance control on the treadmill. It is not in use. Hand tighten the bolts with the washers and spacers into the treadmill frame. Loosen (1) Remove 14 STORAGE Unplug the power cord when the treadmill is recommended that the treadmill be covered during extended periods of each upright. Carefully lay the console and upper body arms on each upright. Remove the bolts, washers and upright spacer from the lower end of storage.
English Manual
Page 15
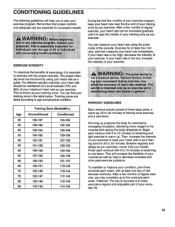
... level can be maintained at a level between workouts. Exercise for exercise by using the pulse mode of your heart rate is near the low end of your heart rate immediately. If your training zone as you exercise. After a few months of regular exercise, you may complete up , 20 to five workouts each workout with 5 to 10 minutes of your heart rate can be found by increasing circulation, delivering...
... level can be maintained at a level between workouts. Exercise for exercise by using the pulse mode of your heart rate is near the low end of your heart rate immediately. If your training zone as you exercise. After a few months of regular exercise, you may complete up , 20 to five workouts each workout with 5 to 10 minutes of your heart rate can be found by increasing circulation, delivering...

English Manual
Page 16
..., consisting of 5-10 minutes of activity similar to that of rest between workouts. smoking nearly doubles the risk of the elevator. Begin with a light meal. Spend the extra time in other health disorders. (Office of regular exercise, you stop and walk the remaining distance. ADDITIONAL SUGGESTIONS Creating a more rhythmic stretches to increase the body temperature, heart rate and circulation in...
..., consisting of 5-10 minutes of activity similar to that of rest between workouts. smoking nearly doubles the risk of the elevator. Begin with a light meal. Spend the extra time in other health disorders. (Office of regular exercise, you stop and walk the remaining distance. ADDITIONAL SUGGESTIONS Creating a more rhythmic stretches to increase the body temperature, heart rate and circulation in...
English Manual
Page 17
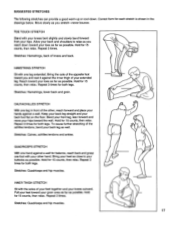
Correct form for 15 counts, then relax. CALF/ACHILLES STRETCH With one hand against a wall for 15 counts, then relax. Bend your front leg, lean forward and move your hips. Repeat 3 times for 15 counts, then relax. To cause further stretching of the opposite foot c toward you and rest it against ...and shoulders to your back leg as you reach down . Repeat 3 times. HAMSTRING STRETCH Sit with one foot with the soles of knees and back. Hold for each stretch is shown in front of your back foot flat on the floor. Stretches: Hamstrings, lower back and groin. Reach ...
Correct form for 15 counts, then relax. CALF/ACHILLES STRETCH With one hand against a wall for 15 counts, then relax. Bend your front leg, lean forward and move your hips. Repeat 3 times for 15 counts, then relax. To cause further stretching of the opposite foot c toward you and rest it against ...and shoulders to your back leg as you reach down . Repeat 3 times. HAMSTRING STRETCH Sit with one foot with the soles of knees and back. Hold for each stretch is shown in front of your back foot flat on the floor. Stretches: Hamstrings, lower back and groin. Reach ...

English Manual
Page 18
... 1 Front Roller/Pulley 35 1 Upright Cable Loom 36 2 Upper Body Arm Cover 37 2 Upright Spacer 38 1 20 " Wire Harness 39 15 Safety Cover Screw 40 2 Metal Spacer 41 6 Upright Washer 42 4 3/8" x 3 1/2" Bolt 43 1 14" Power Board/Controller Wire 44 1 Belt Guide 45 6 Small Screw 46 1 Electronics Bracket 47 1 6" Cable Loom 48 1 Grommet 49 1 Circuit Breaker 50 1 On/Off Switch 51 1 Power Cord 52 2 Wheel Bolt 53 2 Front Wheel 54 1 Power Cord Bracket 55 1 Incline Stop Bracket 56 1 Controller 57...
... 1 Front Roller/Pulley 35 1 Upright Cable Loom 36 2 Upper Body Arm Cover 37 2 Upright Spacer 38 1 20 " Wire Harness 39 15 Safety Cover Screw 40 2 Metal Spacer 41 6 Upright Washer 42 4 3/8" x 3 1/2" Bolt 43 1 14" Power Board/Controller Wire 44 1 Belt Guide 45 6 Small Screw 46 1 Electronics Bracket 47 1 6" Cable Loom 48 1 Grommet 49 1 Circuit Breaker 50 1 On/Off Switch 51 1 Power Cord 52 2 Wheel Bolt 53 2 Front Wheel 54 1 Power Cord Bracket 55 1 Incline Stop Bracket 56 1 Controller 57...
English Manual
Page 19
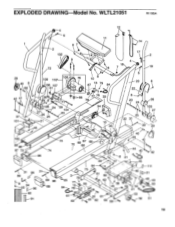
WLTL21051 R1195A 29 40 8 66 12 4 5 0 2 102 6 7 9 72 11 14 17 2 • , --A x> 4 18 8 7 19 108 109 110* 106 107 61 76 10 87 13 79 84 5 20 8 22 42 41 37 101 100.99 98 97 73 36 8 105 24 26 25 21 4 74 96 31 95 89 94 31 89 86 88 412 91 86 1 33 8 23 36 24 59104. 23 EXPLODED DRAWING Model No.
WLTL21051 R1195A 29 40 8 66 12 4 5 0 2 102 6 7 9 72 11 14 17 2 • , --A x> 4 18 8 7 19 108 109 110* 106 107 61 76 10 87 13 79 84 5 20 8 22 42 41 37 101 100.99 98 97 73 36 8 105 24 26 25 21 4 74 96 31 95 89 94 31 89 86 88 412 91 86 1 33 8 23 36 24 59104. 23 EXPLODED DRAWING Model No.

English Manual
Page 20
... ICON Health & Fitness, Inc. Mountain Time (excluding holidays). If possible, place the treadmill near your telephone for easy reference when calling. When ordering parts, please be prepared to give the following information: • The MODEL NUMBER of the product (WLTL21051). • The NAME of the product (WESLO CADENCES 10.0xt treadmill). • The SERIAL NUMBER of the product (see the front cover of this manual). • The KEY NUMBER...
... ICON Health & Fitness, Inc. Mountain Time (excluding holidays). If possible, place the treadmill near your telephone for easy reference when calling. When ordering parts, please be prepared to give the following information: • The MODEL NUMBER of the product (WLTL21051). • The NAME of the product (WESLO CADENCES 10.0xt treadmill). • The SERIAL NUMBER of the product (see the front cover of this manual). • The KEY NUMBER...


