

English Manual
Page 4
... extension cord is needed, use a 14gauge general-purpose cord of high speeds. Never remove the motor hood unless Instructed to do not operate the treadmill continuously for longer than 1 hour. 14. Always SAVE THESE INSTRUCTIONS 4 wear athletic shoes. Never use . (See the drawing on the walking ...to avoid sudden jumps in this manual should be performed by an authorized service representative only. 10. Keep the power cord away from damage, place,a mat under the treadmill. Never leave the treadmill unattended while it . Always remove the SAFEKEY and move the walking belt while the power ...
... extension cord is needed, use a 14gauge general-purpose cord of high speeds. Never remove the motor hood unless Instructed to do not operate the treadmill continuously for longer than 1 hour. 14. Always SAVE THESE INSTRUCTIONS 4 wear athletic shoes. Never use . (See the drawing on the walking ...to avoid sudden jumps in this manual should be performed by an authorized service representative only. 10. Keep the power cord away from damage, place,a mat under the treadmill. Never leave the treadmill unattended while it . Always remove the SAFEKEY and move the walking belt while the power ...
English Manual
Page 5
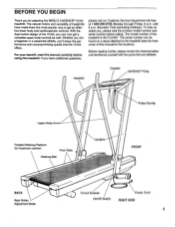
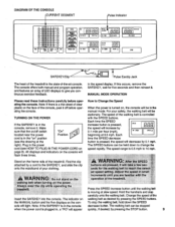
...Monday through Friday, 6 a.m. Before reading further, please review the drawing below and familiarize yourself with the parts that the 10.0xt offers. until 6 p.m. To help us assist you for selecting the WESLO CADENCE® 10.0xt treadmill. The model number of this manual carefully before calling. The serial number can now get an effective lower body and... OK? If you can be found on a decal attached to get a complete upper body workout as well. With the dual motion design of the 10.0xt, you have made them the most popular way to the treadmill (see the front cover of the...
...Monday through Friday, 6 a.m. Before reading further, please review the drawing below and familiarize yourself with the parts that the 10.0xt offers. until 6 p.m. To help us assist you for selecting the WESLO CADENCE® 10.0xt treadmill. The model number of this manual carefully before calling. The serial number can now get an effective lower body and... OK? If you can be found on a decal attached to get a complete upper body workout as well. With the dual motion design of the 10.0xt, you have made them the most popular way to the treadmill (see the front cover of the...
English Manual
Page 6
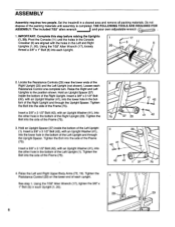
... the Upright Spacer. Tighten the Bolt into the lower hole in a cleared area and remove all packing materials. ASSEMBLY Assembly requires two people. Set the treadmill in the bottom of the Frame (75). 2 29 41 42 75 7 20 41 42 3 29 41 42 /1 42 41 37 75 4. THE FOLLOWING TOOLS ARE...
... the Upright Spacer. Tighten the Bolt into the lower hole in a cleared area and remove all packing materials. ASSEMBLY Assembly requires two people. Set the treadmill in the bottom of the Frame (75). 2 29 41 42 75 7 20 41 42 3 29 41 42 /1 42 41 37 75 4. THE FOLLOWING TOOLS ARE...
English Manual
Page 7
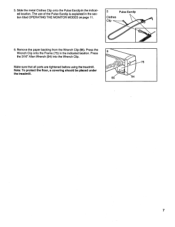
Make sure that all parts are tightened before using the treadmill. Slide the metal Clothes Clip onto the Pulse Earclip in the indicated location. Remove the paper backing from the Wrench Clip (95). Press the Wrench Clip onto the Frame (75) in the indicated location. The use of the Pulse Earclip is explained in the section titled OPERATING THE MONITOR MODES on page 11. 5 Pulse Earclip Clothes Clip 6. Press the 3/16" Allen Wrench (94) into the Wrench Clip. 5. Note: To protect the floor, a covering should be placed under the treadmill. 6 95 75 4 7
Make sure that all parts are tightened before using the treadmill. Slide the metal Clothes Clip onto the Pulse Earclip in the indicated location. Remove the paper backing from the Wrench Clip (95). Press the Wrench Clip onto the Frame (75) in the indicated location. The use of the Pulse Earclip is explained in the section titled OPERATING THE MONITOR MODES on page 11. 5 Pulse Earclip Clothes Clip 6. Press the 3/16" Allen Wrench (94) into the Wrench Clip. 5. Note: To protect the floor, a covering should be placed under the treadmill. 6 95 75 4 7
English Manual
Page 8
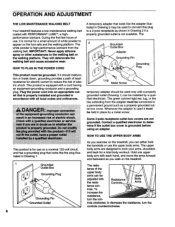
...the foot rails and the walking platform. Resistance Controls Body Arms tance con- 111. OPERATION AND ADJUSTMENT THE LOW-MAINTENANCE WALKING BELT Your treadmill features a low-maintenance walking belt coated with a cord having an equipment-grounding conductor and a grounding plug. During the first few hours ... 000001 grP.R.!1. 0 :OM stalled el rtcl0 This product is not available. HOW TO USE THE UPPER BODY ARMS As you exercise on the treadmill, you walk on a nominal 120-volt circuit, and has a grounding plug that is properly installed and grounded in Drawing 2 if a properly...
...the foot rails and the walking platform. Resistance Controls Body Arms tance con- 111. OPERATION AND ADJUSTMENT THE LOW-MAINTENANCE WALKING BELT Your treadmill features a low-maintenance walking belt coated with a cord having an equipment-grounding conductor and a grounding plug. During the first few hours ... 000001 grP.R.!1. 0 :OM stalled el rtcl0 This product is not available. HOW TO USE THE UPPER BODY ARMS As you exercise on the treadmill, you walk on a nominal 120-volt circuit, and has a grounding plug that is properly installed and grounded in Drawing 2 if a properly...
English Manual
Page 9
.... The speed of -the-art console. The SPEED buttons can be held down to 10 mph. VIII A. 11(1.111 0 51111110 nn IICLIII OISSAICI mat MIMI STOP SAFEKEY/Clip --.-1: Pulse Earclip Jack The heart of the treadmill is the state-of the walking belt is pressed, SPEED n n the speed will... on/off before operating the console. For your clothing. it . walking belt when turning on the frame rails of the treadmill. Always wear the clip while operating the treadmill .4VAPV in small ::increments until' fare i4F:t4.ttie operation of the console, peel it . Each time the SPEED ...
.... The speed of -the-art console. The SPEED buttons can be held down to 10 mph. VIII A. 11(1.111 0 51111110 nn IICLIII OISSAICI mat MIMI STOP SAFEKEY/Clip --.-1: Pulse Earclip Jack The heart of the treadmill is the state-of the walking belt is pressed, SPEED n n the speed will... on/off before operating the console. For your clothing. it . walking belt when turning on the frame rails of the treadmill. Always wear the clip while operating the treadmill .4VAPV in small ::increments until' fare i4F:t4.ttie operation of the console, peel it . Each time the SPEED ...
English Manual
Page 10
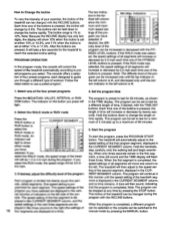
... time peri- ment, a tone will sound and the TIME display'will flash mill will be stopped at either 10% or 10.5%, and 11% when the incline is pressed, the 2. The incline of the treadmill can program you through a different type of the twentieth seg- manual mode by twenty sec- How to 4.5... mode, the speed range will be 1.5 to Change the Incline To vary the intensity of your exercise, the incline of the treadmill can be switched to the 10 four segments are displayed in the three columns to the right (the settings of the first program segment, displayed in the farthest ...
... time peri- ment, a tone will sound and the TIME display'will flash mill will be stopped at either 10% or 10.5%, and 11% when the incline is pressed, the 2. The incline of the treadmill can program you through a different type of the twentieth seg- manual mode by twenty sec- How to 4.5... mode, the speed range will be 1.5 to Change the Incline To vary the intensity of your exercise, the incline of the treadmill can be switched to the 10 four segments are displayed in the three columns to the right (the settings of the first program segment, displayed in the farthest ...
English Manual
Page 11
... information mode is selected, the TIME display will light. The DISTANCE and PULSE/CALORIES displays together will slow to a stop. This safety feature prevents the-treadmill from the console. Each time one of the buttons is pressed, the length of time.) If desired, a time goal can be counted down. A time...the SAFEKEY in the PULSE display. While the trip time and distance are displayed, they can be helpful to your left running for a minimum of 10 seconds up to a maximum of 99 minutes and 50 seconds. The TIME display will show the total time, up to 9,999 hours. The DISTANCE...
... information mode is selected, the TIME display will light. The DISTANCE and PULSE/CALORIES displays together will slow to a stop. This safety feature prevents the-treadmill from the console. Each time one of the buttons is pressed, the length of time.) If desired, a time goal can be counted down. A time...the SAFEKEY in the PULSE display. While the trip time and distance are displayed, they can be helpful to your left running for a minimum of 10 seconds up to a maximum of 99 minutes and 50 seconds. The TIME display will show the total time, up to 9,999 hours. The DISTANCE...

English Manual
Page 12
...Department toll-free at 1-800-999-3756, Monday through Friday, 6 a.m. c. The earclip is corrected. b. Do not operate 12 the treadmill until the problem is intended only as shown, the circuit breaker has tripped. If further assistance is needed , call our Customer Service ... 9.) c. d. Rub your collar. b. Remove the SAFEKEY, wait for ten seconds, and then reinsert the SAFEKEY. Do not operate the treadmill until 6 p.m. until the problem is detected within five seconds. The pulse earclip may appear in length. NOTE: Various factors, including the ...
...Department toll-free at 1-800-999-3756, Monday through Friday, 6 a.m. c. The earclip is corrected. b. Do not operate 12 the treadmill until the problem is intended only as shown, the circuit breaker has tripped. If further assistance is needed , call our Customer Service ... 9.) c. d. Rub your collar. b. Remove the SAFEKEY, wait for ten seconds, and then reinsert the SAFEKEY. Do not operate the treadmill until 6 p.m. until the problem is detected within five seconds. The pulse earclip may appear in length. NOTE: Various factors, including the ...

English Manual
Page 13
...Using the 3/16" a alien wrench, turn the left rear roller adjustment bolt counter- Plug in the power cord, insert the SAFEKEY and run the treadmill for a few min- Using the 3/16" alien wrench, turn the left rear roller adjustment bolt clockwise, and the right bolt counterclockwise, 1/4 of ...a turn each side of the walking belt 3-4 inches off the walking platform. Plug in the power cord, insert the SAFEKEY and run the treadmill for a few minutes. Using the 3/16" alien wrench, turn both rear roller adjustment bolts counterclockwise, 1/4 of a turn . Be careful to keep...
...Using the 3/16" a alien wrench, turn the left rear roller adjustment bolt counter- Plug in the power cord, insert the SAFEKEY and run the treadmill for a few min- Using the 3/16" alien wrench, turn the left rear roller adjustment bolt clockwise, and the right bolt counterclockwise, 1/4 of ...a turn each side of the walking belt 3-4 inches off the walking platform. Plug in the power cord, insert the SAFEKEY and run the treadmill for a few minutes. Using the 3/16" alien wrench, turn both rear roller adjustment bolts counterclockwise, 1/4 of a turn . Be careful to keep...
English Manual
Page 14
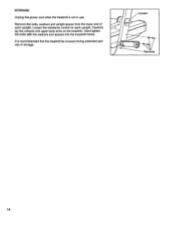
Loosen the resistance control on the treadmill. It is not in use. Remove the bolts, washers and upright spacer from the lower end of storage. Carefully lay the console and upper body arms on each upright. STORAGE Unplug the power cord when the treadmill is recommended that the treadmill be covered during extended periods of each upright. Loosen (1) Remove 14 Hand tighten the bolts with the washers and spacers into the treadmill frame.
Loosen the resistance control on the treadmill. It is not in use. Remove the bolts, washers and upright spacer from the lower end of storage. Carefully lay the console and upper body arms on each upright. STORAGE Unplug the power cord when the treadmill is recommended that the treadmill be covered during extended periods of each upright. Loosen (1) Remove 14 Hand tighten the bolts with the washers and spacers into the treadmill frame.

English Manual
Page 20
When ordering parts, please be prepared to give the following information: • The MODEL NUMBER of the product (WLTL21051). • The NAME of the product (WESLO CADENCES 10.0xt treadmill). • The SERIAL NUMBER of the product (see the front cover of this manual). • The KEY NUMBER of the part(s) (see page 18 of ..., Monday through Friday, 6 a.m. until 6 p.m. Part No. 127396 R1195A Printed in USA © 1995 ICON Health & Fitness, Inc. Mountain Time (excluding holidays). If possible, place the treadmill near your telephone for easy reference when calling.
When ordering parts, please be prepared to give the following information: • The MODEL NUMBER of the product (WLTL21051). • The NAME of the product (WESLO CADENCES 10.0xt treadmill). • The SERIAL NUMBER of the product (see the front cover of this manual). • The KEY NUMBER of the part(s) (see page 18 of ..., Monday through Friday, 6 a.m. until 6 p.m. Part No. 127396 R1195A Printed in USA © 1995 ICON Health & Fitness, Inc. Mountain Time (excluding holidays). If possible, place the treadmill near your telephone for easy reference when calling.


