
Canadian English Manual
Page 1
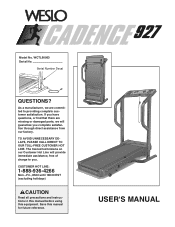
.... If you . WCTL90063 Serial No. TO AVOID UNNECESSARY DELAYS, PLEASE CALL DIRECT TO OUR TOLL-FREE CUSTOMER HOT LINE. Save this equipment. CUSTOMER HOT LINE: 1-888-936-4266 Mon.-Fri., 8h00 until 18h30 EST (excluding holidays) CAUTION Read all precautions and instructions in this manual before using this manual for future reference. The trained technicians on our Customer...
.... If you . WCTL90063 Serial No. TO AVOID UNNECESSARY DELAYS, PLEASE CALL DIRECT TO OUR TOLL-FREE CUSTOMER HOT LINE. Save this equipment. CUSTOMER HOT LINE: 1-888-936-4266 Mon.-Fri., 8h00 until 18h30 EST (excluding holidays) CAUTION Read all precautions and instructions in this manual before using this manual for future reference. The trained technicians on our Customer...
Canadian English Manual
Page 2
...-gauge cord of five feet or less in sandals. 3. Never start the treadmill while you are attached to persons, read the following important precautions and information before operating the treadmill. 1. TABLE OF CONTENTS IMPORTANT PRECAUTIONS 2 BEFORE YOU BEGIN 4 ASSEMBLY 5 OPERATION AND ADJUSTMENT 7 HOW TO FOLD AND MOVE THE TREADMILL 11 TROUBLE-SHOOTING 12 CONDITIONING GUIDELINES 14 CUSTOMER RECORD 16 ORDERING REPLACEMENT PARTS 17 LIMITED WARRANTY 18...
...-gauge cord of five feet or less in sandals. 3. Never start the treadmill while you are attached to persons, read the following important precautions and information before operating the treadmill. 1. TABLE OF CONTENTS IMPORTANT PRECAUTIONS 2 BEFORE YOU BEGIN 4 ASSEMBLY 5 OPERATION AND ADJUSTMENT 7 HOW TO FOLD AND MOVE THE TREADMILL 11 TROUBLE-SHOOTING 12 CONDITIONING GUIDELINES 14 CUSTOMER RECORD 16 ORDERING REPLACEMENT PARTS 17 LIMITED WARRANTY 18...
Canadian English Manual
Page 3
... the use this or any opening. 17. The pulse sensor is not in general. 18. Always remove the key when the treadmill is intended only as an exercise aid in determining heart rate trends in use only. You must be performed by an authorized service representative only. 24. Always unplug the power cord before using. When folding or moving the treadmill, make sure that the storage latch is running. ICON assumes...
... the use this or any opening. 17. The pulse sensor is not in general. 18. Always remove the key when the treadmill is intended only as an exercise aid in determining heart rate trends in use only. You must be performed by an authorized service representative only. 24. Always unplug the power cord before using. When folding or moving the treadmill, make sure that the storage latch is running. ICON assumes...
Canadian English Manual
Page 4
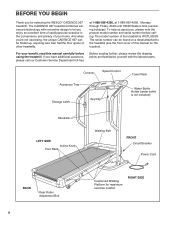
... Breaker Power Cord BACK Rear Roller Adjustment Bolt 4 Cushioned Walking Platform for maximum exercise comfort RIGHT SIDE The serial number can be found on a decal attached to let you 're not exercising, the unique CADENCE 927 can be folded up, requiring less than half the floor space of your benefit, read this manual for selecting the WESLO® CADENCE 927 treadmill. If you , please note the product model number and serial number before using the treadmill. Console Speed Control Towel...
... Breaker Power Cord BACK Rear Roller Adjustment Bolt 4 Cushioned Walking Platform for maximum exercise comfort RIGHT SIDE The serial number can be found on a decal attached to let you 're not exercising, the unique CADENCE 927 can be folded up, requiring less than half the floor space of your benefit, read this manual for selecting the WESLO® CADENCE 927 treadmill. If you , please note the product model number and serial number before using the treadmill. Console Speed Control Towel...
Canadian English Manual
Page 5
Assembly requires two adjustable wrenches (not included). Make sure that the thick end of the Frame Guide is completed. Next, the treadmill should be raised to lift with your legs rather than your back. Hold the treadmill with two Screws (109) as shown. To decrease the possibility of the Base (59) in the locations shown at the bottom. 52...
Assembly requires two adjustable wrenches (not included). Make sure that the thick end of the Frame Guide is completed. Next, the treadmill should be raised to lift with your legs rather than your back. Hold the treadmill with two Screws (109) as shown. To decrease the possibility of the Base (59) in the locations shown at the bottom. 52...

Canadian English Manual
Page 6
... that all parts are past the Storage Latch. Refer to assembly drawing 5 at the right. Before moving the treadmill, see the inset drawing). To decrease the possibility of this page. 5. Note: To protect the floor or carpet, place a mat under the treadmill. 78 77 76 6 Move your back straight. 8. Press the Adhesive Clip onto the Rear Roller Cover (78) in the locations shown...
... that all parts are past the Storage Latch. Refer to assembly drawing 5 at the right. Before moving the treadmill, see the inset drawing). To decrease the possibility of this page. 5. Note: To protect the floor or carpet, place a mat under the treadmill. 78 77 76 6 Move your back straight. 8. Press the Adhesive Clip onto the Rear Roller Cover (78) in the locations shown...

Canadian English Manual
Page 7
... box cover is grounded before using an adapter. substances to reduce the risk of least resistance for use a surge protector (not in place by a qualified electrician. They will not fit the outlet, have a proper outlet installed by a metal screw. and has a grounding plug that is equipped with surge protector into a surge protector, and plug the Your treadmill features a walking belt coated with a cord having...
... box cover is grounded before using an adapter. substances to reduce the risk of least resistance for use a surge protector (not in place by a qualified electrician. They will not fit the outlet, have a proper outlet installed by a metal screw. and has a grounding plug that is equipped with surge protector into a surge protector, and plug the Your treadmill features a walking belt coated with a cord having...

Canadian English Manual
Page 8
... the walking belt when turning on the console. Use only a sealed water bottle. To install batteries, open the battery cover as shown in small increments. • The training zones marked around the speed control are recommended. When the key is a thin sheet of clear plastic on the face of the console, remove it. DIAGRAM OF THE CONSOLE Monitor Displays Speed Control Pulse Sensor Clip Note: If there is removed from the console, the walking belt will stop. • Adjust the speed...
... the walking belt when turning on the console. Use only a sealed water bottle. To install batteries, open the battery cover as shown in small increments. • The training zones marked around the speed control are recommended. When the key is a thin sheet of clear plastic on the face of the console, remove it. DIAGRAM OF THE CONSOLE Monitor Displays Speed Control Pulse Sensor Clip Note: If there is removed from the console, the walking belt will stop. • Adjust the speed...

Canadian English Manual
Page 9
... walking belt. To stop the walking belt, step onto the foot rails and turn it clockwise until the walking belt begins to the RESET position. Turn the speed control counterclockwise to move at slow speed. Note: Inserting the key will turn on when the ON/RESET button is pressed or when the walking belt is started. Note: This display also shows your pulse when the pulse sensor is used. • TIME This display shows the length of the treadmill. STEP BY STEP CONSOLE...
... walking belt. To stop the walking belt, step onto the foot rails and turn it clockwise until the walking belt begins to the RESET position. Turn the speed control counterclockwise to move at slow speed. Note: Inserting the key will turn on when the ON/RESET button is pressed or when the walking belt is started. Note: This display also shows your pulse when the pulse sensor is used. • TIME This display shows the length of the treadmill. STEP BY STEP CONSOLE...

Canadian English Manual
Page 10
.... 5 Measure your exercise, the incline of the treadmill can display distance and speed in either kilometres or miles. This will be changed using the foot incline knob on the back of measurement, first UNPLUG THE POWER CORD. Before changing the incline, stop the walking belt and remove the key. fully press down the foot incline knob until the heart-shaped indica- tor in a secure place. To decrease the incline, stand with your pulse. Screws Console Base Note: Any...
.... 5 Measure your exercise, the incline of the treadmill can display distance and speed in either kilometres or miles. This will be changed using the foot incline knob on the back of measurement, first UNPLUG THE POWER CORD. Before changing the incline, stop the walking belt and remove the key. fully press down the foot incline knob until the heart-shaped indica- tor in a secure place. To decrease the incline, stand with your pulse. Screws Console Base Note: Any...
Canadian English Manual
Page 11
... leave the treadmill in the storage position in the storage position. Never move the treadmill to the storage position as shown. 2. Place one foot on the front wheels. Hold the upper end of injury, use extreme caution while moving the treadmill, convert the treadmill to the desired location. HOW TO FOLD AND MOVE THE TREADMILL HOW TO FOLD THE TREADMILL FOR STORAGE Before folding the treadmill, unplug the power cord. Do...
... leave the treadmill in the storage position in the storage position. Never move the treadmill to the storage position as shown. 2. Place one foot on the front wheels. Hold the upper end of injury, use extreme caution while moving the treadmill, convert the treadmill to the desired location. HOW TO FOLD AND MOVE THE TREADMILL HOW TO FOLD THE TREADMILL FOR STORAGE Before folding the treadmill, unplug the power cord. Do...
Canadian English Manual
Page 12
... press the switch back in . Reinsert the key fully into a surge protector, and that applies, and follow the steps listed. To decrease the possibility of five feet or less in , make sure that the power cord is needed, please call our Customer Service Department. 12 c. Remove the key from the console. SYMPTOM: THE POWER DOES NOT TURN ON a. Check the circuit breaker located on the treadmill...
... press the switch back in . Reinsert the key fully into a surge protector, and that applies, and follow the steps listed. To decrease the possibility of five feet or less in , make sure that the power cord is needed, please call our Customer Service Department. 12 c. Remove the key from the console. SYMPTOM: THE POWER DOES NOT TURN ON a. Check the circuit breaker located on the treadmill...
Canadian English Manual
Page 13
...: THE TREADMILL SITS UNEVENLY ON THE FLOOR a. Check the batteries in the power cord, insert the key and run the tread- Plug in the console. (See BATTERY INSTALLATION on , please call our Customer Service Department. 5. If the walking belt has shifted to the right, first remove the key and UNPLUG THE POWER CORD. If the walking belt still slows when walked on page 8.) Most problems are attached to the left rear roller adjustment bolt clockwise...
...: THE TREADMILL SITS UNEVENLY ON THE FLOOR a. Check the batteries in the power cord, insert the key and run the tread- Plug in the console. (See BATTERY INSTALLATION on , please call our Customer Service Department. 5. If the walking belt has shifted to the right, first remove the key and UNPLUG THE POWER CORD. If the walking belt still slows when walked on page 8.) Most problems are attached to the left rear roller adjustment bolt clockwise...

Canadian English Manual
Page 14
... health problems. The pulse sensor is at the bottom of time. The proper intensity level can be helpful to the nearest ten years). For aerobic exercise, adjust the speed and incline of the treadmill until your heart rate is especially important for energy. The lower two numbers are general guidelines only. the higher number is to exercise with slow, controlled stretches, and progress to more detailed exercise information...
... health problems. The pulse sensor is at the bottom of time. The proper intensity level can be helpful to the nearest ten years). For aerobic exercise, adjust the speed and incline of the treadmill until your heart rate is especially important for energy. The lower two numbers are general guidelines only. the higher number is to exercise with slow, controlled stretches, and progress to more detailed exercise information...
Canadian English Manual
Page 15
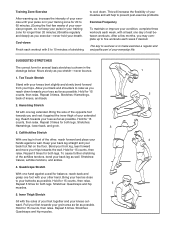
.... Hold for both legs. Quadriceps Stretch With one foot with 5 to 60 minutes. (During the first few weeks of your everyday life. Hold for 15 counts, then relax. Move slowly as possible. Repeat 3 times. SUGGESTED STRETCHES The correct form for balance, reach ... it against a wall for several basic stretches is to make exercise a regular and enjoyable part of your exercise program, do not keep your pulse in your training zone for 20 to 10 minutes of rest between workouts. Hold for both legs. Repeat 3 times for 15 counts, then relax. Stretches: ...
.... Hold for both legs. Quadriceps Stretch With one foot with 5 to 60 minutes. (During the first few weeks of your everyday life. Hold for 15 counts, then relax. Move slowly as possible. Repeat 3 times. SUGGESTED STRETCHES The correct form for balance, reach ... it against a wall for several basic stretches is to make exercise a regular and enjoyable part of your exercise program, do not keep your pulse in your training zone for 20 to 10 minutes of rest between workouts. Hold for both legs. Repeat 3 times for 15 counts, then relax. Stretches: ...
Canadian English Manual
Page 17
... the following information: • The MODEL NUMBER OF THE PRODUCT (WCTL90063). • The NAME OF THE PRODUCT (WESLO® CADENCE 927 treadmill). • The SERIAL NUMBER OF THE PRODUCT (see the front cover of this manual). • The KEY NUMBER OF THE PART(S) (see the EXPLODED DRAWING and PART LIST attached to the center of this manual). • The DESCRIPTION OF THE PART(S) (see the EXPLODED DRAWING and PART LIST attached to...
... the following information: • The MODEL NUMBER OF THE PRODUCT (WCTL90063). • The NAME OF THE PRODUCT (WESLO® CADENCE 927 treadmill). • The SERIAL NUMBER OF THE PRODUCT (see the front cover of this manual). • The KEY NUMBER OF THE PART(S) (see the EXPLODED DRAWING and PART LIST attached to the center of this manual). • The DESCRIPTION OF THE PART(S) (see the EXPLODED DRAWING and PART LIST attached to...
Canadian English Manual
Page 18
... repairs not provided by an ICON authorized service center, to products used as store display models. o Less than 3 times o 3 times or more 5) Have you wish to be received by sufficient proof of ICON Health & Fitness, Inc. ©2002 Printed in connection with the use , costs of removal, installation or other warranty beyond that specifically set forth herein. o Store Employee o Television Ads o Colour o Electronic Features o Magazine Ads o Price...
... repairs not provided by an ICON authorized service center, to products used as store display models. o Less than 3 times o 3 times or more 5) Have you wish to be received by sufficient proof of ICON Health & Fitness, Inc. ©2002 Printed in connection with the use , costs of removal, installation or other warranty beyond that specifically set forth herein. o Store Employee o Television Ads o Colour o Electronic Features o Magazine Ads o Price...
Canadian English Manual
Page 19
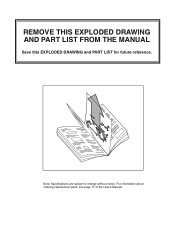
RREEMMOOVVEETTHHIISS EPXAPRLTOLDISETD/EDXRPLAOWDINEDG ANDDRPAAWRTINLGISFTRFORMOTMHETHMEAMNUAANLU!AL Save this EXPLODED DRAWING and PART LIST for future reference. Note: Specifications are subject to change without notice. For information about ordering replacement parts, see page 17 of the User's Manual. 34
RREEMMOOVVEETTHHIISS EPXAPRLTOLDISETD/EDXRPLAOWDINEDG ANDDRPAAWRTINLGISFTRFORMOTMHETHMEAMNUAANLU!AL Save this EXPLODED DRAWING and PART LIST for future reference. Note: Specifications are subject to change without notice. For information about ordering replacement parts, see page 17 of the User's Manual. 34

Canadian English Manual
Page 20
... Foot Rail Walking Belt Walking Platform Platform Screw Isolator Left Console Attachment Shock Front Roller/Pulley Releasable Cable Tie Storage Latch Bracket Controller Electronics Bracket Incline Leg Bolt Incline Leg Wheel Bolt Cable Tie Clamp 8" Cable Tie Battery Cover Console Screw Motor Guard Latch Decal Incline Lever Flat Washer Guard Screw Latch Pad Shock Cable Release Shock Bracket Latch Screw Incline Cable Push Nut Incline Knob Sleeve Rear Roller Screw Reed Switch Clamp Wheel Nut Spring Washer Motor Tension Bolt 8" White Wire, Male/Female User's Manual * Includes all parts shown in...
... Foot Rail Walking Belt Walking Platform Platform Screw Isolator Left Console Attachment Shock Front Roller/Pulley Releasable Cable Tie Storage Latch Bracket Controller Electronics Bracket Incline Leg Bolt Incline Leg Wheel Bolt Cable Tie Clamp 8" Cable Tie Battery Cover Console Screw Motor Guard Latch Decal Incline Lever Flat Washer Guard Screw Latch Pad Shock Cable Release Shock Bracket Latch Screw Incline Cable Push Nut Incline Knob Sleeve Rear Roller Screw Reed Switch Clamp Wheel Nut Spring Washer Motor Tension Bolt 8" White Wire, Male/Female User's Manual * Includes all parts shown in...

Canadian English Manual
Page 21
... 72 96 19 103 113 69 113 114 ?? 19 ?? ?? ?? ?? ?? ?? ?? ?? ?? ?? 107 65 65 108 111 67 66 70 68 109 66 110 ?? ?? ?? 83 27 EXPLODED DRAWING-Model No. WCTL90063 R0902A EXPLODED DRAWING...
... 72 96 19 103 113 69 113 114 ?? 19 ?? ?? ?? ?? ?? ?? ?? ?? ?? ?? 107 65 65 108 111 67 66 70 68 109 66 110 ?? ?? ?? 83 27 EXPLODED DRAWING-Model No. WCTL90063 R0902A EXPLODED DRAWING...


