
English Manual
Page 3
... carpet from the treadmill at a time. 9. Never move the walking belt while the power is capable of high speeds. The treadmill is turned off. When connecting the power cord (see your local WESLO dealer or call 1-800-8063651 and order part number 146148. 17. Do not use . 19. Do not change speed or stop unexpectedly, which may result in speed. 7. When folding or moving the treadmill, make sure that the storage latch is being...
... carpet from the treadmill at a time. 9. Never move the walking belt while the power is capable of high speeds. The treadmill is turned off. When connecting the power cord (see your local WESLO dealer or call 1-800-8063651 and order part number 146148. 17. Do not use . 19. Do not change speed or stop unexpectedly, which may result in speed. 7. When folding or moving the treadmill, make sure that the storage latch is being...

English Manual
Page 4
When using . Inspect and properly tighten all parts of the treadmill is about to do so by an authorized service representative only. 28. DANGER: 27. Never remove the motor hood unless instructed to change to order a free replacement decal (see the front cover of this manual. ICON assumes no responsibility for personal injury or property damage sustained by pressing the speed buttons. In some instances, the speed may change . 23. Never...
When using . Inspect and properly tighten all parts of the treadmill is about to do so by an authorized service representative only. 28. DANGER: 27. Never remove the motor hood unless instructed to change to order a free replacement decal (see the front cover of this manual. ICON assumes no responsibility for personal injury or property damage sustained by pressing the speed buttons. In some instances, the speed may change . 23. Never...
English Manual
Page 5
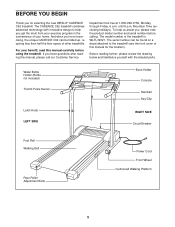
... Pulse Sensor Latch Knob LEFT SIDE Book Holder Console Handrail Key/Clip RIGHT SIDE Circuit Breaker Foot Rail Walking Belt Rear Roller Adjustment Bolts Power Cord Front Wheel Cushioned Walking Platform 5 The model number of other treadmills. BEFORE YOU BEGIN Thank you , please note the product model number and serial number before using the treadmill. For your home. And when you get the most from your exercise program in the convenience of this manual, please call our Customer Service...
... Pulse Sensor Latch Knob LEFT SIDE Book Holder Console Handrail Key/Clip RIGHT SIDE Circuit Breaker Foot Rail Walking Belt Rear Roller Adjustment Bolts Power Cord Front Wheel Cushioned Walking Platform 5 The model number of other treadmills. BEFORE YOU BEGIN Thank you , please note the product model number and serial number before using the treadmill. For your home. And when you get the most from your exercise program in the convenience of this manual, please call our Customer Service...
English Manual
Page 6
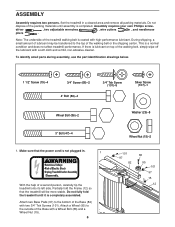
... is coated with two 3/4" Tek Screws (101). To identify small parts during assembly, use the part identification drawings below. 1 1/2" Screw (79)-4 3/4" Screw (68)-2 4" Bolt (89)-4 3/4" Tek Screw (101)-5 Silver Screw (107)-1 Wheel Bolt (86)-2 Washer (29)-8 3" Bolt (47)-4 1. Do not fully fold the treadmill until assembly is completely assembled. Partially fold the Frame (12) so that the power cord is lubricant on top of the treadmill walking belt is a normal condition and does...
... is coated with two 3/4" Tek Screws (101). To identify small parts during assembly, use the part identification drawings below. 1 1/2" Screw (79)-4 3/4" Screw (68)-2 4" Bolt (89)-4 3/4" Tek Screw (101)-5 Silver Screw (107)-1 Wheel Bolt (86)-2 Washer (29)-8 3" Bolt (47)-4 1. Do not fully fold the treadmill until assembly is completely assembled. Partially fold the Frame (12) so that the power cord is lubricant on top of the treadmill walking belt is a normal condition and does...
English Manual
Page 7
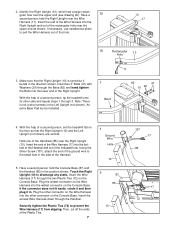
... Right Upright (10), which has a large rectan- 2a gular hole near the Wire Harness (17). With the help of the ground wire to prevent the Wire Harness (17) from slipping. Plug the widest connector on the Console Base. Using the Silver Screw (107), attach the end of a second person, tip the treadmill onto its other connector on the Console Base. Securely tighten the...
... Right Upright (10), which has a large rectan- 2a gular hole near the Wire Harness (17). With the help of the ground wire to prevent the Wire Harness (17) from slipping. Plug the widest connector on the Console Base. Using the Silver Screw (107), attach the end of a second person, tip the treadmill onto its other connector on the Console Base. Securely tighten the...

English Manual
Page 8
... used to the Console Base (87) with two 1 1/2" Screws (79) as shown. Raise the Uprights back to pinch the Wire Harness. Be careful not to the vertical position. Attach the Handrail (85) to adjust the walking belt (see page 23). Insert the Lock Pin into the Right Upright (10) as you use the treadmill. Make sure that all parts are properly tightened before you set the...
... used to the Console Base (87) with two 1 1/2" Screws (79) as shown. Raise the Uprights back to pinch the Wire Harness. Be careful not to the vertical position. Attach the Handrail (85) to adjust the walking belt (see page 23). Insert the Lock Pin into the Right Upright (10) as you use the treadmill. Make sure that all parts are properly tightened before you set the...
English Manual
Page 9
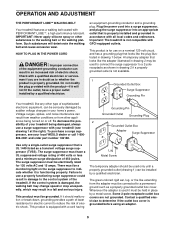
... electric current to the control system of your treadmill being turned on a nominal 120-volt circuit, and has a grounding plug that looks like any other appli- If the control system is damaged, the walking belt may change speed or stop unexpectedly, which may be seriously damaged by a metal screw. ances being damaged, always use a surge suppressor with all local codes and ordinances. pressor...
... electric current to the control system of your treadmill being turned on a nominal 120-volt circuit, and has a grounding plug that looks like any other appli- If the control system is damaged, the walking belt may change speed or stop unexpectedly, which may be seriously damaged by a metal screw. ances being damaged, always use a surge suppressor with all local codes and ordinances. pressor...
English Manual
Page 10
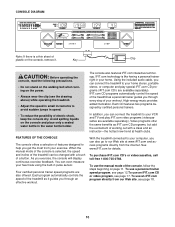
... treadmill. • Adjust the speed in the water bottle holder. CONSOLE DIAGRAM Note: If there is like having a personal trainer right in your home. Avoid spilling liquids on the console, remove it guides you through every step of plastic on the console and place only a sealed water bottle in small increments to help you exercise, the console will display continuous exercise feedback. IFIT.com CD programs automatically control the speed...
... treadmill. • Adjust the speed in the water bottle holder. CONSOLE DIAGRAM Note: If there is like having a personal trainer right in your home. Avoid spilling liquids on the console, remove it guides you through every step of plastic on the console and place only a sealed water bottle in small increments to help you exercise, the console will display continuous exercise feedback. IFIT.com CD programs automatically control the speed...

English Manual
Page 11
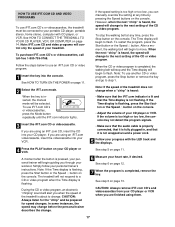
... pulse sensor (see page 9). 2 Stand on page 12). The display will begin to the other every few steps backward until the key is reached. 5 Follow your progress with the LED track and the displays. HOW TO TURN ON THE POWER 1 Plug in sequence until you have burned (see page 23). 4 Change the incline of the treadmill as desired by pressing the Speed buttons. if a button is pressed, the walking belt...
... pulse sensor (see page 9). 2 Stand on page 12). The display will begin to the other every few steps backward until the key is reached. 5 Follow your progress with the LED track and the displays. HOW TO TURN ON THE POWER 1 Plug in sequence until you have burned (see page 23). 4 Change the incline of the treadmill as desired by pressing the Speed buttons. if a button is pressed, the walking belt...

English Manual
Page 12
.... Speed display-This display shows the speed of the treadmill and possible injury, unplug the power cord when the treadmill is not in either miles or kilometers. Time display-When the manual mode or the iFIT.com mode is selected, this display will be shown. After a few seconds. Distance display-This display shows the distance that you are finished exercising, remove the key. Note: The console can display speed and distance in use. To measure your heart rate, Pulse Sensor stand...
.... Speed display-This display shows the speed of the treadmill and possible injury, unplug the power cord when the treadmill is not in either miles or kilometers. Time display-When the manual mode or the iFIT.com mode is selected, this display will be shown. After a few seconds. Distance display-This display shows the distance that you are finished exercising, remove the key. Note: The console can display speed and distance in use. To measure your heart rate, Pulse Sensor stand...

English Manual
Page 13
... moved to a stop the program temporarily, press the Stop button. The Time display will then slow to the left . See step 5 on page 12. 6 When the program is too high or too low, you can manually override the setting by pressing the Speed buttons. To restart the program, press the Start button or the Speed v button. When the program has ended, adjust the incline of the treadmill and possible injury, unplug the power cord when the treadmill...
... moved to a stop the program temporarily, press the Stop button. The Time display will then slow to the left . See step 5 on page 12. 6 When the program is too high or too low, you can manually override the setting by pressing the Speed buttons. To restart the program, press the Start button or the Speed v button. When the program has ended, adjust the incline of the treadmill and possible injury, unplug the power cord when the treadmill...

English Manual
Page 16
... the included adapter. IN VIDEO AUDIO IN CH 34 OUT RF OUT A ANT. B ANT. If you have a TV with a built-in VCR, see instruction B. Plug the adapter into the AUDIO OUT jack on your VCR and plug the wire into the unused side of the audio cable into the included adapter. Next, remove the wire that is connected to your home stereo, see instruction A below. Plug one end...
... the included adapter. IN VIDEO AUDIO IN CH 34 OUT RF OUT A ANT. B ANT. If you have a TV with a built-in VCR, see instruction B. Plug the adapter into the AUDIO OUT jack on your VCR and plug the wire into the unused side of the audio cable into the included adapter. Next, remove the wire that is connected to your home stereo, see instruction A below. Plug one end...
English Manual
Page 17
... your personal trainer will begin guiding you when the speed of the treadmill is flashing, press the Start button or the Speed v button on the console. • Adjust the volume of the CD or video program. If you can manually override the setting at any time by pressing the Speed buttons on page 11. 2 Select the iFIT.com mode. A moment after the button is completed, remove the key. Note: If the Time display is...
... your personal trainer will begin guiding you when the speed of the treadmill is flashing, press the Start button or the Speed v button on the console. • Adjust the volume of the CD or video program. If you can manually override the setting at any time by pressing the Speed buttons on page 11. 2 Select the iFIT.com mode. A moment after the button is completed, remove the key. Note: If the Time display is...

English Manual
Page 18
To use another program, press the Stop button and go to move . A list of specific system requirements will be connected to the next setting for the program. When the key is heard, the speed will begin to the next setting for the program. However, when the next "chirp" is inserted, the manual mode will change . When you start the program, an on -line instructions to start an internet connection. 4 Start your web browser, if necessary...
To use another program, press the Stop button and go to move . A list of specific system requirements will be connected to the next setting for the program. When the key is heard, the speed will begin to the next setting for the program. However, when the next "chirp" is inserted, the manual mode will change . When you start the program, an on -line instructions to start an internet connection. 4 Start your web browser, if necessary...

English Manual
Page 19
... Stop button for metric kilometers will show the total number of miles (or kilometers) that the walking belt has moved. Press the Speed v button to kilometers per hour. The Distance/Laps display will appear in the Speed display. When the information mode is selected, the following information will be shown: The Time display will show the total number of hours the treadmill has been used. The information mode also allows you to switch the console...
... Stop button for metric kilometers will show the total number of miles (or kilometers) that the walking belt has moved. Press the Speed v button to kilometers per hour. The Distance/Laps display will appear in the Speed display. When the information mode is selected, the following information will be shown: The Time display will show the total number of hours the treadmill has been used. The information mode also allows you to switch the console...

English Manual
Page 22
... the gap between the Magnet and the Reed Switch is plugged into the console. Reinsert the key fully into a properly grounded outlet (see c. After the power cord has been plugged in, make sure that applies, and follow the steps listed. Remove the key from the treadmill. PROBLEM: The speed display on SOLUTION: a. Re-attach the hood, and run , please call our Customer Service Department tollfree at 1-800-999-3756...
... the gap between the Magnet and the Reed Switch is plugged into the console. Reinsert the key fully into a properly grounded outlet (see c. After the power cord has been plugged in, make sure that applies, and follow the steps listed. Remove the key from the treadmill. PROBLEM: The speed display on SOLUTION: a. Re-attach the hood, and run , please call our Customer Service Department tollfree at 1-800-999-3756...
English Manual
Page 23
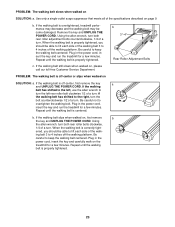
... the walking belt centered. PROBLEM: The walking belt slows when walked on , please call our toll-free Customer Service Department. When the walking belt is off the walking platform. Be careful to 4 inches off -center, first remove the key a and UNPLUG THE POWER CORD. c. When the walking belt is properly tightened. b. Be careful to lift each side of the specifications described on the treadmill for a few minutes. b 3"-4" Rear Roller Adjustment Bolts PROBLEM: The walking belt is properly tightened...
... the walking belt centered. PROBLEM: The walking belt slows when walked on , please call our toll-free Customer Service Department. When the walking belt is off the walking platform. Be careful to 4 inches off -center, first remove the key a and UNPLUG THE POWER CORD. c. When the walking belt is properly tightened. b. Be careful to lift each side of the specifications described on the treadmill for a few minutes. b 3"-4" Rear Roller Adjustment Bolts PROBLEM: The walking belt is properly tightened...
English Manual
Page 24
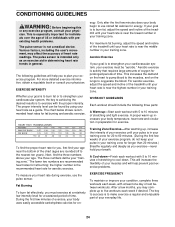
... -Start each workout with 5 to five workouts each week, with the proper intensity. The proper intensity level can be "aerobic." ergy. If your training zone. For maximum fat burning, adjust the speed and incline of the treadmill until your heart rate is near the highest number in your goal is near the bottom of your exercise program, do not keep your pulse in your heart rate...
... -Start each workout with 5 to five workouts each week, with the proper intensity. The proper intensity level can be "aerobic." ergy. If your training zone. For maximum fat burning, adjust the speed and incline of the treadmill until your heart rate is near the highest number in your goal is near the bottom of your exercise program, do not keep your pulse in your heart rate...
English Manual
Page 27
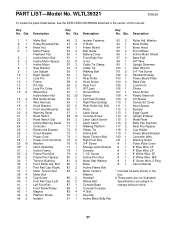
... 4 45 2 Motor Belt Pulley/Flywheel/Fan Motor Nut Motor/Pulley/ Flywheel/ Fan Incline Motor Bolt Incline Motor Spacer Incline Motor Stop Bracket Left Upright Right Upright Lock Pin Frame Pin Clip Lock Pin Collar Wheel Nut/ Incline Motor Nut Belt Guide Screw Wire Harness Hood Bracket Front Hood Bracket Warning Decal Reed Switch Reed Switch Clip Incline Warning Decal Controller Electronics Bracket Circuit Breaker Power Cord Power Cord Grommet Washer Latch Assembly Incline Frame Frame Pivot Bolt Frame Pivot Spacer Tension Bushing Front Roller Adj. PART LIST-Model No. Description Key No. Qty...
... 4 45 2 Motor Belt Pulley/Flywheel/Fan Motor Nut Motor/Pulley/ Flywheel/ Fan Incline Motor Bolt Incline Motor Spacer Incline Motor Stop Bracket Left Upright Right Upright Lock Pin Frame Pin Clip Lock Pin Collar Wheel Nut/ Incline Motor Nut Belt Guide Screw Wire Harness Hood Bracket Front Hood Bracket Warning Decal Reed Switch Reed Switch Clip Incline Warning Decal Controller Electronics Bracket Circuit Breaker Power Cord Power Cord Grommet Washer Latch Assembly Incline Frame Frame Pivot Bolt Frame Pivot Spacer Tension Bushing Front Roller Adj. PART LIST-Model No. Description Key No. Qty...
English Manual
Page 28
... THE PRODUCT (WESLO® CADENCE C62 treadmill) • The SERIAL NUMBER OF THE PRODUCT (see the front cover of this manual) • The KEY NUMBER AND DESCRIPTION OF THE PART(S) (see the EXPLODED DRAWING in workmanship and material, under this warranty is limited in lieu of any implied warranties of merchantability or fitness for which vary from the date of purchase. products used as store display models. Some...
... THE PRODUCT (WESLO® CADENCE C62 treadmill) • The SERIAL NUMBER OF THE PRODUCT (see the front cover of this manual) • The KEY NUMBER AND DESCRIPTION OF THE PART(S) (see the EXPLODED DRAWING in workmanship and material, under this warranty is limited in lieu of any implied warranties of merchantability or fitness for which vary from the date of purchase. products used as store display models. Some...


