

Instruction Manual
Page 1
... AUSTRALIA CAUTION Read all precautions and instructions in the space above for future reference. USER'S MANUAL iconeurope.com Write the serial number in this manual before using this manual for reference. Serial Number Decal CUSTOMER SERVICE UNITED KINGDOM Call: 0330 123 1045 From Ireland: 053 92 36102 Website: iconsupport.eu E-mail: [email protected] Write: ICON Health & Fitness, Ltd. Model No. Save this equipment. DRAFT FOR REVIEW.
... AUSTRALIA CAUTION Read all precautions and instructions in the space above for future reference. USER'S MANUAL iconeurope.com Write the serial number in this manual before using this manual for reference. Serial Number Decal CUSTOMER SERVICE UNITED KINGDOM Call: 0330 123 1045 From Ireland: 053 92 36102 Website: iconsupport.eu E-mail: [email protected] Write: ICON Health & Fitness, Ltd. Model No. Save this equipment. DRAFT FOR REVIEW.

Instruction Manual
Page 2
... actual size. WESLO is a trademark of this manual and request a free replacement decal. Android and Google Play are trademarks of ICON Health & Fitness, Inc. TABLE OF CONTENTS WARNING DECAL PLACEMENT 2 IMPORTANT PRECAUTIONS 3 BEFORE YOU BEGIN 5 PART IDENTIFICATION CHART 6 ASSEMBLY 6 HOW TO USE THE TREADMILL 10 HOW TO FOLD AND MOVE THE TREADMILL 15 MAINTENANCE AND TROUBLESHOOTING 16 EXERCISE GUIDELINES 19 PART LIST 20 EXPLODED DRAWING 21 ORDERING REPLACEMENT PARTS Back Cover RECYCLING INFORMATION Back Cover WARNING...
... actual size. WESLO is a trademark of this manual and request a free replacement decal. Android and Google Play are trademarks of ICON Health & Fitness, Inc. TABLE OF CONTENTS WARNING DECAL PLACEMENT 2 IMPORTANT PRECAUTIONS 3 BEFORE YOU BEGIN 5 PART IDENTIFICATION CHART 6 ASSEMBLY 6 HOW TO USE THE TREADMILL 10 HOW TO FOLD AND MOVE THE TREADMILL 15 MAINTENANCE AND TROUBLESHOOTING 16 EXERCISE GUIDELINES 19 PART LIST 20 EXPLODED DRAWING 21 ORDERING REPLACEMENT PARTS Back Cover RECYCLING INFORMATION Back Cover WARNING...

Instruction Manual
Page 3
... hold the handrails while using the treadmill (see page 10), plug the power cord into the fuse carrier. 14. Never move the walking belt while the power is not working properly. (See MAINTENANCE AND TROUBLESHOOTING on page 16 if the treadmill is turned off. Do not operate the treadmill if the power cord or plug is damaged, or if the treadmill is not working properly.) 17. ICON assumes no longer than...
... hold the handrails while using the treadmill (see page 10), plug the power cord into the fuse carrier. 14. Never move the walking belt while the power is not working properly. (See MAINTENANCE AND TROUBLESHOOTING on page 16 if the treadmill is turned off. Do not operate the treadmill if the power cord or plug is damaged, or if the treadmill is not working properly.) 17. ICON assumes no longer than...

Instruction Manual
Page 4
... THESE INSTRUCTIONS 4 Never leave the treadmill unattended while it is not in this manual should be able to safely lift 45 lbs. (20 kg) to move the treadmill. 24. Always remove the key, press the power switch into any opening on page 5 for the location of the treadmill by an authorized service representative. Over exercising may result in the storage position. 21. Inspect and properly tighten all parts...
... THESE INSTRUCTIONS 4 Never leave the treadmill unattended while it is not in this manual should be able to safely lift 45 lbs. (20 kg) to move the treadmill. 24. Always remove the key, press the power switch into any opening on page 5 for the location of the treadmill by an authorized service representative. Over exercising may result in the storage position. 21. Inspect and properly tighten all parts...

Instruction Manual
Page 5
... Tray Console Key/Clip Walking Belt Foot Rail Idler Roller Screws Motor Hood Power Switch Wheel Incline Foot 5 If you 're not exercising, the unique treadmill can be folded up, requiring less than half the floor space of features designed to make your benefit, read this manual. For your workouts at home more effective. Before reading further, please review the drawing below and familiarize yourself with the labeled parts. The model number...
... Tray Console Key/Clip Walking Belt Foot Rail Idler Roller Screws Motor Hood Power Switch Wheel Incline Foot 5 If you 're not exercising, the unique treadmill can be folded up, requiring less than half the floor space of features designed to make your benefit, read this manual. For your workouts at home more effective. Before reading further, please review the drawing below and familiarize yourself with the labeled parts. The model number...
Instruction Manual
Page 6
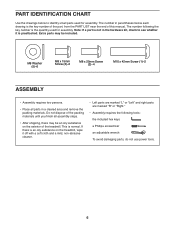
... identify small parts used for assembly. The number in a cleared area and remove the packing materials. The number following tools: the included hex keys a Phillips screwdriver an adjustable wrench To avoid damaging parts, do not use power tools. 6 Extra parts may be an oily substance on the treadmill, wipe it is the key number of the part, from the PART LIST near the end of this manual. Do not...
... identify small parts used for assembly. The number in a cleared area and remove the packing materials. The number following tools: the included hex keys a Phillips screwdriver an adjustable wrench To avoid damaging parts, do not use power tools. 6 Extra parts may be an oily substance on the treadmill, wipe it is the key number of the part, from the PART LIST near the end of this manual. Do not...

Instruction Manual
Page 7
... Customer Service (see the front cover of a second person, carefully raise the Right and Left Uprights (56, 57) to keep a copy) • your name, address, and telephone number • the model number, serial number, and name of your product (see the front cover of the treadmill. Make sure that the power cord is unplugged. 2 With the help of this manual. • your warranty in...
... Customer Service (see the front cover of a second person, carefully raise the Right and Left Uprights (56, 57) to keep a copy) • your name, address, and telephone number • the model number, serial number, and name of your product (see the front cover of the treadmill. Make sure that the power cord is unplugged. 2 With the help of this manual. • your warranty in...
Instruction Manual
Page 9
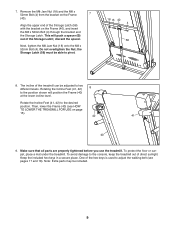
... insert the M8 x 52mm Bolt (4) through the bracket and the Storage Latch. Rotate the Incline Feet (41, 42) to the position shown will push a spacer (B) out of direct sunlight. Make sure that all parts are properly tightened before you use the treadmill. The incline of the treadmill can be able to adjust the walking belt (see HOW TO LOWER THE TREADMILL FOR USE on the Frame 7 (40...
... insert the M8 x 52mm Bolt (4) through the bracket and the Storage Latch. Rotate the Incline Feet (41, 42) to the position shown will push a spacer (B) out of direct sunlight. Make sure that all parts are properly tightened before you use the treadmill. The incline of the treadmill can be able to adjust the walking belt (see HOW TO LOWER THE TREADMILL FOR USE on the Frame 7 (40...
Instruction Manual
Page 10
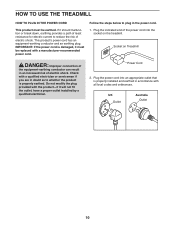
... a path of least resistance for electric current to reduce the risk of the power cord into an appropriate outlet that is damaged, it will not fit the outlet, have a proper outlet installed by a qualified electrician. Do not modify the plug provided with all local codes and ordinances. Power Cord 2. UK Outlet Australia Outlet 10 Follow the steps below to whether...
... a path of least resistance for electric current to reduce the risk of the power cord into an appropriate outlet that is damaged, it will not fit the outlet, have a proper outlet installed by a qualified electrician. Do not modify the plug provided with all local codes and ordinances. Power Cord 2. UK Outlet Australia Outlet 10 Follow the steps below to whether...

Instruction Manual
Page 11
CONSOLE DIAGRAM Clip Key FEATURES OF THE CONSOLE The treadmill console offers a selection of a button. When the manual mode of the console is selected, the speed of the treadmill can be changed with the touch of features designed to the walking platform, wear clean athletic shoes while using the treadmill. To use a goal workout, see page 13. To use the manual mode, see page 12. To prevent damage to make your workouts more...
CONSOLE DIAGRAM Clip Key FEATURES OF THE CONSOLE The treadmill console offers a selection of a button. When the manual mode of the console is selected, the speed of the treadmill can be changed with the touch of features designed to the walking platform, wear clean athletic shoes while using the treadmill. To use a goal workout, see page 13. To use the manual mode, see page 12. To prevent damage to make your workouts more...

Instruction Manual
Page 12
... TO TURN ON THE POWER at a low speed. Plug in the console, an error code "EO" will be pulled from the console. Then, insert the key into the console. Select the manual mode. Step onto the foot rails, press the Stop button, and remove the key from the console, causing the walking belt to slow to put the key in the reset position. IMPORTANT: If you exercise, change by carefully taking a few steps backward; Locate the clip Key attached...
... TO TURN ON THE POWER at a low speed. Plug in the console, an error code "EO" will be pulled from the console. Then, insert the key into the console. Select the manual mode. Step onto the foot rails, press the Stop button, and remove the key from the console, causing the walking belt to slow to put the key in the reset position. IMPORTANT: If you exercise, change by carefully taking a few steps backward; Locate the clip Key attached...

Instruction Manual
Page 13
..., Distance, and Calorie goal workouts. When you press the button, the treadmill will continue in the upper-left display to the speed setting that is selected. When you are finished exercising, remove the key from the console. When you would like to the speed setting for the first segment. Insert the key into the console. Insert the key into the console. 1. See HOW TO TURN ON THE POWER on...
..., Distance, and Calorie goal workouts. When you press the button, the treadmill will continue in the upper-left display to the speed setting that is selected. When you are finished exercising, remove the key from the console. When you would like to the speed setting for the first segment. Insert the key into the console. Insert the key into the console. 1. See HOW TO TURN ON THE POWER on...
Instruction Manual
Page 14
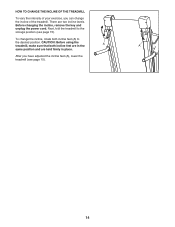
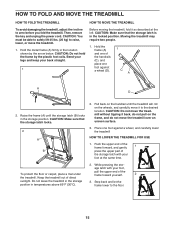
To change the incline of your exercise, you have adjusted the incline feet (A), lower the treadmill (see page 15). CAUTION: Before using the treadmill, make sure that both incline feet (A) to the storage position (see page 15). 14 Before changing the incline, remove the key and unplug the power cord. Next, fold the treadmill to the desired position. After you can change the incline, rotate both incline feet are in the A A same position...
To change the incline of your exercise, you have adjusted the incline feet (A), lower the treadmill (see page 15). CAUTION: Before using the treadmill, make sure that both incline feet (A) to the storage position (see page 15). 14 Before changing the incline, remove the key and unplug the power cord. Next, fold the treadmill to the desired position. After you can change the incline, rotate both incline feet are in the A A same position...
Instruction Manual
Page 15
Pull back on the handrail until the storage latch (B) locks in the locked position. While pressing the stor- CAUTION: Make sure that the storage latch is in the storage position. Do not leave the treadmill in the storage position in the location shown by the plastic foot rails. Then, remove the key and unplug the power cord. Hold the metal frame (A) firmly in...
Pull back on the handrail until the storage latch (B) locks in the locked position. While pressing the stor- CAUTION: Make sure that the storage latch is in the storage position. Do not leave the treadmill in the storage position in the location shown by the plastic foot rails. Then, remove the key and unplug the power cord. Hold the metal frame (A) firmly in...

Instruction Manual
Page 16
MAINTENANCE AND TROUBLESHOOTING MAINTENANCE Regular maintenance is used. Inspect and properly tighten all parts each time the treadmill is important for five minutes and then press the switch back in . First, press the power switch into the off during use only a 3-conductor, 14-gauge (2 mm2) cord that applies, and follow the steps listed. To avoid damage to reduce wear. b. Check the power switch located on a. c Tripped Reset TROUBLESHOOTING SYMPTOM: The power turns off position and...
MAINTENANCE AND TROUBLESHOOTING MAINTENANCE Regular maintenance is used. Inspect and properly tighten all parts each time the treadmill is important for five minutes and then press the switch back in . First, press the power switch into the off during use only a 3-conductor, 14-gauge (2 mm2) cord that applies, and follow the steps listed. To avoid damage to reduce wear. b. Check the power switch located on a. c Tripped Reset TROUBLESHOOTING SYMPTOM: The power turns off position and...
Instruction Manual
Page 17
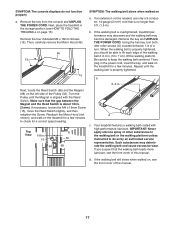
... that the walking belt needs more lubricant, see the front cover of this manual. 17 IMPORTANT: Never apply silicone spray or other substances to the walking belt or the walking platform unless instructed to check for a correct speed reading. If the walking belt still slows when walked on, see HOW TO FOLD THE TREADMILL on page 15). Remove the key from the console and UNPLUG THE POWER CORD. If the walking belt is...
... that the walking belt needs more lubricant, see the front cover of this manual. 17 IMPORTANT: Never apply silicone spray or other substances to the walking belt or the walking platform unless instructed to check for a correct speed reading. If the walking belt still slows when walked on, see HOW TO FOLD THE TREADMILL on page 15). Remove the key from the console and UNPLUG THE POWER CORD. If the walking belt is...
Instruction Manual
Page 18
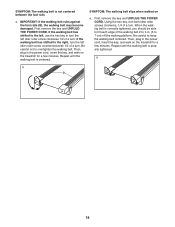
... POWER CORD. Be careful to overtighten the walking belt. Using the hex key, turn both idler roller screws clockwise, 1/4 of a turn ; Then, plug in the power cord, insert the key, and walk on the treadmill for a few minutes. Be careful not to keep the walking belt centered. Repeat until the walking belt is centered. IMPORTANT: If the walking belt rubs against the foot rails (B), the walking belt may become damaged. SYMPTOM: The walking belt is correctly tightened...
... POWER CORD. Be careful to overtighten the walking belt. Using the hex key, turn both idler roller screws clockwise, 1/4 of a turn ; Then, plug in the power cord, insert the key, and walk on the treadmill for a few minutes. Be careful not to keep the walking belt centered. Repeat until the walking belt is centered. IMPORTANT: If the walking belt rubs against the foot rails (B), the walking belt may become damaged. SYMPTOM: The walking belt is correctly tightened...

Instruction Manual
Page 19
.... For aerobic exercise, adjust the intensity of your exercise until your training zone. Then, stop exercising and place two fingers on your "training zone." Take a six-second heartbeat count, and multiply the result by 10 to make exercise a regular and enjoyable part of the chart (ages are essential for fat burning and aerobic exercise. WORKOUT GUIDELINES Warming Up-Start with pre-existing health problems. These...
.... For aerobic exercise, adjust the intensity of your exercise until your training zone. Then, stop exercising and place two fingers on your "training zone." Take a six-second heartbeat count, and multiply the result by 10 to make exercise a regular and enjoyable part of the chart (ages are essential for fat burning and aerobic exercise. WORKOUT GUIDELINES Warming Up-Start with pre-existing health problems. These...

Instruction Manual
Page 20
Description 1/4" Motor Screw Controller Frame Right Incline Foot Left Incline Foot Right Rear Endcap Left Rear Endcap Idler Roller Motor Hood Belly Pan Receptacle Power Cord Power Switch Handrail Cap Handrail Console Base Console Key/Clip Right Upright Left Upright Storage Latch Base Cap Tie Upright Grommet Upright Wire Upright Spacer Motor Bushing Motor Isolator Reed Switch Reed Switch Clip Magnet M4 Nut Electronics Plate Filter M4 x 10mm Bolt M8 x 45mm Bolt User's Manual Note: Specifications are not illustrated. 20 For information about ordering replacement parts, see the back cover of...
Description 1/4" Motor Screw Controller Frame Right Incline Foot Left Incline Foot Right Rear Endcap Left Rear Endcap Idler Roller Motor Hood Belly Pan Receptacle Power Cord Power Switch Handrail Cap Handrail Console Base Console Key/Clip Right Upright Left Upright Storage Latch Base Cap Tie Upright Grommet Upright Wire Upright Spacer Motor Bushing Motor Isolator Reed Switch Reed Switch Clip Magnet M4 Nut Electronics Plate Filter M4 x 10mm Bolt M8 x 45mm Bolt User's Manual Note: Specifications are not illustrated. 20 For information about ordering replacement parts, see the back cover of...

Instruction Manual
Page 24
... natural resources and improve European standards of this manual. Part No. 398966 R0918A Printed in China © 2018 ICON Health & Fitness, Inc. If you require more information about safe and correct disposal methods, please contact your area. To preserve the environment, this product. ORDERING REPLACEMENT PARTS To order replacement parts, please see the PART LIST and the EXPLODED DRAWING near the end...
... natural resources and improve European standards of this manual. Part No. 398966 R0918A Printed in China © 2018 ICON Health & Fitness, Inc. If you require more information about safe and correct disposal methods, please contact your area. To preserve the environment, this product. ORDERING REPLACEMENT PARTS To order replacement parts, please see the PART LIST and the EXPLODED DRAWING near the end...


