
English Manual
Page 1
...., 6 a.m.-6 p.m. Serial Number Decal QUESTIONS? Keep this equipment. USER'S MANUAL Visit our website at www.weslo.com new products, prizes, fitness tips, and much more! WLEL2005.0 Serial No. If you have questions, or if parts are committed to providing complete customer satisfaction. MST ON THE WEB: www.wesloservice.com CAUTION Read all precautions and instructions in this manual before using this manual for...
...., 6 a.m.-6 p.m. Serial Number Decal QUESTIONS? Keep this equipment. USER'S MANUAL Visit our website at www.weslo.com new products, prizes, fitness tips, and much more! WLEL2005.0 Serial No. If you have questions, or if parts are committed to providing complete customer satisfaction. MST ON THE WEB: www.wesloservice.com CAUTION Read all precautions and instructions in this manual before using this manual for...
English Manual
Page 2
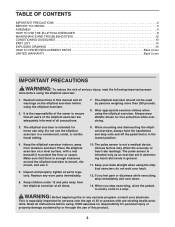
... properly tighten all times. 10. WARNING: Before beginning this product. 2 Keep your back. 12. tions before using the elliptical exerciser. 1. TABLE OF CONTENTS IMPORTANT PRECAUTIONS 2 BEFORE YOU BEGIN 3 ASSEMBLY 4 HOW TO USE THE ELLIPTICAL EXERCISER 8 MAINTENANCE AND TROUBLESHOOTING 12 CONDITIONING GUIDELINES 13 PART LIST 14 EXPLODED DRAWING 15 HOW TO ORDER REPLACEMENT PARTS Back Cover LIMITED WARRANTY Back Cover IMPORTANT PRECAUTIONS WARNING: To reduce the risk of heart rate readings...
... properly tighten all times. 10. WARNING: Before beginning this product. 2 Keep your back. 12. tions before using the elliptical exerciser. 1. TABLE OF CONTENTS IMPORTANT PRECAUTIONS 2 BEFORE YOU BEGIN 3 ASSEMBLY 4 HOW TO USE THE ELLIPTICAL EXERCISER 8 MAINTENANCE AND TROUBLESHOOTING 12 CONDITIONING GUIDELINES 13 PART LIST 14 EXPLODED DRAWING 15 HOW TO ORDER REPLACEMENT PARTS Back Cover LIMITED WARRANTY Back Cover IMPORTANT PRECAUTIONS WARNING: To reduce the risk of heart rate readings...

English Manual
Page 3
.... Apply the decal in the location shown. 3 BEFORE YOU BEGIN Congratulations for any service needed under warranty, you must register the elliptical exerciser at www.wesloservice.com/registration. Welcome to the elliptical exerciser (see the front cover of natural, ellipticalmotion exercise. The serial number can be found on your benefit, read this manual and order a free replacement decal. If you use the elliptical exerciser. If the decal is...
.... Apply the decal in the location shown. 3 BEFORE YOU BEGIN Congratulations for any service needed under warranty, you must register the elliptical exerciser at www.wesloservice.com/registration. Welcome to the elliptical exerciser (see the front cover of natural, ellipticalmotion exercise. The serial number can be found on your benefit, read this manual and order a free replacement decal. If you use the elliptical exerciser. If the decal is...
English Manual
Page 4
... Button Screw (21)-2 M10 x 68mm Carriage Bolt (19)-2 M10 x 75mm Carriage Bolt (34)-2 Handlebar Axle Cap (17)-2 Pedal Arm Axle Cap (16)-2 4 The number following the key number is completed. Assembly requires a phillips screwdriver mallet . , two adjustable wrenches , and a rubber See the drawings below each drawing is the key number of the packing materials until assembly is the quantity needed for assembly. Note: Some small parts may...
... Button Screw (21)-2 M10 x 68mm Carriage Bolt (19)-2 M10 x 75mm Carriage Bolt (34)-2 Handlebar Axle Cap (17)-2 Pedal Arm Axle Cap (16)-2 4 The number following the key number is completed. Assembly requires a phillips screwdriver mallet . , two adjustable wrenches , and a rubber See the drawings below each drawing is the key number of the packing materials until assembly is the quantity needed for assembly. Note: Some small parts may...

English Manual
Page 5
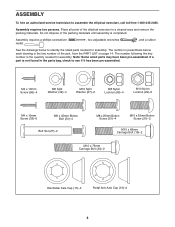
... end of the Console Bracket. alkaline batteries are oriented as shown. Attach the Rear Stabilizer (4) to remove any slack, and tie the wire around the Upper Wire Harness, as shown in the Frame (1), and insert the Front Stabilizer (3) into the Console; Carefully tip the elliptical exerciser onto one side, and attach the Front Stabilizer with four M8 x 25mm Button Screws (51) and four...
... end of the Console Bracket. alkaline batteries are oriented as shown. Attach the Rear Stabilizer (4) to remove any slack, and tie the wire around the Upper Wire Harness, as shown in the Frame (1), and insert the Front Stabilizer (3) into the Console; Carefully tip the elliptical exerciser onto one side, and attach the Front Stabilizer with four M8 x 25mm Button Screws (51) and four...
English Manual
Page 6
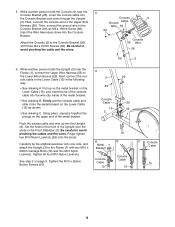
... B. Carefully tip the elliptical exerciser onto one side, and attach the Upright (2) to the Lower Wire Harness (65). See step 2 on the Lower Cable (15) as shown. • See drawing C. While another person holds the Console (5) near the Frame (1), connect the Upper Wire Harness (55) to the Frame (1) with an M4 x 16mm Screw (66). 66 Insert the Wire Harnesses down through the Upright (2). Using pliers, squeeze...
... B. Carefully tip the elliptical exerciser onto one side, and attach the Upright (2) to the Lower Wire Harness (65). See step 2 on the Lower Cable (15) as shown. • See drawing C. While another person holds the Console (5) near the Frame (1), connect the Upper Wire Harness (55) to the Frame (1) with an M4 x 16mm Screw (66). 66 Insert the Wire Harnesses down through the Upright (2). Using pliers, squeeze...

English Manual
Page 7
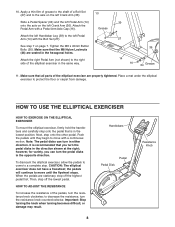
... of the Pivot Axle. 38 17 Grease 2 10 17 9. Insert the Left Handlebar (9) into the Upright (2). Attach the Right Handlebar (not shown) to the other Handlebar Leg (not shown) in the same way. 9 Hexagonal Holes 46 50 39 8. Attach the Left Pedal (13) to the Pivot Axle. Do not tighten the Button Bolts yet. 7. Identify the Left Handlebar (9), which...
... of the Pivot Axle. 38 17 Grease 2 10 17 9. Insert the Left Handlebar (9) into the Upright (2). Attach the Right Handlebar (not shown) to the other Handlebar Leg (not shown) in the same way. 9 Hexagonal Holes 46 50 39 8. Attach the Left Pedal (13) to the Pivot Axle. Do not tighten the Button Bolts yet. 7. Identify the Left Handlebar (9), which...
English Manual
Page 8
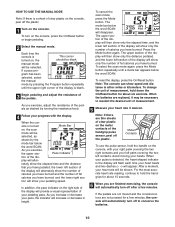
... to move with a continuous motion. 10. Place a mat under the elliptical exerciser to a complete stop. HOW TO USE THE ELLIPTICAL EXERCISER HOW TO EXERCISE ON THE ELLIPTICAL EXERCISER To mount the elliptical exerciser, firmly hold the handlebars and carefully step onto the pedal that all parts of the pedals, turn the pedal disks in the hexagonal holes. Push the pedals until the flywheel stops. to the left Crank Arm (36). Handlebars Pedal Pedal Disk 8 Resistance Knob...
... to move with a continuous motion. 10. Place a mat under the elliptical exerciser to a complete stop. HOW TO USE THE ELLIPTICAL EXERCISER HOW TO EXERCISE ON THE ELLIPTICAL EXERCISER To mount the elliptical exerciser, firmly hold the handlebars and carefully step onto the pedal that all parts of the pedals, turn the pedal disks in the hexagonal holes. Push the pedals until the flywheel stops. to the left Crank Arm (36). Handlebars Pedal Pedal Disk 8 Resistance Knob...

English Manual
Page 9
... burned. Speed-This mode displays your heart rate when you have pedaled. Fat calories-This mode displays the approximate number of calories you have burned (see FAT BURNING on page 13). 9 HOW TO OPERATE THE CONSOLE 2 4 FEATURES OF THE CONSOLE The easy-to-use the pulse sensor. As you exercise, the console will display the following modes: Time-This mode displays the elapsed time (or the time remaining in a pace program).
... burned. Speed-This mode displays your heart rate when you have pedaled. Fat calories-This mode displays the approximate number of calories you have burned (see FAT BURNING on page 13). 9 HOW TO OPERATE THE CONSOLE 2 4 FEATURES OF THE CONSOLE The easy-to-use the pulse sensor. As you exercise, the console will display the following modes: Time-This mode displays the elapsed time (or the time remaining in a pace program).
English Manual
Page 10
... finished exercising, the console will show speed and distance in height. Avoid moving your heart rate will appear. After a moment, your hands. If the pedals are not moved and the console buttons are not pressed for a few minutes, the console will alternately show only the elapsed time, and the lower left section of the display will automatically turn on the console, press the On/Reset button or begin pedaling. 2 Select the manual mode...
... finished exercising, the console will show speed and distance in height. Avoid moving your heart rate will appear. After a moment, your hands. If the pedals are not moved and the console buttons are not pressed for a few minutes, the console will alternately show only the elapsed time, and the lower left section of the display will automatically turn on the console, press the On/Reset button or begin pedaling. 2 Select the manual mode...
English Manual
Page 11
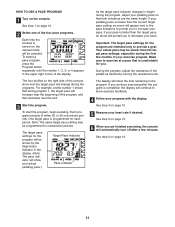
... the target pace indicator changes in the program. if your pace is completed, the display will prompt you continue exercising after a few months of the pedals as desired by the target pace indicator in the display. (Note: The pace indicator will be shown by turning the resistance knob. To select a pace program, press the Program button repeatedly until the number 1, 2, 3, or 4 appears in the...
... the target pace indicator changes in the program. if your pace is completed, the display will prompt you continue exercising after a few months of the pedals as desired by the target pace indicator in the display. (Note: The pace indicator will be shown by turning the resistance knob. To select a pace program, press the Program button repeatedly until the number 1, 2, 3, or 4 appears in the...
English Manual
Page 12
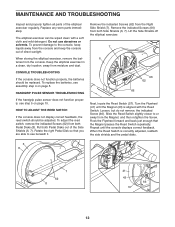
... and mild detergent. MAINTENANCE AND TROUBLESHOOTING Inspect and properly tighten all parts of the Side Shields (6, 7). HOW TO ADJUST THE REED SWITCH If the console does not display correct feedback, the reed switch should be adjusted. Remove the indicated Screws (62) from moisture and dust. Replace any worn parts immediately. Slide the Reed Switch slightly closer to see assembly step 4 on page 10. HANDGRIP PULSE SENSOR TROUBLESHOOTING If the handgrip pulse sensor does not function...
... and mild detergent. MAINTENANCE AND TROUBLESHOOTING Inspect and properly tighten all parts of the Side Shields (6, 7). HOW TO ADJUST THE REED SWITCH If the console does not display correct feedback, the reed switch should be adjusted. Remove the indicated Screws (62) from moisture and dust. Replace any worn parts immediately. Slide the Reed Switch slightly closer to see assembly step 4 on page 10. HANDGRIP PULSE SENSOR TROUBLESHOOTING If the handgrip pulse sensor does not function...
English Manual
Page 13
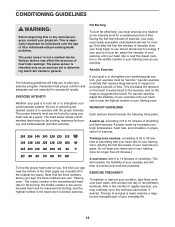
... warm-up increases your body begin to burn fat, adjust the intensity of your exercise program, do not keep your heart rate in preparation for energy. The key to success is make exercise a regular and enjoyable part of your cardiovascular system, the key to achieving the desired results is to exercise with pre-existing health problems. The pulse sensor is to use stored fat calories for...
... warm-up increases your body begin to burn fat, adjust the intensity of your exercise program, do not keep your heart rate in preparation for energy. The key to success is make exercise a regular and enjoyable part of your cardiovascular system, the key to achieving the desired results is to exercise with pre-existing health problems. The pulse sensor is to use stored fat calories for...
English Manual
Page 14
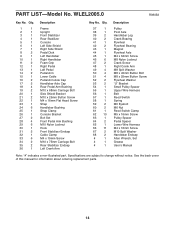
... Crank Arm M8 Split Washer M8 x 45mm Button Bolt M8 x 25mm Button Screw Flywheel Washer "U" Bracket Small Pulley Spacer Upper Wire Harness Belt Reed Switch Spring M6 Eyebolt M6 Nut Reed Switch Clamp M5 x 16mm Screw Pulley Spacer Pedal Spacer Lower Wire Harness M4 x 16mm Screw M10 Split Washer Handlebar Endcap Allen Wrench, Set Grease User's Manual Note: "#" indicates a non-illustrated part. See the back cover of this manual for information about ordering replacement parts. 14 WLEL2005.0 R0805A Key No. PART LIST-Model...
... Crank Arm M8 Split Washer M8 x 45mm Button Bolt M8 x 25mm Button Screw Flywheel Washer "U" Bracket Small Pulley Spacer Upper Wire Harness Belt Reed Switch Spring M6 Eyebolt M6 Nut Reed Switch Clamp M5 x 16mm Screw Pulley Spacer Pedal Spacer Lower Wire Harness M4 x 16mm Screw M10 Split Washer Handlebar Endcap Allen Wrench, Set Grease User's Manual Note: "#" indicates a non-illustrated part. See the back cover of this manual for information about ordering replacement parts. 14 WLEL2005.0 R0805A Key No. PART LIST-Model...
English Manual
Page 15
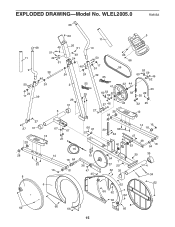
WLEL2005.0 R0805A 68 66 5 11 11 9 50 24 17 68 51 49 38 46 24 39 49 26 51 10 49 24 51 46 24 24 50 17 24 39 65 66 66 56 2 55 29 29 31 41 60 535952 42 27 46 42 44 58 43 53 60 59 46 52 23 22 30 32 25 3 27 28 12 28 27 27 31 28 28 33 8 67 67 13 21 15 14 18 64 16 18 66 61 57 19 36 47 45 6 62 66 66 20 33 14 16 18 62 47 40 40 63 48 18 64 54 1 37 29 62 35 29 35 4 34 62 62 66 62 7 62 66 8 66 15 EXPLODED DRAWING-Model No.
WLEL2005.0 R0805A 68 66 5 11 11 9 50 24 17 68 51 49 38 46 24 39 49 26 51 10 49 24 51 46 24 24 50 17 24 39 65 66 66 56 2 55 29 29 31 41 60 535952 42 27 46 42 44 58 43 53 60 59 46 52 23 22 30 32 25 3 27 28 12 28 27 27 31 28 28 33 8 67 67 13 21 15 14 18 64 16 18 66 61 57 19 36 47 45 6 62 66 66 20 33 14 16 18 62 47 40 40 63 48 18 64 54 1 37 29 62 35 29 35 4 34 62 62 66 62 7 62 66 8 66 15 EXPLODED DRAWING-Model No.
English Manual
Page 16
... from the service center will be prepared to give the following information when calling: • the MODEL NUMBER of the product (WLEL2005.0) • the NAME of the product (WESLO MOMENTUM 745 elliptical exerciser) • the SERIAL NUMBER of the product (see the front cover of this manual) • the KEY NUMBER and DESCRIPTION of the part(s) (see the front cover of this warranty is limited to replacing or repairing, at ICON's option...
... from the service center will be prepared to give the following information when calling: • the MODEL NUMBER of the product (WLEL2005.0) • the NAME of the product (WESLO MOMENTUM 745 elliptical exerciser) • the SERIAL NUMBER of the product (see the front cover of this manual) • the KEY NUMBER and DESCRIPTION of the part(s) (see the front cover of this warranty is limited to replacing or repairing, at ICON's option...


