
English Manual
Page 1
... all precautions and instructions in the space above for future reference. Keep this equipment. USER'S MANUAL Patent Pending Visit our website at www.weslo.com new products, prizes, fitness tips, and much more! Serial Number Decal QUESTIONS? If you . CUSTOMER HOT LINE: 1-800-999-3756 Mon.ÐFri., 6 a.m.Ð6 p.m. Write the serial number in this manual before using this manual for reference. The...
... all precautions and instructions in the space above for future reference. Keep this equipment. USER'S MANUAL Patent Pending Visit our website at www.weslo.com new products, prizes, fitness tips, and much more! Serial Number Decal QUESTIONS? If you . CUSTOMER HOT LINE: 1-800-999-3756 Mon.ÐFri., 6 a.m.Ð6 p.m. Write the serial number in this manual before using this manual for reference. The...
English Manual
Page 2
¨ TABLE OF CONTENTS IMPORTANT PRECAUTIONS 3 BEFORE YOU BEGIN 4 ASSEMBLY 5 HOW TO USE THE EXERCISE CYCLE 9 MAINTENANCE AND STORAGE 11 CONDITIONING GUIDELINES 12 PART LIST 14 EXPLODED DRAWING 15 ORDERING REPLACEMENT PARTS Back Cover LIMITED WARRANTY Back Cover 2
¨ TABLE OF CONTENTS IMPORTANT PRECAUTIONS 3 BEFORE YOU BEGIN 4 ASSEMBLY 5 HOW TO USE THE EXERCISE CYCLE 9 MAINTENANCE AND STORAGE 11 CONDITIONING GUIDELINES 12 PART LIST 14 EXPLODED DRAWING 15 ORDERING REPLACEMENT PARTS Back Cover LIMITED WARRANTY Back Cover 2

English Manual
Page 3
... at all instructions before using the exercise cycle. 8. Read owner's manual and follow instructions. Use the exercise cycle indoors on the exercise cycle. Inspect and tighten all instructions in -home use only. CAUTION DECAL PLACEMENT: The decal shown below has been placed on a level surface. Decal is not legible, please call our Customer Service Department toll-free at any worn parts immediately. 5. Replace any time while exercising, stop immediately...
... at all instructions before using the exercise cycle. 8. Read owner's manual and follow instructions. Use the exercise cycle indoors on the exercise cycle. Inspect and tighten all instructions in -home use only. CAUTION DECAL PLACEMENT: The decal shown below has been placed on a level surface. Decal is not legible, please call our Customer Service Department toll-free at any worn parts immediately. 5. Replace any time while exercising, stop immediately...
English Manual
Page 4
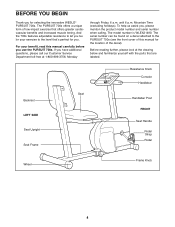
... 700s features adjustable resistance to let you tailor your benefit, read this manual for you use the PURSUIT 700s. The PURSUIT 700s offers a unique form of low-impact exercise that Õs perfect for the location of this manual carefully before you . The model number is WLEX21490. For your exercise to the PURSUIT 700s (see the front cover of the decal). Backrest LEFT SIDE Seat Upright Seat Frame Seat Resistance Knob Console Handlebar Handlebar Post FRONT Seat Handle Pedal Strap Pedal...
... 700s features adjustable resistance to let you tailor your benefit, read this manual for you use the PURSUIT 700s. The PURSUIT 700s offers a unique form of low-impact exercise that Õs perfect for the location of this manual carefully before you . The model number is WLEX21490. For your exercise to the PURSUIT 700s (see the front cover of the decal). Backrest LEFT SIDE Seat Upright Seat Frame Seat Resistance Knob Console Handlebar Handlebar Post FRONT Seat Handle Pedal Strap Pedal...
English Manual
Page 5
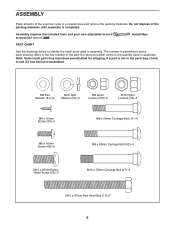
... assembly is not in a cleared area and remove the packing materials. If a part is completed. Assembly requires the included tools and your own adjustable wrench screwdriver . and phillips PART CHART Use the drawings below each drawing refers to see if it has been pre-assembled. Do not dispose of the exercise cycle in the parts bag, check to the key number of the part...
... assembly is not in a cleared area and remove the packing materials. If a part is completed. Assembly requires the included tools and your own adjustable wrench screwdriver . and phillips PART CHART Use the drawings below each drawing refers to see if it has been pre-assembled. Do not dispose of the exercise cycle in the parts bag, check to the key number of the part...

English Manual
Page 6
... excess Reed Switch Wire (42) and Resistance Cable (31) up through the Handlebar Post. Press two batteries into the Console. Make sure that the mark on the right side of Console 4 33 Console Wire 43 42 32 10 3 43 6 Back of the 2 Frame (1). Slide the Seat Frame (2) out until it stops. Next, attach the Console (33) to the Handlebar Post (3) with three M10 x 25mm Button Head Screws...
... excess Reed Switch Wire (42) and Resistance Cable (31) up through the Handlebar Post. Press two batteries into the Console. Make sure that the mark on the right side of Console 4 33 Console Wire 43 42 32 10 3 43 6 Back of the 2 Frame (1). Slide the Seat Frame (2) out until it stops. Next, attach the Console (33) to the Handlebar Post (3) with three M10 x 25mm Button Head Screws...
English Manual
Page 7
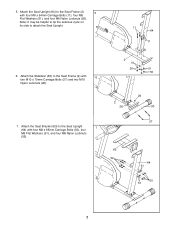
... 7. Attach the Seat Upright (64) to the Seat Frame (2) with four M8 x 54mm Carriage Bolts (11), four M8 Flat Washers (51), and four M8 Nylon Locknuts (55). Attach the Seat Bracket (63) to attach the Seat Upright. 11 64 11 6. Note: It may be helpful to tip the exercise cycle on its side to the Seat Upright 7... (64) with four M8 x 65mm Carriage Bolts (52), four M8 Flat Washers (51), and ...
... 7. Attach the Seat Upright (64) to the Seat Frame (2) with four M8 x 54mm Carriage Bolts (11), four M8 Flat Washers (51), and four M8 Nylon Locknuts (55). Attach the Seat Bracket (63) to attach the Seat Upright. 11 64 11 6. Note: It may be helpful to tip the exercise cycle on its side to the Seat Upright 7... (64) with four M8 x 65mm Carriage Bolts (52), four M8 Flat Washers (51), and ...

English Manual
Page 8
Attach the Seat Handles (25) to the Seat Bracket 9 (63) with 8 four M6 x 16mm Screws (46). 44 63 9. Attach the Seat (44) to the Seat Upright (64) with four M6 x 16mm Screws (46). 12 25 10 63 12 45 46 64 8 Attach the Backrest (45) to the Seat Bracket (63) with two M10 x 97mm Hex Head Bolts (12), and two M10 Nylon Locknuts (26). 46 25 26 10. 8.
Attach the Seat Handles (25) to the Seat Bracket 9 (63) with 8 four M6 x 16mm Screws (46). 44 63 9. Attach the Seat (44) to the Seat Upright (64) with four M6 x 16mm Screws (46). 12 25 10 63 12 45 46 64 8 Attach the Backrest (45) to the Seat Bracket (63) with two M10 x 97mm Hex Head Bolts (12), and two M10 Nylon Locknuts (26). 46 25 26 10. 8.
English Manual
Page 9
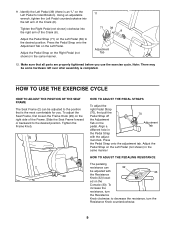
... that all parts are properly tightened before you . ment tab. Adjust the Pedal Strap on the Right Pedal (not shown) in the Pedal Strap with 33 the Resistance Knob (32) locat- Adjustment Tab 12. Press the Pedal Strap onto the adjustment tab. Using an adjustable wrench, tighten the Left Pedal counterclockwise into the right arm of the Crank (8). 71 39 8 Adjust the Pedal Strap (71) on the right side of the Crank (8). To adjust the Seat Frame, first...
... that all parts are properly tightened before you . ment tab. Adjust the Pedal Strap on the Right Pedal (not shown) in the Pedal Strap with 33 the Resistance Knob (32) locat- Adjustment Tab 12. Press the Pedal Strap onto the adjustment tab. Using an adjustable wrench, tighten the Left Pedal counterclockwise into the right arm of the Crank (8). 71 39 8 Adjust the Pedal Strap (71) on the right side of the Crank (8). To adjust the Seat Frame, first...
English Manual
Page 10
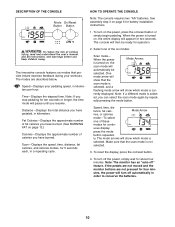
...- ly. The mode arrows will appear for battery installation instructions. 1. If the pedals are not moved and the monitor buttons are described below. DistanceÑDisplays the total distance you have burned. (See BURNING FAT on , the entire display will show which mode is select- When the power is cur- The console will show which mode is turned on page 12.) CaloriesÑDisplays the approximate number of fat...
...- ly. The mode arrows will appear for battery installation instructions. 1. If the pedals are not moved and the monitor buttons are described below. DistanceÑDisplays the total distance you have burned. (See BURNING FAT on , the entire display will show which mode is select- When the power is cur- The console will show which mode is turned on page 12.) CaloriesÑDisplays the approximate number of fat...
English Manual
Page 11
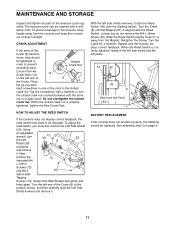
... BATTERY REPLACEMENT If the console does not function properly, the batteries should be adjusted. Turn the Crank (8) until the Magnet (61) is aligned with a soft, damp cloth. See assembly step 3 on the left side shield removed, locate the Reed Switch (42) (see the drawing below). HOW TO ADJUST THE REED SWITCH If the console does not display correct feedback, the reed switch may need to prevent excessive wear. MAINTENANCE AND STORAGE Inspect and tighten...
... BATTERY REPLACEMENT If the console does not function properly, the batteries should be adjusted. Turn the Crank (8) until the Magnet (61) is aligned with a soft, damp cloth. See assembly step 3 on the left side shield removed, locate the Reed Switch (42) (see the drawing below). HOW TO ADJUST THE REED SWITCH If the console does not display correct feedback, the reed switch may need to prevent excessive wear. MAINTENANCE AND STORAGE Inspect and tighten...
English Manual
Page 12
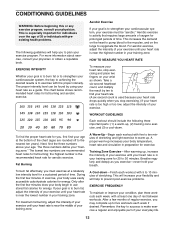
... your body uses easily accessible carbohydrate calories for you stop exercising and place two fingers on the lungs to success is near the highest number in preparation for fat burning and aerobic exercise. Remember, the key to oxygenate the blood. The chart below shows recommended heart rates for exercise. For aerobic exercise, adjust the intensity of your exercise until your condition, plan three workouts each workout...
... your body uses easily accessible carbohydrate calories for you stop exercising and place two fingers on the lungs to success is near the highest number in preparation for fat burning and aerobic exercise. Remember, the key to oxygenate the blood. The chart below shows recommended heart rates for exercise. For aerobic exercise, adjust the intensity of your exercise until your condition, plan three workouts each workout...

English Manual
Page 13
.... Allow your back and shoulders to your hips. Stretches: Hamstrings, lower back and groin. 3. Keep your back leg straight and your hips toward you stretchÑnever bounce. 1. Stretches: Quadriceps and hip muscles. 5. SUGGESTED STRETCHES The correct form for 15 counts, then relax. Move slowly as well. Toe Touch Stretch Stand with the soles...
.... Allow your back and shoulders to your hips. Stretches: Hamstrings, lower back and groin. 3. Keep your back leg straight and your hips toward you stretchÑnever bounce. 1. Stretches: Quadriceps and hip muscles. 5. SUGGESTED STRETCHES The correct form for 15 counts, then relax. Move slowly as well. Toe Touch Stretch Stand with the soles...
English Manual
Page 14
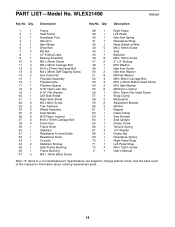
... 24 2 Wheel Assembly 25 2 Seat Handle 26 6 M10 Nylon Locknut 27 2 M10 x 70mm Carriage Bolt 28 4 Foam Grip 29 1 Frame Knob 30 1 Stabilizer 31 1 Resistance Control/Cable 32 1 Resistance Knob 33 1 Console 34 2 Stabilizer Endcap 35 1 Seat Frame Bushing 36 1 Frame Bushing 37 2 M4 x 16mm Black Screw 38 1 Right Pedal 39 1 Left Pedal 40 1 Idler Arm Spring 41 1 Resistance Strap 42 1 Reed Switch w/Wire 43 5 M4 x 16mm Screw 44 1 Seat 45 1 Backrest...
... 24 2 Wheel Assembly 25 2 Seat Handle 26 6 M10 Nylon Locknut 27 2 M10 x 70mm Carriage Bolt 28 4 Foam Grip 29 1 Frame Knob 30 1 Stabilizer 31 1 Resistance Control/Cable 32 1 Resistance Knob 33 1 Console 34 2 Stabilizer Endcap 35 1 Seat Frame Bushing 36 1 Frame Bushing 37 2 M4 x 16mm Black Screw 38 1 Right Pedal 39 1 Left Pedal 40 1 Idler Arm Spring 41 1 Resistance Strap 42 1 Reed Switch w/Wire 43 5 M4 x 16mm Screw 44 1 Seat 45 1 Backrest...
English Manual
Page 16
... any implied warranties of removal, installation or other rights which warranty claims are made must be prepared to give the following information: ¥ The MODEL NUMBER of the product (WLEX21490) ¥ The NAME of the product (WESLO¨ PURSUIT 700s exercise cycle) ¥ The SERIAL NUMBER of the product (see the front cover of this manual) ¥ The KEY NUMBER and DESCRIPTION of the part(s) (see the PART LIST on...
... any implied warranties of removal, installation or other rights which warranty claims are made must be prepared to give the following information: ¥ The MODEL NUMBER of the product (WLEX21490) ¥ The NAME of the product (WESLO¨ PURSUIT 700s exercise cycle) ¥ The SERIAL NUMBER of the product (see the front cover of this manual) ¥ The KEY NUMBER and DESCRIPTION of the part(s) (see the PART LIST on...


