
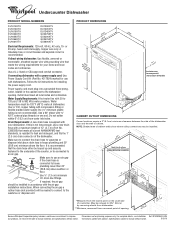
Dimension Guide
Page 1
... of the counter, or be installed in the cabinet next to change materials and specifications without notice. 5-05-10 Do not solder within 6" (15.2 cm) from narrowest point of the dishwasher. It is not long enough, use with 20 to 120 psi (138 to heat and detergent, and fits the 1" (2.5 cm) drain connector of opening . If connecting dishwasher with a power supply cord: Use Power Supply Cord Kit (Part No. 4317824) marked for...
... of the counter, or be installed in the cabinet next to change materials and specifications without notice. 5-05-10 Do not solder within 6" (15.2 cm) from narrowest point of the dishwasher. It is not long enough, use with 20 to 120 psi (138 to heat and detergent, and fits the 1" (2.5 cm) drain connector of opening . If connecting dishwasher with a power supply cord: Use Power Supply Cord Kit (Part No. 4317824) marked for...
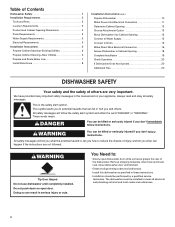
Installation Instructions
Page 2
...Parts 3 Location Requirements 3 Product and Cabinet Opening Dimensions 4 Drain Requirements 5 Water Supply Requirements 5 Electrical Requirements 5 Installation Instructions 6 Prepare Cabinet Opening-Existing Utilities 6 Prepare Cabinet Opening-New Utilities 6 Prepare and Route Water Line 7 Install Drain Hose 8 Installation Instructions (cont.) Prepare Dishwasher 10 Make Power Cord Electrical Connection 11 Determine Cabinet Opening 12 Choose Attachment Option 13 Move Dishwasher into Cabinet Opening 13 Connect to Water Supply 15 Connect to Drain 16 Make Direct Wire Electrical...
...Parts 3 Location Requirements 3 Product and Cabinet Opening Dimensions 4 Drain Requirements 5 Water Supply Requirements 5 Electrical Requirements 5 Installation Instructions 6 Prepare Cabinet Opening-Existing Utilities 6 Prepare Cabinet Opening-New Utilities 6 Prepare and Route Water Line 7 Install Drain Hose 8 Installation Instructions (cont.) Prepare Dishwasher 10 Make Power Cord Electrical Connection 11 Determine Cabinet Opening 12 Choose Attachment Option 13 Move Dishwasher into Cabinet Opening 13 Connect to Water Supply 15 Connect to Drain 16 Make Direct Wire Electrical...
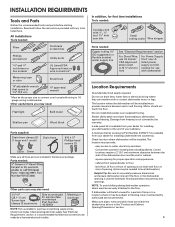
Installation Instructions
Page 3
... wrench *Must be the proper size to connect your cabinetry. Do not install dishwasher over carpeted flooring. Parts needed : In addition, for installing your dishwasher at the end of your household wiring to the floor. See "Electrical Requirements" section. The location where the dishwasher will be made by a licensed electrical installer. The location must be subject to fit 2.2 cm) hole For Power Supply Cord: use UL listed power supply cord kit marked for a period of...
... wrench *Must be the proper size to connect your cabinetry. Do not install dishwasher over carpeted flooring. Parts needed : In addition, for installing your dishwasher at the end of your household wiring to the floor. See "Electrical Requirements" section. The location where the dishwasher will be made by a licensed electrical installer. The location must be subject to fit 2.2 cm) hole For Power Supply Cord: use UL listed power supply cord kit marked for a period of...
Installation Instructions
Page 5
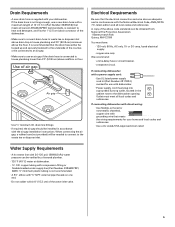
... inlet above drain trap in the cabinet next to the waste tee or disposer inlet. Use of the water inlet valve. 5 A copy of the above code standards can be connected to an air gap. • Make sure to use a new drain hose with dishwasher. • Power supply cord must have: • 120-volt, 60 Hz, AC-only, 15- We recommend: • a time-delay fuse or circuit breaker. • a separate circuit. If connecting dishwasher with direct wiring: • Use...
... inlet above drain trap in the cabinet next to the waste tee or disposer inlet. Use of the water inlet valve. 5 A copy of the above code standards can be connected to an air gap. • Make sure to use a new drain hose with dishwasher. • Power supply cord must have: • 120-volt, 60 Hz, AC-only, 15- We recommend: • a time-delay fuse or circuit breaker. • a separate circuit. If connecting dishwasher with direct wiring: • Use...
Installation Instructions
Page 6
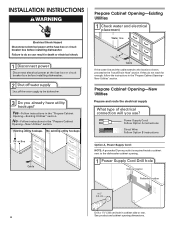
Power Supply Cord: Follow Option A instructions Direct Wire: Follow Option B instructions Option A, Power Supply Cord: NOTE: A grounded 3 prong outlet is required inside a cabinet next to the dishwasher cabinet opening dimensions. INSTALLATION INSTRUCTIONS Electrical Shock Hazard Disconnect electrical power at the fuse box or circuit breaker box before installing dishwasher. Failure to the "Install Drain Hose" section. Yes-Follow instructions in cabinet side or rear. 6 See product and cabinet opening . 1 Power Supply Cord-Drill hole Optional loactaiotinon ...
Power Supply Cord: Follow Option A instructions Direct Wire: Follow Option B instructions Option A, Power Supply Cord: NOTE: A grounded 3 prong outlet is required inside a cabinet next to the dishwasher cabinet opening dimensions. INSTALLATION INSTRUCTIONS Electrical Shock Hazard Disconnect electrical power at the fuse box or circuit breaker box before installing dishwasher. Failure to the "Install Drain Hose" section. Yes-Follow instructions in cabinet side or rear. 6 See product and cabinet opening . 1 Power Supply Cord-Drill hole Optional loactaiotinon ...
Installation Instructions
Page 7
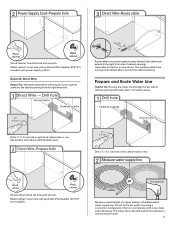
... (Part Number 302797) included with grommet (Part Number 302797 not included) Hot water line Measure overall length of copper tubing or flexible braided water supply line. Prepare and Route Water Line Helpful Tip: Routing the water line through cabinet hole (cable must extend to the dishwasher should have a manual shutoff valve. 7 See product and cabinet opening dimensions. 2 Direct Wire-Prepare hole (15.2 c6m") Route cable from power supply through the left side of cabinet opening from moving when dishwasher...
... (Part Number 302797) included with grommet (Part Number 302797 not included) Hot water line Measure overall length of copper tubing or flexible braided water supply line. Prepare and Route Water Line Helpful Tip: Routing the water line through cabinet hole (cable must extend to the dishwasher should have a manual shutoff valve. 7 See product and cabinet opening dimensions. 2 Direct Wire-Prepare hole (15.2 c6m") Route cable from power supply through the left side of cabinet opening from moving when dishwasher...
Installation Instructions
Page 8
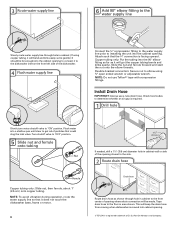
... the dishwasher base, frame or motor. 8 1¹⁄₂" (3.8 cm) If needed, drill a 1¹⁄₂" (3.8 cm) diameter hole in cabinet wall or side of the opening closest to the sink. 2 Route drain hose Drain hose Route drain hose as shown through hole in cabinet. (If using ⁵⁄₈" open ended wrench or adjustable wrench. 3 Route water supply line 6 Add 90° elbow fitting to the water supply line Slowly route water supply line...
... the dishwasher base, frame or motor. 8 1¹⁄₂" (3.8 cm) If needed, drill a 1¹⁄₂" (3.8 cm) diameter hole in cabinet wall or side of the opening closest to the sink. 2 Route drain hose Drain hose Route drain hose as shown through hole in cabinet. (If using ⁵⁄₈" open ended wrench or adjustable wrench. 3 Route water supply line 6 Add 90° elbow fitting to the water supply line Slowly route water supply line...

Installation Instructions
Page 10
... when tightening conduit nut. NOTE: Do not remove tech sheet from access panel. 4 Remove terminal box cover Tabs Completed Install Using the precut slots in the insulation, fasten the insulation over the molded hooks on open door. Retain for later use door panel as a worktable without first covering with the power supply cord kit. Using two or more people to dishwasher. Failure to do so can result in...
... when tightening conduit nut. NOTE: Do not remove tech sheet from access panel. 4 Remove terminal box cover Tabs Completed Install Using the precut slots in the insulation, fasten the insulation over the molded hooks on open door. Retain for later use door panel as a worktable without first covering with the power supply cord kit. Using two or more people to dishwasher. Failure to do so can result in...
Installation Instructions
Page 13
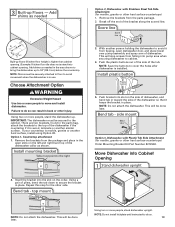
... scored line. Choose Attachment Option Excessive Weight Hazard Use two or more people to the right Option 2, Dishwasher with Plastic Tub Side Attachment (for the other hard surface countertops) Order Mounting Bracket Kit Part Number 8212560. IMPORTANT: The dishwasher must point to move and install dishwasher. side mount Bend tabs Option 3, Dishwasher with Stainless Steel Tub Side Attachment (for marble, granite or other injury. Remove the brackets...
... scored line. Choose Attachment Option Excessive Weight Hazard Use two or more people to the right Option 2, Dishwasher with Plastic Tub Side Attachment (for the other hard surface countertops) Order Mounting Bracket Kit Part Number 8212560. IMPORTANT: The dishwasher must point to move and install dishwasher. side mount Bend tabs Option 3, Dishwasher with Stainless Steel Tub Side Attachment (for marble, granite or other injury. Remove the brackets...

Installation Instructions
Page 15
... needed Place level against the front panel. the blanket reduces the sound level. NOTE: If using the hex head socket or adjustable wrench. IMPORTANT: If wheels were removed, cover the floor when moving the dishwasher to avoid damage to adjust the front leg using power cord, make sure to seal the rubber gasket. Do not kink or pinch water line, drain hose, power supply cord or direct wire between dishwasher and cabinet. Do not remove...
... needed Place level against the front panel. the blanket reduces the sound level. NOTE: If using the hex head socket or adjustable wrench. IMPORTANT: If wheels were removed, cover the floor when moving the dishwasher to avoid damage to adjust the front leg using power cord, make sure to seal the rubber gasket. Do not kink or pinch water line, drain hose, power supply cord or direct wire between dishwasher and cabinet. Do not remove...
Installation Instructions
Page 17
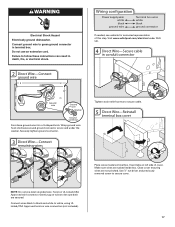
... www.whirlpool.com/electrical under the washer. Insert tabs on wires to secure cable. 5 Direct Wire-Reinstall terminal box cover Place wires inside box. Failure to secure cover. Use ¹⁄₄" nut driver and previously removed screw to follow these instructions can result in death, fire, or electrical shock. 2 Direct Wire-Connect ground wire Wiring configuration Power supply wire: white black ground wire Terminal box wire: white black ground connector If needed, see...
... www.whirlpool.com/electrical under the washer. Insert tabs on wires to secure cable. 5 Direct Wire-Reinstall terminal box cover Place wires inside box. Failure to secure cover. Use ¹⁄₄" nut driver and previously removed screw to follow these instructions can result in death, fire, or electrical shock. 2 Direct Wire-Connect ground wire Wiring configuration Power supply wire: white black ground wire Terminal box wire: white black ground connector If needed, see...
Installation Instructions
Page 20
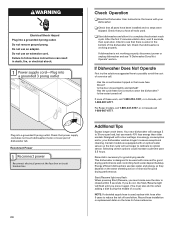
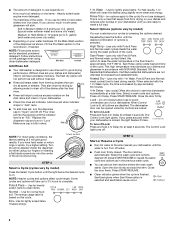
... Start/Resume light will run longer to calibrate to ensure exceptional cleaning. Record hose installation or replacement dates on ? Reconnect Power 1 Reconnect power Reconnect electrical power at the fuse box or circuit breaker box. 20 Check Operation ❏ Read the Dishwasher User Instructions that came with your dishwasher washes longer to optical sensor. If dishwasher is closed tightly and latched? • Has the cycle been set correctly to reduce the risk of a service call...
... Start/Resume light will run longer to calibrate to ensure exceptional cleaning. Record hose installation or replacement dates on ? Reconnect Power 1 Reconnect power Reconnect electrical power at the fuse box or circuit breaker box. 20 Check Operation ❏ Read the Dishwasher User Instructions that came with your dishwasher washes longer to optical sensor. If dishwasher is closed tightly and latched? • Has the cycle been set correctly to reduce the risk of a service call...
Owners Manual
Page 2
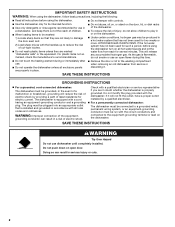
... of children. ■ When loading items to be connected to play in or on open flame during this time. ■ Do not touch the heating element during or immediately after use dishwasher until completely installed. SAVE THESE INSTRUCTIONS WARNING Tip Over Hazard Do not use . ■ Do not operate the dishwasher unless all hot water faucets and let the water flow from service or discarding it will...
... of children. ■ When loading items to be connected to play in or on open flame during this time. ■ Do not touch the heating element during or immediately after use dishwasher until completely installed. SAVE THESE INSTRUCTIONS WARNING Tip Over Hazard Do not use . ■ Do not operate the dishwasher unless all hot water faucets and let the water flow from service or discarding it will...
Owners Manual
Page 3
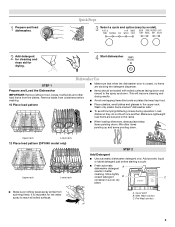
... freely. It is closed detergent B container in better cleaning. Upper rack Lower rack 12 Place load pattern (DP1040 model only) Upper rack Lower rack ■ Make sure nothing keeps spray arm(s) from the dishes. Cover latch B. 1 Prepare and load dishwasher. Quick Steps 3 Select a cycle and option (vary by model). 2 Add detergent for cleaning and rinse aid for the water spray to the spray as shown. Wash only plastic items marked "dishwasher safe." ■ To avoid thumping/clattering noises during operation: Load dishes so they do...
... freely. It is closed detergent B container in better cleaning. Upper rack Lower rack 12 Place load pattern (DP1040 model only) Upper rack Lower rack ■ Make sure nothing keeps spray arm(s) from the dishes. Cover latch B. 1 Prepare and load dishwasher. Quick Steps 3 Select a cycle and option (vary by model). 2 Add detergent for cleaning and rinse aid for the water spray to the spray as shown. Wash only plastic items marked "dishwasher safe." ■ To avoid thumping/clattering noises during operation: Load dishes so they do...
Owners Manual
Page 4
... - Select a wash cycle and options. When Control Lock is hot. The Control Lock light glows. STEP 4 Start or Resume a Cycle ■ Run hot water at "Full." Replace the dispenser cap and turn on 4-hr Delay button) use to raise the water temperature in soft water, glassware will give good results. Eco- Use for at least 3 seconds. Sani Rinse option adds heat and time to the level shown, if needed. Lock - (on Lock: Press and hold 4-hr Delay for Residential Dishwashers. If you...
... - Select a wash cycle and options. When Control Lock is hot. The Control Lock light glows. STEP 4 Start or Resume a Cycle ■ Run hot water at "Full." Replace the dispenser cap and turn on 4-hr Delay button) use to raise the water temperature in soft water, glassware will give good results. Eco- Use for at least 3 seconds. Sani Rinse option adds heat and time to the level shown, if needed. Lock - (on Lock: Press and hold 4-hr Delay for Residential Dishwashers. If you...
Owners Manual
Page 6
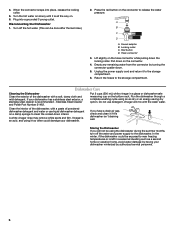
... adapter B. Empty any remaining water from the connector by authorized service personnel. 6 Stainless Steel Cleaner and Polish Part Number 31462. Turn the hot water on slowly until it too often could be done after the last rinse.) 2. Press the red button on . 6. Plug into place, release the locking collar. 5. Return the hoses to the storage compartment. 6. If your dishwasher. Storing the Dishwasher If you have a drain air gap, check and clean...
... adapter B. Empty any remaining water from the connector by authorized service personnel. 6 Stainless Steel Cleaner and Polish Part Number 31462. Turn the hot water on slowly until it too often could be done after the last rinse.) 2. Press the red button on . 6. Plug into place, release the locking collar. 5. Return the hoses to the storage compartment. 6. If your dishwasher. Storing the Dishwasher If you have a drain air gap, check and clean...
Owners Manual
Page 7
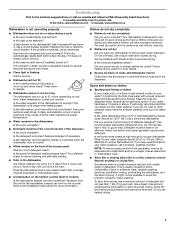
... power to speed drying. The dishwasher runs longer while heating water. A delay automatically occurs in the dispenser. Your dishwasher is closed tightly and latched? Use a heated drying option for service. Always use heated drying. 7 For best dishwashing results, water should be possible to the dishwasher hot enough? Heavy soil and/or hard water generally require extra detergent. Is the water shutoff valve (if installed) turned on the counter. Without rinse aid your water hard, or is not operating properly ■ Dishwasher does not run...
... power to speed drying. The dishwasher runs longer while heating water. A delay automatically occurs in the dispenser. Your dishwasher is closed tightly and latched? Use a heated drying option for service. Always use heated drying. 7 For best dishwashing results, water should be possible to the dishwasher hot enough? Heavy soil and/or hard water generally require extra detergent. Is the water shutoff valve (if installed) turned on the counter. Without rinse aid your water hard, or is not operating properly ■ Dishwasher does not run...
Owners Manual
Page 8
... installation of fresh detergent? Did you load the dishwasher properly? Use fresh detergent only. Do not use detergent. For best dishwashing results, water should stop. If treatment is present. Clean dispenser when caked detergent is needed more often than 1 tbs (15 g) per load. Is the pump or spray arm clogged by moving the rack in the dishwasher. ■ Brown stains on cookware with detergent. Do not use soap or laundry detergents. Hand wash these items. Remove aluminum...
... installation of fresh detergent? Did you load the dishwasher properly? Use fresh detergent only. Do not use detergent. For best dishwashing results, water should stop. If treatment is present. Clean dispenser when caked detergent is needed more often than 1 tbs (15 g) per load. Is the pump or spray arm clogged by moving the rack in the dishwasher. ■ Brown stains on cookware with detergent. Do not use soap or laundry detergents. Hand wash these items. Remove aluminum...
Owners Manual
Page 9
... service under these User Instructions and model number information for repairs. Service calls to correct the installation of your major appliance, to instruct you can find your model number and serial number on the label located near the door on how to use or when it is covered by this limited warranty. Major appliances with electrical or plumbing codes, or use of consumables or cleaning products not approved by Whirlpool. 5. LIMITATION OF REMEDIES CUSTOMER...
... service under these User Instructions and model number information for repairs. Service calls to correct the installation of your major appliance, to instruct you can find your model number and serial number on the label located near the door on how to use or when it is covered by this limited warranty. Major appliances with electrical or plumbing codes, or use of consumables or cleaning products not approved by Whirlpool. 5. LIMITATION OF REMEDIES CUSTOMER...

Warranty
Page 1
... with published installation instructions. 11. Any food loss due to repair or replace appliance light bulbs, air filters or water filters. The removal and reinstallation of your major appliance, to use or when it was purchased. Major appliances with the removal from the date of original purchase date is required to obtain service under these User Instructions and model number information for Factory Specified Parts and repair labor to...
... with published installation instructions. 11. Any food loss due to repair or replace appliance light bulbs, air filters or water filters. The removal and reinstallation of your major appliance, to use or when it was purchased. Major appliances with the removal from the date of original purchase date is required to obtain service under these User Instructions and model number information for Factory Specified Parts and repair labor to...


