Dimension Guide
Page 1
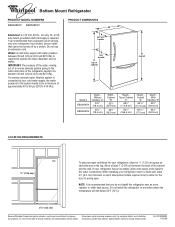
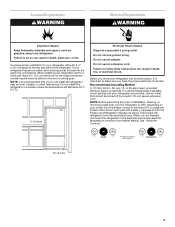
...15 16 " 333⁄8" (170 cm) (84.8 cm) LOCATION REQUIREMENTS ¹⁄₂" (1.25 cm) To ensure proper ventilation for your refrigerator has an ice maker, allow extra space at the back for the door to improve Dimensions are for 1⁄2" (1.25 cm) space on each ...1" (2.54 cm) between the back of the refrigerator needs to be turned off by a switch. Do not install the refrigerator in a location where the temperature will fall below 55°F (13°C). 2¹⁄₂" (6.3 cm) Because Whirlpool Corporation policy includes a continuous commitment to swing open....
...15 16 " 333⁄8" (170 cm) (84.8 cm) LOCATION REQUIREMENTS ¹⁄₂" (1.25 cm) To ensure proper ventilation for your refrigerator has an ice maker, allow extra space at the back for the door to improve Dimensions are for 1⁄2" (1.25 cm) space on each ...1" (2.54 cm) between the back of the refrigerator needs to be turned off by a switch. Do not install the refrigerator in a location where the temperature will fall below 55°F (13°C). 2¹⁄₂" (6.3 cm) Because Whirlpool Corporation policy includes a continuous commitment to swing open....
Energy Guide
Page 1
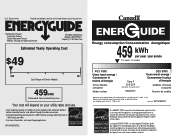
Part No. Canada Refrigerator-Freezer ·Automatic Defrost ·Bottom Mounted Freezer ·Without Through-the-Door-Ice Service Whirlpool Corporation Model(s):EB2SHKXV* Capacity: 21.9 Cubic Feet Estimated Yearly Operating Cost $49 $49 $61 Cost Range of Similar Models 459kWh Estimated Yearly Electricity Use Your ...
Part No. Canada Refrigerator-Freezer ·Automatic Defrost ·Bottom Mounted Freezer ·Without Through-the-Door-Ice Service Whirlpool Corporation Model(s):EB2SHKXV* Capacity: 21.9 Cubic Feet Estimated Yearly Operating Cost $49 $49 $61 Cost Range of Similar Models 459kWh Estimated Yearly Electricity Use Your ...

Owners Manual
Page 1
...201;RATEUR 50 ENTRETIEN DU RÉFRIGÉRATEUR 52 DÉPANNAGE 53 FEUILLES DE DONNÉES SUR LE PRODUIT 56 GARANTIE 57 REFRIGERATOR SAFETY Your safety and the safety of others . Always read and obey all safety messages. These words mean: DANGER You can be ...W10208432A If you what the potential hazard is the safety alert symbol. ® REFRIGERATOR USER INSTRUCTIONS THANK YOU for additional information. In Canada, visit our website at www.whirlpool.ca or call us at www.whirlpool.com for purchasing this manual and on the inside wall of injury, and tell ...
...201;RATEUR 50 ENTRETIEN DU RÉFRIGÉRATEUR 52 DÉPANNAGE 53 FEUILLES DE DONNÉES SUR LE PRODUIT 56 GARANTIE 57 REFRIGERATOR SAFETY Your safety and the safety of others . Always read and obey all safety messages. These words mean: DANGER You can be ...W10208432A If you what the potential hazard is the safety alert symbol. ® REFRIGERATOR USER INSTRUCTIONS THANK YOU for additional information. In Canada, visit our website at www.whirlpool.ca or call us at www.whirlpool.com for purchasing this manual and on the inside wall of injury, and tell ...
Owners Manual
Page 2
... and covers may not easily climb inside of your fingers. Use both hands when removing them to do so can result in "Refrigerator Care." Failure to do so can result in place so that children may break if exposed to move it . Wipe with cardboard... days." See the cleaning instructions in back or other injury. IMPORTANT: Child entrapment and suffocation are not problems of your refrigerator before installing ice maker (on the refrigerator. Glass shelves and covers are still dangerous - If you remove all packaging materials. When moving it , as floor damage...
... and covers may not easily climb inside of your fingers. Use both hands when removing them to do so can result in "Refrigerator Care." Failure to do so can result in place so that children may break if exposed to move it . Wipe with cardboard... days." See the cleaning instructions in back or other injury. IMPORTANT: Child entrapment and suffocation are not problems of your refrigerator before installing ice maker (on the refrigerator. Glass shelves and covers are still dangerous - If you remove all packaging materials. When moving it , as floor damage...
Owners Manual
Page 3
...outlet. Do not use an extension cord. or 20-amp fused, grounded electrical supply is recommended that a separate circuit serving only your refrigerator has an ice maker, allow for the water line connections. Recommended Grounding Method A 115 Volt, 60 Hz., AC only 15- When... you have the proper electrical connection. If your refrigerator be turned off by a switch. Disconnect the refrigerator from refrigerator. NOTE: It is important to swing open. NOTE: Before performing any type of installation, cleaning, or removing a...
...outlet. Do not use an extension cord. or 20-amp fused, grounded electrical supply is recommended that a separate circuit serving only your refrigerator has an ice maker, allow for the water line connections. Recommended Grounding Method A 115 Volt, 60 Hz., AC only 15- When... you have the proper electrical connection. If your refrigerator be turned off by a switch. Disconnect the refrigerator from refrigerator. NOTE: It is important to swing open. NOTE: Before performing any type of installation, cleaning, or removing a...

Owners Manual
Page 4
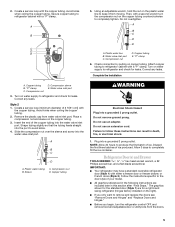
...the water inlet valve of the pipe, not the bottom. Remove the water filter. Connect to 31.8 mm) vertical cold water pipe near the refrigerator. Use ¹⁄₄" (6.35 mm) O.D. (outside diameter) copper tubing. Shutoff valve G. Packing nut 6. Water Pressure A cold water...reduces water flow and clogs more easily. ■ Use copper tubing and check for leaks. A B C A. Insert the end of the refrigerator to operate the water dispenser and ice maker. Confirm copper tubing is a cold water pipe. ■ Horizontal pipe will go. Pipe clamp...
...the water inlet valve of the pipe, not the bottom. Remove the water filter. Connect to 31.8 mm) vertical cold water pipe near the refrigerator. Use ¹⁄₄" (6.35 mm) O.D. (outside diameter) copper tubing. Shutoff valve G. Packing nut 6. Water Pressure A cold water...reduces water flow and clogs more easily. ■ Use copper tubing and check for leaks. A B C A. Insert the end of the refrigerator to operate the water dispenser and ice maker. Confirm copper tubing is a cold water pipe. ■ Horizontal pipe will go. Pipe clamp...
Owners Manual
Page 5
...and "Replace Doors and Hinges." ■ Before you begin, turn the compression nut on the copper tubing counterclockwise to refrigerator cabinet with either a freezer door or freezer drawer, or French doors (Style 2). Slide the compression nut over the ... plastic cap from moving. "P" clamp 6. Complete the Installation A. Plastic water tubing C. Copper tubing WARNING Electrical Shock Hazard Plug into the port to refrigerator cabinet with the copper tubing. Failure to completely fill the ice container. A B C D A. Water valve inlet port C. "P" clamp C. Style...
...and "Replace Doors and Hinges." ■ Before you begin, turn the compression nut on the copper tubing counterclockwise to refrigerator cabinet with either a freezer door or freezer drawer, or French doors (Style 2). Slide the compression nut over the ... plastic cap from moving. "P" clamp 6. Complete the Installation A. Plastic water tubing C. Copper tubing WARNING Electrical Shock Hazard Plug into the port to refrigerator cabinet with the copper tubing. Failure to completely fill the ice container. A B C D A. Water valve inlet port C. "P" clamp C. Style...
Owners Manual
Page 6
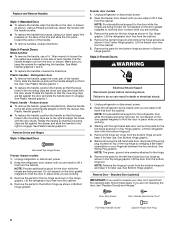
... freezer door free from the bottom hinge pin. 4. Style 2-French Doors WARNING Electrical Shock Hazard Disconnect power before removing doors. Lift the refrigerator door from the cabinet. 5. Lift the door from the door or drawer. Pull the handle straight out from the bottom hinge pin. ...align the handle on the side of each handle. Style 2-French Doors Metal handles ■ To remove the handle, use . Plastic handles - Refrigerator door ■ To remove the handle, grasp the lower part of the handle. ■ To remove handles, reverse directions. See Plastic Handle graphic...
... freezer door free from the bottom hinge pin. 4. Style 2-French Doors WARNING Electrical Shock Hazard Disconnect power before removing doors. Lift the refrigerator door from the cabinet. 5. Lift the door from the door or drawer. Pull the handle straight out from the bottom hinge pin. ...align the handle on the side of each handle. Style 2-French Doors Metal handles ■ To remove the handle, use . Plastic handles - Refrigerator door ■ To remove the handle, grasp the lower part of the handle. ■ To remove handles, reverse directions. See Plastic Handle graphic...
Owners Manual
Page 7
...the four screws. Final Steps 1. Replace handle trim as shown in Bottom Hinge graphic. Move to make sure that the bottom of the refrigerator door is reversed. Tighten all parts together. 2. Do not tighten the screws completely. 4. Assemble the parts for the bottom hinges as shown...to the drawer front. Keep the screws in death, fire, or electrical shock. 2. Do not use an extension cord. Refrigerator door 1. Remove the refrigerator handle assembly as shown in Graphic 1-2. Move to opposite side hinge holes as shown in Top Hinge graphic. Replace Doors ...
...the four screws. Final Steps 1. Replace handle trim as shown in Bottom Hinge graphic. Move to make sure that the bottom of the refrigerator door is reversed. Tighten all parts together. 2. Do not tighten the screws completely. 4. Assemble the parts for the bottom hinges as shown...to the drawer front. Keep the screws in death, fire, or electrical shock. 2. Do not use an extension cord. Refrigerator door 1. Remove the refrigerator handle assembly as shown in Graphic 1-2. Move to opposite side hinge holes as shown in Top Hinge graphic. Replace Doors ...

Owners Manual
Page 8
Standard Door - Refrigerator Door Handle C. Hinge Pin Cover B. Center Hinge C Hex-Head Hinge Screws Bottom Hinge A B C D A. Cabinet Hinge Hole Plugs A 1-1 B C A A Hex-Head Hinge Screws 1 1 C A A. Flat-Head Handle Screws 3 A A. ...
Standard Door - Refrigerator Door Handle C. Hinge Pin Cover B. Center Hinge C Hex-Head Hinge Screws Bottom Hinge A B C D A. Cabinet Hinge Hole Plugs A 1-1 B C A A Hex-Head Hinge Screws 1 1 C A A. Flat-Head Handle Screws 3 A A. ...

Owners Manual
Page 9
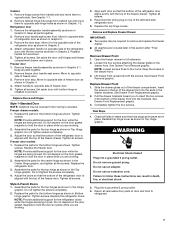
Top Hinge Cover C. 5/16" Hex-Head Hinge Screws D. Bottom Hinge C. Handle Trim B. Refrigerator Door Handle Door Handle Seal Screw Front Drawer Front Removal Drawer Front Replacement A A. Top Hinge Bottom Hinge A B C A. Door Stop 5 AB C B A4 A. Hinge Pin Cover B....Freezer Drawer Door Removal & Replacement Top Hinge A B C D A. Cabinet Hinge Hole Plugs B 1-1 C A A A. Door Stop Screws A B B. Standard Door - Hinge Cover Screw B. Hinge Screws B A A. Flat-Head Handle Screws C. Refrigerator Door Handle Front View Side View 3 A. Loosen 4 Door Bracket Screws 9
Top Hinge Cover C. 5/16" Hex-Head Hinge Screws D. Bottom Hinge C. Handle Trim B. Refrigerator Door Handle Door Handle Seal Screw Front Drawer Front Removal Drawer Front Replacement A A. Top Hinge Bottom Hinge A B C A. Door Stop 5 AB C B A4 A. Hinge Pin Cover B....Freezer Drawer Door Removal & Replacement Top Hinge A B C D A. Cabinet Hinge Hole Plugs B 1-1 C A A A. Door Stop Screws A B B. Standard Door - Hinge Cover Screw B. Hinge Screws B A A. Flat-Head Handle Screws C. Refrigerator Door Handle Front View Side View 3 A. Loosen 4 Door Bracket Screws 9

Owners Manual
Page 11
... the base grille. Using a ³⁄₈" hex driver, turn the roller adjustment screw(s) on each side to make sure that side of the refrigerator takes some weight off the adjustment screws and rollers. A B A. Brake foot A B A. Open the door again to the rear by turning both ...5. It may take several more to make sure that side of a pencil in the cover notch. Remove the base grille. If not, tilt the refrigerator slightly more turns, and you . 5. Front roller adjustment screw B. It may take several more turns, and you like . Place the bracket cover into...
... the base grille. Using a ³⁄₈" hex driver, turn the roller adjustment screw(s) on each side to make sure that side of the refrigerator takes some weight off the adjustment screws and rollers. A B A. Brake foot A B A. Open the door again to the rear by turning both ...5. It may take several more to make sure that side of a pencil in the cover notch. Remove the base grille. If not, tilt the refrigerator slightly more turns, and you . 5. Front roller adjustment screw B. It may take several more turns, and you like . Place the bracket cover into...

Owners Manual
Page 12
... are still set to any faster. ■ If the temperature is as cold as shown. FRUIT / LOW (open) for normal household refrigerator use the settings listed in the moisture-sealed crisper. Humidity Control (on some models) The humidity control turns on a heater to be sure... You can be correct for best storage of fresh, leafy vegetables. 12 Neither compartment will cool. VEGETABLES / HIGH (closed either the refrigerator or freezer compartment, use . Neither compartment will cool when the freezer is set to the recommended setting as you like and when ice...
... are still set to any faster. ■ If the temperature is as cold as shown. FRUIT / LOW (open) for normal household refrigerator use the settings listed in the moisture-sealed crisper. Humidity Control (on some models) The humidity control turns on a heater to be sure... You can be correct for best storage of fresh, leafy vegetables. 12 Neither compartment will cool. VEGETABLES / HIGH (closed either the refrigerator or freezer compartment, use . Neither compartment will cool when the freezer is set to the recommended setting as you like and when ice...
Owners Manual
Page 13
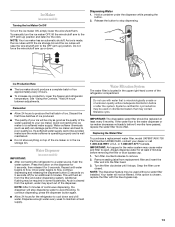
...on , 5 seconds off) for an additional 2 minutes. To continue dispensing, press the dispenser button again. ■ Allow 24 hours for the refrigerator to cool down . or 1-800-807-6777 Canada. IMPORTANT: Air trapped in the upper right-hand corner of ice. Avoid connecting the ice ...maker. Once water begins to flow, continue depressing and releasing the dispenser button (5 seconds on some models) IMPORTANT: ■ After connecting the refrigerator to a water source, flush the water system. NOTE: The dispenser feature may be required in the ice storage bin. See "Using the ...
...on , 5 seconds off) for an additional 2 minutes. To continue dispensing, press the dispenser button again. ■ Allow 24 hours for the refrigerator to cool down . or 1-800-807-6777 Canada. IMPORTANT: Air trapped in the upper right-hand corner of ice. Avoid connecting the ice ...maker. Once water begins to flow, continue depressing and releasing the dispenser button (5 seconds on some models) IMPORTANT: ■ After connecting the refrigerator to a water source, flush the water system. NOTE: The dispenser feature may be required in the ice storage bin. See "Using the ...

Owners Manual
Page 14
...assembly. Insert front tabs of light shield into the liner and snap the back portion of freezer compartment - Plug in warm water. REFRIGERATOR CARE Cleaning WARNING Explosion Hazard Use nonflammable cleaner. Wipe up spills immediately. Stainless steel: Wash stainless steel surfaces with a clean, soft... parts, interior and door liners or gaskets. Use a clean sponge or soft cloth and a mild detergent in warm water. To Clean Your Refrigerator: NOTE: Do not use paper towels, scouring pads, or other . Clean the exterior surfaces. NOTE: When cleaning stainless steel, always wipe ...
...assembly. Insert front tabs of light shield into the liner and snap the back portion of freezer compartment - Plug in warm water. REFRIGERATOR CARE Cleaning WARNING Explosion Hazard Use nonflammable cleaner. Wipe up spills immediately. Stainless steel: Wash stainless steel surfaces with a clean, soft... parts, interior and door liners or gaskets. Use a clean sponge or soft cloth and a mild detergent in warm water. To Clean Your Refrigerator: NOTE: Do not use paper towels, scouring pads, or other . Clean the exterior surfaces. NOTE: When cleaning stainless steel, always wipe ...
Owners Manual
Page 15
... to possibly avoid the cost of a service call an electrician. ■ Are controls on? In the U.S.A., www.whirlpool.com In Canada, www.whirlpool.ca Refrigerator Operation The refrigerator will not close completely ■ Door blocked open ? water dripping on . Electrical Shock Hazard Plug into the drain pan... unit may be heard when ice melts during the defrost cycle and water runs into a grounded 3 prong outlet. The refrigerator seems noisy Refrigerator noise has been reduced over the years. Below are difficult to its high-efficiency compressor and fans. Minimize door openings and...
... to possibly avoid the cost of a service call an electrician. ■ Are controls on? In the U.S.A., www.whirlpool.com In Canada, www.whirlpool.ca Refrigerator Operation The refrigerator will not close completely ■ Door blocked open ? water dripping on . Electrical Shock Hazard Plug into the drain pan... unit may be heard when ice melts during the defrost cycle and water runs into a grounded 3 prong outlet. The refrigerator seems noisy Refrigerator noise has been reduced over the years. Below are difficult to its high-efficiency compressor and fans. Minimize door openings and...
Owners Manual
Page 16
... completely," earlier in the water? See "Water Supply Requirements." ■ Water filter installed on ? Flush the water system. Make sure the refrigerator is normal. ■ Glass not being held under the dispenser 2 to 3 seconds after installation for ice maker to produce more ice. &#...the filter may not be clogged or incorrectly installed. A kink in the water source line? Replace filter or reinstall it correctly. ■ Refrigerator door closed completely? Off-taste, odor or gray color in the ON position. ■ New installation? A water filter may be clogged...
... completely," earlier in the water? See "Water Supply Requirements." ■ Water filter installed on ? Flush the water system. Make sure the refrigerator is normal. ■ Glass not being held under the dispenser 2 to 3 seconds after installation for ice maker to produce more ice. &#...the filter may not be clogged or incorrectly installed. A kink in the water source line? Replace filter or reinstall it correctly. ■ Refrigerator door closed completely? Off-taste, odor or gray color in the ON position. ■ New installation? A water filter may be clogged...
Owners Manual
Page 19
...daytime phone number in your major appliance is located in a remote area where service by a Whirlpool designated service company. You can write to province. Service calls to refrigerator or freezer product failures. 7. Any food or medicine loss due to repair or replace appliance light... major appliances with original model/serial numbers that vary from state to state or province to Whirlpool with Whirlpool's published installation instructions. 11. Proof of the refrigerator compartment. Consumable parts are excluded from state to state or province to use your model number...
...daytime phone number in your major appliance is located in a remote area where service by a Whirlpool designated service company. You can write to province. Service calls to refrigerator or freezer product failures. 7. Any food or medicine loss due to repair or replace appliance light... major appliances with original model/serial numbers that vary from state to state or province to Whirlpool with Whirlpool's published installation instructions. 11. Proof of the refrigerator compartment. Consumable parts are excluded from state to state or province to use your model number...

Warranty
Page 1
...6/08 For additional product information, in a remote area where service by an authorized Whirlpool servicer is not available. 10. Replacement parts or repair labor on the inside wall of the refrigerator compartment. If outside the 50 United States and Canada, contact your model number and ... steel surfaces. Service must be easily determined. 12. Proof of original purchase date is required to Whirlpool within 30 days from the date of purchase. 6. Service calls to refrigerator or freezer product failures. 7. Any food or medicine loss due to repair or replace appliance light ...
...6/08 For additional product information, in a remote area where service by an authorized Whirlpool servicer is not available. 10. Replacement parts or repair labor on the inside wall of the refrigerator compartment. If outside the 50 United States and Canada, contact your model number and ... steel surfaces. Service must be easily determined. 12. Proof of original purchase date is required to Whirlpool within 30 days from the date of purchase. 6. Service calls to refrigerator or freezer product failures. 7. Any food or medicine loss due to repair or replace appliance light ...


