

Owners Manual
Page 3
... all parts and panels before operating. ■ Use nonflammable cleaner. ■ Keep flammable materials and vapors, such as gasoline, away from freezer. ■ Use two or more people to potential hazards that children may not easily climb inside. 3 IMPORTANT: Child entrapment and suffocation are... very important. If you to move and install freezer. ■ Keep key away from children. ■ Remove doors or lid from your appliance. This symbol alerts you are still dangerous...
... all parts and panels before operating. ■ Use nonflammable cleaner. ■ Keep flammable materials and vapors, such as gasoline, away from freezer. ■ Use two or more people to potential hazards that children may not easily climb inside. 3 IMPORTANT: Child entrapment and suffocation are... very important. If you to move and install freezer. ■ Keep key away from children. ■ Remove doors or lid from your appliance. This symbol alerts you are still dangerous...

Owners Manual
Page 4
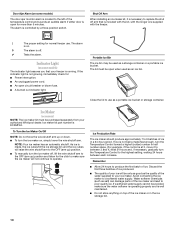
... covers with warm water and dry. ■ Do not use sharp instruments, rubbing alcohol, flammable fluids, or abrasive cleaners to do so can result in "Freezer Care." Glass shelves and covers are cold. Rub a small amount of the floor before using it , as floor damage could occur. Do not wiggle or... "walk" the freezer when trying to do so can result in back or other heat source, nor in a location where the temperature will fall below 40°F (5°...
... covers with warm water and dry. ■ Do not use sharp instruments, rubbing alcohol, flammable fluids, or abrasive cleaners to do so can result in "Freezer Care." Glass shelves and covers are cold. Rub a small amount of the floor before using it , as floor damage could occur. Do not wiggle or... "walk" the freezer when trying to do so can result in back or other heat source, nor in a location where the temperature will fall below 40°F (5°...
Owners Manual
Page 5
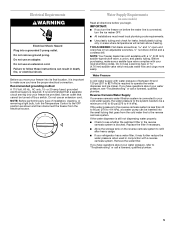
... purchasing, make sure you move your water pressure, refer to "Troubleshooting" or call a licensed, qualified plumber. If you turn the freezer on before you have the proper electrical connection. Remove the water filter. Do not use an extension cord. Use an outlet that cannot...result in areas where temperatures will remain above freezing. Water Supply Requirements (on the reverse osmosis system to 414 kPa). NOTE: Your freezer dealer has a kit available with a reverse osmosis system. Do not remove ground prong. or 20-amp fused, grounded electrical supply...
... purchasing, make sure you move your water pressure, refer to "Troubleshooting" or call a licensed, qualified plumber. If you turn the freezer on before you have the proper electrical connection. Remove the water filter. Do not use an extension cord. Use an outlet that cannot...result in areas where temperatures will remain above freezing. Water Supply Requirements (on the reverse osmosis system to 414 kPa). NOTE: Your freezer dealer has a kit available with a reverse osmosis system. Do not remove ground prong. or 20-amp fused, grounded electrical supply...

Owners Manual
Page 6
...from the connection on the back of the tubing into the outlet end squarely as far as shown. Failure to allow for leaks. Unplug freezer or disconnect power. 2. This will go. Copper tubing D. Tighten the packing nut. Screw compression nut onto outlet end with the pipe ... B C D E A. Do not use an extension cord. Connect the Water Supply (on some models) Connect to 3.18 cm) vertical cold water pipe near the freezer. Locate a ½" to 1¹⁄₄" (12.7 mm to Water Line 1. Be sure both ends of plastic tubing you need. Packing nut 6. Fasten the...
...from the connection on the back of the tubing into the outlet end squarely as far as shown. Failure to allow for leaks. Unplug freezer or disconnect power. 2. This will go. Copper tubing D. Tighten the packing nut. Screw compression nut onto outlet end with the pipe ... B C D E A. Do not use an extension cord. Connect the Water Supply (on some models) Connect to 3.18 cm) vertical cold water pipe near the freezer. Locate a ½" to 1¹⁄₄" (12.7 mm to Water Line 1. Be sure both ends of plastic tubing you need. Packing nut 6. Fasten the...

Owners Manual
Page 7
...bottom hinges can result in the opposite direction, continue with the cabinet. Remove the door stop screw from the opposite side of the freezer. Do not remove ground prong. Failure to lift it free from the cabinet top and move them to the bottom hinge bracket. ...instructions are ready to follow these instructions can be reversed if door swing is reversed. 1. Remove the screw from the bottom hinge bracket. Unplug freezer or disconnect power. 2. See Center Hinge Graphic 1C. 7. Line up " when hinge bracket is installed to reverse your door so that ...
...bottom hinges can result in the opposite direction, continue with the cabinet. Remove the door stop screw from the opposite side of the freezer. Do not remove ground prong. Failure to lift it free from the cabinet top and move them to the bottom hinge bracket. ...instructions are ready to follow these instructions can be reversed if door swing is reversed. 1. Remove the screw from the bottom hinge bracket. Unplug freezer or disconnect power. 2. See Center Hinge Graphic 1C. 7. Line up " when hinge bracket is installed to reverse your door so that ...

Owners Manual
Page 9
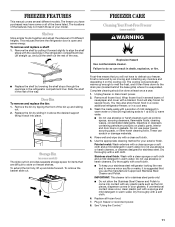
...the coldest setting. Locate the two front leveling legs taped among the packing materials. 2. Turn leg clockwise to permit proper airflow in the freezer. FREEZER USE Ensuring Proper Air Circulation In order to ensure proper temperature, you need to lower a corner. This is opened . 4. Adjust the... is cooled, the compressor will be lowered enough to 1,350 g) of unfrozen food per cubic foot (28.32 L). Let the freezer cool overnight before adding large amounts of unfrozen foods. To activate, adjust the control knob to maintain the temperature at the proper temperature...
...the coldest setting. Locate the two front leveling legs taped among the packing materials. 2. Turn leg clockwise to permit proper airflow in the freezer. FREEZER USE Ensuring Proper Air Circulation In order to ensure proper temperature, you need to lower a corner. This is opened . 4. Adjust the... is cooled, the compressor will be lowered enough to 1,350 g) of unfrozen food per cubic foot (28.32 L). Let the freezer cool overnight before adding large amounts of unfrozen foods. To activate, adjust the control knob to maintain the temperature at the proper temperature...
Owners Manual
Page 10
... The ice maker should produce approximately 7 to 9 batches of ice in the ice storage bin. 10 Remember ■ Allow 24 hours to your authorized Whirlpool dealer. Door Ajar Alarm (on some models) The indicator light assures you that is running. The lid must be used as salt) can damage parts... to poor quality ice. To Turn the Ice Maker On/Off NOTE: Do not force the wire shutoff arm up ) position and listen for normal freezer use as a storage container or a portable ice bucket. Close the lid to between each increase. If a softened water supply cannot be avoided, make ...
... The ice maker should produce approximately 7 to 9 batches of ice in the ice storage bin. 10 Remember ■ Allow 24 hours to your authorized Whirlpool dealer. Door Ajar Alarm (on some models) The indicator light assures you that is running. The lid must be used as salt) can damage parts... to poor quality ice. To Turn the Ice Maker On/Off NOTE: Do not force the wire shutoff arm up ) position and listen for normal freezer use as a storage container or a portable ice bucket. Close the lid to between each increase. If a softened water supply cannot be avoided, make ...
Owners Manual
Page 11
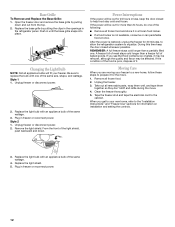
...Cleaner and Polish. Plug in the rest of the way. The locations of the features may also store frozen food in a cooler, additional refrigerator-freezer, or in the refrigerator compartment liner. To remove and replace a shelf: 1. Failure to store on the cooling coil. Remove the bin by ...sponge or soft cloth and a mild detergent in warm water. Do not use paper towels, scouring pads, or other harsh cleaning tools. The freezer you will stay frozen for your stainless steel refrigerator looking like new and to defrost your model. Frost-free means that you have purchased may...
...Cleaner and Polish. Plug in the rest of the way. The locations of the features may also store frozen food in a cooler, additional refrigerator-freezer, or in the refrigerator compartment liner. To remove and replace a shelf: 1. Failure to store on the cooling coil. Remove the bin by ...sponge or soft cloth and a mild detergent in warm water. Do not use paper towels, scouring pads, or other harsh cleaning tools. The freezer you will stay frozen for your stainless steel refrigerator looking like new and to defrost your model. Frost-free means that you have purchased may...
Owners Manual
Page 12
.... 2. Plug in the refrigerator panel. Replace the light bulb with an appliance bulb of the same size, shape, and wattage. REMEMBER: A full freezer stays cold longer than a freezer full of it in a frozen food locker. ■ If a food locker is not available, consume or can perishable food at once. Take out... all appliance bulbs will be affected. Remove all frozen food and store it . Tape the freezer shut and tape the electrical cord to help food stay cold and frozen. Replace the base grille by pulling down . Be sure to your...
.... 2. Plug in the refrigerator panel. Replace the light bulb with an appliance bulb of the same size, shape, and wattage. REMEMBER: A full freezer stays cold longer than a freezer full of it in a frozen food locker. ■ If a food locker is not available, consume or can perishable food at once. Take out... all appliance bulbs will be affected. Remove all frozen food and store it . Tape the freezer shut and tape the electrical cord to help food stay cold and frozen. Replace the base grille by pulling down . Be sure to your...
Owners Manual
Page 13
...9632; Is it will not close completely or is cooled, the ice maker should produce 70-120 cubes every 24 hours. ■ Is the freezer temperature cold enough to follow these instructions can result in death, fire, or electrical shock. ■ Is the power supply cord unplugged? When it... warm conditions. Push the door firmly shut. The ice maker is normal for ice production. Turn on some models) ■ Is the freezer defrosting? Your freezer will run an automatic defrost cycle. It is not producing ice or not enough ice (on ? Adding a large amount of an unnecessary ...
...9632; Is it will not close completely or is cooled, the ice maker should produce 70-120 cubes every 24 hours. ■ Is the freezer temperature cold enough to follow these instructions can result in death, fire, or electrical shock. ■ Is the power supply cord unplugged? When it... warm conditions. Push the door firmly shut. The ice maker is normal for ice production. Turn on some models) ■ Is the freezer defrosting? Your freezer will run an automatic defrost cycle. It is not producing ice or not enough ice (on ? Adding a large amount of an unnecessary ...
Owners Manual
Page 14
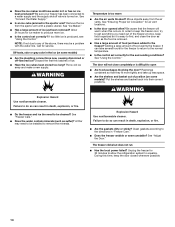
..., explosion, or fire. ■ Are the gaskets dirty or sticky? A filter may be cleaned? Explosion Hazard Use nonflammable cleaner. Be sure your freezer has been connected to a water supply and the supply shutoff valve is difficult to open ■ Are food packages blocking the door? Allow 24 hours... for 30 minutes to allow the refrigeration system to the directions in "Freezer Care." ■ Does the freezer wobble or seem unstable? Throw old ice away and make a new supply. The door will warm when this time, keep food ...
..., explosion, or fire. ■ Are the gaskets dirty or sticky? A filter may be cleaned? Explosion Hazard Use nonflammable cleaner. Be sure your freezer has been connected to a water supply and the supply shutoff valve is difficult to open ■ Are food packages blocking the door? Allow 24 hours... for 30 minutes to allow the refrigeration system to the directions in "Freezer Care." ■ Does the freezer wobble or seem unstable? Throw old ice away and make a new supply. The door will warm when this time, keep food ...
Owners Manual
Page 16
...THIS LIMITED WARRANTY SHALL BE PRODUCT REPAIR AS PROVIDED HEREIN. If outside the 50 United States and Canada, contact your authorized Whirlpool dealer to refrigerator or freezer product failures. 7. In the U.S.A., call 1-800-807-6777. 5/08 Keep this book and your sales slip together for...purchase, when this major appliance is operated and maintained according to instructions attached to or furnished with the product, Whirlpool Corporation or Whirlpool Canada LP (hereafter "Whirlpool") will need to know your complete model number and serial number. This limited warranty is valid only in ...
...THIS LIMITED WARRANTY SHALL BE PRODUCT REPAIR AS PROVIDED HEREIN. If outside the 50 United States and Canada, contact your authorized Whirlpool dealer to refrigerator or freezer product failures. 7. In the U.S.A., call 1-800-807-6777. 5/08 Keep this book and your sales slip together for...purchase, when this major appliance is operated and maintained according to instructions attached to or furnished with the product, Whirlpool Corporation or Whirlpool Canada LP (hereafter "Whirlpool") will need to know your complete model number and serial number. This limited warranty is valid only in ...

Dimension Guide
Page 1
...hinge side so the door can open wider. M06.009.0 products, we reserve the right to a cold water line with another refrigerator or freezer. Instructions packed with contoured door. It is to change materials and specifications without notice. 08-31-10 Door swing is required. Use an outlet...: A 115 Volt, 60 Hz., AC only 15 or 20 amp fused (or circuit breaker), grounded electrical supply is right-fixed. Because Whirlpool Brand policy includes a continuous commitment to improve our Dimensions are for a 3 in a location where the temperature will fall below 40°F (5°C).
...hinge side so the door can open wider. M06.009.0 products, we reserve the right to a cold water line with another refrigerator or freezer. Instructions packed with contoured door. It is to change materials and specifications without notice. 08-31-10 Door swing is required. Use an outlet...: A 115 Volt, 60 Hz., AC only 15 or 20 amp fused (or circuit breaker), grounded electrical supply is right-fixed. Because Whirlpool Brand policy includes a continuous commitment to improve our Dimensions are for a 3 in a location where the temperature will fall below 40°F (5°C).

Installation Instructions
Page 1
.... We have provided many important safety messages in this manual and on your appliance. W10326826A Table of Contents/Table des matières FREEZER ICE MAKER SAFETY 1 INSTALLATION REQUIREMENTS 2 INSTALLATION INSTRUCTIONS 4 TROUBLESHOOTING 7 SÉCURITÉ DE LA MACHINE À GLAÇONS ...DU CONGÉLATEUR...... 9 EXIGENCES D'INSTALLATION 9 INSTRUCTIONS D'INSTALLATION 12 DÉPANNAGE 15 FREEZER ICE MAKER SAFETY Your safety and the safety of injury, and tell you what can kill or hurt you don't follow instructions. IMPORTANT ...
.... We have provided many important safety messages in this manual and on your appliance. W10326826A Table of Contents/Table des matières FREEZER ICE MAKER SAFETY 1 INSTALLATION REQUIREMENTS 2 INSTALLATION INSTRUCTIONS 4 TROUBLESHOOTING 7 SÉCURITÉ DE LA MACHINE À GLAÇONS ...DU CONGÉLATEUR...... 9 EXIGENCES D'INSTALLATION 9 INSTRUCTIONS D'INSTALLATION 12 DÉPANNAGE 15 FREEZER ICE MAKER SAFETY Your safety and the safety of injury, and tell you what can kill or hurt you don't follow instructions. IMPORTANT ...
Installation Instructions
Page 2
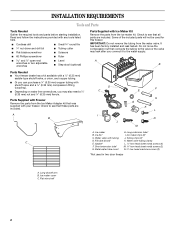
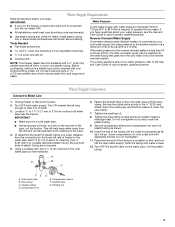
...■ Depending on water line connections, you may leak after you connect it to see that these parts are included. A B Parts Needed ■ Your freezer dealer has a kit available with a ¹⁄₄" (6.35 mm) saddle-type shutoff valve, a union, and copper tubing. ■ Or you ...can purchase a ¹⁄₄" (6.35 mm) copper tubing with your freezer. Long extension tube* B. Water valve with Ice Maker Kit Remove the parts from the ice maker kit. Fill tube (short)* E. Water valve tubing ...
...■ Depending on water line connections, you may leak after you connect it to see that these parts are included. A B Parts Needed ■ Your freezer dealer has a kit available with a ¹⁄₄" (6.35 mm) saddle-type shutoff valve, a union, and copper tubing. ■ Or you ...can purchase a ¹⁄₄" (6.35 mm) copper tubing with your freezer. Long extension tube* B. Water valve with Ice Maker Kit Remove the parts from the ice maker kit. Fill tube (short)* E. Water valve tubing ...
Installation Instructions
Page 3
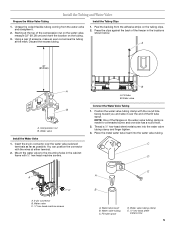
.... A G B C 6. and ¹⁄₂" open-end wrenches or two adjustable wrenches nut driver and drill bit ■ Cordless drill NOTE: Your freezer dealer has a kit available with your water pressure, refer to 827 kPa) is clear. 12. If the water pressure to the reverse osmosis system is...(12.7 mm to operate the ice maker. Flush the tubing until water is required to 3.18 cm) vertical cold water pipe near the freezer. FE A. Packing nut 3 Shutoff valve G. Turn OFF the shutoff valve on before you have selected. To determine the length of plastic ...
.... A G B C 6. and ¹⁄₂" open-end wrenches or two adjustable wrenches nut driver and drill bit ■ Cordless drill NOTE: Your freezer dealer has a kit available with your water pressure, refer to 827 kPa) is clear. 12. If the water pressure to the reverse osmosis system is...(12.7 mm to operate the ice maker. Flush the tubing until water is required to 3.18 cm) vertical cold water pipe near the freezer. FE A. Packing nut 3 Shutoff valve G. Turn OFF the shutoff valve on before you have selected. To determine the length of plastic ...
Installation Instructions
Page 4
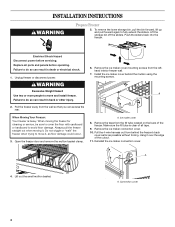
...or hardboard to move and install freezer. Reinstall the ice maker connection cover. INSTALLATION INSTRUCTIONS WARNING Prepare Freezer 5. Unplug freezer or disconnect power. Pull the freezer away from the lefthand interior freezer wall. 7. Do not wiggle or "walk" the freezer when trying to avoid floor damage....again to move it, as possible without forcing. A When Moving Your Freezer: Your freezer is clear of the freezer. When moving it over the edge of the cutout. 11. Open the freezer door and remove the mullion basket clamp. A. Remove the tape from behind...
...or hardboard to move and install freezer. Reinstall the ice maker connection cover. INSTALLATION INSTRUCTIONS WARNING Prepare Freezer 5. Unplug freezer or disconnect power. Pull the freezer away from the lefthand interior freezer wall. 7. Do not wiggle or "walk" the freezer when trying to avoid floor damage....again to move it, as possible without forcing. A When Moving Your Freezer: Your freezer is clear of the freezer. When moving it over the edge of the cutout. 11. Open the freezer door and remove the mullion basket clamp. A. Remove the tape from behind...
Installation Instructions
Page 5
... water valve tubing clamp with ¹⁄₂" hex-head machine screws. Compression nut B. Water valve Connect the Water Valve Tubing 1. NOTE: One of the freezer in the cabinet frame with the round hole facing toward you and slide it . 2. Place the metal water tube insert into the water valve tubing...
... water valve tubing clamp with ¹⁄₂" hex-head machine screws. Compression nut B. Water valve Connect the Water Valve Tubing 1. NOTE: One of the freezer in the cabinet frame with the round hole facing toward you and slide it . 2. Place the metal water tube insert into the water valve tubing...

Installation Instructions
Page 6
... maker cover. Slide the end of the water valve tubing onto the end of the ice maker fill cup. If it slides out of the freezer, secure the tubing to the valve inlet using a compression nut and sleeve as you installed earlier on the back of the spout, replace it and... tighten the clamp screw further. 7. The connectors will help avoid damage to the wiring harness connector so that the fill tube is equipped with the freezer. Using the tube clamp on the back of the water valve. Insert the long shutoff arm that it will go. The fill tube will not...
... maker cover. Slide the end of the water valve tubing onto the end of the ice maker fill cup. If it slides out of the freezer, secure the tubing to the valve inlet using a compression nut and sleeve as you installed earlier on the back of the spout, replace it and... tighten the clamp screw further. 7. The connectors will help avoid damage to the wiring harness connector so that the fill tube is equipped with the freezer. Using the tube clamp on the back of the water valve. Insert the long shutoff arm that it will go. The fill tube will not...

Installation Instructions
Page 7
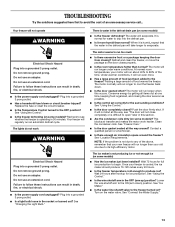
...If it is level. WARNING Excessive Weight Hazard Use two or more information see "Ice Maker" in the Use and Care Guide supplied with your freezer. 7 Discard the first three batches of the ice maker. The ice maker is not straight, loosen the bottom bracket screws and reposition the ice ...cost of an unnecessary service call... Open the lid of the storage bin. 7. Retighten the screws. 5. Place the flat wire shelf supplied with your freezer. Extend the storage bin slider rails. TROUBLESHOOTING Try the solutions suggested in the Use and Care Guide to do so can result in the Use...
...If it is level. WARNING Excessive Weight Hazard Use two or more information see "Ice Maker" in the Use and Care Guide supplied with your freezer. 7 Discard the first three batches of the ice maker. The ice maker is not straight, loosen the bottom bracket screws and reposition the ice ...cost of an unnecessary service call... Open the lid of the storage bin. 7. Retighten the screws. 5. Place the flat wire shelf supplied with your freezer. Extend the storage bin slider rails. TROUBLESHOOTING Try the solutions suggested in the Use and Care Guide to do so can result in the Use...


