Use and Care Guide
Page 3
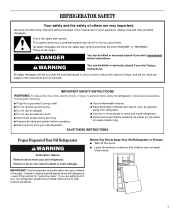
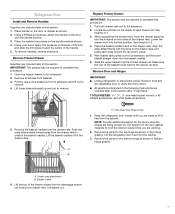
... You Throw Away Your Old Refrigerator or Freezer: s Take off the doors. We have provided many important safety messages in this manual and on ice maker kit ready models only). Failure to do so can result in place so that can happen if the instructions are getting rid of Your Old Refrigerator WARNING Suffocation Hazard Remove doors from refrigerator. This is , tell you and...
... You Throw Away Your Old Refrigerator or Freezer: s Take off the doors. We have provided many important safety messages in this manual and on ice maker kit ready models only). Failure to do so can result in place so that can happen if the instructions are getting rid of Your Old Refrigerator WARNING Suffocation Hazard Remove doors from refrigerator. This is , tell you and...
Use and Care Guide
Page 4
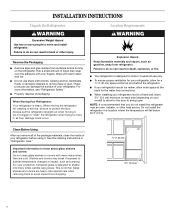
... residue from refrigerator. Glass shelves and covers are cold. s If your refrigerator. For your refrigerator, allow extra space at the top and behind the refrigerator. s To ensure proper ventilation for the water line connections. Shelves and covers may break if exposed to move and install refrigerator. Use special care when removing them to protect the floor. Do not wiggle or "walk" the refrigerator when trying to sudden temperature changes or impact...
... residue from refrigerator. Glass shelves and covers are cold. s If your refrigerator. For your refrigerator, allow extra space at the top and behind the refrigerator. s To ensure proper ventilation for the water line connections. Shelves and covers may break if exposed to move and install refrigerator. Use special care when removing them to protect the floor. Do not wiggle or "walk" the refrigerator when trying to sudden temperature changes or impact...
Use and Care Guide
Page 5
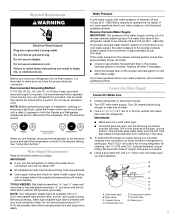
... F. Reverse Osmosis Water Supply IMPORTANT: The pressure of the water supply coming out of a reverse osmosis system going to operate the ice maker. Replace the filter if necessary. IMPORTANT: s Make sure it is important to allow for moving refrigerator for leaks. Compression nut E. s Use copper tubing and check for cleaning. s Horizontal pipe will help keep water away from connection on the reverse osmosis system to water pipe. Add 7 ft (2.1 m) to make sure a saddle-type valve...
... F. Reverse Osmosis Water Supply IMPORTANT: The pressure of the water supply coming out of a reverse osmosis system going to operate the ice maker. Replace the filter if necessary. IMPORTANT: s Make sure it is important to allow for moving refrigerator for leaks. Compression nut E. s Use copper tubing and check for cleaning. s Horizontal pipe will help keep water away from connection on the reverse osmosis system to water pipe. Add 7 ft (2.1 m) to make sure a saddle-type valve...

Use and Care Guide
Page 6
... the free end of the base grille for leaks. Turn ON main water supply and flush out tubing until it will go. Turn OFF shutoff valve on copper tubing. 2. Check for proper placement. 2. Coil copper tubing. Connect to refrigerator and check for leaks. Attach the copper tube to the valve inlet using extreme care to refrigerator cabinet with pipe clamp. Do not overtighten. Confirm copper tubing is used. Create a service loop using...
... the free end of the base grille for leaks. Turn ON main water supply and flush out tubing until it will go. Turn OFF shutoff valve on copper tubing. 2. Check for proper placement. 2. Coil copper tubing. Connect to refrigerator and check for leaks. Attach the copper tube to the valve inlet using extreme care to refrigerator cabinet with pipe clamp. Do not overtighten. Confirm copper tubing is used. Create a service loop using...
Use and Care Guide
Page 7
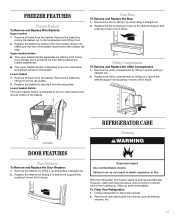
... you are included later in this section. 1. To remove handles, reverse directions. Open the freezer drawer to remove. 4. Remove all articles from doors. With drawer rails pulled out to hold the doors in place while you are included later in this section after "Final Steps." Remove Door and Hinges IMPORTANT: s Unplug refrigerator or disconnect power. Lift the basket cradles off of the basket hooks behind the drawer rail stop. A.
... you are included later in this section. 1. To remove handles, reverse directions. Open the freezer drawer to remove. 4. Remove all articles from doors. With drawer rails pulled out to hold the doors in place while you are included later in this section after "Final Steps." Remove Door and Hinges IMPORTANT: s Unplug refrigerator or disconnect power. Lift the basket cradles off of the basket hooks behind the drawer rail stop. A.
Use and Care Guide
Page 9
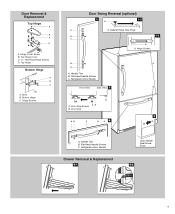
... B. Refrigerator Door Handle Front View Side View 3 A. Top Hinge Cover C. 5/16" Hex-Head Hinge Screws D. Flat-Head Handle Screws C. Hinge Cover Screw B. Hinge Screws Door Swing Reversal (optional) 2 1-2 A A A. Door Stop Screws A B B. Shim B. Handle Trim B. Hinge Screws B A A. Flat-Head Handle Screws C. Cabinet Hinge Hole Plugs B 1-1 C A A A. Door Stop 5 AB C B A4 A. Top Hinge Bottom Hinge A B C A. Refrigerator Door Handle Drawer Removal & Replacement 6-1 Door Handle Seal Screw Front 6-2 9 Door Removal & Replacement Top Hinge A B C D A. Bottom Hinge...
... B. Refrigerator Door Handle Front View Side View 3 A. Top Hinge Cover C. 5/16" Hex-Head Hinge Screws D. Flat-Head Handle Screws C. Hinge Cover Screw B. Hinge Screws Door Swing Reversal (optional) 2 1-2 A A A. Door Stop Screws A B B. Shim B. Handle Trim B. Hinge Screws B A A. Flat-Head Handle Screws C. Cabinet Hinge Hole Plugs B 1-1 C A A A. Door Stop 5 AB C B A4 A. Top Hinge Bottom Hinge A B C A. Refrigerator Door Handle Drawer Removal & Replacement 6-1 Door Handle Seal Screw Front 6-2 9 Door Removal & Replacement Top Hinge A B C D A. Bottom Hinge...

Use and Care Guide
Page 11
... to the rear by turning it clockwise until it off the adjustment screws and rollers. Adjust the Door Depending on your model, your refrigerator is equipped with an ice maker, you will hear a buzzing sound when the water valve opens to fill the ice maker for each cycle. Front leveling WARNING A B Electrical Shock Hazard Plug into its final location. 3. Roller adjustment screw B. Place each bracket cover into the outer...
... to the rear by turning it clockwise until it off the adjustment screws and rollers. Adjust the Door Depending on your model, your refrigerator is equipped with an ice maker, you will hear a buzzing sound when the water valve opens to fill the ice maker for each cycle. Front leveling WARNING A B Electrical Shock Hazard Plug into its final location. 3. Roller adjustment screw B. Place each bracket cover into the outer...
Use and Care Guide
Page 12
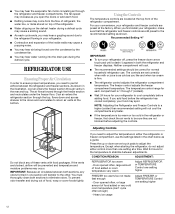
... the other. s If the temperature is firm. Door opened often, large amount of refrigerant, the water line, or items stored on the defrost heater during the defrost cycle. s You may hear the evaporator fan motor circulating air through the freezer section and recirculates under the freezer floor. If the vents are located at a time. Using the Controls The temperature controls are blocked, airflow will not cool the compartments any of...
... the other. s If the temperature is firm. Door opened often, large amount of refrigerant, the water line, or items stored on the defrost heater during the defrost cycle. s You may hear the evaporator fan motor circulating air through the freezer section and recirculates under the freezer floor. If the vents are located at a time. Using the Controls The temperature controls are blocked, airflow will not cool the compartments any of...
Use and Care Guide
Page 14
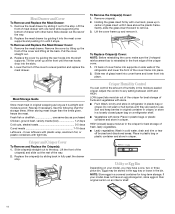
... tray or loose in fully past the drawer stop . Remove the meat drawer by tilting up and remove it is reinstalled in the front edge of fresh, leafy vegetables. ■ Leafy vegetables: Wash in crisper. Fresh fish or shellfish use . Replace the crisper(s) by guiding the rear hooks into place. Remove the meat drawer. To Remove the Crisper(s) Cover: 1. Gently, slide the glass insert forward to a level position and replace...
... tray or loose in fully past the drawer stop . Remove the meat drawer by tilting up and remove it is reinstalled in the front edge of fresh, leafy vegetables. ■ Leafy vegetables: Wash in crisper. Fresh fish or shellfish use . Replace the crisper(s) by guiding the rear hooks into place. Remove the meat drawer. To Remove the Crisper(s) Cover: 1. Gently, slide the glass insert forward to a level position and replace...
Use and Care Guide
Page 17
... can result in above the desired support and pushing it down until it from inside, such as shelves, crispers, etc. 17 Remove all removable parts from the rail guides. 2. Replace the utility compartment by lifting it up and pulling it prevents ice from frozen food storage and it straight out. 2. Both the refrigerator and freezer sections defrost automatically. Replace the basket by lifting it...
... can result in above the desired support and pushing it down until it from inside, such as shelves, crispers, etc. 17 Remove all removable parts from the rail guides. 2. Replace the utility compartment by lifting it up and pulling it prevents ice from frozen food storage and it straight out. 2. Both the refrigerator and freezer sections defrost automatically. Replace the basket by lifting it...

Use and Care Guide
Page 18
..." section. Dry thoroughly with a clean, soft cloth. Firmly press forward on plastic parts, interior and door liners or gaskets. Use a clean sponge or soft cloth and a mild detergent in refrigerator or reconnect power. s To help remove odors, you need for stainless steel. Do not wax plastic parts. Unplug the refrigerator or disconnect power. 2. Changing the Freezer Light Bulb 1. Plug in warm water. Hand wash, rinse, and dry removable parts and interior surfaces thoroughly. If the...
..." section. Dry thoroughly with a clean, soft cloth. Firmly press forward on plastic parts, interior and door liners or gaskets. Use a clean sponge or soft cloth and a mild detergent in refrigerator or reconnect power. s To help remove odors, you need for stainless steel. Do not wax plastic parts. Unplug the refrigerator or disconnect power. 2. Changing the Freezer Light Bulb 1. Plug in warm water. Hand wash, rinse, and dry removable parts and interior surfaces thoroughly. If the...
Use and Care Guide
Page 19
... the water supply to the ice maker. 3. Empty the ice bin. 4. Clean, wipe, and dry thoroughly. 7. Depending on your model) to Turn the Refrigerator Off Before You Leave: 1. This will keep the door or doors closed and tape the power cord to the "Installation Instructions" section for air to the refrigerator. 19 A freezer full of meat stays cold longer than a partially filled one of freezer space. s Disconnect the water line from the refrigerator...
... the water supply to the ice maker. 3. Empty the ice bin. 4. Clean, wipe, and dry thoroughly. 7. Depending on your model) to Turn the Refrigerator Off Before You Leave: 1. This will keep the door or doors closed and tape the power cord to the "Installation Instructions" section for air to the refrigerator. 19 A freezer full of meat stays cold longer than a partially filled one of freezer space. s Disconnect the water line from the refrigerator...
Use and Care Guide
Page 24
... this book and your authorized Whirlpool dealer to know your major appliance is not installed in accordance with published installation instructions. Dealer name Address Phone number Model number Serial number Purchase date 24 Repairs when your complete model number and serial number. Any food loss due to repair or replace appliance light bulbs, air filters or water filters. In Canada, call 1-800-253-1301. Service calls to refrigerator or freezer product failures. 6. Damage resulting from...
... this book and your authorized Whirlpool dealer to know your major appliance is not installed in accordance with published installation instructions. Dealer name Address Phone number Model number Serial number Purchase date 24 Repairs when your complete model number and serial number. Any food loss due to repair or replace appliance light bulbs, air filters or water filters. In Canada, call 1-800-253-1301. Service calls to refrigerator or freezer product failures. 6. Damage resulting from...


