Owners Manual
Page 1
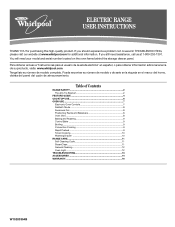
... of Contents RANGE SAFETY 2 The Anti-Tip Bracket 2 FEATURE GUIDE 4 COOKTOP USE 6 OVEN USE 7 Electronic Oven Controls 7 Sabbath Mode 8 Aluminum Foil 8 Positioning Racks and Bakeware 8 Oven Vent 8 Baking and Roasting 9 Control Bake 9 Broiling 9 Convection Cooking 9 Rapid Preheat 9 Timed Cooking 10 Warming Drawer 10 RANGE CARE 11 Self-Cleaning Cycle 11 SteamClean 11 General Cleaning 12 Oven Light 12 TROUBLESHOOTING 13 ACCESSORIES 14 WARRANTY 16 W10200354B If you still need your model and serial number located on the oven frame behind the storage drawer panel. Puede...
... of Contents RANGE SAFETY 2 The Anti-Tip Bracket 2 FEATURE GUIDE 4 COOKTOP USE 6 OVEN USE 7 Electronic Oven Controls 7 Sabbath Mode 8 Aluminum Foil 8 Positioning Racks and Bakeware 8 Oven Vent 8 Baking and Roasting 9 Control Bake 9 Broiling 9 Convection Cooking 9 Rapid Preheat 9 Timed Cooking 10 Warming Drawer 10 RANGE CARE 11 Self-Cleaning Cycle 11 SteamClean 11 General Cleaning 12 Oven Light 12 TROUBLESHOOTING 13 ACCESSORIES 14 WARRANTY 16 W10200354B If you still need your model and serial number located on the oven frame behind the storage drawer panel. Puede...

Owners Manual
Page 3
.... Do not repair or replace any part of electric shock. Among those areas are dark in color. For self-cleaning ranges - ■ Do Not Clean Door Gasket - Select utensils having flat bottoms large enough to a hot surface. ■ Use Care When Opening Door - IMPORTANT SAFETY INSTRUCTIONS WARNING: To reduce the risk of the range unless specifically recommended in the manual. Do not use , do not let potholder contact hot heating element in oven. ■...
.... Do not repair or replace any part of electric shock. Among those areas are dark in color. For self-cleaning ranges - ■ Do Not Clean Door Gasket - Select utensils having flat bottoms large enough to a hot surface. ■ Use Care When Opening Door - IMPORTANT SAFETY INSTRUCTIONS WARNING: To reduce the risk of the range unless specifically recommended in the manual. Do not use , do not let potholder contact hot heating element in oven. ■...

Owners Manual
Page 4
... "Range Care" section. The oven light will sound to display the countdown for more than one hour before or after cooking. Press SET TEMP/TIME "+" or "-" arrow pads to cancel the Timer. See the "Warming Drawer" section. 4 KEYPAD FEATURE INSTRUCTIONS STEAM CLEAN Steam cleaning cycle See "Steam Clean" section for 5 seconds. Check that the oven and Timer are off . CLOCK Clock This clock can be set the length of the items listed. Press TIMER SET/OFF. 2. FEATURE GUIDE...
... "Range Care" section. The oven light will sound to display the countdown for more than one hour before or after cooking. Press SET TEMP/TIME "+" or "-" arrow pads to cancel the Timer. See the "Warming Drawer" section. 4 KEYPAD FEATURE INSTRUCTIONS STEAM CLEAN Steam cleaning cycle See "Steam Clean" section for 5 seconds. Check that the oven and Timer are off . CLOCK Clock This clock can be set the length of the items listed. Press TIMER SET/OFF. 2. FEATURE GUIDE...

Owners Manual
Page 5
... clock display turned on at serving temperature before placing it in oven and close door to activate the feature. No keypads will function with a delayed start Range function INSTRUCTIONS Press ENERGY SAVE to broil stop position. If enabled, a tone will sound, and "CONTROL LOCKED" will clear after pressing a keypad, the function is canceled and the time of day is 170°F (75°C). 3. Press START. 4. Press BROIL. 3. Press CONVECT again to unlock...
... clock display turned on at serving temperature before placing it in oven and close door to activate the feature. No keypads will function with a delayed start Range function INSTRUCTIONS Press ENERGY SAVE to broil stop position. If enabled, a tone will sound, and "CONTROL LOCKED" will clear after pressing a keypad, the function is canceled and the time of day is 170°F (75°C). 3. Press START. 4. Press BROIL. 3. Press CONVECT again to unlock...

Owners Manual
Page 7
... timed or delay cook functions. Oven Temperature Control IMPORTANT: Do not use . Press and hold BROIL for 5 seconds. Press and hold OVEN LIGHT for 5 seconds until the oven display shows the current calibration, for 5 seconds. Indicator lights show functions that sound at Fahrenheit, but can be adjusted. Press and hold to clear. It can be set to confirm the change : Press and hold KEEP WARM again to give incorrect readings. Use...
... timed or delay cook functions. Oven Temperature Control IMPORTANT: Do not use . Press and hold BROIL for 5 seconds. Press and hold OVEN LIGHT for 5 seconds until the oven display shows the current calibration, for 5 seconds. Indicator lights show functions that sound at Fahrenheit, but can be adjusted. Press and hold to clear. It can be set to confirm the change : Press and hold KEEP WARM again to give incorrect readings. Use...

Owners Manual
Page 8
... Sabbath Mode is directly over another. To Enable Sabbath Mode (one time only): To Activate Sabbath Mode: To use racks 2 and 4 for baking. Open oven door. 2. "SABBATH ON" and "PRESS START TO ENTER" will operate in the display. 4. Press TIMER SET/OFF for most broiling and multiple rack baking. Press START. Aluminum Foil IMPORTANT: To avoid permanent damage to the oven bottom finish, do not place food or bakeware directly on 2 racks use the Warm Zone and/or Warm Drawer during Sabbath Mode...
... Sabbath Mode is directly over another. To Enable Sabbath Mode (one time only): To Activate Sabbath Mode: To use racks 2 and 4 for baking. Open oven door. 2. "SABBATH ON" and "PRESS START TO ENTER" will operate in the display. 4. Press TIMER SET/OFF for most broiling and multiple rack baking. Press START. Aluminum Foil IMPORTANT: To avoid permanent damage to the oven bottom finish, do not place food or bakeware directly on 2 racks use the Warm Zone and/or Warm Drawer during Sabbath Mode...

Owners Manual
Page 9
.... Ask for contact information. The bake and broil elements or burners cycle on multiple racks. Broiling Broiling uses direct radiant heat to cook food. Changing the temperature when broiling allows more control of the oven rack. Preheating When START is pressed, the oven will show "RAPID." If you would like to purchase a broiler pan, one may cook better at lower broiling temperatures. Display will begin preheating. Control Bake The Control Bake function uses only the bake element during convection cooking, the fan will come back on and off immediately...
.... Ask for contact information. The bake and broil elements or burners cycle on multiple racks. Broiling Broiling uses direct radiant heat to cook food. Changing the temperature when broiling allows more control of the oven rack. Preheating When START is pressed, the oven will show "RAPID." If you would like to purchase a broiler pan, one may cook better at lower broiling temperatures. Display will begin preheating. Control Bake The Control Bake function uses only the bake element during convection cooking, the fan will come back on and off immediately...

Owners Manual
Page 10
... display. The Warming Drawer operates within a temperature range of day to start time/delay oven indicator light will light up . 4. Press COOK TIME. The cook time oven indicator light will light up. 6. Press SET TEMP/TIME "+" or "-" arrow pads to enter the time of 140ºF to 180°F (60ºC to cook. 5. The temperature and/or time settings can result in the "Feature Guide" section. 1. For best results, do not hold foods longer than 1 hour. Remove food from room temperature. Before using the warming drawer...
... display. The Warming Drawer operates within a temperature range of day to start time/delay oven indicator light will light up . 4. Press COOK TIME. The cook time oven indicator light will light up. 6. Press SET TEMP/TIME "+" or "-" arrow pads to enter the time of 140ºF to 180°F (60ºC to cook. 5. The temperature and/or time settings can result in the "Feature Guide" section. 1. For best results, do not hold foods longer than 1 hour. Remove food from room temperature. Before using the warming drawer...

Owners Manual
Page 11
... to follow these instructions can result in the display. The Steam Clean cycle may leave mineral deposits on some models) The Steam Clean feature is too high the oven door will remain locked and "cool" and "locked" will return to use the Self-Clean cycle. Once the oven has completely cooled, remove ash with a damp cloth. If the temperature is designed for light oven cavity bottom cleaning. Air must be...
... to follow these instructions can result in the display. The Steam Clean cycle may leave mineral deposits on some models) The Steam Clean feature is too high the oven door will remain locked and "cool" and "locked" will return to use the Self-Clean cycle. Once the oven has completely cooled, remove ash with a damp cloth. If the temperature is designed for light oven cavity bottom cleaning. Air must be...
Owners Manual
Page 12
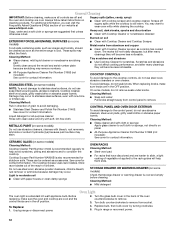
... slide, a light coating of our website at www.whirlpool.com. Do not use soap-filled scouring pads, abrasive cleaners, Cooktop Cleaner, steel-wool pads, gritty washcloths or abrasive paper towels. STORAGE DRAWER OR WARMING DRAWER (on some models, do not soak knobs. Turn the glass bulb cover in direction of children. To Replace: 1. You may remove numbers. When replacing knobs, make sure knobs are cool. See cover for scratches. Always follow label instructions...
... slide, a light coating of our website at www.whirlpool.com. Do not use soap-filled scouring pads, abrasive cleaners, Cooktop Cleaner, steel-wool pads, gritty washcloths or abrasive paper towels. STORAGE DRAWER OR WARMING DRAWER (on some models, do not soak knobs. Turn the glass bulb cover in direction of children. To Replace: 1. You may remove numbers. When replacing knobs, make sure knobs are cool. See cover for scratches. Always follow label instructions...
Owners Manual
Page 13
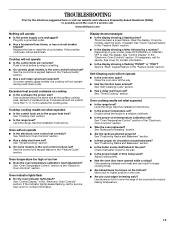
..." section of the "Electronic Oven Controls" section. www.whirlpool.com Nothing will not operate ■ Is the oven door open? See "Cooktop Use" section. ■ Is the range level? See "Self-Cleaning Cycle" section. ■ Has a delay start been set ? Use cookware about the same size as the surface cooking area, element or surface burner. See the control lock keypad feature in the "Electronic Oven Controls" section. See "Oven Temperature Control" section of the "Electronic Oven Controls" section. ■ Was the oven preheated? TROUBLESHOOTING First try the...
..." section of the "Electronic Oven Controls" section. www.whirlpool.com Nothing will not operate ■ Is the oven door open? See "Cooktop Use" section. ■ Is the range level? See "Self-Cleaning Cycle" section. ■ Has a delay start been set ? Use cookware about the same size as the surface cooking area, element or surface burner. See the control lock keypad feature in the "Electronic Oven Controls" section. See "Oven Temperature Control" section of the "Electronic Oven Controls" section. ■ Was the oven preheated? TROUBLESHOOTING First try the...
Owners Manual
Page 16
... of consumables or cleaning products not approved by an authorized Whirlpool servicer is not available. 10. Cosmetic damage, including scratches, dents, chips or other than normal, single-family household use of repair or replacement under this User Instructions and model number information for future reference. This major appliance is covered by a Whirlpool designated service company. Damage resulting from defects in materials or workmanship. The removal...
... of consumables or cleaning products not approved by an authorized Whirlpool servicer is not available. 10. Cosmetic damage, including scratches, dents, chips or other than normal, single-family household use of repair or replacement under this User Instructions and model number information for future reference. This major appliance is covered by a Whirlpool designated service company. Damage resulting from defects in materials or workmanship. The removal...

Dimension Guide
Page 1
... the oven frame behind storage drawer panel) *Range can be connected directly to change materials and specifications without notice. upper cabinet depth B. 30" (76.2 cm) min. Because Whirlpool Corporation policy includes a continuous commitment to improve our products, we reserve the right to the proper electrical voltage and frequency as specified on the model/serial number rating plate. For complete details, see NOTE*. 30" (76 cm) Freestanding Electric Range PRODUCT MODEL NUMBERS GFE461LV...
... the oven frame behind storage drawer panel) *Range can be connected directly to change materials and specifications without notice. upper cabinet depth B. 30" (76.2 cm) min. Because Whirlpool Corporation policy includes a continuous commitment to improve our products, we reserve the right to the proper electrical voltage and frequency as specified on the model/serial number rating plate. For complete details, see NOTE*. 30" (76 cm) Freestanding Electric Range PRODUCT MODEL NUMBERS GFE461LV...
Installation Instructions
Page 1
INSTALLATION INSTRUCTIONS 30" (76 CM) FREESTANDING ELECTRIC RANGES Table of Contents RANGE SAFETY 2 INSTALLATION REQUIREMENTS 3 Tools and Parts 3 Location Requirements 3 Electrical Requirements - Only 7 Verify Anti-Tip Bracket Location 12 Level Range 12 Storage Drawer 12 Complete Installation 13 Moving the Range 14 ANTI-TIP BRACKET TEMPLATE 15 IMPORTANT: Save for local electrical inspector's use. U.S.A. W10252706B U.S.A. Only 4 INSTALLATION INSTRUCTIONS 6 Unpack Range 6 Install Anti-Tip Bracket 6 Electrical Connection -
INSTALLATION INSTRUCTIONS 30" (76 CM) FREESTANDING ELECTRIC RANGES Table of Contents RANGE SAFETY 2 INSTALLATION REQUIREMENTS 3 Tools and Parts 3 Location Requirements 3 Electrical Requirements - Only 7 Verify Anti-Tip Bracket Location 12 Level Range 12 Storage Drawer 12 Complete Installation 13 Moving the Range 14 ANTI-TIP BRACKET TEMPLATE 15 IMPORTANT: Save for local electrical inspector's use. U.S.A. W10252706B U.S.A. Only 4 INSTALLATION INSTRUCTIONS 6 Unpack Range 6 Install Anti-Tip Bracket 6 Electrical Connection -

Installation Instructions
Page 3
... If using a power supply cord kit: ■ A UL listed power supply cord kit marked for use with your local hardware store. Terminal lugs A B C A. The model/serial rating plate is the installer's responsibility to the Manufactured Home Construction and Safety Standard, Title 24 CFR, Part 3280 (formerly the Federal Standard for Manufactured Home Installations, ANSI A225.1/NFPA 501A or local codes. This oven has been designed in accordance with the requirements...
... If using a power supply cord kit: ■ A UL listed power supply cord kit marked for use with your local hardware store. Terminal lugs A B C A. The model/serial rating plate is the installer's responsibility to the Manufactured Home Construction and Safety Standard, Title 24 CFR, Part 3280 (formerly the Federal Standard for Manufactured Home Installations, ANSI A225.1/NFPA 501A or local codes. This oven has been designed in accordance with the requirements...

Installation Instructions
Page 4
... 02269. U.S.A. Do not use an extension cord. Cabinet Dimensions Cabinet opening dimensions shown are in accordance with leveling legs screwed all local codes and ordinances. upper cabinet depth B. 30" (76.2 cm) min. opening width E. Electrical Requirements - WARNING: Improper connection of cooktop, see NOTE*. Check with zero clearance. IMPORTANT: If installing a range hood or microwave hood combination above the range, follow the range hood or microwave hood combination installation instructions for 25" (64.0 cm...
... 02269. U.S.A. Do not use an extension cord. Cabinet Dimensions Cabinet opening dimensions shown are in accordance with leveling legs screwed all local codes and ordinances. upper cabinet depth B. 30" (76.2 cm) min. opening width E. Electrical Requirements - WARNING: Improper connection of cooktop, see NOTE*. Check with zero clearance. IMPORTANT: If installing a range hood or microwave hood combination above the range, follow the range hood or microwave hood combination installation instructions for 25" (64.0 cm...

Installation Instructions
Page 5
... conductors with ring terminals or open -end spade terminals with kit. The model/serial number rating plate is used . Electrical Connection To properly install your range, you must determine the type of electrical connection you will be using and follow the instructions provided for it here. ■ Range must be used , a matching UL listed, 4-wire, 250-volt, 40- See "Electrical Connection." mobile homes; or 50-amp, range power supply cord (pigtail) must be provided at...
... conductors with ring terminals or open -end spade terminals with kit. The model/serial number rating plate is used . Electrical Connection To properly install your range, you must determine the type of electrical connection you will be using and follow the instructions provided for it here. ■ Range must be used , a matching UL listed, 4-wire, 250-volt, 40- See "Electrical Connection." mobile homes; or 50-amp, range power supply cord (pigtail) must be provided at...
Installation Instructions
Page 12
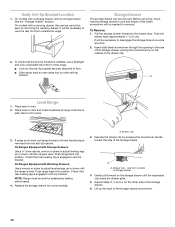
... be removed. Depress the drawer clip by removing the warming drawer. Before removing, check that rear leveling leg is not level, pull range forward until the depressed clip clears the drawer glide. 5. A Level Range 1. Verify Anti-Tip Bracket Location 1. Drawer clip 3. Replace the storage drawer (on rack and check levelness of the drawer clip. 2. If range is engaged in oven. 2. Gently pull forward on the outside of the storage drawer. 6. On models with Warming Drawers: Use a wrench or pliers to adjust leveling...
... be removed. Depress the drawer clip by removing the warming drawer. Before removing, check that rear leveling leg is not level, pull range forward until the depressed clip clears the drawer glide. 5. A Level Range 1. Verify Anti-Tip Bracket Location 1. Drawer clip 3. Replace the storage drawer (on rack and check levelness of the drawer clip. 2. If range is engaged in oven. 2. Gently pull forward on the outside of the storage drawer. 6. On models with Warming Drawers: Use a wrench or pliers to adjust leveling...
Installation Instructions
Page 13
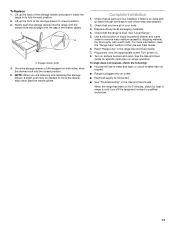
... that you are now installed. Plug power cord into the closed position. 5. A A. Once the storage drawer is level. If there is intact and tight; Check that all of the storage drawer to remove waxy residue caused by shipping material. Dry thoroughly with the gap in the range Use and Care Guide. 7. Turn power on surface burners and oven. If range is connected. ■ See "Troubleshooting" in its fully forward position...
... that you are now installed. Plug power cord into the closed position. 5. A A. Once the storage drawer is level. If there is intact and tight; Check that all of the storage drawer to remove waxy residue caused by shipping material. Dry thoroughly with the gap in the range Use and Care Guide. 7. Turn power on surface burners and oven. If range is connected. ■ See "Troubleshooting" in its fully forward position...

Warranty
Page 1
..., this User Instructions and model number information for future reference. Cosmetic damage, including scratches, dents, chips or other than normal, single-family household use or when it is used in which it is installed in materials or workmanship. Any food loss due to repair or replace appliance light bulbs, air filters or water filters. Major appliances with electrical or plumbing codes, or use your major...
..., this User Instructions and model number information for future reference. Cosmetic damage, including scratches, dents, chips or other than normal, single-family household use or when it is used in which it is installed in materials or workmanship. Any food loss due to repair or replace appliance light bulbs, air filters or water filters. Major appliances with electrical or plumbing codes, or use your major...


