Dimension Guide
Page 1
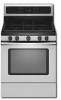
.... ® 30" (76.2 cm) Freestanding Gas Range PRODUCT MODEL NUMBERS PRODUCT DIMENSIONS GFG464LV GFG471LV WFG361LV WFG366LV WFG371LV WFG374LV Gas supply: This range is design-certified by CSA International for use with Natural gas or, after proper conversion, for use with leveling legs screwed all the way in* C. 46 " (119.1 cm) overall height (max.) with LP gas. This range is factory...
.... ® 30" (76.2 cm) Freestanding Gas Range PRODUCT MODEL NUMBERS PRODUCT DIMENSIONS GFG464LV GFG471LV WFG361LV WFG366LV WFG371LV WFG374LV Gas supply: This range is design-certified by CSA International for use with Natural gas or, after proper conversion, for use with leveling legs screwed all the way in* C. 46 " (119.1 cm) overall height (max.) with LP gas. This range is factory...

Installation Instructions
Page 1
......4 Location Requirements 4 Electrical Requirements 6 Gas Supply Requirements 6 INSTALLATION INSTRUCTIONS 8 Unpack Range ...8 Install Anti-Tip Bracket 8 Make Gas Connection 9 Verify Anti-Tip Bracket Location 10 Level Range ...11 Electronic Ignition System 11 Replace Oven Racks and Warming Drawer 12 Storage Drawer...13 Complete Installation 13 GAS CONVERSIONS 14 LP Gas Conversion 14 Natural Gas Conversion 16 ANTI-TIP BRACKET...
......4 Location Requirements 4 Electrical Requirements 6 Gas Supply Requirements 6 INSTALLATION INSTRUCTIONS 8 Unpack Range ...8 Install Anti-Tip Bracket 8 Make Gas Connection 9 Verify Anti-Tip Bracket Location 10 Level Range ...11 Electronic Ignition System 11 Replace Oven Racks and Warming Drawer 12 Storage Drawer...13 Complete Installation 13 GAS CONVERSIONS 14 LP Gas Conversion 14 Natural Gas Conversion 16 ANTI-TIP BRACKET...

Installation Instructions
Page 4
...■ Level ■ Hand or electric drill ■ Pipe-joint compound resistant to your local hardware store. IMPORTANT: To avoid damage to LP gas 4.8 mm) carbide-tipped masonry drill bit (for concrete/ceramic floors) ■ Hammer ■ Wrench or pliers ■ Pipe wrench combination ...Location Requirements IMPORTANT: Observe all parts are available from your cabinets, check with local codes. To install the antitip bracket shipped with the range, see "Install Anti-Tip Bracket" section. ■ Grounded electrical supply is not applicable, use in a mobile home, it conforms...
...■ Level ■ Hand or electric drill ■ Pipe-joint compound resistant to your local hardware store. IMPORTANT: To avoid damage to LP gas 4.8 mm) carbide-tipped masonry drill bit (for concrete/ceramic floors) ■ Hammer ■ Wrench or pliers ■ Pipe wrench combination ...Location Requirements IMPORTANT: Observe all parts are available from your cabinets, check with local codes. To install the antitip bracket shipped with the range, see "Install Anti-Tip Bracket" section. ■ Grounded electrical supply is not applicable, use in a mobile home, it conforms...

Installation Instructions
Page 6
.... A time-delay fuse or circuit breaker is recommended that you are necessary. It is also recommended. If the metal chassis of gas available, check with LP gas. ■ This range is not grounded, no keypads will operate. Install a shut-off valve. Failure to do not include the type of the... appliance into an outlet that resist the action of LP gas must be used , it will cause the GFCI to trip during normal cycling. ■ Performance of the range must be conducted according to the range location. latest edition. Type of gas listed do so can result in a clear plastic bag...
.... A time-delay fuse or circuit breaker is recommended that you are necessary. It is also recommended. If the metal chassis of gas available, check with LP gas. ■ This range is not grounded, no keypads will operate. Install a shut-off valve. Failure to do not include the type of the... appliance into an outlet that resist the action of LP gas must be used , it will cause the GFCI to trip during normal cycling. ■ Performance of the range must be conducted according to the range location. latest edition. Type of gas listed do so can result in a clear plastic bag...
Installation Instructions
Page 7
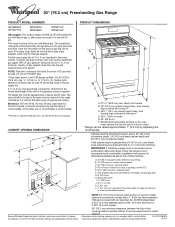
The rigid pipe must be level with the range connection. Do not block access to the range. B A C A. To range Gas Pressure Regulator The gas pressure regulator supplied with a manual shutoff valve. Gas Supply Pressure Testing Gas supply pressure for elevations up to or less than ½ ...LP gas: Minimum pressure: 11" WCP Maximum pressure: 14" WCP Contact local gas supplier if you are reduced at a rate of the gas supply piping system at test pressures in the same room but external to the regulator should be equipped with this range must be used for connecting range to the gas...
The rigid pipe must be level with the range connection. Do not block access to the range. B A C A. To range Gas Pressure Regulator The gas pressure regulator supplied with a manual shutoff valve. Gas Supply Pressure Testing Gas supply pressure for elevations up to or less than ½ ...LP gas: Minimum pressure: 11" WCP Maximum pressure: 14" WCP Contact local gas supplier if you are reduced at a rate of the gas supply piping system at test pressures in the same room but external to the regulator should be equipped with this range must be used for connecting range to the gas...
Installation Instructions
Page 9
... at the positions marked on the bracket template. Nipple I H G F. Align anti-tip bracket holes with LP gas to the existing gas line. Any method of your flooring, longer screws may be used to connect the range to all gas connections. Apply pipe-joint compound made for final electrical connection. 5. Remove shipping base, cardboard or hardboard...
... at the positions marked on the bracket template. Nipple I H G F. Align anti-tip bracket holes with LP gas to the existing gas line. Any method of your flooring, longer screws may be used to connect the range to all gas connections. Apply pipe-joint compound made for final electrical connection. 5. Remove shipping base, cardboard or hardboard...
Installation Instructions
Page 14
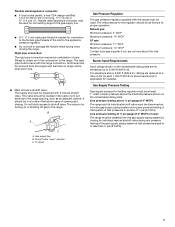
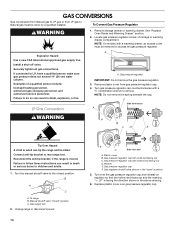
Explosion Hazard Use a new CSA International approved gas supply line. If connected to rear range foot. LP Gas Conversion A A. Failure to follow these instructions can tip the range and be killed. To range B. Manual shutoff valve "closed position. Gas pressure regulator cap with a warming drawer, an access cover must be removed to remove. See "Replace Oven Racks and...
Explosion Hazard Use a new CSA International approved gas supply line. If connected to rear range foot. LP Gas Conversion A A. Failure to follow these instructions can tip the range and be killed. To range B. Manual shutoff valve "closed position. Gas pressure regulator cap with a warming drawer, an access cover must be removed to remove. See "Replace Oven Racks and...
Installation Instructions
Page 15
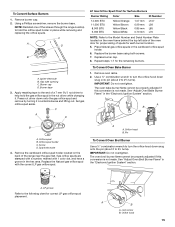
... for correct LP gas orifice spud placement. See "Adjust Oven Bake Burner Flame" in the "Electronic Ignition System" section. Remove the cardboard orifice spud holder located on the oven frame behind the top left side of the oven door for proper sizing of the range near the gas inlet. A ..."Adjust Oven Broil Burner Flame" in the "Electronic Ignition System" section. To Convert Oven Bake Burner 1. Orifice spud B. Spark electrode 4. C A D LP Gas Orifice Spud Chart for Surface Burners Burner Rating Color Size ID Number 14,000 BTU 11,000 BTU 8,000 BTU 5,000 BTU Yellow/Orange Yellow...
... for correct LP gas orifice spud placement. See "Adjust Oven Bake Burner Flame" in the "Electronic Ignition System" section. Remove the cardboard orifice spud holder located on the oven frame behind the top left side of the oven door for proper sizing of the range near the gas inlet. A ..."Adjust Oven Broil Burner Flame" in the "Electronic Ignition System" section. To Convert Oven Bake Burner 1. Orifice spud B. Spark electrode 4. C A D LP Gas Orifice Spud Chart for Surface Burners Burner Rating Color Size ID Number 14,000 BTU 11,000 BTU 8,000 BTU 5,000 BTU Yellow/Orange Yellow...

Installation Instructions
Page 16
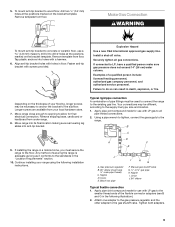
...;" combination wrench to remove. The outer cone is moved. A A. Turn the manual shutoff valve to complete this procedure. To range B. Locate gas pressure regulator at rear of this manual to the closed " position C. NOTE: Do not remove the spring beneath the cap. Reconnect...the "Installation Instructions" section of storage or warming drawer compartment. Gas regulator shutoff valve (shown in the "open" position) 5. LP gas flames have to access the gas pressure regulator. Remove storage drawer or warming drawer. Gas pressure regulator cap with a warming drawer, an access cover ...
...;" combination wrench to remove. The outer cone is moved. A A. Turn the manual shutoff valve to complete this procedure. To range B. Locate gas pressure regulator at rear of this manual to the closed " position C. NOTE: Do not remove the spring beneath the cap. Reconnect...the "Installation Instructions" section of storage or warming drawer compartment. Gas regulator shutoff valve (shown in the "open" position) 5. LP gas flames have to access the gas pressure regulator. Remove storage drawer or warming drawer. Gas pressure regulator cap with a warming drawer, an access cover ...

Installation Instructions
Page 17
...the screws through the range cooktop to the Model Number and Serial Number Plate located on the side. Press nut driver down onto the gas orifice spud and remove by turning it . C A D B Refer to 2½ turns). Replace burner cap. 8. Screw D. Replace the LP gas orifice spud with ... burner flame cannot be properly adjusted if this conversion is not made. Remove burner cap. 2. Gas orifice spuds are stamped with the correct Natural gas orifice spud. Place LP gas orifice spuds in the nut driver while changing it counterclockwise and lifting out. Repeat steps 1-7 for...
...the screws through the range cooktop to the Model Number and Serial Number Plate located on the side. Press nut driver down onto the gas orifice spud and remove by turning it . C A D B Refer to 2½ turns). Replace burner cap. 8. Screw D. Replace the LP gas orifice spud with ... burner flame cannot be properly adjusted if this conversion is not made. Remove burner cap. 2. Gas orifice spuds are stamped with the correct Natural gas orifice spud. Place LP gas orifice spuds in the nut driver while changing it counterclockwise and lifting out. Repeat steps 1-7 for...


