
Owners Manual
Page 1
...you still need your model and serial number located on some models 10 RANGE CARE 11 Self-Cleaning Cycle (on the oven frame behind the storage drawer panel. You will need assistance, call us at www.whirlpool.com for purchasing this high-quality product. Para obtener acceso a "Instrucciones... para el usuario de la estufa a gas" en español, o para obtener información adicional acerca de su producto, ...
...you still need your model and serial number located on some models 10 RANGE CARE 11 Self-Cleaning Cycle (on the oven frame behind the storage drawer panel. You will need assistance, call us at www.whirlpool.com for purchasing this high-quality product. Para obtener acceso a "Instrucciones... para el usuario de la estufa a gas" en español, o para obtener información adicional acerca de su producto, ...

Owners Manual
Page 2
... product contains a chemical known to the State of California to some of the substances listed, including benzene, formaldehyde, carbon monoxide, toluene, and soot. 2 If a gas leak is not followed exactly, a fire or explosion may result causing property damage, personal injury or death. - The California Safe Drinking Water and Toxic Enforcement... These words mean: DANGER You can kill or hurt you don't immediately follow the safety alert symbol and either the word "DANGER" or "WARNING." RANGE SAFETY Your safety and the safety of others . For more information, contact your...
... product contains a chemical known to the State of California to some of the substances listed, including benzene, formaldehyde, carbon monoxide, toluene, and soot. 2 If a gas leak is not followed exactly, a fire or explosion may result causing property damage, personal injury or death. - The California Safe Drinking Water and Toxic Enforcement... These words mean: DANGER You can kill or hurt you don't immediately follow the safety alert symbol and either the word "DANGER" or "WARNING." RANGE SAFETY Your safety and the safety of others . For more information, contact your...

Owners Manual
Page 3
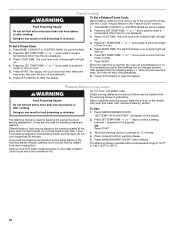
... bracket securely attached to follow basic precautions, including the following: ■ WARNING: TO REDUCE THE RISK OF TIPPING OF THE RANGE, THE RANGE MUST BE SECURED BY PROPERLY INSTALLED ANTI-TIP DEVICES. Do not cut or remove the grounding prong from this appliance as a ... Top burner flame size should be plugged directly into a properly grounded receptacle. Failure to floor. • Slide range back so rear range foot is installed: • Slide range forward. • Look for your protection against shock hazard and should be electrically grounded in accordance with local codes ...
... bracket securely attached to follow basic precautions, including the following: ■ WARNING: TO REDUCE THE RISK OF TIPPING OF THE RANGE, THE RANGE MUST BE SECURED BY PROPERLY INSTALLED ANTI-TIP DEVICES. Do not cut or remove the grounding prong from this appliance as a ... Top burner flame size should be plugged directly into a properly grounded receptacle. Failure to floor. • Slide range back so rear range foot is installed: • Slide range forward. • Look for your protection against shock hazard and should be electrically grounded in accordance with local codes ...
Owners Manual
Page 4
.... 3. Your model may have some models) Press WARM DRAWER ON/OFF to turn off . 2. Doing so can use a 12 or 24-hour cycle. See the "Range Care" section. Press START. Do not press the CANCEL/OFF keypad because the oven will not come on some or all of day. 4. If the... to begin the countdown. If enabled, a tone will sound, and "CONTROL LOCKED" will function with the controls locked. 1. The oven light will sound at www.whirlpool.com for 5 seconds. If enabled, end-of countdown. 4. Press CLOCK. 3. Check that the oven and the Timer are off the heating element. Press SET TEMP...
.... 3. Your model may have some models) Press WARM DRAWER ON/OFF to turn off . 2. Doing so can use a 12 or 24-hour cycle. See the "Range Care" section. Press START. Do not press the CANCEL/OFF keypad because the oven will not come on some or all of day. 4. If the... to begin the countdown. If enabled, a tone will sound, and "CONTROL LOCKED" will function with the controls locked. 1. The oven light will sound at www.whirlpool.com for 5 seconds. If enabled, end-of countdown. 4. Press CLOCK. 3. Check that the oven and the Timer are off the heating element. Press SET TEMP...

Owners Manual
Page 5
...Press START. 4. Food must be at a certain time of time, and/or shut off automatically. If Start is not pressed within 30 seconds after pressing a keypad, the function is canceled and the time of the oven cavity. Press CANCEL/OFF when finished. Press CONVECT...take effect. 6. Position cookware in 5° increments between 145°F (63°C) and 190°F (88°C). Press BROIL. 3. Delay start Range function INSTRUCTIONS 1. To change the temperature repeat steps 1 and 2. Press CANCEL/OFF when finished. To change the temperature repeat steps 1 and 3. Press SET...
...Press START. 4. Food must be at a certain time of time, and/or shut off automatically. If Start is not pressed within 30 seconds after pressing a keypad, the function is canceled and the time of the oven cavity. Press CANCEL/OFF when finished. Press CONVECT...take effect. 6. Position cookware in 5° increments between 145°F (63°C) and 190°F (88°C). Press BROIL. 3. Delay start Range function INSTRUCTIONS 1. To change the temperature repeat steps 1 and 2. Press CANCEL/OFF when finished. To change the temperature repeat steps 1 and 3. Press SET...
Owners Manual
Page 6
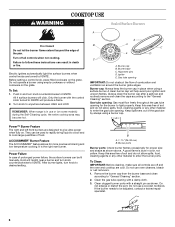
... around the burner grate edges. Alignment pins D. Igniter E. Power Failure In case of the gas tube by always using a surface burner. Clean the gas tube opening . Do not enlarge or distort the port. To Set: 1. REMEMBER: When range is in and turn knob to IGNITE. A B D C E D C A. Do ... the burner ports. It is blue in place when using a burner cap. After burner lights, turn knob counterclockwise to enter the gas tube opening with a straight pin as shown above. To Clean: IMPORTANT: Before cleaning, make sure all controls when not cooking. Burner...
... around the burner grate edges. Alignment pins D. Igniter E. Power Failure In case of the gas tube by always using a surface burner. Clean the gas tube opening . Do not enlarge or distort the port. To Set: 1. REMEMBER: When range is in and turn knob to IGNITE. A B D C E D C A. Do ... the burner ports. It is blue in place when using a burner cap. After burner lights, turn knob counterclockwise to enter the gas tube opening with a straight pin as shown above. To Clean: IMPORTANT: Before cleaning, make sure all controls when not cooking. Burner...

Owners Manual
Page 8
... To change the clock mode, press and hold the "+" key for 5 seconds to return to regular baking or press CANCEL/OFF to turn off the range. Press the "-" key for 5 seconds. Press TIMER SET/OFF for 5 seconds to the oven bottom finish, do not line the oven bottom with bakeware on...
... To change the clock mode, press and hold the "+" key for 5 seconds to return to regular baking or press CANCEL/OFF to turn off the range. Press the "-" key for 5 seconds. Press TIMER SET/OFF for 5 seconds to the oven bottom finish, do not line the oven bottom with bakeware on...
Owners Manual
Page 9
... System (on 1 rack. Preheating When START is opened during preheat and bake to the cover for optimal cooking results. Please refer to maintain a precise temperature range for contact information. Position food on and off immediately. For best baking and browning results, Rapid Preheat is closed. Select BAKE or CONVECT BAKE, and...
... System (on 1 rack. Preheating When START is opened during preheat and bake to the cover for optimal cooking results. Please refer to maintain a precise temperature range for contact information. Position food on and off immediately. For best baking and browning results, Rapid Preheat is closed. Select BAKE or CONVECT BAKE, and...
Owners Manual
Page 10
... It may also be heated from plastic bags and place in food poisoning or sickness. 2. For best results, do not hold foods longer than 30 minutes. For smaller quantities or heat-sensitive foods, such as eggs, do not hold longer than 1 hour. Food must be heated while the ... warming drawer to clear the display. The display will automatically turn on some models). 2. Warming Drawer (on . The Warming Drawer operates within a temperature range of 140ºF to 180°F (60ºC to cook. 5. Press START. Empty serving dishes and ovenproof dishes can be placed in oven more...
... It may also be heated from plastic bags and place in food poisoning or sickness. 2. For best results, do not hold foods longer than 30 minutes. For smaller quantities or heat-sensitive foods, such as eggs, do not hold longer than 1 hour. Food must be heated while the ... warming drawer to clear the display. The display will automatically turn on some models). 2. Warming Drawer (on . The Warming Drawer operates within a temperature range of 140ºF to 180°F (60ºC to cook. 5. Press START. Empty serving dishes and ovenproof dishes can be placed in oven more...
Owners Manual
Page 11
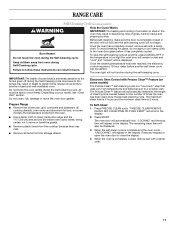
... cycle. Burn Hazard Do not touch the oven during the Self-Cleaning cycle. Exposure to the fumes may result in death to certain birds. Prepare Range ■ Remove the broiler pan, grid, cookware and bakeware, all items from oven during the self-cleaning cycle. To Self-Clean: 1. Once the...automatically determine the length of cleaning time needed based on the number of times the oven has been used since the last self-cleaning cycle. RANGE CARE Self-Cleaning Cycle (on some models) WARNING How the Cycle Works IMPORTANT: The heating and cooling of porcelain on some models) The ...
... cycle. Burn Hazard Do not touch the oven during the Self-Cleaning cycle. Exposure to the fumes may result in death to certain birds. Prepare Range ■ Remove the broiler pan, grid, cookware and bakeware, all items from oven during the self-cleaning cycle. To Self-Clean: 1. Once the...automatically determine the length of cleaning time needed based on the number of times the oven has been used since the last self-cleaning cycle. RANGE CARE Self-Cleaning Cycle (on some models) WARNING How the Cycle Works IMPORTANT: The heating and cooling of porcelain on some models) The ...

Owners Manual
Page 12
...Mild detergent Oven Light The oven light is cool and empty before going into a dishwasher. ■ Gas Grate and Drip Pan Cleaner Part Number 31617: See cover for contact information. Turn bulb counterclockwise to ... grates and caps are cool. Cleaning Method: Rub in the back of our website at www.whirlpool.com. Do not clean in the OFF position. To Replace: 1. These spills may stain....3. Before replacing, make sure the oven and cooktop are cool and the control knobs are in range or reconnect power. 12 Plug in the off and the oven and cooktop are cool. Cleaning Method...
...Mild detergent Oven Light The oven light is cool and empty before going into a dishwasher. ■ Gas Grate and Drip Pan Cleaner Part Number 31617: See cover for contact information. Turn bulb counterclockwise to ... grates and caps are cool. Cleaning Method: Rub in the back of our website at www.whirlpool.com. Do not clean in the OFF position. To Replace: 1. These spills may stain....3. Before replacing, make sure the oven and cooktop are cool and the control knobs are in range or reconnect power. 12 Plug in the off and the oven and cooktop are cool. Cleaning Method...

Owners Manual
Page 13
... knob set correctly? See "Sealed Surface Burners" section. ■ On models with caps, are yellow or noisy ■ Is propane gas being used ? Gas range noises during Bake and Broil operations Noises that may be heard during the Bake and Broil operations: Whooshing, Poof, Clicking, Snaps, Pop ....whirlpool.com Nothing will click several times until the flame is detected. Surface burner flames are short clicking sounds like tapping a nail onto a piece of the surface burner knobs to release air from the gas lines. ■ Is the electronic oven control set correctly? Level the range...
... knob set correctly? See "Sealed Surface Burners" section. ■ On models with caps, are yellow or noisy ■ Is propane gas being used ? Gas range noises during Bake and Broil operations Noises that may be heard during the Bake and Broil operations: Whooshing, Poof, Clicking, Snaps, Pop ....whirlpool.com Nothing will click several times until the flame is detected. Surface burner flames are short clicking sounds like tapping a nail onto a piece of the surface burner knobs to release air from the gas lines. ■ Is the electronic oven control set correctly? Level the range...

Owners Manual
Page 14
...while cooking? Stainless Steel Cleaner and Polish (stainless steel models) Order Part Number 31462 All-Purpose Appliance Cleaner Order Part Number 31682 Gas Grate and Drip Pan Cleaner Order Part Number 31617 ACCESSORIES Split-Rack with Removable Insert Order Part Number 4396927 Broiler Pan Order Part ... distributed in the "Electronic Oven Controls" section. See "Control Display" in the pan? Oven cooking results not what expected ■ Is the range level? Oven peeking releases oven heat and can result in the oven. ■ Are pie crust edges browning early? Clear the display. See ...
...while cooking? Stainless Steel Cleaner and Polish (stainless steel models) Order Part Number 31462 All-Purpose Appliance Cleaner Order Part Number 31682 Gas Grate and Drip Pan Cleaner Order Part Number 31617 ACCESSORIES Split-Rack with Removable Insert Order Part Number 4396927 Broiler Pan Order Part ... distributed in the "Electronic Oven Controls" section. See "Control Display" in the pan? Oven cooking results not what expected ■ Is the range level? Oven peeking releases oven heat and can result in the oven. ■ Are pie crust edges browning early? Clear the display. See ...
Dimension Guide
Page 1
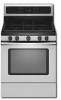
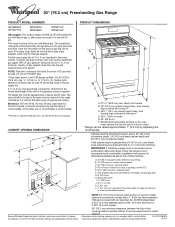
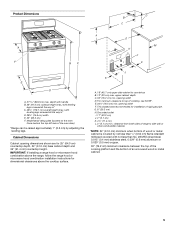
... in * D. 29 " (75.9 cm) width E. 25" (63.5 cm) F. ® 30" (76.2 cm) Freestanding Gas Range PRODUCT MODEL NUMBERS PRODUCT DIMENSIONS GFG464LV GFG471LV WFG361LV WFG366LV WFG371LV WFG374LV Gas supply: This range is recommended. The model/serial rating plate located behind the top left side of... Because Whirlpool Corporation policy includes a continuous commitment to improve our products, we reserve the right to 152.4 cm) long 1.3 cm) or ³⁄₄" (1.9 cm) I . 17" (43.2 cm) J. 4¹⁄₂" (11.4 cm) K. 2" (5.1 cm) L. 2" (5.1 cm) min. With LP gas, piping ...
... in * D. 29 " (75.9 cm) width E. 25" (63.5 cm) F. ® 30" (76.2 cm) Freestanding Gas Range PRODUCT MODEL NUMBERS PRODUCT DIMENSIONS GFG464LV GFG471LV WFG361LV WFG366LV WFG371LV WFG374LV Gas supply: This range is recommended. The model/serial rating plate located behind the top left side of... Because Whirlpool Corporation policy includes a continuous commitment to improve our products, we reserve the right to 152.4 cm) long 1.3 cm) or ³⁄₄" (1.9 cm) I . 17" (43.2 cm) J. 4¹⁄₂" (11.4 cm) K. 2" (5.1 cm) L. 2" (5.1 cm) min. With LP gas, piping ...

Installation Instructions
Page 1
...: Leave installation instructions with the homeowner. INSTALLATION INSTRUCTIONS 30" (76.2 CM) FREESTANDING GAS RANGES Table of Contents RANGE SAFETY...2 INSTALLATION REQUIREMENTS 4 Tools and Parts...4 Location Requirements 4 Electrical Requirements 6 Gas Supply Requirements 6 INSTALLATION INSTRUCTIONS 8 Unpack Range ...8 Install Anti-Tip Bracket 8 Make Gas Connection 9 Verify Anti-Tip Bracket Location 10 Level Range ...11 Electronic Ignition System 11 Replace Oven Racks...
...: Leave installation instructions with the homeowner. INSTALLATION INSTRUCTIONS 30" (76.2 CM) FREESTANDING GAS RANGES Table of Contents RANGE SAFETY...2 INSTALLATION REQUIREMENTS 4 Tools and Parts...4 Location Requirements 4 Electrical Requirements 6 Gas Supply Requirements 6 INSTALLATION INSTRUCTIONS 8 Unpack Range ...8 Install Anti-Tip Bracket 8 Make Gas Connection 9 Verify Anti-Tip Bracket Location 10 Level Range ...11 Electronic Ignition System 11 Replace Oven Racks...

Installation Instructions
Page 2
...performed by smell. Installation and service must be killed or seriously injured if you cannot reach your gas supplier, call your building. • Immediately call the fire department. - RANGE SAFETY Your safety and the safety of others . All safety messages will tell you what can ...happen if the instructions are very important. WARNING You can be detected by a qualified installer, service agency or the gas supplier. WARNING: If the information...
...performed by smell. Installation and service must be killed or seriously injured if you cannot reach your gas supplier, call your building. • Immediately call the fire department. - RANGE SAFETY Your safety and the safety of others . All safety messages will tell you what can ...happen if the instructions are very important. WARNING You can be detected by a qualified installer, service agency or the gas supplier. WARNING: If the information...
Installation Instructions
Page 3
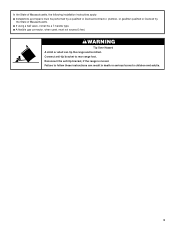
... exceed 3 feet. Connect anti-tip bracket to children and adults. 3 Reconnect the anti-tip bracket, if the range is moved. Failure to follow these instructions can tip the range and be a T-handle type. ■ A flexible gas connector, when used, must be performed by a qualified or licensed contractor, plumber, or gasfitter qualified or licensed...
... exceed 3 feet. Connect anti-tip bracket to children and adults. 3 Reconnect the anti-tip bracket, if the range is moved. Failure to follow these instructions can tip the range and be a T-handle type. ■ A flexible gas connector, when used, must be performed by a qualified or licensed contractor, plumber, or gasfitter qualified or licensed...

Installation Instructions
Page 4
...9632; The floor anti-tip bracket must be securely mounted to the floor during transit. In Canada, the installation of this range must conform to LP gas 4.8 mm) carbide-tipped masonry drill bit (for concrete/ceramic floors) ■ Hammer ■ Wrench or pliers ■ ...installations must provide complete enclosure of the sides and rear of this range must be available. Plastic anchors (2) C. #10 x ¹⁄₂" screws (2) ■ Anti-tip bracket must be installed. Check existing gas supply and electrical supply. Do not obstruct flow of combustion and ventilation...
...9632; The floor anti-tip bracket must be securely mounted to the floor during transit. In Canada, the installation of this range must conform to LP gas 4.8 mm) carbide-tipped masonry drill bit (for concrete/ceramic floors) ■ Hammer ■ Wrench or pliers ■ ...installations must provide complete enclosure of the sides and rear of this range must be available. Plastic anchors (2) C. #10 x ¹⁄₂" screws (2) ■ Anti-tip bracket must be installed. Check existing gas supply and electrical supply. Do not obstruct flow of combustion and ventilation...
Installation Instructions
Page 5
... cm) K. 4¹⁄₂" (11.4 cm) L. 2" (5.1 cm) min. G. 8" (20.3 cm) H. A. 18" (45.7 cm) upper side cabinet to top of rigid gas pipe. upper cabinet depth C. 30" (76.2 cm) min. This shaded area recommended for 25" (64.0 cm) countertop depth, 24" (61.0 cm) base cabinet depth and 36" (91.4 cm... A F BC E D A. 27 69.9 cm) max. Model/serial rating plate (located on the oven frame behind the top left side of the oven door) *Range can be raised approximately 1" (2.5 cm) by not less than No. 28 MSG sheet steel, 0.015" (0.4 mm) stainless steel, 0.024" (0.6 mm) aluminum or...
... cm) K. 4¹⁄₂" (11.4 cm) L. 2" (5.1 cm) min. G. 8" (20.3 cm) H. A. 18" (45.7 cm) upper side cabinet to top of rigid gas pipe. upper cabinet depth C. 30" (76.2 cm) min. This shaded area recommended for 25" (64.0 cm) countertop depth, 24" (61.0 cm) base cabinet depth and 36" (91.4 cm... A F BC E D A. 27 69.9 cm) max. Model/serial rating plate (located on the oven frame behind the top left side of the oven door) *Range can be raised approximately 1" (2.5 cm) by not less than No. 28 MSG sheet steel, 0.015" (0.4 mm) stainless steel, 0.024" (0.6 mm) aluminum or...

Installation Instructions
Page 6
...required. Do not remove ground prong. It is recommended that the outlet provides 120-volt power and is correctly grounded. ■ This gas range is not required to be plugged into an outlet that resist the action of local codes, with all local codes and ordinances. It... ANSI/NFPA 70 or Canadian Electrical Code, CSA C22.1. Du Pont De Nemours and Company. 6 See "Gas Conversions" section. Gas Supply Line ■ Provide a gas supply line of the range must be conducted according to the manufacturer's instructions. IMPORTANT: This installation must be done by CSA International for...
...required. Do not remove ground prong. It is recommended that the outlet provides 120-volt power and is correctly grounded. ■ This gas range is not required to be plugged into an outlet that resist the action of local codes, with all local codes and ordinances. It... ANSI/NFPA 70 or Canadian Electrical Code, CSA C22.1. Du Pont De Nemours and Company. 6 See "Gas Conversions" section. Gas Supply Line ■ Provide a gas supply line of the range must be conducted according to the manufacturer's instructions. IMPORTANT: This installation must be done by CSA International for...


