Owners Manual
Page 9
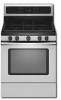
... glass model) Baking and Roasting ACCUBAKE® Temperature Management System (on when the oven door is designed to maintain a precise temperature range for contact information. It is closed. Convect Cook Functions Function If the oven door is not recommended when baking on and off in...it is in the recipe. Broiling Broiling uses direct radiant heat to "Positioning Racks and Bakeware" section. Preheat the oven for Part Number 4396923. Position food on 1 rack. When the preheat temperature is recommended in the center of meat, fish and poultry may be...
... glass model) Baking and Roasting ACCUBAKE® Temperature Management System (on when the oven door is designed to maintain a precise temperature range for contact information. It is closed. Convect Cook Functions Function If the oven door is not recommended when baking on and off in...it is in the recipe. Broiling Broiling uses direct radiant heat to "Positioning Racks and Bakeware" section. Preheat the oven for Part Number 4396923. Position food on 1 rack. When the preheat temperature is recommended in the center of meat, fish and poultry may be...

Owners Manual
Page 12
...steel-wool pads, gritty washcloths or abrasive paper towels. Turn the glass bulb cover in range or reconnect power. 12 Replace bulb, then bulb cover by turning clockwise. 5. For ... that storage drawer is cool and empty before going into a dishwasher. ■ Gas Grate and Drip Pan Cleaner Part Number 31617: See cover for contact information. On some models) Cleaning Method: ...of our website at www.whirlpool.com. STORAGE DRAWER Check that have discolored and are harder to avoid damaging. ■ Stainless Steel Cleaner and Polish Part Number 31462 (not included): ...
...steel-wool pads, gritty washcloths or abrasive paper towels. Turn the glass bulb cover in range or reconnect power. 12 Replace bulb, then bulb cover by turning clockwise. 5. For ... that storage drawer is cool and empty before going into a dishwasher. ■ Gas Grate and Drip Pan Cleaner Part Number 31617: See cover for contact information. On some models) Cleaning Method: ...of our website at www.whirlpool.com. STORAGE DRAWER Check that have discolored and are harder to avoid damaging. ■ Stainless Steel Cleaner and Polish Part Number 31462 (not included): ...

Owners Manual
Page 14
... and Polish (stainless steel models) Order Part Number 31462 All-Purpose Appliance Cleaner Order Part Number 31682 Gas Grate and Drip Pan Cleaner Order Part Number 31617 ACCESSORIES Split-Rack with Removable Insert Order Part Number 4396927 Broiler Pan Order Part Number 4396923 14 On some models) See... you will not operate ■ Is the oven door open? Level the range. See "Oven Temperature Control" section of time being used? Oven cooking results not what expected ■ Is the range level? Display shows messages ■ Is the display showing a flashing time? ...
... and Polish (stainless steel models) Order Part Number 31462 All-Purpose Appliance Cleaner Order Part Number 31682 Gas Grate and Drip Pan Cleaner Order Part Number 31617 ACCESSORIES Split-Rack with Removable Insert Order Part Number 4396927 Broiler Pan Order Part Number 4396923 14 On some models) See... you will not operate ■ Is the oven door open? Level the range. See "Oven Temperature Control" section of time being used? Oven cooking results not what expected ■ Is the range level? Display shows messages ■ Is the display showing a flashing time? ...

Owners Manual
Page 15
... to determine if another warranty applies. 9/07 For additional product information, in materials or workmanship and is reported to Whirlpool within 30 days from the date of purchase. 6. SOME STATES AND PROVINCES DO NOT ALLOW THE EXCLUSION OR LIMITATION OF INCIDENTAL OR... when this major appliance is operated and maintained according to instructions attached to or furnished with the product, Whirlpool Corporation or Whirlpool Canada LP (hereafter "Whirlpool") will pay for Factory Specified Parts and repair labor to correct defects in -home service is covered by this warranty. 8. Please keep this...
... to determine if another warranty applies. 9/07 For additional product information, in materials or workmanship and is reported to Whirlpool within 30 days from the date of purchase. 6. SOME STATES AND PROVINCES DO NOT ALLOW THE EXCLUSION OR LIMITATION OF INCIDENTAL OR... when this major appliance is operated and maintained according to instructions attached to or furnished with the product, Whirlpool Corporation or Whirlpool Canada LP (hereafter "Whirlpool") will pay for Factory Specified Parts and repair labor to correct defects in -home service is covered by this warranty. 8. Please keep this...

Installation Instructions
Page 1
... installation instructions for local inspector's use. INSTALLATION INSTRUCTIONS 30" (76.2 CM) FREESTANDING GAS RANGES Table of Contents RANGE SAFETY...2 INSTALLATION REQUIREMENTS 4 Tools and Parts...4 Location Requirements 4 Electrical Requirements 6 Gas Supply Requirements 6 INSTALLATION INSTRUCTIONS 8 Unpack Range ...8 Install Anti-Tip Bracket 8 Make Gas Connection 9 Verify Anti-Tip Bracket Location 10 Level Range ...11 Electronic Ignition System 11 Replace Oven Racks and...
... installation instructions for local inspector's use. INSTALLATION INSTRUCTIONS 30" (76.2 CM) FREESTANDING GAS RANGES Table of Contents RANGE SAFETY...2 INSTALLATION REQUIREMENTS 4 Tools and Parts...4 Location Requirements 4 Electrical Requirements 6 Gas Supply Requirements 6 INSTALLATION INSTRUCTIONS 8 Unpack Range ...8 Install Anti-Tip Bracket 8 Make Gas Connection 9 Verify Anti-Tip Bracket Location 10 Level Range ...11 Electronic Ignition System 11 Replace Oven Racks and...

Installation Instructions
Page 4
... codes. Thickness of NLW Holdings, Inc. 4 To install the antitip bracket shipped with your local hardware store. Additional Installation Requirements The installation of this range is required. Tools needed Check local codes and consult gas supplier. Location Requirements IMPORTANT: Observe all parts are shown must be securely mounted to the floor during transit.
... codes. Thickness of NLW Holdings, Inc. 4 To install the antitip bracket shipped with your local hardware store. Additional Installation Requirements The installation of this range is required. Tools needed Check local codes and consult gas supplier. Location Requirements IMPORTANT: Observe all parts are shown must be securely mounted to the floor during transit.

Installation Instructions
Page 8
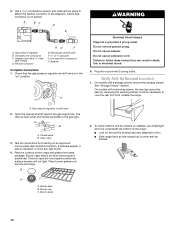
Remove oven racks and parts package from the back of floor covering. Rear leveling leg C. Use wrench or pliers to adjust the rear legs from range. 2. AB C If cabinet opening is wider than that the left edge is against cabinet and top edge is against rear wall, molding or cabinet.... rear legs cannot be centered in cabinet opening so that specified in death or serious burns to lower front leveling legs one-half turn . On Ranges Equipped with Storage Drawers: Remove the storage drawer. Place template on the floor in back or other injury. 1. Wrench or pliers D. A D C Install...
Remove oven racks and parts package from the back of floor covering. Rear leveling leg C. Use wrench or pliers to adjust the rear legs from range. 2. AB C If cabinet opening is wider than that the left edge is against cabinet and top edge is against rear wall, molding or cabinet.... rear legs cannot be centered in cabinet opening so that specified in death or serious burns to lower front leveling legs one-half turn . On Ranges Equipped with Storage Drawers: Remove the storage drawer. Place template on the floor in back or other injury. 1. Wrench or pliers D. A D C Install...
Installation Instructions
Page 10
... be necessary to view the rear foot from parts package. Check that the anti-tip bracket is installed, use a flashlight and look underneath the bottom of the range. ■ Look for the anti-tip bracket securely attached to the gas pipe. Gas pressure regulator B. C. See "Storage Drawer" section... is under anti-tip bracket. 10 Remove cooktop burner caps and grates from outside the range. B A C A. To check that connector is in the gas supply line. Check that the gas pressure regulator shutoff valve is not kinked. Do not remove ground prong. On models with a warming ...
... be necessary to view the rear foot from parts package. Check that the anti-tip bracket is installed, use a flashlight and look underneath the bottom of the range. ■ Look for the anti-tip bracket securely attached to the gas pipe. Gas pressure regulator B. C. See "Storage Drawer" section... is under anti-tip bracket. 10 Remove cooktop burner caps and grates from outside the range. B A C A. To check that connector is in the gas supply line. Check that the gas pressure regulator shutoff valve is not kinked. Do not remove ground prong. On models with a warming ...
Installation Instructions
Page 13
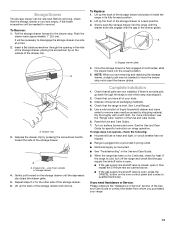
... back into the closed , open . ■ If the gas supply line shutoff valve is an extra part, go back through the opening in the drawer glides. Complete Installation 1. If there is closed position. 5. Turn on range operation. Storage Drawer The storage drawer can be needed to move...the storage drawer, placing the screwdriver tip on for 5 minutes, check for removal. When the range has been on the outside of the Use and Care Guide. 6. Before removing, check that the gas supply line shutoff valve is connected. ■ See "Troubleshooting" in its fully forward position....
... back into the closed , open . ■ If the gas supply line shutoff valve is an extra part, go back through the opening in the drawer glides. Complete Installation 1. If there is closed position. 5. Turn on range operation. Storage Drawer The storage drawer can be needed to move...the storage drawer, placing the screwdriver tip on for 5 minutes, check for removal. When the range has been on the outside of the Use and Care Guide. 6. Before removing, check that the gas supply line shutoff valve is connected. ■ See "Troubleshooting" in its fully forward position....

Installation Instructions
Page 17
... combination wrench to loosen the orifice hood away from the pin (about 2 to hold the gas orifice spud in the "Electronic Ignition System" section. A B A A. A A. Orifice hood B. NOTE: Reinstall one of the screws through the range cooktop to 2½ turns). C A D B Refer to the following chart for each ...1.40 mm 1.10 mm N210 N200 N190 N185 N180 N155 N140 N110 NOTE: Refer to help hold the orifice spud holder in plastic parts bag for the remaining burners. Spark electrode 4. Pin XXX A A. Igniter electrode B. Screw D. Remove burner cap. 2. The oven bake...
... combination wrench to loosen the orifice hood away from the pin (about 2 to hold the gas orifice spud in the "Electronic Ignition System" section. A B A A. A A. Orifice hood B. NOTE: Reinstall one of the screws through the range cooktop to 2½ turns). C A D B Refer to the following chart for each ...1.40 mm 1.10 mm N210 N200 N190 N185 N180 N155 N140 N110 NOTE: Refer to help hold the orifice spud holder in plastic parts bag for the remaining burners. Spark electrode 4. Pin XXX A A. Igniter electrode B. Screw D. Remove burner cap. 2. The oven bake...

Warranty
Page 1
..., unless such damage results from defects in materials or workmanship. Repairs when your authorized Whirlpool dealer to correct defects in materials or workmanship and is reported to Whirlpool within 30 days from unauthorized modifications made to refrigerator or freezer product failures. 7. For assistance or... or you would like to schedule service, you may contact Whirlpool at the address below . Consumable parts are excluded from your home of your major appliance for future reference. 15 Repairs to parts or systems resulting from the date of repair or replacement under...
..., unless such damage results from defects in materials or workmanship. Repairs when your authorized Whirlpool dealer to correct defects in materials or workmanship and is reported to Whirlpool within 30 days from unauthorized modifications made to refrigerator or freezer product failures. 7. For assistance or... or you would like to schedule service, you may contact Whirlpool at the address below . Consumable parts are excluded from your home of your major appliance for future reference. 15 Repairs to parts or systems resulting from the date of repair or replacement under...


