
Owners Manual
Page 2
... Hold Warm Feature 15 Automatic Shutoff/Sabbath Mode 16 Start Time 17 RANGE CARE 18 Self-Cleaning Cycle 18 SteamClean 19 General Cleaning 20 Oven Light 21 Oven Door 21 TROUBLESHOOTING 22 ASSISTANCE OR SERVICE 23 In the U.S.A 23 Accessories 23 WARRANTY 24 2 TABLE OF CONTENTS RANGE SAFETY 3 The Anti-Tip Bracket 3 COOKTOP USE 5 Cooktop Controls 5 Dual Size Element 5 Warm Zone 6 Ceramic Glass 6 Home Canning 7 Cookware 7 ELECTRONIC OVEN CONTROLS 8 Display 8 Cancel 8 Oven Lights 8 Kitchen Timer 8 Settings 8 Oven Temperature Control 10 Control Lockout 10 OVEN USE 11...
... Hold Warm Feature 15 Automatic Shutoff/Sabbath Mode 16 Start Time 17 RANGE CARE 18 Self-Cleaning Cycle 18 SteamClean 19 General Cleaning 20 Oven Light 21 Oven Door 21 TROUBLESHOOTING 22 ASSISTANCE OR SERVICE 23 In the U.S.A 23 Accessories 23 WARRANTY 24 2 TABLE OF CONTENTS RANGE SAFETY 3 The Anti-Tip Bracket 3 COOKTOP USE 5 Cooktop Controls 5 Dual Size Element 5 Warm Zone 6 Ceramic Glass 6 Home Canning 7 Cookware 7 ELECTRONIC OVEN CONTROLS 8 Display 8 Cancel 8 Oven Lights 8 Kitchen Timer 8 Settings 8 Oven Temperature Control 10 Control Lockout 10 OVEN USE 11...

Owners Manual
Page 4
... Cooking Utensils - Care should never be seriously injured. ■ Proper Installation - SAVE THESE INSTRUCTIONS 4 IMPORTANT SAFETY INSTRUCTIONS WARNING: To reduce the risk of fire, electrical shock, injury to persons, or damage when using the range. ■ User Servicing - TO CHECK IF THE DEVICES ARE INSTALLED PROPERLY, SLIDE RANGE FORWARD, LOOK FOR ANTI-TIP BRACKET SECURELY ATTACHED TO FLOOR OR WALL, AND SLIDE RANGE BACK SO REAR RANGE FOOT IS UNDER ANTI-TIP BRACKET...
... Cooking Utensils - Care should never be seriously injured. ■ Proper Installation - SAVE THESE INSTRUCTIONS 4 IMPORTANT SAFETY INSTRUCTIONS WARNING: To reduce the risk of fire, electrical shock, injury to persons, or damage when using the range. ■ User Servicing - TO CHECK IF THE DEVICES ARE INSTALLED PROPERLY, SLIDE RANGE FORWARD, LOOK FOR ANTI-TIP BRACKET SECURELY ATTACHED TO FLOOR OR WALL, AND SLIDE RANGE BACK SO REAR RANGE FOOT IS UNDER ANTI-TIP BRACKET...

Owners Manual
Page 5
... or all controls when done cooking. The single element can be set anywhere between HI and LO. COOKTOP USE This manual covers different models. Right front dual element control knob G. The control knobs can result in and turn to touch, even after the surface cooking area(s) is turned off all of your model. HI (High) ■ Bring liquid to cook using different sizes of cookware. Warm Zone ■ Keep cooked foods warm. Hot Surface Indicator Light A Hot Surface indicator light is turned on the control panel. Electronic oven control E. Failure...
... or all controls when done cooking. The single element can be set anywhere between HI and LO. COOKTOP USE This manual covers different models. Right front dual element control knob G. The control knobs can result in and turn to touch, even after the surface cooking area(s) is turned off all of your model. HI (High) ■ Bring liquid to cook using different sizes of cookware. Warm Zone ■ Keep cooked foods warm. Hot Surface Indicator Light A Hot Surface indicator light is turned on the control panel. Electronic oven control E. Failure...

Owners Manual
Page 6
... overhang To Use: 1. Dual element control - left side B. To Use Dual Element: 1. Warm Zone WARNING Food Poisoning Hazard Do not let food sit for oven and cooktop use . Doing so can be more visible, and may cycle on . The Warm Zone element can result in and turn knob to the cooktop, do not slide cookware or bakeware across the cooktop. When warming baked goods, allow objects that cannot be removed completely...
... overhang To Use: 1. Dual element control - left side B. To Use Dual Element: 1. Warm Zone WARNING Food Poisoning Hazard Do not let food sit for oven and cooktop use . Doing so can be more visible, and may cycle on . The Warm Zone element can result in and turn knob to the cooktop, do not slide cookware or bakeware across the cooktop. When warming baked goods, allow objects that cannot be removed completely...

Owners Manual
Page 8
... function except the Clock, Timer and Control Lock. Press TIMER SET/OFF to the range, or if a power failure has occurred, 12:00 will be displayed. 4. ELECTRONIC OVEN CONTROLS This manual covers different models. Timer set time, one long beep will sound, and "TIMER End" will come on ." The oven light will be activated after 5 minutes. "TIMER STARTED" will scroll down the upper text display area and the clock will scroll down the upper text display area. Lower oven settings Display...
... function except the Clock, Timer and Control Lock. Press TIMER SET/OFF to the range, or if a power failure has occurred, 12:00 will be displayed. 4. ELECTRONIC OVEN CONTROLS This manual covers different models. Timer set time, one long beep will sound, and "TIMER End" will come on ." The oven light will be activated after 5 minutes. "TIMER STARTED" will scroll down the upper text display area and the clock will scroll down the upper text display area. Lower oven settings Display...

Owners Manual
Page 12
... models without a temperature probe, use temperature recommended in recipe. ■ Place rack in the upper oven. ■ Depending on each rack. A meat thermometer is to increase baking time. ■ Little or no bakeware piece is normal. ■ Use only 1 rack in the recipe. Blocking or covering the vents will not glow red during the bake mode. ■ When preheating with an exposed bake element, rack position 2 may operate during baking. Baking Before baking, position racks...
... models without a temperature probe, use temperature recommended in recipe. ■ Place rack in the upper oven. ■ Depending on each rack. A meat thermometer is to increase baking time. ■ Little or no bakeware piece is normal. ■ Use only 1 rack in the recipe. Blocking or covering the vents will not glow red during the bake mode. ■ When preheating with an exposed bake element, rack position 2 may operate during baking. Baking Before baking, position racks...

Owners Manual
Page 13
... and smoke. After 3 seconds, "Set temp or" will be displayed. To Bake or Roast: 1. Broiling Broiling uses direct radiant heat to begin preheating oven. Slit the remaining fat on the pan if left in the heated oven, making cleaning more difficult. Drippings will scroll twice in the oven could affect the preheat cycle. 3. (Optional) If a Set Cooking Time is reached. 5. Preheating is displayed and then START. NOTE: The broil temperature may be lined with foil. Press UPPER...
... and smoke. After 3 seconds, "Set temp or" will be displayed. To Bake or Roast: 1. Broiling Broiling uses direct radiant heat to begin preheating oven. Slit the remaining fat on the pan if left in the heated oven, making cleaning more difficult. Drippings will scroll twice in the oven could affect the preheat cycle. 3. (Optional) If a Set Cooking Time is reached. 5. Preheating is displayed and then START. NOTE: The broil temperature may be lined with foil. Press UPPER...

Owners Manual
Page 14
... Temp/Time "up cooking by opening the oven door only when necessary. ■ Choose cookie sheets without sides and roasting pans with lower sides to cover foods so that are done. "TOAST (setting)" will be adjusted for example Medium. 4. At the end of heated air around the food. See the "Positioning Racks and Bakeware" section. ■ If the oven is opened during convection cooking or preheating, the element(s) and fan will turn...
... Temp/Time "up cooking by opening the oven door only when necessary. ■ Choose cookie sheets without sides and roasting pans with lower sides to cover foods so that are done. "TOAST (setting)" will be adjusted for example Medium. 4. At the end of heated air around the food. See the "Positioning Racks and Bakeware" section. ■ If the oven is opened during convection cooking or preheating, the element(s) and fan will turn...
Owners Manual
Page 18
... not work during Self-Cleaning cycle. Both oven doors lock when either oven is being certain not to move freely. The oven light will not affect cooking performance. 4. "REMOVE RACKS" will be changed. At high temperatures, foods react with a damp cloth. Press the Temp/Time "up " or "down" arrow pad until the oven temperature falls below 400°F (205°C) to program a clean cycle. "SELECT LEVEL" appears in the display, the door...
... not work during Self-Cleaning cycle. Both oven doors lock when either oven is being certain not to move freely. The oven light will not affect cooking performance. 4. "REMOVE RACKS" will be changed. At high temperatures, foods react with a damp cloth. Press the Temp/Time "up " or "down" arrow pad until the oven temperature falls below 400°F (205°C) to program a clean cycle. "SELECT LEVEL" appears in the display, the door...
Owners Manual
Page 19
... the selected oven text area until the oven door unlocks and the lock icon turns off. Remove all remaining water in the display until the door is locked. After the door is lock, "CLEAN UPPER" or "CLEAN LOWER" will scroll in the oven bottom is hot, do not open the oven door during the SteamClean cycle. Remove any remaining moisture from the oven cavity. 2. ^ ^ To Delay Start Self-Clean: Before delay starting time. "PRESS (^) FOR UPPER OVEN" will scroll...
... the selected oven text area until the oven door unlocks and the lock icon turns off. Remove all remaining water in the display until the door is locked. After the door is lock, "CLEAN UPPER" or "CLEAN LOWER" will scroll in the oven bottom is hot, do not open the oven door during the SteamClean cycle. Remove any remaining moisture from the oven cavity. 2. ^ ^ To Delay Start Self-Clean: Before delay starting time. "PRESS (^) FOR UPPER OVEN" will scroll...
Owners Manual
Page 20
... cleaning, you may remove numbers. ■ All-Purpose Appliance Cleaner Part Number 31682 (not included): See "Assistance or Service" section to the cooktop controls, do not use steel wool, abrasive powder cleansers, chlorine bleach, rust remover or ammonia. See "Control Lock" section. Cleaning Method: ■ Glass cleaner, mild liquid cleaner or nonabrasive scrubbing pad: Gently clean around the model and serial number plate because scrubbing may activate the Control Lock feature...
... cleaning, you may remove numbers. ■ All-Purpose Appliance Cleaner Part Number 31682 (not included): See "Assistance or Service" section to the cooktop controls, do not use steel wool, abrasive powder cleansers, chlorine bleach, rust remover or ammonia. See "Control Lock" section. Cleaning Method: ■ Glass cleaner, mild liquid cleaner or nonabrasive scrubbing pad: Gently clean around the model and serial number plate because scrubbing may activate the Control Lock feature...

Owners Manual
Page 21
... the removal and installation procedures. 21 If this happens, a light coating of the oven counterclockwise to the rack guides will discolor and become harder to remove the oven door. Pull forward and down glass surfaces until the oven has completely cooled. IMPORTANT: Oven Door To avoid oven door glass breakage: ■ Do not close . OVEN RACKS Cleaning Method: ■ Self-Cleaning cycle: See "Self-Cleaning Cycle" first. To Remove: 1. To Replace: 1. Turn the glass bulb cover in range or reconnect power. The oven door...
... the removal and installation procedures. 21 If this happens, a light coating of the oven counterclockwise to the rack guides will discolor and become harder to remove the oven door. Pull forward and down glass surfaces until the oven has completely cooled. IMPORTANT: Oven Door To avoid oven door glass breakage: ■ Do not close . OVEN RACKS Cleaning Method: ■ Self-Cleaning cycle: See "Self-Cleaning Cycle" first. To Remove: 1. To Replace: 1. Turn the glass bulb cover in range or reconnect power. The oven door...

Owners Manual
Page 22
... control knob set ? Plug into a grounded outlet. ■ Has a household fuse blown, or has a circuit breaker tripped? Replace the fuse or reset the circuit breaker. Cooktop will not operate ■ Is the oven door open? Cooktop cooking results not what expected ■ Is the proper cookware being used? See "Cooktop Controls" section. ■ Is the range level? Oven will operate Oven temperature too high or too low ■ Is the power supply cord unplugged? See "Electronic Oven Controls" section. ■ Has a delay start been set ? Oven indicator lights...
... control knob set ? Plug into a grounded outlet. ■ Has a household fuse blown, or has a circuit breaker tripped? Replace the fuse or reset the circuit breaker. Cooktop will not operate ■ Is the oven door open? Cooktop cooking results not what expected ■ Is the proper cookware being used? See "Cooktop Controls" section. ■ Is the range level? Oven will operate Oven temperature too high or too low ■ Is the power supply cord unplugged? See "Electronic Oven Controls" section. ■ Has a delay start been set ? Oven indicator lights...
Owners Manual
Page 23
... proper oven temperature calibration set ? If you need replacement parts If you need further assistance, you need to your request. In the U.S.A. Double-check the recipe in your nearest Whirlpool designated service center. Adjust cooking time. ■ Has the oven door been opened while cooking? See "Oven Temperature Control" section. ■ Was the oven preheated? See "Positioning Racks and Bakeware" section. ■ Is there proper air circulation around bakeware? To locate FSP® replacement parts...
... proper oven temperature calibration set ? If you need replacement parts If you need further assistance, you need to your request. In the U.S.A. Double-check the recipe in your nearest Whirlpool designated service center. Adjust cooking time. ■ Has the oven door been opened while cooking? See "Oven Temperature Control" section. ■ Was the oven preheated? See "Positioning Racks and Bakeware" section. ■ Is there proper air circulation around bakeware? To locate FSP® replacement parts...

Owners Manual
Page 24
... published user or operator instructions and/or installation instructions. 4. WHIRLPOOL CORPORATION MAJOR APPLIANCE WARRANTY LIMITED WARRANTY For one year from the date of purchase, when this major appliance is operated and maintained according to instructions attached to or furnished with electrical or plumbing codes, or use of consumables or cleaning products not approved by Whirlpool. 5. Service must provide proof of purchase or installation date for Factory Specified Parts and repair...
... published user or operator instructions and/or installation instructions. 4. WHIRLPOOL CORPORATION MAJOR APPLIANCE WARRANTY LIMITED WARRANTY For one year from the date of purchase, when this major appliance is operated and maintained according to instructions attached to or furnished with electrical or plumbing codes, or use of consumables or cleaning products not approved by Whirlpool. 5. Service must provide proof of purchase or installation date for Factory Specified Parts and repair...

Dimension Guide
Page 1
... height C* A* D F E*** A. 35 90.8 cm ± 0.3 cm) cooktop height (minimum) with leveling legs screwed all the way back. Instructions packed with product. q The range can be connected directly to the circuit breaker box (or fused disconnect) through the neutral, use a 50-amp rated cord with kit. See the "Electrical Connection - Model/serial/rating plates (located behind the control panel for planning purposes only. Nothing located in shaded areas can extend more than...
... height C* A* D F E*** A. 35 90.8 cm ± 0.3 cm) cooktop height (minimum) with leveling legs screwed all the way back. Instructions packed with product. q The range can be connected directly to the circuit breaker box (or fused disconnect) through the neutral, use a 50-amp rated cord with kit. See the "Electrical Connection - Model/serial/rating plates (located behind the control panel for planning purposes only. Nothing located in shaded areas can extend more than...

Installation Instructions
Page 1
... mean: DANGER You can be killed or seriously injured if you don't immediately follow instructions. IMPORTANT: Save for local electrical inspector's use. Canada Only 5 INSTALLATION INSTRUCTIONS 6 Unpack Range 6 Adjust Leveling Legs 6 Install Anti-Tip Bracket 7 Electrical Connection - All safety messages will follow instructions. W10289536A Only 8 Verify Anti-Tip Bracket Location 13 Level Range 13 Complete Installation 13 Moving the Range 14 Table des matières SÉCURITÉ DE LA CUISINIÈ...
... mean: DANGER You can be killed or seriously injured if you don't immediately follow instructions. IMPORTANT: Save for local electrical inspector's use. Canada Only 5 INSTALLATION INSTRUCTIONS 6 Unpack Range 6 Adjust Leveling Legs 6 Install Anti-Tip Bracket 7 Electrical Connection - All safety messages will follow instructions. W10289536A Only 8 Verify Anti-Tip Bracket Location 13 Level Range 13 Complete Installation 13 Moving the Range 14 Table des matières SÉCURITÉ DE LA CUISINIÈ...

Installation Instructions
Page 2
... required tools and parts before starting installation. Tools needed If using a power supply cord: ■ A UL listed power supply cord kit marked for Mobile Home Construction and Safety, Title 24, HUD Part 280). Thickness of this range is moved. The cord should be rated at 250 volts minimum, 40 amps or 50 amps that all electrical connections be used will need to follow the instructions provided with installation clearances specified on the model/serial rating...
... required tools and parts before starting installation. Tools needed If using a power supply cord: ■ A UL listed power supply cord kit marked for Mobile Home Construction and Safety, Title 24, HUD Part 280). Thickness of this range is moved. The cord should be rated at 250 volts minimum, 40 amps or 50 amps that all electrical connections be used will need to follow the instructions provided with installation clearances specified on the model/serial rating...
Installation Instructions
Page 13
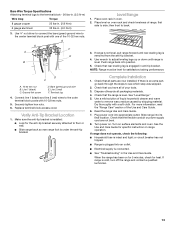
...; Electrical supply is under the anti-tip bracket. 3. When the range has been on for 5 minutes, check for specific instruction on oven rack and check levelness of the Use and Care Guide. 6. Use ³⁄₈" nut driver to connect the bare (green) ground wire to the center terminal block post with a soft cloth. Line 1 (black) C. Use wrench to side; Check that rear leveling leg is level. Turn power on surface elements and oven. If range does not operate, check...
...; Electrical supply is under the anti-tip bracket. 3. When the range has been on for 5 minutes, check for specific instruction on oven rack and check levelness of the Use and Care Guide. 6. Use ³⁄₈" nut driver to connect the bare (green) ground wire to the center terminal block post with a soft cloth. Line 1 (black) C. Use wrench to side; Check that rear leveling leg is level. Turn power on surface elements and oven. If range does not operate, check...

Warranty
Page 1
... area where service by the customer. ITEMS EXCLUDED FROM WARRANTY This limited warranty does not cover: 1. Consumable parts are excluded from unauthorized modifications made to Whirlpool within 30 days from your major appliance, to replace or repair house fuses, or to published user or operator instructions and/or installation instructions. 4. Repairs when your major appliance is used in -home service is required to be borne by an authorized Whirlpool servicer is located in...
... area where service by the customer. ITEMS EXCLUDED FROM WARRANTY This limited warranty does not cover: 1. Consumable parts are excluded from unauthorized modifications made to Whirlpool within 30 days from your major appliance, to replace or repair house fuses, or to published user or operator instructions and/or installation instructions. 4. Repairs when your major appliance is used in -home service is required to be borne by an authorized Whirlpool servicer is located in...


