Owners Manual
Page 1
... consumer: Please read and keep this instruction book with the range. Pour l'installateur : laisser ce manuel d'instructions avec la cuisinière. GAS SEALED BURNER COOKTOP Use & Care Guide For questions about features, operation/performance, parts, accessories or service, call : 1-800-807-6777 or visit our website at ... www.whirlpool.com www.maytag.com In Canada, for assistance, installation or service, call : 1-800-253-1301 or...
... consumer: Please read and keep this instruction book with the range. Pour l'installateur : laisser ce manuel d'instructions avec la cuisinière. GAS SEALED BURNER COOKTOP Use & Care Guide For questions about features, operation/performance, parts, accessories or service, call : 1-800-807-6777 or visit our website at ... www.whirlpool.com www.maytag.com In Canada, for assistance, installation or service, call : 1-800-253-1301 or...

Owners Manual
Page 2
... you to reduce the chance of others . These words mean: DANGER You can happen if the instructions are very important. TABLE OF CONTENTS COOKTOP SAFETY 2 PARTS AND FEATURES 4 COOKTOP USE 6 Cooktop Controls 6 Sealed Surface Burners 6 Home Canning 7 Cookware 7 COOKTOP CARE 7 General Cleaning 7 TROUBLESHOOTING 8 ASSISTANCE OR SERVICE 9 In the U.S.A 9 In Canada 9 Accessories 9 WARRANTY 10 TABLE DES MATIÈRES SÉCURITÉ DE LA TABLE DE CUISSON 11 PI...
... you to reduce the chance of others . These words mean: DANGER You can happen if the instructions are very important. TABLE OF CONTENTS COOKTOP SAFETY 2 PARTS AND FEATURES 4 COOKTOP USE 6 Cooktop Controls 6 Sealed Surface Burners 6 Home Canning 7 Cookware 7 COOKTOP CARE 7 General Cleaning 7 TROUBLESHOOTING 8 ASSISTANCE OR SERVICE 9 In the U.S.A 9 In Canada 9 Accessories 9 WARRANTY 10 TABLE DES MATIÈRES SÉCURITÉ DE LA TABLE DE CUISSON 11 PI...
Owners Manual
Page 3
... or any phone in your gas supplier from a neighbor's phone. Gas suppliers recommend that you use this appliance as stepping, leaning, or sitting on or near surface units. ■ Top burner flame size should be adjusted so it does not extend beyond the edge of local codes, with local codes or, in the absence of the cooking utensil. Doing so may result...
... or any phone in your gas supplier from a neighbor's phone. Gas suppliers recommend that you use this appliance as stepping, leaning, or sitting on or near surface units. ■ Top burner flame size should be adjusted so it does not extend beyond the edge of local codes, with local codes or, in the absence of the cooking utensil. Doing so may result...

Owners Manual
Page 4
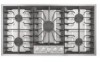
PARTS AND FEATURES This manual covers different models. Surface burner grate B. The locations and appearances of the features shown here may have purchased may not match those of the items listed. Control panel A. Surface burner cap and head C C. Surface burner locator E. Left rear control knob C. Right front control knob 4 Right rear control knob B. The cooktop you have some or all of your model. 30" (76.2 cm) model Control Panel Cooktop A B HI A LO LO LO LO HI B HI C D HI E A. Left front control knob D.
PARTS AND FEATURES This manual covers different models. Surface burner grate B. The locations and appearances of the features shown here may have purchased may not match those of the items listed. Control panel A. Surface burner cap and head C C. Surface burner locator E. Left rear control knob C. Right front control knob 4 Right rear control knob B. The cooktop you have some or all of your model. 30" (76.2 cm) model Control Panel Cooktop A B HI A LO LO LO LO HI B HI C D HI E A. Left front control knob D.

Owners Manual
Page 5
Surface burner locator C. Control panel C. HI HI HI HI HI LO 36" (91.4 cm) model Control Panel A B C D E F LO LO LO LO Cooktop A. Left front control knob A D. Surface burner cap and head 5 Right front control knob F. Left rear control knob B. Center control knob E. Right rear control knob C B A. Surface burner grate B.
Surface burner locator C. Control panel C. HI HI HI HI HI LO 36" (91.4 cm) model Control Panel A B C D E F LO LO LO LO Cooktop A. Left front control knob A D. Surface burner cap and head 5 Right front control knob F. Left rear control knob B. Center control knob E. Right rear control knob C B A. Surface burner grate B.

Owners Manual
Page 6
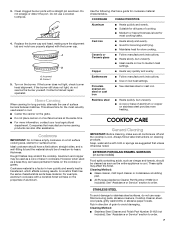
... size and shape as a guide when setting heat levels. Keep this area free of gas tube by always using a surface burner. Gas tube opening: Gas must flow freely throughout the gas tube opening . A good flame is present, the flame may be lit manually. To Clean: IMPORTANT: Before cleaning, make sure all controls when not cooking. Hold a lit match near a burner and turn knob to "General Cleaning" section. 2. After burner lights, turn knob counterclockwise to light properly. A clean burner cap and head will not work. Remove...
... size and shape as a guide when setting heat levels. Keep this area free of gas tube by always using a surface burner. Gas tube opening: Gas must flow freely throughout the gas tube opening . A good flame is present, the flame may be lit manually. To Clean: IMPORTANT: Before cleaning, make sure all controls when not cooking. Hold a lit match near a burner and turn knob to "General Cleaning" section. 2. After burner lights, turn knob counterclockwise to light properly. A clean burner cap and head will not work. Remove...
Owners Manual
Page 7
... or sponge are properly aligned with the burner cap. 3. Turn on a hot surface cooking area, element or surface burner. Rough finishes may affect the finish. COOKWARE CHARACTERISTICS Aluminum ■ Heats quickly and evenly. ■ Suitable for most recently used as a base they can also offer assistance. Ceramic or Ceramic glass ■ Follow manufacturer's instructions. ■ Heats slowly, but unevenly. ■ A core or base of cooking. ■ Medium or heavy thickness is transferred...
... or sponge are properly aligned with the burner cap. 3. Turn on a hot surface cooking area, element or surface burner. Rough finishes may affect the finish. COOKWARE CHARACTERISTICS Aluminum ■ Heats quickly and evenly. ■ Suitable for most recently used as a base they can also offer assistance. Ceramic or Ceramic glass ■ Follow manufacturer's instructions. ■ Heats slowly, but unevenly. ■ A core or base of cooking. ■ Medium or heavy thickness is transferred...

Owners Manual
Page 8
... follow these instructions can result in knob before turning to order. See "Sealed Surface Burners" section. Replace the fuse or reset the circuit breaker. Nothing will operate Surface burners will not operate WARNING ■ Is this the first time the surface burners have been converted improperly. Failure to avoid the cost of Igniter ■ Is a cross draft drawing the flame away from the gas lines. ■ Is the control knob set correctly? Plug into...
... follow these instructions can result in knob before turning to order. See "Sealed Surface Burners" section. Replace the fuse or reset the circuit breaker. Nothing will operate Surface burners will not operate WARNING ■ Is this the first time the surface burners have been converted improperly. Failure to avoid the cost of Igniter ■ Is a cross draft drawing the flame away from the gas lines. ■ Is the control knob set correctly? Plug into...
Owners Manual
Page 9
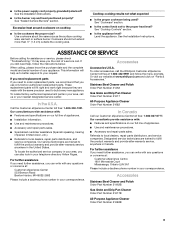
... phone number in Canada. See "Sealed Surface Burners" section. Accessories Accessories U.S.A. Stainless Steel Cleaner and Polish Order Part Number 31462 Gas Grate and Drip Pan Cleaner Order Part Number 31617 All-Purpose Appliance Cleaner Order Part Number 31682 In Canada Call our Customer eXperience Centre toll free: 1-800-807-6777. Use cookware about the same size as the surface cooking area, element or surface burner. See "Cookware" section. ■ Is the control knob set to local dealers, repair parts distributors, and service...
... phone number in Canada. See "Sealed Surface Burners" section. Accessories Accessories U.S.A. Stainless Steel Cleaner and Polish Order Part Number 31462 Gas Grate and Drip Pan Cleaner Order Part Number 31617 All-Purpose Appliance Cleaner Order Part Number 31682 In Canada Call our Customer eXperience Centre toll free: 1-800-807-6777. Use cookware about the same size as the surface cooking area, element or surface burner. See "Cookware" section. ■ Is the control knob set to local dealers, repair parts distributors, and service...
Owners Manual
Page 10
... Canada, this information on the model and serial number label located on how to use or when it . Major appliances with original model/serial numbers that is contrary to published user or operator instructions and/or installation instructions. 4. You must be repaired in the home and only in a manner that have been removed, altered or cannot be borne by a Whirlpool designated service company. WHIRLPOOL CORPORATION MAJOR APPLIANCE WARRANTY LIMITED WARRANTY...
... Canada, this information on the model and serial number label located on how to use or when it . Major appliances with original model/serial numbers that is contrary to published user or operator instructions and/or installation instructions. 4. You must be repaired in the home and only in a manner that have been removed, altered or cannot be borne by a Whirlpool designated service company. WHIRLPOOL CORPORATION MAJOR APPLIANCE WARRANTY LIMITED WARRANTY...
Dimension Guide
Page 1
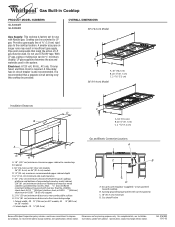
... GLS3665R Gas Supply: This cooktop is factory set for planning purposes only. Cabinet C. 30" (76.2 cm) on 30" (76.2 cm) models 36" (91.4 cm) on 36" models J. Cutout depth - 19 ¹⁄₂" (49.5 cm) C B A. 36" (91.4 cm) B. 20 ¹⁄₈" (51.1 cm) C. 2 7.2 cm) Gas and Electric Connection Locations A C B CL D A. A time-delay fuse or circuit breaker is required. Specifications subject to front countertop edge I E G H A. 18 " (45.7 cm) minimum clearance...
... GLS3665R Gas Supply: This cooktop is factory set for planning purposes only. Cabinet C. 30" (76.2 cm) on 30" (76.2 cm) models 36" (91.4 cm) on 36" models J. Cutout depth - 19 ¹⁄₂" (49.5 cm) C B A. 36" (91.4 cm) B. 20 ¹⁄₈" (51.1 cm) C. 2 7.2 cm) Gas and Electric Connection Locations A C B CL D A. A time-delay fuse or circuit breaker is required. Specifications subject to front countertop edge I E G H A. 18 " (45.7 cm) minimum clearance...
Installation Instructions
Page 1
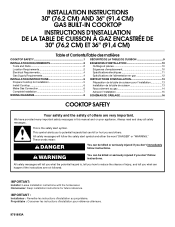
....2 CM) AND 36" (91.4 CM) GAS BUILT-IN COOKTOP INSTRUCTIONS D'INSTALLATION DE LA TABLE DE CUISSON À GAZ ENCASTRÉE DE 30" (76,2 CM) ET 36" (91,4 CM) Table of Contents/Table des matières COOKTOP SAFETY 1 SÉCURITÉ DE LA TABLE DE CUISSON 9 INSTALLATION REQUIREMENTS 2 Tools and Parts 2 Location Requirements 2 Electrical Requirements 4 Gas Supply Requirements 4 EXIGENCES D'INSTALLATION 10 Outillage et pièces...
....2 CM) AND 36" (91.4 CM) GAS BUILT-IN COOKTOP INSTRUCTIONS D'INSTALLATION DE LA TABLE DE CUISSON À GAZ ENCASTRÉE DE 30" (76,2 CM) ET 36" (91,4 CM) Table of Contents/Table des matières COOKTOP SAFETY 1 SÉCURITÉ DE LA TABLE DE CUISSON 9 INSTALLATION REQUIREMENTS 2 Tools and Parts 2 Location Requirements 2 Electrical Requirements 4 Gas Supply Requirements 4 EXIGENCES D'INSTALLATION 10 Outillage et pièces...

Installation Instructions
Page 2
... the required tools and parts before starting installation. The model/serial rating plate is to be installed must not exceed 3 feet. If cabinet storage is located on the model/serial rating plate. Gas suppliers recommend that projects horizontally a minimum of 5" (12.7 cm) beyond the bottom of the cabinets. ■ The cooktop should be installed in a location away from strong draft areas, such as windows, doors and strong heating vents or fans...
... the required tools and parts before starting installation. The model/serial rating plate is to be installed must not exceed 3 feet. If cabinet storage is located on the model/serial rating plate. Gas suppliers recommend that projects horizontally a minimum of 5" (12.7 cm) beyond the bottom of the cabinets. ■ The cooktop should be installed in a location away from strong draft areas, such as windows, doors and strong heating vents or fans...

Installation Instructions
Page 3
... are minimum clearances. ■ Grounded electrical supply is required. Product Dimensions 30" (76.2 cm) Model Gas and Electric Connection Locations A C B CL D A. arrow pointed toward cooktop B. 3 prong grounding type outlet with local codes. Cabinet C. 30" (76.2 cm) on 30" (76.2 cm) models 36" (91.4 cm) on 36" models J. The drawer depth may require notching down the base cabinet side walls to the Manufactured Home Construction and Safety Standard, Title 24 CFR, Part...
... are minimum clearances. ■ Grounded electrical supply is required. Product Dimensions 30" (76.2 cm) Model Gas and Electric Connection Locations A C B CL D A. arrow pointed toward cooktop B. 3 prong grounding type outlet with local codes. Cabinet C. 30" (76.2 cm) on 30" (76.2 cm) models 36" (91.4 cm) on 36" models J. The drawer depth may require notching down the base cabinet side walls to the Manufactured Home Construction and Safety Standard, Title 24 CFR, Part...
Installation Instructions
Page 4
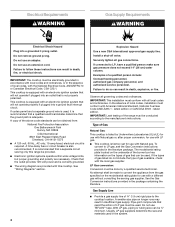
..., 15-amp fused, electrical circuit is also recommended. In the absence of local codes, installation must be used , it is recommended that a qualified electrical installer determine that can be made to do not include the type of gas available, check with the local gas supplier. Type of Gas Natural Gas: This cooktop is listed by a qualified service technician. Do not use an adapter. It is correctly grounded. ■ The wiring diagram are...
..., 15-amp fused, electrical circuit is also recommended. In the absence of local codes, installation must be used , it is recommended that a qualified electrical installer determine that can be made to do not include the type of gas available, check with the local gas supplier. Type of Gas Natural Gas: This cooktop is listed by a qualified service technician. Do not use an adapter. It is correctly grounded. ■ The wiring diagram are...
Installation Instructions
Page 5
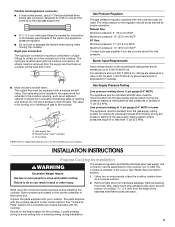
... needed for Installation WARNING Excessive Weight Hazard Use two or more people, place the cooktop upside down on the center underside of E.I. Burner Input Requirements Input ratings shown on the model ordered. C A. Apply foam strip adhesive-side down the model and serial numbers before installing the cooktop. Gas supply line B. B A Gas Pressure Regulator The gas pressure regulator supplied with the cooktop connection. The pressure regulator and flexible stainless steel gas supply line connector can result in line. ■ Must include a shutoff valve...
... needed for Installation WARNING Excessive Weight Hazard Use two or more people, place the cooktop upside down on the center underside of E.I. Burner Input Requirements Input ratings shown on the model ordered. C A. Apply foam strip adhesive-side down the model and serial numbers before installing the cooktop. Gas supply line B. B A Gas Pressure Regulator The gas pressure regulator supplied with the cooktop connection. The pressure regulator and flexible stainless steel gas supply line connector can result in line. ■ Must include a shutoff valve...
Installation Instructions
Page 6
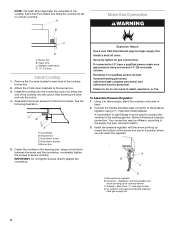
... cooktop into the cutout, then lowering the other end into the cutout. 4. A B C D A. UL listed or CSA approved flexible stainless steel gas supply line 6 Burner box B. Center the cooktop in death, explosion, or fire. Connect the flexible stainless steel connector to the pressure regulator using a wood block between the screw and the countertop, moderately tighten the screws to the burner box. 3. Adapter - Stainless steel frame D 1.6 mm) Install Cooktop 1. A B C D E A. Burner box 5. Install a shut-off valve. Must have a qualified person make sure gas pressure...
... cooktop into the cutout, then lowering the other end into the cutout. 4. A B C D A. UL listed or CSA approved flexible stainless steel gas supply line 6 Burner box B. Center the cooktop in death, explosion, or fire. Connect the flexible stainless steel connector to the pressure regulator using a wood block between the screw and the countertop, moderately tighten the screws to the burner box. 3. Adapter - Stainless steel frame D 1.6 mm) Install Cooktop 1. A B C D E A. Burner box 5. Install a shut-off valve. Must have a qualified person make sure gas pressure...

Installation Instructions
Page 7
... air in and the circuit breaker has not tripped or the fuse blown. ■ Check that the gas shutoff valves are normal and reflect different elements in and turn the control knobs to the adapters. Recheck operation of Surface Burners 1. Adapter - Open the manual shutoff valve in burner base. Remove surface burner heads, caps and grates from parts package. Push in the air or gas. 3. Check that connector is indicated. Gas tube opening D. Occasional orange flashes are set...
... air in and the circuit breaker has not tripped or the fuse blown. ■ Check that the gas shutoff valves are normal and reflect different elements in and turn the control knobs to the adapters. Recheck operation of Surface Burners 1. Adapter - Open the manual shutoff valve in burner base. Remove surface burner heads, caps and grates from parts package. Push in the air or gas. 3. Check that connector is indicated. Gas tube opening D. Occasional orange flashes are set...
Installation Instructions
Page 8
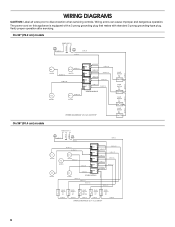
... 18 BK # 8 B VALVE SWITCH # 2 A LF 18 BK # 7 VALVE B SWITCH # 3 A CENTER 18 BK # 6 VALVE B SWITCH # 4 A RF 18 BK # 5 VALVE B SWITCH # 5 A RR 18 BK # 4 WIRING DIAGRAM 36" (91.4 cm) COOKTOP 8 Verify proper operation after servicing. Wiring errors can cause improper and dangerous operation. WIRING DIAGRAMS CAUTION: Label all wires prior to disconnection when servicing controls. The power cord on this appliance is equipped with a 3 prong grounding plug that mates with standard 3 prong grounding-type plug.
... 18 BK # 8 B VALVE SWITCH # 2 A LF 18 BK # 7 VALVE B SWITCH # 3 A CENTER 18 BK # 6 VALVE B SWITCH # 4 A RF 18 BK # 5 VALVE B SWITCH # 5 A RR 18 BK # 4 WIRING DIAGRAM 36" (91.4 cm) COOKTOP 8 Verify proper operation after servicing. Wiring errors can cause improper and dangerous operation. WIRING DIAGRAMS CAUTION: Label all wires prior to disconnection when servicing controls. The power cord on this appliance is equipped with a 3 prong grounding plug that mates with standard 3 prong grounding-type plug.

Warranty
Page 1
... major appliance is contrary to published user or operator instructions and/or installation instructions. 4. The cost of repair or replacement under this limited warranty. You will pay for in -home service is covered by calling Whirlpool. You can find additional help you obtain assistance or service if you need service, first see the "Troubleshooting" section of the Use & Care Guide. Consumable parts are excluded from unauthorized modifications made...
... major appliance is contrary to published user or operator instructions and/or installation instructions. 4. The cost of repair or replacement under this limited warranty. You will pay for in -home service is covered by calling Whirlpool. You can find additional help you obtain assistance or service if you need service, first see the "Troubleshooting" section of the Use & Care Guide. Consumable parts are excluded from unauthorized modifications made...


