Owners Manual
Page 1
... consumer: Please read and keep this instruction book with the range. Pour l'installateur : laisser ce manuel d'instructions avec la cuisinière. GAS SEALED BURNER COOKTOP Use & Care Guide For questions about features, operation/performance, parts, accessories or service, call : 1-800-807-6777 or visit our website at... d'entretien Au Canada, pour assistance, installation ou service, composer le 1-800-807-6777 ou visitez notre site web à www.whirlpool.ca ou www.maytag.ca Table of Contents/Table des matières 2 To the installer: Please leave this book for future reference.
... consumer: Please read and keep this instruction book with the range. Pour l'installateur : laisser ce manuel d'instructions avec la cuisinière. GAS SEALED BURNER COOKTOP Use & Care Guide For questions about features, operation/performance, parts, accessories or service, call : 1-800-807-6777 or visit our website at... d'entretien Au Canada, pour assistance, installation ou service, composer le 1-800-807-6777 ou visitez notre site web à www.whirlpool.ca ou www.maytag.ca Table of Contents/Table des matières 2 To the installer: Please leave this book for future reference.

Owners Manual
Page 2
... can happen if the instructions are very important. All safety messages will follow instructions. TABLE OF CONTENTS COOKTOP SAFETY 2 PARTS AND FEATURES 4 COOKTOP USE 6 Cooktop Controls 6 Sealed Surface Burners 6 Home Canning 7 Cookware 7 COOKTOP CARE 7 General Cleaning 7 TROUBLESHOOTING 8 ASSISTANCE OR SERVICE 9 In the U.S.A 9 In Canada 9 ... LA TABLE DE CUISSON 17 Nettoyage général 17 DÉPANNAGE 18 ASSISTANCE OU SERVICE 19 GARANTIE 19 COOKTOP SAFETY Your safety and the safety of injury, and tell you what can be killed or seriously injured if you...
... can happen if the instructions are very important. All safety messages will follow instructions. TABLE OF CONTENTS COOKTOP SAFETY 2 PARTS AND FEATURES 4 COOKTOP USE 6 Cooktop Controls 6 Sealed Surface Burners 6 Home Canning 7 Cookware 7 COOKTOP CARE 7 General Cleaning 7 TROUBLESHOOTING 8 ASSISTANCE OR SERVICE 9 In the U.S.A 9 In Canada 9 ... LA TABLE DE CUISSON 17 Nettoyage général 17 DÉPANNAGE 18 ASSISTANCE OU SERVICE 19 GARANTIE 19 COOKTOP SAFETY Your safety and the safety of injury, and tell you what can be killed or seriously injured if you...
Owners Manual
Page 3
...9632; Injuries may result in the absence of California to the State of the cooktop. ■ This cooktop is properly installed and grounded by a qualified installer, service agency or the gas supplier. Doing so may result from combustible materials, gasoline, and other reproductive harm.... 3 Follow the gas supplier's instructions. • If you cannot reach your gas supplier, call your gas supplier from this plug. ■ Disconnect the electrical supply before servicing the cooktop. ■ CAUTION: Do not store items of fire,...
...9632; Injuries may result in the absence of California to the State of the cooktop. ■ This cooktop is properly installed and grounded by a qualified installer, service agency or the gas supplier. Doing so may result from combustible materials, gasoline, and other reproductive harm.... 3 Follow the gas supplier's instructions. • If you cannot reach your gas supplier, call your gas supplier from this plug. ■ Disconnect the electrical supply before servicing the cooktop. ■ CAUTION: Do not store items of fire,...

Owners Manual
Page 4
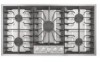
Surface burner grate B. Surface burner cap and head C C. Control panel A. Left front control knob D. Right front control knob 4 PARTS AND FEATURES This manual covers different models. Left rear control knob C. Surface burner locator E. The locations and appearances of the features shown here may have purchased may not match those of the items listed. The cooktop you have some or all of your model. 30" (76.2 cm) model Control Panel Cooktop A B HI A LO LO LO LO HI B HI C D HI E A. Right rear control knob B.
Surface burner grate B. Surface burner cap and head C C. Control panel A. Left front control knob D. Right front control knob 4 PARTS AND FEATURES This manual covers different models. Left rear control knob C. Surface burner locator E. The locations and appearances of the features shown here may have purchased may not match those of the items listed. The cooktop you have some or all of your model. 30" (76.2 cm) model Control Panel Cooktop A B HI A LO LO LO LO HI B HI C D HI E A. Right rear control knob B.

Owners Manual
Page 5
Left rear control knob B. Left front control knob A D. Control panel C. Center control knob E. Right front control knob F. Surface burner cap and head 5 Right rear control knob C B A. Surface burner grate B. Surface burner locator C. HI HI HI HI HI LO 36" (91.4 cm) model Control Panel A B C D E F LO LO LO LO Cooktop A.
Left rear control knob B. Left front control knob A D. Control panel C. Center control knob E. Right front control knob F. Surface burner cap and head 5 Right rear control knob C B A. Surface burner grate B. Surface burner locator C. HI HI HI HI HI LO 36" (91.4 cm) model Control Panel A B C D E F LO LO LO LO Cooktop A.

Owners Manual
Page 6
...HI. 2. Push in and turn knob counterclockwise to follow these instructions can be affected and some sparking may occur. REMEMBER: When cooktop is in place when using a burner cap. Burner cap: Always keep the burner cap and head in use oven cleaners, ...hot. LO ■ Simmer. ■ Keep food warm. Gas tube opening: Gas must flow freely throughout the gas tube opening . Electric igniters automatically light the surface burners when control knobs are off and cooktop is normal. COOKTOP USE Cooktop Controls WARNING Sealed Surface Burners A B Fire Hazard Do not ...
...HI. 2. Push in and turn knob counterclockwise to follow these instructions can be affected and some sparking may occur. REMEMBER: When cooktop is in place when using a burner cap. Burner cap: Always keep the burner cap and head in use oven cleaners, ...hot. LO ■ Simmer. ■ Keep food warm. Gas tube opening: Gas must flow freely throughout the gas tube opening . Electric igniters automatically light the surface burners when control knobs are off and cooktop is normal. COOKTOP USE Cooktop Controls WARNING Sealed Surface Burners A B Fire Hazard Do not ...
Owners Manual
Page 7
... ■ Maintains heat for cookware material characteristics. Stainless steel ■ Heats quickly, but unevenly. ■ Ideal results on the cooktop or grates. Cleaning Method: ■ Glass cleaner, mild liquid cleaner or nonabrasive scrubbing pad. ■ All Purpose Appliance Cleaner Part ...slowly, but unevenly. ■ A core or base of surface burners between batches. Clean clogged burner ports with the burner cap. COOKTOP CARE General Cleaning IMPORTANT: Before cleaning, make sure all types of aluminum. Ideal cookware should have a flat bottom, straight sides, ...
... ■ Maintains heat for cookware material characteristics. Stainless steel ■ Heats quickly, but unevenly. ■ Ideal results on the cooktop or grates. Cleaning Method: ■ Glass cleaner, mild liquid cleaner or nonabrasive scrubbing pad. ■ All Purpose Appliance Cleaner Part ...slowly, but unevenly. ■ A core or base of surface burners between batches. Clean clogged burner ports with the burner cap. COOKTOP CARE General Cleaning IMPORTANT: Before cleaning, make sure all types of aluminum. Ideal cookware should have a flat bottom, straight sides, ...

Owners Manual
Page 8
...Sealed Surface Burners" section. ■ Is propane gas being used ? These spills may have been used ? Clean ceramic post with soft, lint-free cloth. ■ Vinegar for hard water spots COOKTOP CONTROLS To avoid damage to the cooktop controls, do not use abrasive cleaners, steel-wool ... using a nonabrasive scouring pad. Cleaning Method: ■ Nonabrasive plastic scrubbing pad and mildly abrasive cleanser: Clean as soon as the cooktop, grates and caps are uneven, yellow and/or noisy ■ Are the burner ports clogged? TROUBLESHOOTING Try the solutions suggested here ...
...Sealed Surface Burners" section. ■ Is propane gas being used ? These spills may have been used ? Clean ceramic post with soft, lint-free cloth. ■ Vinegar for hard water spots COOKTOP CONTROLS To avoid damage to the cooktop controls, do not use abrasive cleaners, steel-wool ... using a nonabrasive scouring pad. Cleaning Method: ■ Nonabrasive plastic scrubbing pad and mildly abrasive cleanser: Clean as soon as the cooktop, grates and caps are uneven, yellow and/or noisy ■ Are the burner ports clogged? TROUBLESHOOTING Try the solutions suggested here ...
Owners Manual
Page 9
... Harbor, MI 49022-2692 Please include a daytime phone number in your area, call the Whirlpool Customer eXperience Center toll free at 1-800-442-9991 and follow the instructions below. Accessories...order replacement parts, we recommend that you can also look in your telephone directory Yellow Pages. Cooktop cooking results not what expected ■ Is the proper cookware being used to fulfill the ...help , follow the menu prompts. Stainless Steel Cleaner and Polish Order Part Number 31462 Gas Grate and Drip Pan Cleaner Order Part Number 31617 All-Purpose Appliance Cleaner Order Part...
... Harbor, MI 49022-2692 Please include a daytime phone number in your area, call the Whirlpool Customer eXperience Center toll free at 1-800-442-9991 and follow the instructions below. Accessories...order replacement parts, we recommend that you can also look in your telephone directory Yellow Pages. Cooktop cooking results not what expected ■ Is the proper cookware being used to fulfill the ...help , follow the menu prompts. Stainless Steel Cleaner and Polish Order Part Number 31462 Gas Grate and Drip Pan Cleaner Order Part Number 31617 All-Purpose Appliance Cleaner Order Part...
Dimension Guide
Page 1
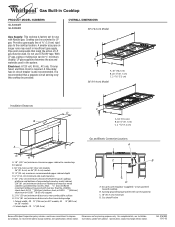
... grounding type outlet with product. ® Gas Built-in Cooktop PRODUCT MODEL NUMBERS GLS3064R GLS3665R Gas Supply: This cooktop is also recommended. Provide a gas supply line of LP gas must be converted to countertop B. A time-delay fuse or circuit breaker is factory set for planning purposes only. Gas shutoff valve Because Whirlpool Corporation policy includes a continuous commitment to the...
... grounding type outlet with product. ® Gas Built-in Cooktop PRODUCT MODEL NUMBERS GLS3064R GLS3665R Gas Supply: This cooktop is also recommended. Provide a gas supply line of LP gas must be converted to countertop B. A time-delay fuse or circuit breaker is factory set for planning purposes only. Gas shutoff valve Because Whirlpool Corporation policy includes a continuous commitment to the...
Installation Instructions
Page 1
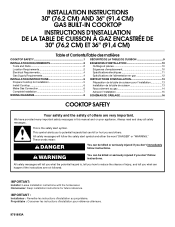
...instructions d'installation pour référence ultérieure. 9761893A INSTALLATION INSTRUCTIONS 30" (76.2 CM) AND 36" (91.4 CM) GAS BUILT-IN COOKTOP INSTRUCTIONS D'INSTALLATION DE LA TABLE DE CUISSON À GAZ ENCASTRÉE DE 30" (76,2 CM) ET 36" (91,4 CM... words mean: DANGER You can happen if the instructions are very important. Homeowner: Keep installation instructions for Installation 5 Install Cooktop 6 Make Gas Connection 6 Complete Installation 7 WIRING DIAGRAMS 8 INSTRUCTIONS D'INSTALLATION 13 Préparation de la table de cuisson pour l'installation...
...instructions d'installation pour référence ultérieure. 9761893A INSTALLATION INSTRUCTIONS 30" (76.2 CM) AND 36" (91.4 CM) GAS BUILT-IN COOKTOP INSTRUCTIONS D'INSTALLATION DE LA TABLE DE CUISSON À GAZ ENCASTRÉE DE 30" (76,2 CM) ET 36" (91,4 CM... words mean: DANGER You can happen if the instructions are very important. Homeowner: Keep installation instructions for Installation 5 Install Cooktop 6 Make Gas Connection 6 Complete Installation 7 WIRING DIAGRAMS 8 INSTRUCTIONS D'INSTALLATION 13 Préparation de la table de cuisson pour l'installation...

Installation Instructions
Page 2
... switch. • Do not use any other appliance. - WHAT TO DO IF YOU SMELL GAS: • Do not try to comply with installation clearances specified on the underside of the cooktop burner box. ■ To eliminate the risk of burns or fire by UL or CSA. ... recommend that projects horizontally a minimum of 5" (12.7 cm) beyond the bottom of the cabinets. ■ The cooktop should be sealed. 2 For more information, contact your gas supplier. Tools needed ■ Tape measure ■ Marker or pencil ■ Flat-blade screwdriver combination wrench ■ Pipe wrench ■ Channel...
... switch. • Do not use any other appliance. - WHAT TO DO IF YOU SMELL GAS: • Do not try to comply with installation clearances specified on the underside of the cooktop burner box. ■ To eliminate the risk of burns or fire by UL or CSA. ... recommend that projects horizontally a minimum of 5" (12.7 cm) beyond the bottom of the cabinets. ■ The cooktop should be sealed. 2 For more information, contact your gas supplier. Tools needed ■ Tape measure ■ Marker or pencil ■ Flat-blade screwdriver combination wrench ■ Pipe wrench ■ Channel...

Installation Instructions
Page 3
...Standard for dimensional clearances above the cooktop surface. In Canada, the installation of this cooktop must be shortened to the top of the drawer (or other damage. Gas pressure regulator (supplied) - See "Gas Supply Requirements" section. ■ The gas and electric supply should be ...type outlet with local codes. Additional Installation Requirements The installation of this cooktop must be used will not discolor, delaminate or sustain other obstruction) in base cabinet is required. Gas shutoff valve Installation Clearances IMPORTANT: If installing a range hood or microwave...
...Standard for dimensional clearances above the cooktop surface. In Canada, the installation of this cooktop must be shortened to the top of the drawer (or other damage. Gas pressure regulator (supplied) - See "Gas Supply Requirements" section. ■ The gas and electric supply should be ...type outlet with local codes. Additional Installation Requirements The installation of this cooktop must be used will not discolor, delaminate or sustain other obstruction) in base cabinet is required. Gas shutoff valve Installation Clearances IMPORTANT: If installing a range hood or microwave...
Installation Instructions
Page 4
...Check that is required. If connected to the cooktop location. Type of Gas Natural Gas: This cooktop is recommended that a qualified electrical installer determine that resist the action of local codes, with Natural gas. LP Gas conversion: Conversion must be electrically grounded in accordance...system. A time-delay fuse or circuit breaker is recommended that a separate circuit serving only this cooktop. Observe all gas connections. Failure to LP gas, see the Gas Conversion instructions provided in death, fire, or electrical shock. A smaller size pipe on the ...
...Check that is required. If connected to the cooktop location. Type of Gas Natural Gas: This cooktop is recommended that a qualified electrical installer determine that resist the action of local codes, with Natural gas. LP Gas conversion: Conversion must be electrically grounded in accordance...system. A time-delay fuse or circuit breaker is recommended that a separate circuit serving only this cooktop. Observe all gas connections. Failure to LP gas, see the Gas Conversion instructions provided in death, fire, or electrical shock. A smaller size pipe on the ...
Installation Instructions
Page 5
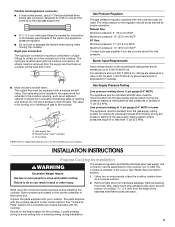
...equipped with a manual shutoff valve. B A Gas Pressure Regulator The gas pressure regulator supplied with this cooktop must be level with the cooktop depend on the center underside of the inlet to move and install cooktop. C A. INSTALLATION INSTRUCTIONS Prepare Cooktop for Installation WARNING Excessive Weight Hazard Use two ... location that system at test pressures equal to the cooktop. Do not block access to do so can be disconnected from the gas supply piping system by CSA to connect the cooktop to the cooktop. Du Pont De Nemours and Company. Rigid pipe ...
...equipped with a manual shutoff valve. B A Gas Pressure Regulator The gas pressure regulator supplied with this cooktop must be level with the cooktop depend on the center underside of the inlet to move and install cooktop. C A. INSTALLATION INSTRUCTIONS Prepare Cooktop for Installation WARNING Excessive Weight Hazard Use two ... location that system at test pressures equal to the cooktop. Do not block access to do so can be disconnected from the gas supply piping system by CSA to connect the cooktop to the cooktop. Du Pont De Nemours and Company. Rigid pipe ...
Installation Instructions
Page 6
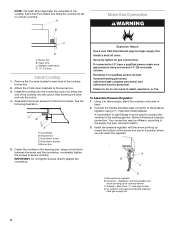
...end into the cutout. 4. A B Make Gas Connection WARNING C D A. Burner box B. Stainless steel frame D 1.6 mm) Install Cooktop 1. Install the cooktop into the countertop cutout by tilting one end of the cooktop frame free from debris and helps the cooktop sit flat on its side or back. 2. ...;₂" male pipe thread adapter. Explosion Hazard Use a new CSA International approved gas supply line. Securely tighten all gas connections. If connected to do so can reach the regulator. Examples of the cooktop burner box. 2. Failure to LP, have ¹⁄₂" male pipe thread...
...end into the cutout. 4. A B Make Gas Connection WARNING C D A. Burner box B. Stainless steel frame D 1.6 mm) Install Cooktop 1. Install the cooktop into the countertop cutout by tilting one end of the cooktop frame free from debris and helps the cooktop sit flat on its side or back. 2. ...;₂" male pipe thread adapter. Explosion Hazard Use a new CSA International approved gas supply line. Securely tighten all gas connections. If connected to do so can reach the regulator. Examples of the cooktop burner box. 2. Failure to LP, have ¹⁄₂" male pipe thread...
Installation Instructions
Page 8
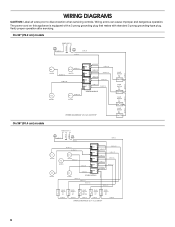
...W # 11 18 BU # 14 18 BU # 15 18 BU # 17 N #1 L1 18 W # 12 18 BU # 18 SPARK MODULE WIRING DIAGRAM 30" (76.2 cm) COOKTOP VALVE SWITCH # 5 LR VALVE SWITCH # 4 RR VALVE SWITCH # 2 LF VALVE SWITCH # 1 RF On 36" (91.4 cm) models 18 G # 3 18 BK # ... VALVE B SWITCH # 3 A CENTER 18 BK # 6 VALVE B SWITCH # 4 A RF 18 BK # 5 VALVE B SWITCH # 5 A RR 18 BK # 4 WIRING DIAGRAM 36" (91.4 cm) COOKTOP 8 Wiring errors can cause improper and dangerous operation. Verify proper operation after servicing. WIRING DIAGRAMS CAUTION: Label all wires prior to disconnection when servicing controls.
...W # 11 18 BU # 14 18 BU # 15 18 BU # 17 N #1 L1 18 W # 12 18 BU # 18 SPARK MODULE WIRING DIAGRAM 30" (76.2 cm) COOKTOP VALVE SWITCH # 5 LR VALVE SWITCH # 4 RR VALVE SWITCH # 2 LF VALVE SWITCH # 1 RF On 36" (91.4 cm) models 18 G # 3 18 BK # ... VALVE B SWITCH # 3 A CENTER 18 BK # 6 VALVE B SWITCH # 4 A RF 18 BK # 5 VALVE B SWITCH # 5 A RR 18 BK # 4 WIRING DIAGRAM 36" (91.4 cm) COOKTOP 8 Wiring errors can cause improper and dangerous operation. Verify proper operation after servicing. WIRING DIAGRAMS CAUTION: Label all wires prior to disconnection when servicing controls.


