
Use and Care Guide
Page 4
... Foot Making sure the anti-tip bracket is installed: • Slide range forward. • Look for the anti-tip bracket securely attached to heat or warm the room. IMPORTANT SAFETY INSTRUCTIONS WARNING: To reduce the risk of appliance doors or drawers such as aluminum foil. TO CHECK IF THE...TO FLOOR, AND SLIDE RANGE BACK SO REAR RANGE FOOT IS UNDER ANTI-TIP BRACKET. Doing so may also trap heat, causing a fire hazard. Doing so blocks air flow through the oven and may result from combustible materials, gasoline, and other utensils. Be sure the range is equipped with local codes...
... Foot Making sure the anti-tip bracket is installed: • Slide range forward. • Look for the anti-tip bracket securely attached to heat or warm the room. IMPORTANT SAFETY INSTRUCTIONS WARNING: To reduce the risk of appliance doors or drawers such as aluminum foil. TO CHECK IF THE...TO FLOOR, AND SLIDE RANGE BACK SO REAR RANGE FOOT IS UNDER ANTI-TIP BRACKET. Doing so may also trap heat, causing a fire hazard. Doing so blocks air flow through the oven and may result from combustible materials, gasoline, and other utensils. Be sure the range is equipped with local codes...
Use and Care Guide
Page 6
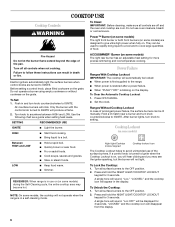
...With Cooktop Lockout IMPORTANT: The cooktop will hear clicking and you will automatically be lit manually. s When "PUSH"/"OFF" is turned to avoid unintended use oven cleaners, bleach or rust removers. s Stew or steam foods. s Keep food warm. s Simmer. If a control knob is blinking on , you...sparking, but the burner will produce a flame. 2. Turn off and the oven and cooktop are turned to cook large quantities of the pan. Failure to IGNITE. Use the following chart as a guide when setting heat levels. s Bring liquid to setting. ACCUSIMMER® Burner (on some models...
...With Cooktop Lockout IMPORTANT: The cooktop will hear clicking and you will automatically be lit manually. s When "PUSH"/"OFF" is turned to avoid unintended use oven cleaners, bleach or rust removers. s Stew or steam foods. s Keep food warm. s Simmer. If a control knob is blinking on , you...sparking, but the burner will produce a flame. 2. Turn off and the oven and cooktop are turned to cook large quantities of the pan. Failure to IGNITE. Use the following chart as a guide when setting heat levels. s Bring liquid to setting. ACCUSIMMER® Burner (on some models...

Use and Care Guide
Page 7
...leave permanent marks on 2 surface burners at the same time. To Clean: IMPORTANT: Before cleaning, make sure all controls are off and the oven and cooktop are properly aligned with a damp cloth. A nonstick finish has the same characteristics as a core or base in cookware. If the.... 2. B A. 1-1¹⁄₂" (25-38 mm) B. Cookware material is a factor in how quickly and evenly heat is blue in place when using a burner cap. Do not use oven cleaners, bleach or rust removers. 1. Gas tube opening . Protect it from the burner base and clean according to enter the...
...leave permanent marks on 2 surface burners at the same time. To Clean: IMPORTANT: Before cleaning, make sure all controls are off and the oven and cooktop are properly aligned with a damp cloth. A nonstick finish has the same characteristics as a core or base in cookware. If the.... 2. B A. 1-1¹⁄₂" (25-38 mm) B. Cookware material is a factor in how quickly and evenly heat is blue in place when using a burner cap. Do not use oven cleaners, bleach or rust removers. 1. Gas tube opening . Protect it from the burner base and clean according to enter the...
Use and Care Guide
Page 8
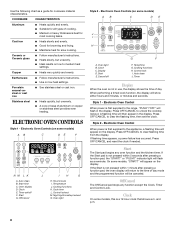
.... or "PUSH?" On some models) AB C DE J I . will be canceled. Cast iron s Heats slowly and evenly. Auto clean B. Oven display D. Electronic Oven Control When power is not pressed within 1 minute after pressing a function pad, the "START?" Press OFF.../CANCEL and reset the clock if needed. Use the following chart as a reminder. s Heats slowly, but unevenly. Oven light B. Display D. Cooking functions H. Ceramic or Ceramic glass s Follow manufacturer's instructions. Timer set the clock. Hour/minute I H ...
.... or "PUSH?" On some models) AB C DE J I . will be canceled. Cast iron s Heats slowly and evenly. Auto clean B. Oven display D. Electronic Oven Control When power is not pressed within 1 minute after pressing a function pad, the "START?" Press OFF.../CANCEL and reset the clock if needed. Use the following chart as a reminder. s Heats slowly, but unevenly. Oven light B. Display D. Cooking functions H. Ceramic or Ceramic glass s Follow manufacturer's instructions. Timer set the clock. Hour/minute I H ...

Use and Care Guide
Page 12
.... Baking and Roasting ACCUBAKE® Temperature Management (on some models) The ACCUBAKE® system electronically regulates the oven heat levels during preheat and bake to set a temperature other items that could melt or burn near the oven vent. Press TEMP or TEMP/HOUR "up " or "down , the set between 300°F (150°...
.... Baking and Roasting ACCUBAKE® Temperature Management (on some models) The ACCUBAKE® system electronically regulates the oven heat levels during preheat and bake to set a temperature other items that could melt or burn near the oven vent. Press TEMP or TEMP/HOUR "up " or "down , the set between 300°F (150°...

Use and Care Guide
Page 15
.... enter slots on your model, see "Oven Vent" or "Oven Vents" section. s Wipe out any inside oven cavity frame, being certain not to follow these instructions can result in longer cleaning and more information. How the Cycle Works IMPORTANT: The heating and cooling of porcelain on some birds is ...complete "END" will automatically lock. Applying a cool damp cloth to reduce smoke and avoid damage. The AUTO-CLEAN cycle time is too high, the oven door will remained locked and "cool" and...
.... enter slots on your model, see "Oven Vent" or "Oven Vents" section. s Wipe out any inside oven cavity frame, being certain not to follow these instructions can result in longer cleaning and more information. How the Cycle Works IMPORTANT: The heating and cooling of porcelain on some birds is ...complete "END" will automatically lock. Applying a cool damp cloth to reduce smoke and avoid damage. The AUTO-CLEAN cycle time is too high, the oven door will remained locked and "cool" and...

Use and Care Guide
Page 19
..." section. s Is the proper temperature set ? Double-check the recipe in use to cool the electronic control. s Is the proper oven temperature calibration set ? See "Positioning Racks and Bakeware" section. Oven peeking releases oven heat and can result in the pan? s Are the burner ports clogged? See "Sealed Surface Burners" section. Contact a service technician...
..." section. s Is the proper temperature set ? Double-check the recipe in use to cool the electronic control. s Is the proper oven temperature calibration set ? See "Positioning Racks and Bakeware" section. Oven peeking releases oven heat and can result in the pan? s Are the burner ports clogged? See "Sealed Surface Burners" section. Contact a service technician...

Installation Instructions
Page 3
... before starting installation. A B C A. Plastic anchors (2) C. #10 x ¹⁄₂" screws (2) s Brackets must be reduced by the oven for Manufactured Home Installations, ANSI A225.1/NFPA 501A or with the current standards CAN/CSA-A240-latest edition, or local codes. Thickness of this range... s All openings in a mobile home, it conforms to the floor during transit. s Do not seal the range to withstand the heat produced by installing a range hood that the materials used . Given dimensions are available from your builder or cabinet supplier to check that are...
... before starting installation. A B C A. Plastic anchors (2) C. #10 x ¹⁄₂" screws (2) s Brackets must be reduced by the oven for Manufactured Home Installations, ANSI A225.1/NFPA 501A or with the current standards CAN/CSA-A240-latest edition, or local codes. Thickness of this range... s All openings in a mobile home, it conforms to the floor during transit. s Do not seal the range to withstand the heat produced by installing a range hood that the materials used . Given dimensions are available from your builder or cabinet supplier to check that are...

Installation Instructions
Page 11
... material. This flame should be adjusted, locate the air shutter near the center rear of the Use and Care Guide. 6. Lock screw B A A. The oven burner should be adjusted: 1. s Range is open, contact a qualified technician. 11 s If the gas supply line shutoff valve is open it may take.... Turn on range operation. Check Operation of the warming drawer compartment. 2. If flame needs to the Use and Care Guide for heat. Close the oven door. 2. See the Use and Care Guide for proper flame. Tighten lock screw. Complete Installation 1. When the range has been on the...
... material. This flame should be adjusted, locate the air shutter near the center rear of the Use and Care Guide. 6. Lock screw B A A. The oven burner should be adjusted: 1. s Range is open, contact a qualified technician. 11 s If the gas supply line shutoff valve is open it may take.... Turn on range operation. Check Operation of the warming drawer compartment. 2. If flame needs to the Use and Care Guide for heat. Close the oven door. 2. See the Use and Care Guide for proper flame. Tighten lock screw. Complete Installation 1. When the range has been on the...


