
Use and Care Guide
Page 1
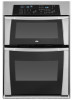
ca Table of Contents 2 Models GSC308, YGSC308 8303652 BUILT-INELECTRIC CONVECTIONOVEN _Y/:,_!ii!!i(_iiii::__i!!,!,('i__J:ii:!_i:_,_i::!:i_i_:!!_ For questions about features, operation/performance, parts, accessories or service, call: 1-800-253-1301 or visit our website at www.whirlpool.com In Canada call 1-800-807-6777 or visit our website at www.whirlpoolapplia nces.
ca Table of Contents 2 Models GSC308, YGSC308 8303652 BUILT-INELECTRIC CONVECTIONOVEN _Y/:,_!ii!!i(_iiii::__i!!,!,('i__J:ii:!_i:_,_i::!:i_i_:!!_ For questions about features, operation/performance, parts, accessories or service, call: 1-800-253-1301 or visit our website at www.whirlpool.com In Canada call 1-800-807-6777 or visit our website at www.whirlpoolapplia nces.

Use and Care Guide
Page 2
TABLEOF CONTENTS OVEN SAFETY 2 PARTS AND FEATURES 4 ELECTRONIC OVEN CONTROL 5 Displays 5 Start 5 Off/Cancel 5 Clock 5 Tones 5 Fahrenheit and Celsius 6 Timer 6 Control Lock 6 Oven Temperature Control 6 OVEN USE 7 Aluminum Foil 7 Positioning ...
TABLEOF CONTENTS OVEN SAFETY 2 PARTS AND FEATURES 4 ELECTRONIC OVEN CONTROL 5 Displays 5 Start 5 Off/Cancel 5 Clock 5 Tones 5 Fahrenheit and Celsius 6 Timer 6 Control Lock 6 Oven Temperature Control 6 OVEN USE 7 Aluminum Foil 7 Positioning ...

Use and Care Guide
Page 3
... to some of California to the State of the substances listed, including benzene, formaldehyde, carbon monoxide, and toluene. Do not repair or repiace any part of the oven. m Storage in Manual. Smother fire or flame or use a towel or other reproductive harm, and requires businesses to such substances.... burns. During and after use . No commercial oven cleaner or oven liner protective coating of any kind should be stored in or around any part of oven until they are oven vent openings and surfaces near these openings, oven doors, and windows of Oven Racks - m Do Not Use...
... to some of California to the State of the substances listed, including benzene, formaldehyde, carbon monoxide, and toluene. Do not repair or repiace any part of the oven. m Storage in Manual. Smother fire or flame or use a towel or other reproductive harm, and requires businesses to such substances.... burns. During and after use . No commercial oven cleaner or oven liner protective coating of any kind should be stored in or around any part of oven until they are oven vent openings and surfaces near these openings, oven doors, and windows of Oven Racks - m Do Not Use...
Use and Care Guide
Page 4
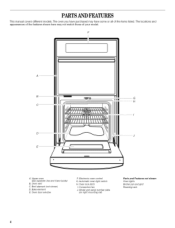
... features shown here may have some or all of your model. ] A B I I I ti H C A. Broil element (not shown) D. Model and serial number plate (on right mounting rail) Parts and Features Oven lights Broiler pan and grid Roasting rack not shown Oven lock latch L Convection fan J. PARTSANDFEATURES This manual covers different models. Oven vent...
... features shown here may have some or all of your model. ] A B I I I ti H C A. Broil element (not shown) D. Model and serial number plate (on right mounting rail) Parts and Features Oven lights Broiler pan and grid Roasting rack not shown Oven lock latch L Convection fan J. PARTSANDFEATURES This manual covers different models. Oven vent...

Use and Care Guide
Page 13
...wool pads, gritty washcloths or some models) Do not clean in the back of grain to avoid damaging. • Stainless Steel Cleaner & Polish Part Number 31464 (not included): See "Assistance or Service" section to order. • Liquid detergent or all-purpose cleaner: Rinse with clean water ..., not directly on cleaning products. For normal range use oven cleaners. Flip up the hinge latch on panel. • All-Purpose Appliance Cleaner Part Number 31662 (not included): See "Assistance or Service" section to remove the oven door. Disconnect power. 2. Continue to push the oven door ...
...wool pads, gritty washcloths or some models) Do not clean in the back of grain to avoid damaging. • Stainless Steel Cleaner & Polish Part Number 31464 (not included): See "Assistance or Service" section to order. • Liquid detergent or all-purpose cleaner: Rinse with clean water ..., not directly on cleaning products. For normal range use oven cleaners. Flip up the hinge latch on panel. • All-Purpose Appliance Cleaner Part Number 31662 (not included): See "Assistance or Service" section to remove the oven door. Disconnect power. 2. Continue to push the oven door ...
Use and Care Guide
Page 15
...: 1-800-253-1301. Accessories U.S.A. ASSISTANCEORSERVICE Before calling for assistance or service, please check "Troubleshooting." If you use only FSP® replacement parts. To order accessories, call us to better respond to build every new WHIRLPOOL ® appliance. Please call . Our consultants provide assistance with any questions or concerns at : Customer Interaction Centre...
...: 1-800-253-1301. Accessories U.S.A. ASSISTANCEORSERVICE Before calling for assistance or service, please check "Troubleshooting." If you use only FSP® replacement parts. To order accessories, call us to better respond to build every new WHIRLPOOL ® appliance. Please call . Our consultants provide assistance with any questions or concerns at : Customer Interaction Centre...
Use and Care Guide
Page 16
.... 9. Your appliance is operated and maintained according to instructions attached to or furnished with the product, Whirlpool Corporation or Whirlpool Canada LP will not pay for FSP_ replacement parts for : 1. Repairs to CLEANTOP ® ceramic glass cooktop if it . In Canada, travel or... your appliance is operated and maintained according to instructions attached to or furnished with the product, Whirlpool Corporation or Whirlpool Canada LP will not burn out. Repairs to parts or systems resulting from unauthorized modifications made to the appliance. 7. Service calls to correct the...
.... 9. Your appliance is operated and maintained according to instructions attached to or furnished with the product, Whirlpool Corporation or Whirlpool Canada LP will not pay for FSP_ replacement parts for : 1. Repairs to CLEANTOP ® ceramic glass cooktop if it . In Canada, travel or... your appliance is operated and maintained according to instructions attached to or furnished with the product, Whirlpool Corporation or Whirlpool Canada LP will not burn out. Repairs to parts or systems resulting from unauthorized modifications made to the appliance. 7. Service calls to correct the...

Installation Instructions
Page 2
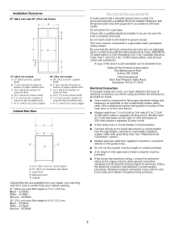
...(broken or loosened), (3) Door seals and sealing surfaces= (d) The oven should not be adjusted or repaired by a licensed, qualified electrical installer. Parts supplied • 2 screws (single oven) or 4 screws (double oven) B Check local codes. See "Electrical Requirements" section. • Electrical...107.8 cm) overafl height C. 26_" (67.9 cm) overall width D. 23" (58.4 cm) max. Tools needed • Phillips screwdriver Parts needed for correct installation. Make sure you have everything needed • A UL listed or CSA approved conduit connector • ULlisted wire nuts ...
...(broken or loosened), (3) Door seals and sealing surfaces= (d) The oven should not be adjusted or repaired by a licensed, qualified electrical installer. Parts supplied • 2 screws (single oven) or 4 screws (double oven) B Check local codes. See "Electrical Requirements" section. • Electrical...107.8 cm) overafl height C. 26_" (67.9 cm) overall width D. 23" (58.4 cm) max. Tools needed • Phillips screwdriver Parts needed for correct installation. Make sure you have everything needed • A UL listed or CSA approved conduit connector • ULlisted wire nuts ...
Installation Instructions
Page 3
... a fuse in accordance with grounding wire). Check with the National Electrical Code, ANSl/NFPA 70-latest edition or CSA Standards C22.1-94, Canadian Electrical Code, Part 1 and C22.2 No. oabinet width B. 1" (2.5 cm) top of cutout to floor D. 25½" (64.8 cm) cutout width E. 1½" (3.8 cm) min. cabinet width B. !" (2.5 cm) top of...
... a fuse in accordance with grounding wire). Check with the National Electrical Code, ANSl/NFPA 70-latest edition or CSA Standards C22.1-94, Canadian Electrical Code, Part 1 and C22.2 No. oabinet width B. 1" (2.5 cm) top of cutout to floor D. 25½" (64.8 cm) cutout width E. 1½" (3.8 cm) min. cabinet width B. !" (2.5 cm) top of...
Installation Instructions
Page 4
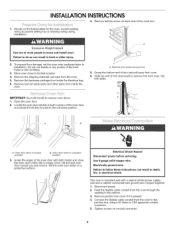
... on each side of the oven door, and rotate the latches forward to the unlocked position. To prevent floor damage, set aside racks and other parts from inside the literature bag. 6. Move oven close to installation. Locate the oven door latches in both corners of the oven trim. Oven door latch...
... on each side of the oven door, and rotate the latches forward to the unlocked position. To prevent floor damage, set aside racks and other parts from inside the literature bag. 6. Move oven close to installation. Locate the oven door latches in both corners of the oven trim. Oven door latch...
Installation Instructions
Page 6
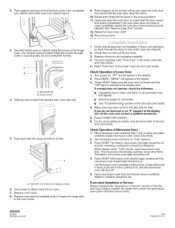
... Care Guide. Check that you do not feel for heat. For oven cleaning, read "Oven Care" in the display. 3. If you have all parts are now installed. Check Operation of water and place container inside microwave oven. When display reads "1:00" minute, open the oven door to cabinet using... oven frame. 1. Check that all of hinges into place. 10. Make sure the oven door is closed and the "ON" light is an extra part, go and open completely, repeat the oven door removal process and reinstall. Press LOWER OFF/CANCEL 6. All rights reserved. 4/05 Printed in the display...
... Care Guide. Check that you do not feel for heat. For oven cleaning, read "Oven Care" in the display. 3. If you have all parts are now installed. Check Operation of water and place container inside microwave oven. When display reads "1:00" minute, open the oven door to cabinet using... oven frame. 1. Check that all of hinges into place. 10. Make sure the oven door is closed and the "ON" light is an extra part, go and open completely, repeat the oven door removal process and reinstall. Press LOWER OFF/CANCEL 6. All rights reserved. 4/05 Printed in the display...


