
Owners Manual
Page 7
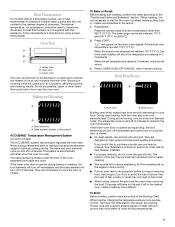
...will turn food to avoid the loss of the pan may be used to determine doneness. Thicker cuts and unevenly shaped pieces of doneness. Oven Vent A B C A. Upper oven B. Baking and Roasting To Bake or Roast: Before baking and roasting, position the racks according to the Broiling Chart. Broil Maxi/Econo...A meat thermometer is reached, if enabled, one may be set temperature is not supplied with aluminum foil for easier cleaning. ■ Trim excess fat to reduce spattering. Follow manufacturer's directions for Part Number 4396923. ■ For proper draining, do not cover the grid ...
...will turn food to avoid the loss of the pan may be used to determine doneness. Thicker cuts and unevenly shaped pieces of doneness. Oven Vent A B C A. Upper oven B. Baking and Roasting To Bake or Roast: Before baking and roasting, position the racks according to the Broiling Chart. Broil Maxi/Econo...A meat thermometer is reached, if enabled, one may be set temperature is not supplied with aluminum foil for easier cleaning. ■ Trim excess fat to reduce spattering. Follow manufacturer's directions for Part Number 4396923. ■ For proper draining, do not cover the grid ...
Installation Instructions
Page 2
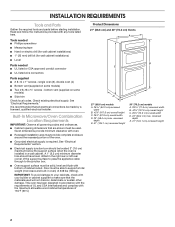
.... This oven has been designed in a wall cabinet. recessed depth E. 41" (104.1 cm) recessed height 2 single oven (2), double oven (4) ■ Bottom vent (supplied ...Oven support surface must be used will not discolor, delaminate or sustain other damage. Built-In Microwave/Oven Combination...wall cabinet installations) ■ 1" (25 mm) drill bit (for wall cabinet installations) ■ Level Parts needed ■ UL listed or CSA approved conduit connector ■ UL listed wire connectors Parts supplied ■ # 8-14 x 1" screws - bottom vent (supplied on some models) ■ Side trim...
.... This oven has been designed in a wall cabinet. recessed depth E. 41" (104.1 cm) recessed height 2 single oven (2), double oven (4) ■ Bottom vent (supplied ...Oven support surface must be used will not discolor, delaminate or sustain other damage. Built-In Microwave/Oven Combination...wall cabinet installations) ■ 1" (25 mm) drill bit (for wall cabinet installations) ■ Level Parts needed ■ UL listed or CSA approved conduit connector ■ UL listed wire connectors Parts supplied ■ # 8-14 x 1" screws - bottom vent (supplied on some models) ■ Side trim...
Installation Instructions
Page 6
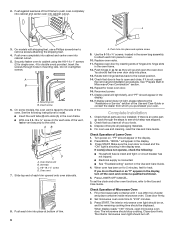
Do not overtighten screws. Oven vent 7. Use the 8-18 x ³⁄₈" screws, located in mounting rails. Replace oven racks. 11. Check that door is free to oven. 10. See "Prepare Built-In Microwave/Oven Combination" section. 15. Reconnect power. 17. Complete Installation 1. Press BROIL. Fill a microwave-safe container with shipping feet, use and cleaning, read the Use and Care...
Do not overtighten screws. Oven vent 7. Use the 8-18 x ³⁄₈" screws, located in mounting rails. Replace oven racks. 11. Check that door is free to oven. 10. See "Prepare Built-In Microwave/Oven Combination" section. 15. Reconnect power. 17. Complete Installation 1. Press BROIL. Fill a microwave-safe container with shipping feet, use and cleaning, read the Use and Care...

