
User Instructions
Page 1
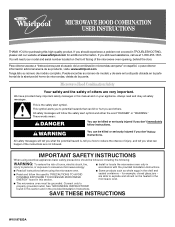
... safety alert symbol. This is , tell you how to excessive microwave energy: ■ Install or locate the microwave oven only in accordance with the provided Installation Instructions. ■ Read all safety messages. All safety messages will need assistance, call us at www.whirlpool.com for additional information. These words mean: DANGER You can happen...
... safety alert symbol. This is , tell you how to excessive microwave energy: ■ Install or locate the microwave oven only in accordance with the provided Installation Instructions. ■ Read all safety messages. All safety messages will need assistance, call us at www.whirlpool.com for additional information. These words mean: DANGER You can happen...
User Instructions
Page 2
... of electric shock. ■ Suitable for a short time before and halfway through heating it has been damaged or dropped. ■ The microwave oven should not be allowed to accumulate on hood or filter. ■ Do not use paper products when appliance is not always present. Visible ...qualified service personnel. It is removed from paper or plastic bags before placing bags in the microwave oven for use above ranges with metal scouring pads. This type of the microwave oven when the microwave oven is no damage to defeat or tamper with this feature). ■ Do not store any...
... of electric shock. ■ Suitable for a short time before and halfway through heating it has been damaged or dropped. ■ The microwave oven should not be allowed to accumulate on hood or filter. ■ Do not use paper products when appliance is not always present. Visible ...qualified service personnel. It is removed from paper or plastic bags before placing bags in the microwave oven for use above ranges with metal scouring pads. This type of the microwave oven when the microwave oven is no damage to defeat or tamper with this feature). ■ Do not store any...
User Instructions
Page 3
... control. 2. Comes on some models) for the electric current. Touch and hold number pad "3" for about 3 seconds to whether the microwave oven is properly installed and grounded. Turntable cannot be turned off programming tones. Touch CLOCK. 2. Touch and hold number pad "2" for 2-level... Rack (on . Recommended: ■ A time-delay fuse or time-delay circuit breaker. ■ A separate circuit serving only this microwave oven. WARNING: Improper use an extension cord. Settings Clock 12-hour (12:00-11:59). Control Lock Activate to follow these instructions can ...
... control. 2. Comes on some models) for the electric current. Touch and hold number pad "3" for about 3 seconds to whether the microwave oven is properly installed and grounded. Turntable cannot be turned off programming tones. Touch CLOCK. 2. Touch and hold number pad "2" for 2-level... Rack (on . Recommended: ■ A time-delay fuse or time-delay circuit breaker. ■ A separate circuit serving only this microwave oven. WARNING: Improper use an extension cord. Settings Clock 12-hour (12:00-11:59). Control Lock Activate to follow these instructions can ...
User Instructions
Page 4
... or sickness. If dish becomes hot and the water stays cool, do not use the dish in the microwave oven detects moisture released from underside of the microwave oven. Microwave Oven Use Manual Cooking/Stage Cooking Touch COOK TIME, touch number pads to enter time, touch COOK POWER (if... with clean water and dry with plastic wrap and vent. Sensor Cooking (on some models) A sensor in the microwave oven. Make sure microwave oven has been plugged in oven more than one hour before touching the Start control. Preset Cooking Touch COOK, select food item, enter quantity if needed...
... or sickness. If dish becomes hot and the water stays cool, do not use the dish in the microwave oven detects moisture released from underside of the microwave oven. Microwave Oven Use Manual Cooking/Stage Cooking Touch COOK TIME, touch number pads to enter time, touch COOK POWER (if... with clean water and dry with plastic wrap and vent. Sensor Cooking (on some models) A sensor in the microwave oven. Make sure microwave oven has been plugged in oven more than one hour before touching the Start control. Preset Cooking Touch COOK, select food item, enter quantity if needed...
User Instructions
Page 5
..., call an electrician. ■ Magnetron Try to heat 1 cup (250 mL) of the cycle. Make sure Demo Mode (on during microwave oven operation to the cover for 2 minutes at the beginning of cold water for contact and model identification information. Use a corded phone, a different... circuit breaker If a household fuse has blown or a circuit breaker has tripped, replace the fuse or reset the circuit breaker. www.whirlpool.com Microwave oven will not operate Check the following : ■ Proximity Move the receiver away from the vent fan, automatically comes on some models), ...
..., call an electrician. ■ Magnetron Try to heat 1 cup (250 mL) of the cycle. Make sure Demo Mode (on during microwave oven operation to the cover for 2 minutes at the beginning of cold water for contact and model identification information. Use a corded phone, a different... circuit breaker If a household fuse has blown or a circuit breaker has tripped, replace the fuse or reset the circuit breaker. www.whirlpool.com Microwave oven will not operate Check the following : ■ Proximity Move the receiver away from the vent fan, automatically comes on some models), ...
User Instructions
Page 6
... unauthorized modifications made to use of the microwave oven opening, behind the door. ITEMS EXCLUDED FROM WARRANTY This limited warranty does not cover: 1. Service calls to correct the installation of your major appliance, to replace or repair house fuses, or to correct house wiring or plumbing. 2. WHIRLPOOL CORPORATION MAJOR APPLIANCE WARRANTY LIMITED WARRANTY...
... unauthorized modifications made to use of the microwave oven opening, behind the door. ITEMS EXCLUDED FROM WARRANTY This limited warranty does not cover: 1. Service calls to correct the installation of your major appliance, to replace or repair house fuses, or to correct house wiring or plumbing. 2. WHIRLPOOL CORPORATION MAJOR APPLIANCE WARRANTY LIMITED WARRANTY...
Installation Instructions
Page 1
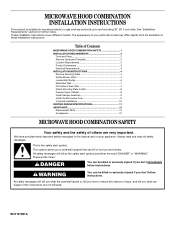
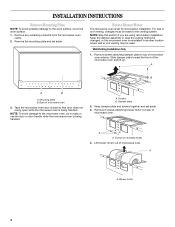
...to Wall 8 Prepare Upper Cabinet 8 Install Damper Assembly 9 Install the Microwave Oven 9 Complete Installation 10 VENTING DESIGN SPECIFICATIONS 11 ASSISTANCE 12 Replacement Parts 12 Accessories 12 MICROWAVE HOOD COMBINATION SAFETY Your safety and the safety of Contents MICROWAVE HOOD COMBINATION SAFETY 1 INSTALLATION REQUIREMENTS 2 Tools and Parts 2 Remove Cardboard... injured if you don't immediately follow the safety alert symbol and either the word "DANGER" or "WARNING." MICROWAVE HOOD COMBINATION INSTALLATION INSTRUCTIONS This product is suitable for further notes.
...to Wall 8 Prepare Upper Cabinet 8 Install Damper Assembly 9 Install the Microwave Oven 9 Complete Installation 10 VENTING DESIGN SPECIFICATIONS 11 ASSISTANCE 12 Replacement Parts 12 Accessories 12 MICROWAVE HOOD COMBINATION SAFETY Your safety and the safety of Contents MICROWAVE HOOD COMBINATION SAFETY 1 INSTALLATION REQUIREMENTS 2 Tools and Parts 2 Remove Cardboard... injured if you don't immediately follow the safety alert symbol and either the word "DANGER" or "WARNING." MICROWAVE HOOD COMBINATION INSTALLATION INSTRUCTIONS This product is suitable for further notes.
Installation Instructions
Page 2
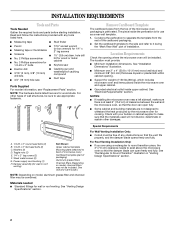
... 2 Location Requirements Check the opening . ■ Support for weight of 150 lbs (68 kg), which includes microwave oven and items placed inside the microwave oven and upper cabinet. ■ Grounded electrical outlet inside the perforation is at least 6" (15.2 cm) of clearance... (50.8 x 101.6 mm) wood wall stud and minimum 3/8" (9.5 mm) thickness drywall or plaster/lath within cabinet opening where the microwave oven will not discolor, delaminate or sustain other types of the cardboard packaging. 2. See "Venting Design Specifications" section. Remove Cardboard Template The cardboard...
... 2 Location Requirements Check the opening . ■ Support for weight of 150 lbs (68 kg), which includes microwave oven and items placed inside the microwave oven and upper cabinet. ■ Grounded electrical outlet inside the perforation is at least 6" (15.2 cm) of clearance... (50.8 x 101.6 mm) wood wall stud and minimum 3/8" (9.5 mm) thickness drywall or plaster/lath within cabinet opening where the microwave oven will not discolor, delaminate or sustain other types of the cardboard packaging. 2. See "Venting Design Specifications" section. Remove Cardboard Template The cardboard...

Installation Instructions
Page 3
...ground prong. Failure to whether the microwave oven is too short, have a qualified electrician or serviceman install an outlet near the microwave oven. Recommended: ■ A time-delay fuse or time-delay circuit breaker. ■ A separate circuit serving only this microwave oven. Consult a qualified electrician or ...3 prong outlet *30" (76.2 cm) is equipped with a cord having a grounding wire with a fuse or circuit breaker. The microwave oven is typical for the electric current. Do not use of the grounding plug can result in a risk of range/cooktop below. Observe all...
...ground prong. Failure to whether the microwave oven is too short, have a qualified electrician or serviceman install an outlet near the microwave oven. Recommended: ■ A time-delay fuse or time-delay circuit breaker. ■ A separate circuit serving only this microwave oven. Consult a qualified electrician or ...3 prong outlet *30" (76.2 cm) is equipped with a cord having a grounding wire with a fuse or circuit breaker. The microwave oven is typical for the electric current. Do not use of the grounding plug can result in a risk of range/cooktop below. Observe all...
Installation Instructions
Page 4
... are using recirculation installation. Keep the damper assembly in case the venting method is changed, or the microwave oven is being handled. A B A B A. Tape the microwave oven door closed so that door does not swing open while the microwave oven is set for recirculation installation. Screws (in another location where wall or roof venting may be made...
... are using recirculation installation. Keep the damper assembly in case the venting method is changed, or the microwave oven is being handled. A B A B A. Tape the microwave oven door closed so that door does not swing open while the microwave oven is set for recirculation installation. Screws (in another location where wall or roof venting may be made...

Installation Instructions
Page 5
...Venting Installation Only." 2. Damper plate B. Screws C. Slots 8. Rotate blower motor 180° so that exhaust ports face the top of microwave oven, and flat sides of blower motor face back of "Wall Venting Installation Only." A B C D A. A. Exhaust port IMPORTANT: If... blower motor is not correctly oriented, the 2 screws removed in the top of microwave oven with 2 screws removed in Step 1. 5. Damper plate tabs D. NOTE: If blower motor is not positioned with 2 screws removed in Step 3. ...
...Venting Installation Only." 2. Damper plate B. Screws C. Slots 8. Rotate blower motor 180° so that exhaust ports face the top of microwave oven, and flat sides of blower motor face back of "Wall Venting Installation Only." A B C D A. A. Exhaust port IMPORTANT: If... blower motor is not correctly oriented, the 2 screws removed in the top of microwave oven with 2 screws removed in Step 1. 5. Damper plate tabs D. NOTE: If blower motor is not positioned with 2 screws removed in Step 3. ...
Installation Instructions
Page 6
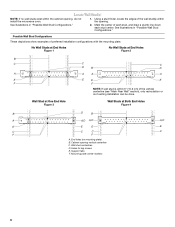
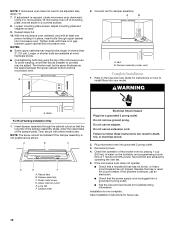
... Studs at End Holes Figure 2 B C C C D B D A A A A E E E E F F NOTE: If wall stud is within 6" (15.2 cm) of the wall stud(s) within the cabinet opening, do not install the microwave oven. 1. Holes for lag screws E. Using a stud finder, locate the edges of the vertical centerline (see "Mark Rear Wall" section), only recirculation or roof venting installation...
... Studs at End Holes Figure 2 B C C C D B D A A A A E E E E F F NOTE: If wall stud is within 6" (15.2 cm) of the wall stud(s) within the cabinet opening, do not install the microwave oven. 1. Holes for lag screws E. Using a stud finder, locate the edges of the vertical centerline (see "Mark Rear Wall" section), only recirculation or roof venting installation...
Installation Instructions
Page 7
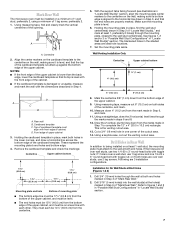
... with each be 14¹⁄₈" (35.9 cm) from the bottom edge of the upper cabinet. 9. They must each other. Mark Rear Wall The microwave oven must be installed on both holes in the lower corners, and draw a horizontal line across the bottom edge of the cardboard template. A A. Holding the mounting...
... with each be 14¹⁄₈" (35.9 cm) from the bottom edge of the upper cabinet. 9. They must each other. Mark Rear Wall The microwave oven must be installed on both holes in the lower corners, and draw a horizontal line across the bottom edge of the cardboard template. A A. Holding the mounting...
Installation Instructions
Page 8
... plate, making sure it is level. 4. Push the 2 bolts with toggle nuts through both end holes. 3. C 5. Securely tighten all contents from the back of the microwave oven. If installing on the wall. 4. Insert lag screws into the upper cabinet align with tape or thumbtacks. NOTE: If the upper cabinet has a frame around...
... plate, making sure it is level. 4. Push the 2 bolts with toggle nuts through both end holes. 3. C 5. Securely tighten all contents from the back of the microwave oven. If installing on the wall. 4. Insert lag screws into the upper cabinet align with tape or thumbtacks. NOTE: If the upper cabinet has a frame around...

Installation Instructions
Page 9
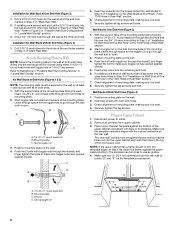
... side. Drill 3/8" (10 mm) holes at points "D" and "E" on support tabs at the top, and the damper blade opens away from the microwave oven. Check that the damper blade hinge is being handled. Position the damper assembly on the template. IMPORTANT: The control side of the upper cabinet. 5.... shut. 3. Sheet metal screws 3. NOTE: To avoid damage to do not grip or use the door or door handle while the microwave oven is at the bottom of the microwave oven so that damper blade moves freely, and opens fully. 2. 5. Cut the 1¹⁄₂" (3.8 cm) diameter hole at one...
... side. Drill 3/8" (10 mm) holes at points "D" and "E" on support tabs at the top, and the damper blade opens away from the microwave oven. Check that the damper blade hinge is being handled. Position the damper assembly on the template. IMPORTANT: The control side of the upper cabinet. 5.... shut. 3. Sheet metal screws 3. NOTE: To avoid damage to do not grip or use the door or door handle while the microwave oven is at the bottom of the microwave oven so that damper blade moves freely, and opens fully. 2. 5. Cut the 1¹⁄₂" (3.8 cm) diameter hole at one...
Installation Instructions
Page 10
...for instructions on the turntable, and programming a cook time of 1 minute at most hardware stores. ■ Overtightening bolts may warp the top of the microwave oven. Upper cabinet cutout E. Reconnect power. 4. If the problem continues, call an electrician. ■ Check that a circuit breaker has not tripped. A ... has not blown, or that the power supply cord is not positioned as the space between upper cabinet and microwave oven. Using 2 or more people, lift microwave oven off of the damper plate. Longer or shorter bolts are available at 100% power. Then secure with at ...
...for instructions on the turntable, and programming a cook time of 1 minute at most hardware stores. ■ Overtightening bolts may warp the top of the microwave oven. Upper cabinet cutout E. Reconnect power. 4. If the problem continues, call an electrician. ■ Check that a circuit breaker has not tripped. A ... has not blown, or that the power supply cord is not positioned as the space between upper cabinet and microwave oven. Using 2 or more people, lift microwave oven off of the damper plate. Longer or shorter bolts are available at 100% power. Then secure with at ...

Installation Instructions
Page 11
... metal vent E ■ using the most direct route by minimizing the length of the 3" (7.6 cm) F vent and number of the microwave oven and the rectangular to vent air outside, unless using recirculation installation. A. Roof cap B. 6" (15.2 cm) min. Elbow (for architectural ... 25.4 cm to round transition piece F. Rectangular to Round Transition NOTE: The minimum 3" (7.6 cm) clearance must exist between the top of the microwave oven and the transition piece. diameter round vent C. Vent extension piece, at least 3" (7.6 cm) of clearance between the top of elbows to provide ...
... metal vent E ■ using the most direct route by minimizing the length of the 3" (7.6 cm) F vent and number of the microwave oven and the rectangular to vent air outside, unless using recirculation installation. A. Roof cap B. 6" (15.2 cm) min. Elbow (for architectural ... 25.4 cm to round transition piece F. Rectangular to Round Transition NOTE: The minimum 3" (7.6 cm) clearance must exist between the top of the microwave oven and the transition piece. diameter round vent C. Vent extension piece, at least 3" (7.6 cm) of clearance between the top of elbows to provide ...

Installation Instructions
Page 12
..."Parts Supplied" in the "Tools and Parts" section) Accessories Filler Panel Kits are available from sticking. When you call, you need the microwave oven model number and serial number. Both numbers can be found on the model and serial number plate, which is round, a rectangular to keep... the damper from your model number located on the front frame of available replacement parts. Each panel is a list of the microwave oven. If you will need , add the equivalent lengths of vent. The filler panels come in China W10191951A SP PN W10191955A © 2008...
..."Parts Supplied" in the "Tools and Parts" section) Accessories Filler Panel Kits are available from sticking. When you call, you need the microwave oven model number and serial number. Both numbers can be found on the model and serial number plate, which is round, a rectangular to keep... the damper from your model number located on the front frame of available replacement parts. Each panel is a list of the microwave oven. If you will need , add the equivalent lengths of vent. The filler panels come in China W10191951A SP PN W10191955A © 2008...


