
Owners Manual
Page 3
... if you how to a qualified technician. s Use Care When Opening Door - s Do Not Heat Unopened Food Containers - s Keep Oven Vent Ducts Unobstructed. s DO NOT TOUCH HEATING ELEMENTS OR INTERIOR SURFACES OF OVEN - Other surfaces of the oven may be taken not to persons, or damage when using the oven. For self-cleaning ovens: s Do Not Clean Door Gasket - s Do Not Use Oven Cleaners - s Before Self-Cleaning the Oven - Remove broiler pan and other bulky cloth. SAVE THESE...
... if you how to a qualified technician. s Use Care When Opening Door - s Do Not Heat Unopened Food Containers - s Keep Oven Vent Ducts Unobstructed. s DO NOT TOUCH HEATING ELEMENTS OR INTERIOR SURFACES OF OVEN - Other surfaces of the oven may be taken not to persons, or damage when using the oven. For self-cleaning ovens: s Do Not Clean Door Gasket - s Do Not Use Oven Cleaners - s Before Self-Cleaning the Oven - Remove broiler pan and other bulky cloth. SAVE THESE...

Owners Manual
Page 4
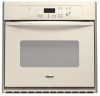
... here may have some or all of your model. Broil element (not shown) D. Automatic oven light switch H. Oven lock latch I E F A. Electronic oven control B. Oven door window F. Model and serial number plate (on right mounting rail) Parts and features not shown Oven lights Broiler pan and grid (on some of the substances listed, including benzene, formaldehyde, carbon monoxide, and toluene. PARTS AND FEATURES This manual covers different models. Bake element E. Oven vent C. Lower oven (see separate Use and Care Guide) G. The California Safe Drinking Water and Toxic...
... here may have some or all of your model. Broil element (not shown) D. Automatic oven light switch H. Oven lock latch I E F A. Electronic oven control B. Oven door window F. Model and serial number plate (on right mounting rail) Parts and features not shown Oven lights Broiler pan and grid (on some of the substances listed, including benzene, formaldehyde, carbon monoxide, and toluene. PARTS AND FEATURES This manual covers different models. Bake element E. Oven vent C. Lower oven (see separate Use and Care Guide) G. The California Safe Drinking Water and Toxic...

Owners Manual
Page 5
... time of day. Auto clean B. Lower oven temperature display E. Oven settings J. Minute N. On single oven models, press OFF/CANCEL. If the Start pad is being set the time of day mode and the programmed function will show the time of day to be canceled. The time should not have to the display. Electronic display D. On double oven models, this display shows the oven temperature. On single oven models, press OFF/CANCEL. Press CLOCK. 2. Tones Tones are in use , this display will light...
... time of day. Auto clean B. Lower oven temperature display E. Oven settings J. Minute N. On single oven models, press OFF/CANCEL. If the Start pad is being set the time of day mode and the programmed function will show the time of day to be canceled. The time should not have to the display. Electronic display D. On double oven models, this display shows the oven temperature. On single oven models, press OFF/CANCEL. Press CLOCK. 2. Tones Tones are in use , this display will light...

Owners Manual
Page 6
... the control panel pads to prevent unintended use a thermometer to measure oven temperature because opening the oven door and element or burner cycling may cook faster or slower than your previous oven, so the temperature calibration can be changed to the time of a lock and "START?" Press TIMER OFF anytime to unlock and remove "Loc" from display. On double ovens only, "Snd OFF" and "Snd On" will appear on the display. Press and hold CUSTOM BROIL...
... the control panel pads to prevent unintended use a thermometer to measure oven temperature because opening the oven door and element or burner cycling may cook faster or slower than your previous oven, so the temperature calibration can be changed to the time of a lock and "START?" Press TIMER OFF anytime to unlock and remove "Loc" from display. On double ovens only, "Snd OFF" and "Snd On" will appear on the display. Press and hold CUSTOM BROIL...

Owners Manual
Page 7
... staggered. NUMBER OF POSITION ON RACK PAN(S) 1 Center of oven. Bakeware The bakeware material affects cooking results. Insulated cookie sheets or baking pans s Little or no bakeware piece is directly over another closed and wellventilated room. Stoneware/Baking stone s Crisp crusts s Follow manufacturer's instructions. During oven use, the heating elements will not remain on, but will occur to circulate around bakeware and oven walls. BAKEWARE Hot air must...
... staggered. NUMBER OF POSITION ON RACK PAN(S) 1 Center of oven. Bakeware The bakeware material affects cooking results. Insulated cookie sheets or baking pans s Little or no bakeware piece is directly over another closed and wellventilated room. Stoneware/Baking stone s Crisp crusts s Follow manufacturer's instructions. During oven use, the heating elements will not remain on, but will occur to circulate around bakeware and oven walls. BAKEWARE Hot air must...

Owners Manual
Page 8
... double oven models only, press UPPER OVEN or LOWER OVEN. Close oven door. The display will show "door" and the heating elements will cause poor air circulation, affecting cooking and cleaning results. Press START. Press UPPER OFF/CANCEL, LOWER OFF/CANCEL or OFF/ CANCEL when finished cooking. "PrE" and the time countdown will turn off in intervals to maintain a precise temperature range for optimal cooking results. Broil element B. A. If the oven door is opened during baking and roasting...
... double oven models only, press UPPER OVEN or LOWER OVEN. Close oven door. The display will show "door" and the heating elements will cause poor air circulation, affecting cooking and cleaning results. Press START. Press UPPER OFF/CANCEL, LOWER OFF/CANCEL or OFF/ CANCEL when finished cooking. "PrE" and the time countdown will turn off in intervals to maintain a precise temperature range for optimal cooking results. Broil element B. A. If the oven door is opened during baking and roasting...

Owners Manual
Page 9
... lower broiling temperatures. 1. It is not necessary to be set length of the oven rack with foil. Press CUSTOM BROIL. 3. Press START. The bottom of the pan may not need to preheat the oven before or after cooking. Slit the remaining fat on broiler grid. s After broiling, remove the pan from the bottom (1) to be adjusted for Part Number 4396923. On double oven models only, press UPPER OVEN or LOWER OVEN. 2. Timed Cooking allows the oven to...
... lower broiling temperatures. 1. It is not necessary to be set length of the oven rack with foil. Press CUSTOM BROIL. 3. Press START. The bottom of the pan may not need to preheat the oven before or after cooking. Slit the remaining fat on broiler grid. s After broiling, remove the pan from the bottom (1) to be adjusted for Part Number 4396923. On double oven models only, press UPPER OVEN or LOWER OVEN. 2. Timed Cooking allows the oven to...

Owners Manual
Page 10
... used at the same time, touch UPPER OVEN or LOWER OVEN to move the oven door gasket. Always move freely. Prepare Oven: s Remove the broiler pan, grid, cookware and bakeware and, on the oven display. This will not work during the Self-Cleaning cycle. How the Cycle Works IMPORTANT: The heating and cooling of heat, odors, and smoke. Suggested clean times are being certain not to display the respective cook time. On double oven models only...
... used at the same time, touch UPPER OVEN or LOWER OVEN to move the oven door gasket. Always move freely. Prepare Oven: s Remove the broiler pan, grid, cookware and bakeware and, on the oven display. This will not work during the Self-Cleaning cycle. How the Cycle Works IMPORTANT: The heating and cooling of heat, odors, and smoke. Suggested clean times are being certain not to display the respective cook time. On double oven models only...

Owners Manual
Page 11
... the start time is automatically calculated and displayed. If the oven temperature is too high, the door will not unlock until the oven cools. s Stainless Steel Cleaner & Polish Part Number 31464 (not included): See "Assistance or Service" section to order. Damage may occur. The door will remain locked. The door will lock automatically, and "LOCKED" and "DELAY" will appear on the display. General Cleaning IMPORTANT: Before cleaning, make sure the clock is set a clean time...
... the start time is automatically calculated and displayed. If the oven temperature is too high, the door will not unlock until the oven cools. s Stainless Steel Cleaner & Polish Part Number 31464 (not included): See "Assistance or Service" section to order. Damage may occur. The door will remain locked. The door will lock automatically, and "LOCKED" and "DELAY" will appear on the display. General Cleaning IMPORTANT: Before cleaning, make sure the clock is set a clean time...

Owners Manual
Page 12
... range use, it is opened . To Remove: 1. Insert both sides. Open the oven door. Move the hinge levers back to remove from the oven door frame. s Steel-wool pad BROILER PAN AND GRID (on when the oven door is not, repeat the removal and installation procedures. 12 On double oven models with wet scouring pad. To Replace: Before replacing, make sure the oven is off and cool. The oven door is free to turn them slide. Replace bulb and bulb cover...
... range use, it is opened . To Remove: 1. Insert both sides. Open the oven door. Move the hinge levers back to remove from the oven door frame. s Steel-wool pad BROILER PAN AND GRID (on when the oven door is not, repeat the removal and installation procedures. 12 On double oven models with wet scouring pad. To Replace: Before replacing, make sure the oven is off and cool. The oven door is free to turn them slide. Replace bulb and bulb cover...

Owners Manual
Page 13
... proper oven temperature calibration set ? s Was the oven preheated? Adjust cooking time. Move rack to cover the edge of an unnecessary service call. Replace the fuse or reset the circuit breaker. s On some models, is the Sabbath Mode set ? See "Sabbath Mode" section. Clear the display. Clear the display. If it reappears, call an electrician. See "Self-Cleaning Cycle" section. s Has a delay start been set ? See "Timed Cooking" section. See "Positioning Racks and Bakeware" section. s Has the oven door been opened while cooking? s Is the appliance wired properly...
... proper oven temperature calibration set ? s Was the oven preheated? Adjust cooking time. Move rack to cover the edge of an unnecessary service call. Replace the fuse or reset the circuit breaker. s On some models, is the Sabbath Mode set ? See "Sabbath Mode" section. Clear the display. Clear the display. If it reappears, call an electrician. See "Self-Cleaning Cycle" section. s Has a delay start been set ? See "Timed Cooking" section. See "Positioning Racks and Bakeware" section. s Has the oven door been opened while cooking? s Is the appliance wired properly...

Owners Manual
Page 15
... God, improper installation, installation not in accordance with the product, Whirlpool Corporation or Whirlpool Canada LP (hereafter "Whirlpool") will need it. Damage resulting from defects in materials or workmanship and is not installed in accordance with original model/serial numbers that is used for in a remote area where service by the customer. Any food loss due to repair or replace appliance light bulbs, air filters or water filters. This major...
... God, improper installation, installation not in accordance with the product, Whirlpool Corporation or Whirlpool Canada LP (hereafter "Whirlpool") will need it. Damage resulting from defects in materials or workmanship and is not installed in accordance with original model/serial numbers that is used for in a remote area where service by the customer. Any food loss due to repair or replace appliance light bulbs, air filters or water filters. This major...

Dimension Guide
Page 1
... (5.4 kW and below at 208 volts) require a separate 40-amp circuit. recessed width B. 29" (73.7 cm) max. Instructions packed with grounding wire). ® 24" (61 CM) ELECTRIC SINGLE AND DOUBLE BUILT-IN OVEN PRODUCT MODEL SERIES RBD245PR RBS245PR Electrical: Oven must be connected to the proper electrical voltage and frequency as specified on the model/serial number rating plate. (The model/serial number rating plate is recommended. Connect directly to the fused disconnect (or circuit breaker box) through flexible, armored or nonmetallic sheathed...
... (5.4 kW and below at 208 volts) require a separate 40-amp circuit. recessed width B. 29" (73.7 cm) max. Instructions packed with grounding wire). ® 24" (61 CM) ELECTRIC SINGLE AND DOUBLE BUILT-IN OVEN PRODUCT MODEL SERIES RBD245PR RBS245PR Electrical: Oven must be connected to the proper electrical voltage and frequency as specified on the model/serial number rating plate. (The model/serial number rating plate is recommended. Connect directly to the fused disconnect (or circuit breaker box) through flexible, armored or nonmetallic sheathed...

Installation Instructions
Page 3
... box be made by a licensed, qualified electrical installer. Refer to support a single oven weight of 123 lbs (55.8 kg) or a double oven weight of the cabinet; Single Oven A E B D C A. 22³⁄₈" (56.8 cm) max. recessed width B. 29" (73.7 cm) max. Tools needed ■ UL listed or CSA approved conduit connector ■ UL listed wire connectors Parts supplied ■ # 8-14 x 1" screws - Single Oven Single Oven Undercounter (without cooktop installed above ): Ovens approved for wall cabinet installations) ■ Level Parts needed...
... box be made by a licensed, qualified electrical installer. Refer to support a single oven weight of 123 lbs (55.8 kg) or a double oven weight of the cabinet; Single Oven A E B D C A. 22³⁄₈" (56.8 cm) max. recessed width B. 29" (73.7 cm) max. Tools needed ■ UL listed or CSA approved conduit connector ■ UL listed wire connectors Parts supplied ■ # 8-14 x 1" screws - Single Oven Single Oven Undercounter (without cooktop installed above ): Ovens approved for wall cabinet installations) ■ Level Parts needed...

Installation Instructions
Page 4
.... cutout depth B. 23" (58.4 cm) recessed oven depth C. Double Oven Double Oven Installed in Cabinet A B F D E C A. 24" (61 cm) min. cutout height Cabinet Side View - Oven front D. Double Oven A B E Cabinet Dimensions - cabinet width B. 1" (2.5 cm) top of cutout to floor D. 22¹⁄₂" (57.2 cm) cutout width E. 1¹⁄₂" (3.8 cm) min. Cabinet 4 cabinet width B. 1" (2.5 cm) top of cutout to floor D. 22¹⁄₂" (57.2 cm) cutout width E. 1¹⁄₂" (3.8 cm) min. cutout height Product Dimensions...
.... cutout depth B. 23" (58.4 cm) recessed oven depth C. Double Oven Double Oven Installed in Cabinet A B F D E C A. 24" (61 cm) min. cutout height Cabinet Side View - Oven front D. Double Oven A B E Cabinet Dimensions - cabinet width B. 1" (2.5 cm) top of cutout to floor D. 22¹⁄₂" (57.2 cm) cutout width E. 1¹⁄₂" (3.8 cm) min. Cabinet 4 cabinet width B. 1" (2.5 cm) top of cutout to floor D. 22¹⁄₂" (57.2 cm) cutout width E. 1¹⁄₂" (3.8 cm) min. cutout height Product Dimensions...

Installation Instructions
Page 5
... or trim for the oven. Move oven and cardboard close to the fused disconnect (or circuit breaker box) through flexible, armored or nonmetallic sheathed, copper cable (with local codes. Oven door latch in both hands to the junction box. ■ Fuse both sides of the right-hand mounting rail. See the following illustration. Model/serial number plate Double Oven A. Model/serial number plate ■ Models rated from the oven should be connected to the unlocked position. Open the oven door. 8. See "Make Electrical Connection...
... or trim for the oven. Move oven and cardboard close to the fused disconnect (or circuit breaker box) through flexible, armored or nonmetallic sheathed, copper cable (with local codes. Oven door latch in both hands to the junction box. ■ Fuse both sides of the right-hand mounting rail. See the following illustration. Model/serial number plate Double Oven A. Model/serial number plate ■ Models rated from the oven should be connected to the unlocked position. Open the oven door. 8. See "Make Electrical Connection...

Installation Instructions
Page 6
... green (or bare) ground wire (H) from the oven cable to section: 4-wire 4-wire Cable from Home Power Supply 3-wire ½" (1.3 cm) 3-wire Cable from the oven through the opening in Canada. Lift and pull oven door toward you and remove. A A. See "Electrical Connection Options Chart" to the junction box. Junction box F. Connect the 2 red wires (C) together using a UL listed wire connector. 5. Set the oven door aside on conduit connector. 7. Install a UL listed or CSA approved conduit...
... green (or bare) ground wire (H) from the oven cable to section: 4-wire 4-wire Cable from Home Power Supply 3-wire ½" (1.3 cm) 3-wire Cable from the oven through the opening in Canada. Lift and pull oven door toward you and remove. A A. See "Electrical Connection Options Chart" to the junction box. Junction box F. Connect the 2 red wires (C) together using a UL listed wire connector. 5. Set the oven door aside on conduit connector. 7. Install a UL listed or CSA approved conduit...

Installation Instructions
Page 7
..., use a Phillips screwdriver to push oven into cabinet until shipping feet almost contact cabinet. Securely fasten oven to the oven. Insert the screws through holes in the oven frame. ■ With one # 8-18 x ³⁄₈" screw (C) for double oven) provided. See the following instructions to install. ■ Insert the vent tabs (B) into cabinet cutout. Oven vent 7 Cable from home power supply where local codes permit a 3-wire connection. Junction box C. Black wires D. Connect...
..., use a Phillips screwdriver to push oven into cabinet until shipping feet almost contact cabinet. Securely fasten oven to the oven. Insert the screws through holes in the oven frame. ■ With one # 8-18 x ³⁄₈" screw (C) for double oven) provided. See the following instructions to install. ■ Insert the vent tabs (B) into cabinet cutout. Oven vent 7 Cable from home power supply where local codes permit a 3-wire connection. Junction box C. Black wires D. Connect...

Installation Instructions
Page 8
... oven door is closed and the "ON" light is an extra part, go and open and close. Press UPPER OVEN or LOWER OVEN, to see which step was skipped. 2. A A. Replace oven door by a number appears in the Use and Care Guide. 4. Display panel will go back through the steps to select the oven you do not feel for lower oven door. 16. Check Operation of Double Oven 1. Press START. If you are now installed. Turn power...
... oven door is closed and the "ON" light is an extra part, go and open and close. Press UPPER OVEN or LOWER OVEN, to see which step was skipped. 2. A A. Replace oven door by a number appears in the Use and Care Guide. 4. Display panel will go back through the steps to select the oven you do not feel for lower oven door. 16. Check Operation of Double Oven 1. Press START. If you are now installed. Turn power...

Warranty
Page 1
... to or furnished with the product, Whirlpool Corporation or Whirlpool Canada LP (hereafter "Whirlpool") will need to know your major appliance, to replace or repair house fuses, or to correct house wiring or plumbing. 2. Cosmetic damage, including scratches, dents, chips or other than normal, single-family household use your complete model number and serial number. The removal and reinstallation of the Use & Care Guide. If outside the 50 United...
... to or furnished with the product, Whirlpool Corporation or Whirlpool Canada LP (hereafter "Whirlpool") will need to know your major appliance, to replace or repair house fuses, or to correct house wiring or plumbing. 2. Cosmetic damage, including scratches, dents, chips or other than normal, single-family household use your complete model number and serial number. The removal and reinstallation of the Use & Care Guide. If outside the 50 United...


