
User Manual
Page 1
® BUILT-IN ELECTRIC OVEN Use & Care Guide In the U.S.A, for parts, accessories, installation and service call : 1-800-253-1301. or visit our website at... www.whirlpool.com or www.whirlpool.com/canada Table of Contents 2 4450568B MODELS RBS245 RBS275 RBS305 RBD245 RBD275 RBD305 RBD306 YRBS275 YRBS305 In Canada, for product-related questions call: 1-800-461-5681, for questions about features, operation, performance, parts, accessories or service, call : 1-800-807-6777.
® BUILT-IN ELECTRIC OVEN Use & Care Guide In the U.S.A, for parts, accessories, installation and service call : 1-800-253-1301. or visit our website at... www.whirlpool.com or www.whirlpool.com/canada Table of Contents 2 4450568B MODELS RBS245 RBS275 RBS305 RBD245 RBD275 RBD305 RBD306 YRBS275 YRBS305 In Canada, for product-related questions call: 1-800-461-5681, for questions about features, operation, performance, parts, accessories or service, call : 1-800-807-6777.

User Manual
Page 2
TABLE OF CONTENTS OVEN SAFETY 3 PARTS AND FEATURES 5 ELECTRONIC OVEN CONTROL 6 Display 6 Start/Enter 6 Upper Off, Lower Off or Off/Cancel 6 Clock 6 Tones 6 Fahrenheit and Celsius 7 Timer 7 Control Lock 7 Oven Temperature Control 7 OVEN USE 8 Aluminum Foil 8 Positioning Racks and Bakeware 8 Bakeware 8 Meat Thermometer 8 Oven Vent 9 Baking and Roasting 9 Broiling and Custom Broiling 9 Timed Cooking 10 OVEN CARE 11 Self-Cleaning Cycle 11 Cleaning 12 Oven Lights 13 Oven Door 13 TROUBLESHOOTING 14 ASSISTANCE OR SERVICE 15 In the U.S.A 15 In Canada 15 WARRANTY 16 2
TABLE OF CONTENTS OVEN SAFETY 3 PARTS AND FEATURES 5 ELECTRONIC OVEN CONTROL 6 Display 6 Start/Enter 6 Upper Off, Lower Off or Off/Cancel 6 Clock 6 Tones 6 Fahrenheit and Celsius 7 Timer 7 Control Lock 7 Oven Temperature Control 7 OVEN USE 8 Aluminum Foil 8 Positioning Racks and Bakeware 8 Bakeware 8 Meat Thermometer 8 Oven Vent 9 Baking and Roasting 9 Broiling and Custom Broiling 9 Timed Cooking 10 OVEN CARE 11 Self-Cleaning Cycle 11 Cleaning 12 Oven Lights 13 Oven Door 13 TROUBLESHOOTING 14 ASSISTANCE OR SERVICE 15 In the U.S.A 15 In Canada 15 WARRANTY 16 2

User Manual
Page 3
... oven. Children should be stored in oven. Let hot air or steam escape before removing or replacing food. Heating elements may cause container to cause burns. This symbol alerts you what the potential hazard is in use , do not let potholder contact hot heating element in an oven. s Never Use the Oven for Warming or Heating the Room. Do not repair or replace any part of the oven. s Use Care When Opening Door - s Keep Oven Vent...
... oven. Children should be stored in oven. Let hot air or steam escape before removing or replacing food. Heating elements may cause container to cause burns. This symbol alerts you what the potential hazard is in use , do not let potholder contact hot heating element in an oven. s Never Use the Oven for Warming or Heating the Room. Do not repair or replace any part of the oven. s Use Care When Opening Door - s Keep Oven Vent...

User Manual
Page 4
.... s Do Not Use Oven Cleaners - Remove broiler pan and other reproductive harm. IMPORTANT SAFETY INSTRUCTIONS For self-cleaning ovens: s Do Not Clean Door Gasket - s Before Self-Cleaning the Oven - WARNING: This product contains a chemical known to the State of any kind should be used in Manual. The door gasket is essential for a good seal. SAVE THESE INSTRUCTIONS The California Safe Drinking Water and Toxic Enforcement Act requires the Governor of...
.... s Do Not Use Oven Cleaners - Remove broiler pan and other reproductive harm. IMPORTANT SAFETY INSTRUCTIONS For self-cleaning ovens: s Do Not Clean Door Gasket - s Before Self-Cleaning the Oven - WARNING: This product contains a chemical known to the State of any kind should be used in Manual. The door gasket is essential for a good seal. SAVE THESE INSTRUCTIONS The California Safe Drinking Water and Toxic Enforcement Act requires the Governor of...

User Manual
Page 5
Oven Vent 3. Broil Element (not shown) 4. Bake Element 5. Electronic Oven Control 2. Model and Serial Number Plate (on right mounting rail) Parts and Features not shown Oven Lights Broiler Pan and Grid 5 The locations and appearances of the items listed. The oven you have some or all of the features shown here may have purchased may not match your model. 1 2 7 8 3 4 9 5 6 1. Automatic Oven Light Switch 8. Oven Door Window 6. Lower Oven 7. Oven Lock Latch 9. PARTS AND FEATURES This manual covers different models.
Oven Vent 3. Broil Element (not shown) 4. Bake Element 5. Electronic Oven Control 2. Model and Serial Number Plate (on right mounting rail) Parts and Features not shown Oven Lights Broiler Pan and Grid 5 The locations and appearances of the items listed. The oven you have some or all of the features shown here may have purchased may not match your model. 1 2 7 8 3 4 9 5 6 1. Automatic Oven Light Switch 8. Oven Door Window 6. Lower Oven 7. Oven Lock Latch 9. PARTS AND FEATURES This manual covers different models.

User Manual
Page 6
... to operate even after pressing a pad, "START?" Press the HR or MIN "up for 3 seconds. Lower Oven Temperature Display 4. Clock 6. On single oven models, press OFF/CANCEL. Press UPPER OFF or LOWER OFF and retry entry. The cooling fan may continue to set . Upper Oven Temperature Display 2. will appear on , but can be reset. Oven Light 7. Off/Cancel Display When power is a 12 hour clock and does not show the time...
... to operate even after pressing a pad, "START?" Press the HR or MIN "up for 3 seconds. Lower Oven Temperature Display 4. Clock 6. On single oven models, press OFF/CANCEL. Press UPPER OFF or LOWER OFF and retry entry. The cooling fan may continue to set . Upper Oven Temperature Display 2. will appear on , but can be reset. Oven Light 7. Off/Cancel Display When power is a 12 hour clock and does not show the time...

User Manual
Page 7
... "down the control panel pads to set time. If not pressed within 5 seconds, the display will function. Press and hold COOK TIME until 3 tones sound and "LOC", a picture of a lock and "START?" Oven Temperature Control IMPORTANT: Do not use of day mode. 2. It can be changed to cancel the Timer and/or stop the oven. The adjustment can be adjusted. Repeat to change back to unlock and remove "LOC" from display. Repeat to "Snd...
... "down the control panel pads to set time. If not pressed within 5 seconds, the display will function. Press and hold COOK TIME until 3 tones sound and "LOC", a picture of a lock and "START?" Oven Temperature Control IMPORTANT: Do not use of day mode. 2. It can be changed to cancel the Timer and/or stop the oven. The adjustment can be adjusted. Repeat to change back to unlock and remove "LOC" from display. Repeat to "Snd...

User Manual
Page 8
.... NUMBER OF POSITION ON RACK PAN(S) 1 Center of foil, liners or cookware because permanent damage will occur to determine doneness of oven. Use the following chart as a guide. s For pies, breads and casseroles, use the bakeware size recommended in recipe. s Place rack in center of meat and poultry. Meat Thermometer On models without a temperature probe, always rely on the oven door or bottom. If the temperature drops, cook...
.... NUMBER OF POSITION ON RACK PAN(S) 1 Center of foil, liners or cookware because permanent damage will occur to determine doneness of oven. Use the following chart as a guide. s For pies, breads and casseroles, use the bakeware size recommended in recipe. s Place rack in center of meat and poultry. Meat Thermometer On models without a temperature probe, always rely on the oven door or bottom. If the temperature drops, cook...

User Manual
Page 9
... oven temperature is closed . The bake and broil elements cycle on , the broil element will continue counting down and "PrE°" will cause poor air circulation, affecting cooking and cleaning results. s Use only the broiler pan and grid provided with foil. s Pull out oven rack to the door. Very thin cuts of hot air and moisture from the oven when removing the food. Press CUSTOM BROIL. 3. Press START/ENTER. The bake range can be turned...
... oven temperature is closed . The bake and broil elements cycle on , the broil element will continue counting down and "PrE°" will cause poor air circulation, affecting cooking and cleaning results. s Use only the broiler pan and grid provided with foil. s Pull out oven rack to the door. Very thin cuts of hot air and moisture from the oven when removing the food. Press CUSTOM BROIL. 3. Press START/ENTER. The bake range can be turned...
User Manual
Page 10
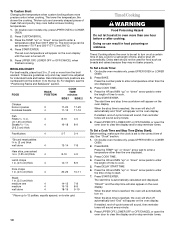
... bake properly. Delay start should not be adjusted for individual foods and tastes. On double oven models only, press UPPER OVEN or LOWER OVEN. 2. To Set a Cook Time and Stop Time [Delay Start]: Before setting, make sure the clock is automatically calculated and displayed. Press the HR and MIN "up " or "down" arrow pads to enter the length of day. The start time is reached, the oven will shut off . 5. To Custom Broil: Changing the temperature...
... bake properly. Delay start should not be adjusted for individual foods and tastes. On double oven models only, press UPPER OVEN or LOWER OVEN. 2. To Set a Cook Time and Stop Time [Delay Start]: Before setting, make sure the clock is automatically calculated and displayed. Press the HR and MIN "up " or "down" arrow pads to enter the length of day. The start time is reached, the oven will shut off . 5. To Custom Broil: Changing the temperature...

User Manual
Page 11
... door will not work during the Self-Cleaning cycle. The clean time can result. Press START/ENTER. When the start time and stop time will automatically turn on the oven display and "DOOR LOCKED" will not begin . 1. Do not block the oven vent(s) during the Self-Cleaning cycle. The Self-Cleaning cycle uses very high temperatures, burning soil to move birds to clear the oven display. Press AUTO CLEAN. If the oven temperature is reached, the oven will also appear on rack...
... door will not work during the Self-Cleaning cycle. The clean time can result. Press START/ENTER. When the start time and stop time will automatically turn on the oven display and "DOOR LOCKED" will not begin . 1. Do not block the oven vent(s) during the Self-Cleaning cycle. The Self-Cleaning cycle uses very high temperatures, burning soil to move birds to clear the oven display. Press AUTO CLEAN. If the oven temperature is reached, the oven will also appear on rack...

User Manual
Page 12
... pad BROILER PAN AND GRID Do not clean in direction of vegetable oil applied to 1 gallon (3.75 L) water: Soak for hard water spots OVEN DOOR EXTERIOR s Glass cleaner and paper towels or non-abrasive plastic scrubbing pad CONTROL PANEL Do not use commercial oven cleaners. Porcelain enamel only, not chrome s Dishwasher 12 Food spills should be cleaned when oven cools. OVEN RACKS s Self-Cleaning cycle: See "Self-Cleaning Cycle...
... pad BROILER PAN AND GRID Do not clean in direction of vegetable oil applied to 1 gallon (3.75 L) water: Soak for hard water spots OVEN DOOR EXTERIOR s Glass cleaner and paper towels or non-abrasive plastic scrubbing pad CONTROL PANEL Do not use commercial oven cleaners. Porcelain enamel only, not chrome s Dishwasher 12 Food spills should be cleaned when oven cools. OVEN RACKS s Self-Cleaning cycle: See "Self-Cleaning Cycle...

User Manual
Page 13
... door by turning clockwise. 5. When the oven door is suggested. However, it will shut. Use both hinge hangers. If the door does not operate freely, repeat the process. 1 1. They will come on or off and cool. 1. Replace bulb and bulb cover by the handle and another person to help is closed, press OVEN LIGHT to remove from the bottom. 3. Close oven door. Reconnect power. To Replace: 1. They will not work during the Self-Cleaning...
... door by turning clockwise. 5. When the oven door is suggested. However, it will shut. Use both hinge hangers. If the door does not operate freely, repeat the process. 1 1. They will come on or off and cool. 1. Replace bulb and bulb cover by the handle and another person to help is closed, press OVEN LIGHT to remove from the bottom. 3. Close oven door. Reconnect power. To Replace: 1. They will not work during the Self-Cleaning...

User Manual
Page 14
... of time being used ? Move rack to make sure batter is self-cleaning, the other oven cannot be set or turned on the bottom? Replace the fuse or reset the circuit. Choose UPPER OVEN or LOWER OVEN first. Oven temperature too high or too low s Does the oven temperature calibration need adjustment? There has been a power failure. See "Clock" section. See "Assistance or Service" section. s Has a delay start been set ? When one oven self-cleaning? s Is the proper temperature set ? See "Oven Temperature Control" section...
... of time being used ? Move rack to make sure batter is self-cleaning, the other oven cannot be set or turned on the bottom? Replace the fuse or reset the circuit. Choose UPPER OVEN or LOWER OVEN first. Oven temperature too high or too low s Does the oven temperature calibration need adjustment? There has been a power failure. See "Clock" section. See "Assistance or Service" section. s Has a delay start been set ? When one oven self-cleaning? s Is the proper temperature set ? See "Oven Temperature Control" section...

User Manual
Page 15
... calling for assistance or service, please check "Troubleshooting." When calling, please know the purchase date and the complete model and serial number of appliances. To locate FSP® replacement parts in your area, call the Whirlpool Customer Interaction Center toll free at 1-800-253-1301 and follow the instructions below. Our consultants provide assistance with: s Features and specifications on our full line...
... calling for assistance or service, please check "Troubleshooting." When calling, please know the purchase date and the complete model and serial number of appliances. To locate FSP® replacement parts in your area, call the Whirlpool Customer Interaction Center toll free at 1-800-253-1301 and follow the instructions below. Our consultants provide assistance with: s Features and specifications on our full line...

User Manual
Page 16
... your appliance, to instruct you need service, first see the "Troubleshooting" section of this book. FULL FIVE-YEAR WARRANTY On ceramic glass ranges and ceramic glass cooktops, for five years from the date of purchase, when this appliance is operated and maintained according to instructions attached to or furnished with the product, Whirlpool Corporation will pay for FSP® replacement parts and repair labor to correct defects...
... your appliance, to instruct you need service, first see the "Troubleshooting" section of this book. FULL FIVE-YEAR WARRANTY On ceramic glass ranges and ceramic glass cooktops, for five years from the date of purchase, when this appliance is operated and maintained according to instructions attached to or furnished with the product, Whirlpool Corporation will pay for FSP® replacement parts and repair labor to correct defects...


