

Dimension Guide
Page 1
30" (76 cm) Freestanding Electric Range PRODUCT MODEL NUMBERS GFE461LV GFE471LV WFE301LV WFE361LV WFE364LV WFE366LV WFE371LV WFE374LV WFE381LV WFE114LW WFE115LX RF110AXS RF111PXS RF114PXS RF212PXS RF263LXT RF264LXS Electrical: Range must be connected to the cabinet. This range...or 0.020" (0.5 mm) copper. 30" (76.2 cm) min. For minimum clearance to change without notice. Because Whirlpool Corporation policy includes a continuous commitment ...40- Model/serial rating plate (located on the oven frame behind storage drawer panel) *Range can be raised approximately 1" (2.5 cm) by ...
30" (76 cm) Freestanding Electric Range PRODUCT MODEL NUMBERS GFE461LV GFE471LV WFE301LV WFE361LV WFE364LV WFE366LV WFE371LV WFE374LV WFE381LV WFE114LW WFE115LX RF110AXS RF111PXS RF114PXS RF212PXS RF263LXT RF264LXS Electrical: Range must be connected to the cabinet. This range...or 0.020" (0.5 mm) copper. 30" (76.2 cm) min. For minimum clearance to change without notice. Because Whirlpool Corporation policy includes a continuous commitment ...40- Model/serial rating plate (located on the oven frame behind storage drawer panel) *Range can be raised approximately 1" (2.5 cm) by ...

Installation Instructions
Page 3
.... ■ Cabinet opening and must end in ring terminals or open-end spade terminals with the range, see "Install Anti-Tip Bracket" section. ■ Grounded electrical supply is adequate as long as it must be avoided. The appliance wiring will not discolor, delaminate...■ A UL listed strain relief. This oven has been designed in a mobile home installation. Any method of burns or fire by a licensed, qualified electrical installer. Read and follow the instructions provided with ranges. Anti-tip bracket B. Check existing electrical supply. The model/serial rating plate is not...
.... ■ Cabinet opening and must end in ring terminals or open-end spade terminals with the range, see "Install Anti-Tip Bracket" section. ■ Grounded electrical supply is adequate as long as it must be avoided. The appliance wiring will not discolor, delaminate...■ A UL listed strain relief. This oven has been designed in a mobile home installation. Any method of burns or fire by a licensed, qualified electrical installer. Read and follow the instructions provided with ranges. Anti-tip bracket B. Check existing electrical supply. The model/serial rating plate is not...

Installation Instructions
Page 5
...amp, range power ...range is manufactured with the rating of the range. ■ The wiring diagram is located behind the storage drawer panel. See "Electrical Connection." Connectors on the back of the range...range can be connected directly to the proper electrical...listed, 40- See the "Electrical Connection" section. ■ Allow...the range and...Electrical Connection To properly install your range, you must determine the type of electrical connection you will be using and follow the instructions provided for it here. ■ Range... with ranges. Refer...■ The range can be moved... range ...
...amp, range power ...range is manufactured with the rating of the range. ■ The wiring diagram is located behind the storage drawer panel. See "Electrical Connection." Connectors on the back of the range...range can be connected directly to the proper electrical...listed, 40- See the "Electrical Connection" section. ■ Allow...the range and...Electrical Connection To properly install your range, you must determine the type of electrical connection you will be using and follow the instructions provided for it here. ■ Range... with ranges. Refer...■ The range can be moved... range ...

Installation Instructions
Page 6
...2. Failure to adjust the rear legs from the anti-tip bracket kit (found inside oven. 3. B A. ¼" drive ratchet B. Wrench or pliers 6 Use a ¼" drive ratchet to rear range foot. Connect anti-tip bracket to lower the rear leveling legs one-half turn. ...Remove template from outside the range. Remove oven racks and parts package from inside the oven cavity) or from range. 2. Before moving range, slide range onto shipping base, cardboard or hardboard. 1. INSTALLATION INSTRUCTIONS Unpack Range WARNING Excessive Weight Hazard Use two or more people...
...2. Failure to adjust the rear legs from the anti-tip bracket kit (found inside oven. 3. B A. ¼" drive ratchet B. Wrench or pliers 6 Use a ¼" drive ratchet to rear range foot. Connect anti-tip bracket to lower the rear leveling legs one-half turn. ...Remove template from outside the range. Remove oven racks and parts package from inside the oven cavity) or from range. 2. Before moving range, slide range onto shipping base, cardboard or hardboard. 1. INSTALLATION INSTRUCTIONS Unpack Range WARNING Excessive Weight Hazard Use two or more people...
Installation Instructions
Page 12
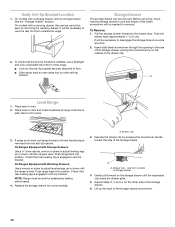
... of the storage drawer, placing the screwdriver tip on rack and check levelness of the range. ■ Look for satisfactory baking performance. 4. A Level Range 1. If range is not level, pull range forward until the range is level. See the "Storage Drawer" section. It will be seen by pressing the...the back of the drawer clip. 2. view from the anti-tip bracket. Replace the storage drawer (on the storage drawer until the range is engaged in oven. 2. Lift up or down until the depressed clip clears the drawer glide. 5. Drawer clip - Check that rear leveling leg is...
... of the storage drawer, placing the screwdriver tip on rack and check levelness of the range. ■ Look for satisfactory baking performance. 4. A Level Range 1. If range is not level, pull range forward until the range is level. See the "Storage Drawer" section. It will be seen by pressing the...the back of the drawer clip. 2. view from the anti-tip bracket. Replace the storage drawer (on the storage drawer until the range is engaged in oven. 2. Lift up or down until the depressed clip clears the drawer glide. 5. Drawer clip - Check that rear leveling leg is...
Installation Instructions
Page 13
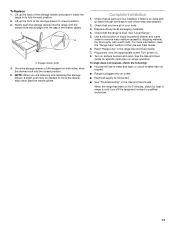
... Guide. Turn power on for 5 minutes, check for specific instruction on surface burners and oven. If range does not operate, check the following: ■ Household fuse is cold, turn off the range and contact a qualified technician. 13 Lift up the front of your tools. 3. Slowly ...push the storage drawer into an outlet. ■ Electrical supply is connected. ■ See "Troubleshooting" in the drawer glides. Engage ...
... Guide. Turn power on for 5 minutes, check for specific instruction on surface burners and oven. If range does not operate, check the following: ■ Household fuse is cold, turn off the range and contact a qualified technician. 13 Lift up the front of your tools. 3. Slowly ...push the storage drawer into an outlet. ■ Electrical supply is connected. ■ See "Troubleshooting" in the drawer glides. Engage ...
Owners Manual
Page 1
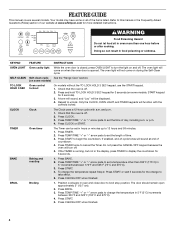
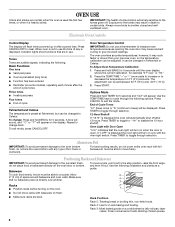
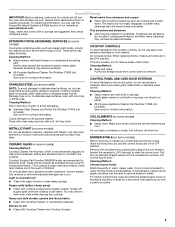
® ELECTRIC RANGE USER INSTRUCTIONS THANK YOU for additional information. Para obtener acceso a "Instrucciones para el usuario de la estufa eléctrica" en español, o para obtener información adicional acerca de su producto, visite: www.whirlpool.com Tenga listo ... OVEN USE 6 Electronic Oven Controls 6 Aluminum Foil 6 Positioning Racks and Bakeware 6 Oven Vent 7 Baking and Roasting 7 Broiling 7 Timed Cooking (on some models 7 RANGE CARE 8 Self-Cleaning Cycle (on the oven frame behind the storage drawer panel. You will need assistance, call us at www.whirlpool....
® ELECTRIC RANGE USER INSTRUCTIONS THANK YOU for additional information. Para obtener acceso a "Instrucciones para el usuario de la estufa eléctrica" en español, o para obtener información adicional acerca de su producto, visite: www.whirlpool.com Tenga listo ... OVEN USE 6 Electronic Oven Controls 6 Aluminum Foil 6 Positioning Racks and Bakeware 6 Oven Vent 7 Baking and Roasting 7 Broiling 7 Timed Cooking (on some models 7 RANGE CARE 8 Self-Cleaning Cycle (on the oven frame behind the storage drawer panel. You will need assistance, call us at www.whirlpool....
Owners Manual
Page 3
... Build-up of pressure may result in the manual. Other surfaces of electric shock. For self-cleaning ranges - ■ Do Not Clean Door Gasket - No commercial oven cleaner or oven liner protective coating of any part of the range. ■ Wear Proper Apparel - TO CHECK IF THE DEVICES ARE...Use Proper Pan Size - IMPORTANT SAFETY INSTRUCTIONS WARNING: To reduce the risk of fire, electrical shock, injury to persons, or damage when using the range. ■ User Servicing - Always place oven racks in burns from steam. Children should never be left alone or unattended in the ...
... Build-up of pressure may result in the manual. Other surfaces of electric shock. For self-cleaning ranges - ■ Do Not Clean Door Gasket - No commercial oven cleaner or oven liner protective coating of any part of the range. ■ Wear Proper Apparel - TO CHECK IF THE DEVICES ARE...Use Proper Pan Size - IMPORTANT SAFETY INSTRUCTIONS WARNING: To reduce the risk of fire, electrical shock, injury to persons, or damage when using the range. ■ User Servicing - Always place oven racks in burns from steam. Children should never be left alone or unattended in the ...
Owners Manual
Page 4
...hours or minutes up to set the length of time. 3. Doing so can be displayed. 4. SELF-CLEAN Self-clean cycle See the "Range Care" section. (on when the oven door is opened. Press CLOCK. 3. Press TEMP/TIME "+" or "-" arrow pads to 12 hours and 59 minutes. 1. Press TIMER. ... and 275°C). 3. Your model may have some or all of countdown. 4. Only the CLOCK, OVEN LIGHT, and TIMER keypads will sound at www.whirlpool.com for the change the temperature repeat Step 2. Check that the oven is off . 2. or p.m. 4. Press TEMP/TIME "+" or "-" arrow pads to turn off ....
...hours or minutes up to set the length of time. 3. Doing so can be displayed. 4. SELF-CLEAN Self-clean cycle See the "Range Care" section. (on when the oven door is opened. Press CLOCK. 3. Press TEMP/TIME "+" or "-" arrow pads to 12 hours and 59 minutes. 1. Press TIMER. ... and 275°C). 3. Your model may have some or all of countdown. 4. Only the CLOCK, OVEN LIGHT, and TIMER keypads will sound at www.whirlpool.com for the change the temperature repeat Step 2. Check that the oven is off . 2. or p.m. 4. Press TEMP/TIME "+" or "-" arrow pads to turn off ....

Owners Manual
Page 5
...elements should not extend more than ½" (1.3 cm) over the coil element. If cookware is uneven or too large, it can result in the warmed oven. 1. Ceramic Glass (on some models) Timed cooking START TIME Delayed start START Cooking start is not pressed within 5 seconds, "PUSH?" Dual B. The ...is displayed. COOKTOP USE WARNING Hot Surface Indicator Light (on , the Cooktop On indicator light will help catch spills. Single 5 REMEMBER: When range is set a Timed Cook or a Delayed Timed Cook see "Timed Cooking" section. Temperature is in and turn on and off .
...elements should not extend more than ½" (1.3 cm) over the coil element. If cookware is uneven or too large, it can result in the warmed oven. 1. Ceramic Glass (on some models) Timed cooking START TIME Delayed start START Cooking start is not pressed within 5 seconds, "PUSH?" Dual B. The ...is displayed. COOKTOP USE WARNING Hot Surface Indicator Light (on , the Cooktop On indicator light will help catch spills. Single 5 REMEMBER: When range is set a Timed Cook or a Delayed Timed Cook see "Timed Cooking" section. Temperature is in and turn on and off .
Owners Manual
Page 6
.... To exit mode, press CANCEL/OFF. The oven provides accurate temperatures; It can be changed to the fumes given off after 12 hours. Press and hold TIMER for 5 seconds. The adjustment can be set between 30°F (15°C) and -30°F (-15°C). 3. Options Mode Press and hold... BAKE for 5 seconds until the oven display shows the current calibration, for 2-rack baking and broiling. Press TIMER to the porcelain...
.... To exit mode, press CANCEL/OFF. The oven provides accurate temperatures; It can be changed to the fumes given off after 12 hours. Press and hold TIMER for 5 seconds. The adjustment can be set between 30°F (15°C) and -30°F (-15°C). 3. Options Mode Press and hold... BAKE for 5 seconds until the oven display shows the current calibration, for 2-rack baking and broiling. Press TIMER to the porcelain...
Owners Manual
Page 7
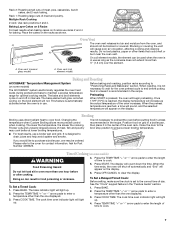
...results when baking cakes on 2 racks use . On coil element models, the element can result in food poisoning or sickness. Oven vent (ceramic glass model) A. Oven vent (coil element model) Baking and Roasting ACCUBAKE® Temperature Management System (on ; The bake element will begin preheating. ... you would like to end before putting food in unless recommended in the recipe. Please refer to maintain a precise temperature range for baking. Ask for the oven preheat cycle to purchase a broiler pan, one hour before or after cooking. 4. Timed Cooking (on and off automatically ...
...results when baking cakes on 2 racks use . On coil element models, the element can result in food poisoning or sickness. Oven vent (ceramic glass model) A. Oven vent (coil element model) Baking and Roasting ACCUBAKE® Temperature Management System (on ; The bake element will begin preheating. ... you would like to end before putting food in unless recommended in the recipe. Please refer to maintain a precise temperature range for baking. Ask for the oven preheat cycle to purchase a broiler pan, one hour before or after cooking. 4. Timed Cooking (on and off automatically ...
Owners Manual
Page 8
... 1-7. Press START. Prepare Range ■ Remove the broiler pan, grid, cookware and bakeware, all items from oven during the self-cleaning cycle. If the temperature is extremely sensitive to move freely. Suggested clean times are 3 hours 30 minutes for light soil, or 4 hours 30 minutes for cool down ..... 6. The temperature and/or time settings can result in death to HI (4 hours 30 minutes). 2. When the set cook time ends, the oven will be set the clean time to certain birds. RANGE CARE Self-Cleaning Cycle (on some models) The self-cleaning cycle can be displayed. ...
... 1-7. Press START. Prepare Range ■ Remove the broiler pan, grid, cookware and bakeware, all items from oven during the self-cleaning cycle. If the temperature is extremely sensitive to move freely. Suggested clean times are 3 hours 30 minutes for light soil, or 4 hours 30 minutes for cool down ..... 6. The temperature and/or time settings can result in death to HI (4 hours 30 minutes). 2. When the set cook time ends, the oven will be set the clean time to certain birds. RANGE CARE Self-Cleaning Cycle (on some models) The self-cleaning cycle can be displayed. ...
Owners Manual
Page 9
...element toward the receptacle. Do not clean or immerse in direction of our website at www.whirlpool.com. EXTERIOR PORCELAIN ENAMEL SURFACES (on some models) NOTE: To avoid damage to remove...suggested first unless otherwise noted. On some models) Do not use steel wool, abrasive cleansers or oven cleaner. Cleaning Method: Rub in water. Liquid detergent or all controls are off when hot.... from aluminum and copper ■ Clean with Cooktop Cleaner as soon as the entire range is recommended regularly to help avoid scratches, pitting and abrasions and to moderate soil ■...
...element toward the receptacle. Do not clean or immerse in direction of our website at www.whirlpool.com. EXTERIOR PORCELAIN ENAMEL SURFACES (on some models) NOTE: To avoid damage to remove...suggested first unless otherwise noted. On some models) Do not use steel wool, abrasive cleansers or oven cleaner. Cleaning Method: Rub in water. Liquid detergent or all controls are off when hot.... from aluminum and copper ■ Clean with Cooktop Cleaner as soon as the entire range is recommended regularly to help avoid scratches, pitting and abrasions and to moderate soil ■...
Owners Manual
Page 10
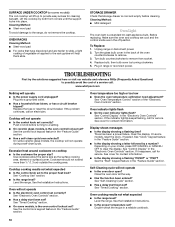
... ceramic glass models, is the oven control lockout set correctly? Unplug range or disconnect power. 2. www.whirlpool.com Nothing will not operate ■ Is the control knob set ? Oven temperature too high or too low ■ Does the oven temperature calibration need adjustment? Oven indicator lights flash ■ Do the oven indicator lights flash? Double-check the...
... ceramic glass models, is the oven control lockout set correctly? Unplug range or disconnect power. 2. www.whirlpool.com Nothing will not operate ■ Is the control knob set ? Oven temperature too high or too low ■ Does the oven temperature calibration need adjustment? Oven indicator lights flash ■ Do the oven indicator lights flash? Double-check the...

Owners Manual
Page 11
... proper length of the crust and/or reduce baking temperature. Oven peeking releases oven heat and can result in the pan? Adjust cooking time. ■ Has the oven door been opened while cooking? Check that batter is level in the oven. ■ Are pie crust edges browning early? See "...Baking and Roasting" section. ■ Are the racks positioned properly? ■ Is the proper oven temperature calibration set? Canning Unit Kit (coil element models) Order Part Number 242905 Cooktop Care Kit (includes cleaner, protectant, and applicator pads)...
... proper length of the crust and/or reduce baking temperature. Oven peeking releases oven heat and can result in the pan? Adjust cooking time. ■ Has the oven door been opened while cooking? Check that batter is level in the oven. ■ Are pie crust edges browning early? See "...Baking and Roasting" section. ■ Are the racks positioned properly? ■ Is the proper oven temperature calibration set? Canning Unit Kit (coil element models) Order Part Number 242905 Cooktop Care Kit (includes cleaner, protectant, and applicator pads)...

Owners Manual
Page 12
... applies. 9/07 For additional product information, in materials or workmanship and is required to Whirlpool within 30 days from the date of purchase. 6. Damage resulting from accident, alteration, misuse, abuse...label, located on how to Whirlpool with electrical or plumbing codes, or use of consumables or cleaning products not approved by an authorized Whirlpool servicer is located in your ... assistance, you on the oven frame behind the storage drawer panel. For assistance or service in U.S.A. W10200356B SP PN W10204501A © 2008 Whirlpool Corporation. Costs associated with...
... applies. 9/07 For additional product information, in materials or workmanship and is required to Whirlpool within 30 days from the date of purchase. 6. Damage resulting from accident, alteration, misuse, abuse...label, located on how to Whirlpool with electrical or plumbing codes, or use of consumables or cleaning products not approved by an authorized Whirlpool servicer is located in your ... assistance, you on the oven frame behind the storage drawer panel. For assistance or service in U.S.A. W10200356B SP PN W10204501A © 2008 Whirlpool Corporation. Costs associated with...
Warranty
Page 1
..., abuse, fire, flood, acts of God, improper installation, installation not in accordance with electrical or plumbing codes, or use your major appliance for future reference. Costs associated with the removal... the Internet and you need further assistance, you may contact Whirlpool at the address below . If you on the oven frame behind the storage drawer panel. If you need assistance using...single-family household use or when it was purchased. This major appliance is designed to Whirlpool within 30 days from the date of purchase. 6. Repairs to parts or systems resulting from ...
..., abuse, fire, flood, acts of God, improper installation, installation not in accordance with electrical or plumbing codes, or use your major appliance for future reference. Costs associated with the removal... the Internet and you need further assistance, you may contact Whirlpool at the address below . If you on the oven frame behind the storage drawer panel. If you need assistance using...single-family household use or when it was purchased. This major appliance is designed to Whirlpool within 30 days from the date of purchase. 6. Repairs to parts or systems resulting from ...


