
Installation Instructions
Page 2
...is the safety alert symbol. All safety messages will follow instructions. Always read and obey all safety messages. TABLE OF CONTENTS SKT60* TRIM KIT SAFETY 2 INSTALLATION REQUIREMENTS 3 Plan the Installation 3 Opening Requirements 3 Tools Needed 3 Parts Supplied 3 Electrical Requirements 4 ASSEMBLY INSTRUCTIONS 4 Assemble...;lateur à leur emplacement définitif 18 Installation de la grille de la base 19 Entretien et nettoyage 19 SKT60* TRIM KIT SAFETY Your safety and the safety of California to cause cancer. State of California Proposition 65 Warnings: WARNING: This ...
...is the safety alert symbol. All safety messages will follow instructions. Always read and obey all safety messages. TABLE OF CONTENTS SKT60* TRIM KIT SAFETY 2 INSTALLATION REQUIREMENTS 3 Plan the Installation 3 Opening Requirements 3 Tools Needed 3 Parts Supplied 3 Electrical Requirements 4 ASSEMBLY INSTRUCTIONS 4 Assemble...;lateur à leur emplacement définitif 18 Installation de la grille de la base 19 Entretien et nettoyage 19 SKT60* TRIM KIT SAFETY Your safety and the safety of California to cause cancer. State of California Proposition 65 Warnings: WARNING: This ...
Installation Instructions
Page 3
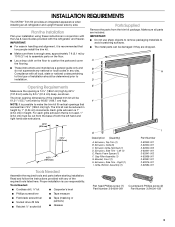
... (157.8 cm) E F G Description (Quantity) A. For each grille extrusion that are dropped. Grille, Bottom Assembly (1) I . INSTALLATION REQUIREMENTS The SKT60* Trim Kit provides an integrated appearance when installing an all local, state or national codes pertaining to this type of installation should be damaged if they are... listed here. The inner opening is enough area, approximately 7 ft (2.1 m) by 66.85" (189.7 cm) high. The trim kit can be determined prior to cushion the parts and cover the flooring. ■ These instructions are included. Each grille extrusion is your...
... (157.8 cm) E F G Description (Quantity) A. For each grille extrusion that are dropped. Grille, Bottom Assembly (1) I . INSTALLATION REQUIREMENTS The SKT60* Trim Kit provides an integrated appearance when installing an all local, state or national codes pertaining to this type of installation should be damaged if they are... listed here. The inner opening is enough area, approximately 7 ft (2.1 m) by 66.85" (189.7 cm) high. The trim kit can be determined prior to cushion the parts and cover the flooring. ■ These instructions are included. Each grille extrusion is your...

Installation Instructions
Page 5
...cardboard or hardboard over the floor at each side of tape to the floor. 6. Fasten the Side Trim to the Opening 1. Failure to do so can be sure to cover the floor with the trim kit. 2. Do not wiggle or "walk" the appliance when trying to avoid floor damage. INSTALLATION INSTRUCTIONS ...service, be damaged if the assembly is tight and flush with the trim kit. 4. When moving it into the wall opening . 4. Prepare the Opening 1. Place the top grille and trim assembly face down on each side of the top trim and into place above and on each end. Using two people, ...
...cardboard or hardboard over the floor at each side of tape to the floor. 6. Fasten the Side Trim to the Opening 1. Failure to do so can be sure to cover the floor with the trim kit. 2. Do not wiggle or "walk" the appliance when trying to avoid floor damage. INSTALLATION INSTRUCTIONS ...service, be damaged if the assembly is tight and flush with the trim kit. 4. When moving it into the wall opening . 4. Prepare the Opening 1. Place the top grille and trim assembly face down on each side of the top trim and into place above and on each end. Using two people, ...


