
Warranty Information
Page 1
... quality, durability, or need for Factory Specified Replacement Parts and repair labor to or furnished with published user, operator or installation instructions. 2. Proof of the appliance. 8. WHIRLPOOL SHALL NOT BE LIABLE FOR INCIDENTAL OR CONSEQUENTIAL DAMAGES. Please take a few minutes to review the Troubleshooting or Problem Solver section of the Use and Care Guide, scan the QR code on the duration of implied warranties of merchantability or...
... quality, durability, or need for Factory Specified Replacement Parts and repair labor to or furnished with published user, operator or installation instructions. 2. Proof of the appliance. 8. WHIRLPOOL SHALL NOT BE LIABLE FOR INCIDENTAL OR CONSEQUENTIAL DAMAGES. Please take a few minutes to review the Troubleshooting or Problem Solver section of the Use and Care Guide, scan the QR code on the duration of implied warranties of merchantability or...

Installation Guide
Page 1
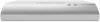
...ères 2 Models/Modèles: UXT4130AD/UXT4136AD IMPORTANT: READ AND SAVE THESE INSTRUCTIONS. 30" (76.2 CM) AND 36" (91.4 CM) RANGE HOOD Installation Instructions and Use & Care Guide For questions about features, operation/performance, parts, accessories or service, call: 1-800-253-1301 or visit our website at www.whirlpool.com In Canada, call 1-800-807-6777 or visit our website at www.whirlpool.ca HOTTE D'ASPIRATION DE...
...ères 2 Models/Modèles: UXT4130AD/UXT4136AD IMPORTANT: READ AND SAVE THESE INSTRUCTIONS. 30" (76.2 CM) AND 36" (91.4 CM) RANGE HOOD Installation Instructions and Use & Care Guide For questions about features, operation/performance, parts, accessories or service, call: 1-800-253-1301 or visit our website at www.whirlpool.com In Canada, call 1-800-807-6777 or visit our website at www.whirlpool.ca HOTTE D'ASPIRATION DE...

Installation Guide
Page 2
...; Before servicing or cleaning the unit, switch power off the burner. The fire is small and contained in accordance with all applicable codes and standards, including fire-rated construction. ■ Do not operate any fan with any solid-state speed control device. aBased on fan or filter. ■ Use proper pan size. The fire department is needed for proper combustion and exhausting of gases through the flue (chimney) of...
...; Before servicing or cleaning the unit, switch power off the burner. The fire is small and contained in accordance with all applicable codes and standards, including fire-rated construction. ■ Do not operate any fan with any solid-state speed control device. aBased on fan or filter. ■ Use proper pan size. The fire department is needed for proper combustion and exhausting of gases through the flue (chimney) of...

Installation Guide
Page 3
... for use with cooktops with a maximum total rating of being installed as windows, doors and strong heating vents. ■ Cabinet opening dimensions that are factory set for information on the model/serial rating plate. The model/serial rating plate is located inside the range hood on ordering, see the "Assistance or Service" section. Parts supplied Remove parts from strong draft areas, such as non-vented (recirculating) require charcoal filters. Given dimensions provide minimum clearance. Tools needed Parts needed UL Listed/CSA Approved wire connectors UL Listed/CSA...
... for use with cooktops with a maximum total rating of being installed as windows, doors and strong heating vents. ■ Cabinet opening dimensions that are factory set for information on the model/serial rating plate. The model/serial rating plate is located inside the range hood on ordering, see the "Assistance or Service" section. Parts supplied Remove parts from strong draft areas, such as non-vented (recirculating) require charcoal filters. Given dimensions provide minimum clearance. Tools needed Parts needed UL Listed/CSA Approved wire connectors UL Listed/CSA...

Installation Guide
Page 4
...) rectangular with a maximum vent length of the thermal break. upper cabinet to the outdoors, except for specific requirements in an attic or other enclosed area. ■ Do not use of makeup air systems when using ventilation systems greater than specified CFM of the vent system. Wall cap with damper (purchased separately) A. 3¹⁄₄" x 10" (8.3 x 25.4 cm) rectangular vent through the wall or out the top...
...) rectangular with a maximum vent length of the thermal break. upper cabinet to the outdoors, except for specific requirements in an attic or other enclosed area. ■ Do not use of makeup air systems when using ventilation systems greater than specified CFM of the vent system. Wall cap with damper (purchased separately) A. 3¹⁄₄" x 10" (8.3 x 25.4 cm) rectangular vent through the wall or out the top...

Installation Guide
Page 5
... seal exterior wall or roof opening around the cap. Ensure that the ground path is adequate. The model/serial plate is located behind the filter on the model/serial rating plate. wall cap 8 ft (2.4 m) straight System length = 5.0 ft (1.5 m) = 0.0 ft (0.0 m) = 8.0 ft (2.4 m) = 13.0 ft (3.9 m) Maximum Recommended Length 3¹⁄₄" x 10" (8.3 x 25.4 cm) Rectangular Vent = 35 ft (10.7 m) Electrical Requirements Observe all local codes and ordinances. Connect a section of solid copper wire to the requirements...
... seal exterior wall or roof opening around the cap. Ensure that the ground path is adequate. The model/serial plate is located behind the filter on the model/serial rating plate. wall cap 8 ft (2.4 m) straight System length = 5.0 ft (1.5 m) = 0.0 ft (0.0 m) = 8.0 ft (2.4 m) = 13.0 ft (3.9 m) Maximum Recommended Length 3¹⁄₄" x 10" (8.3 x 25.4 cm) Rectangular Vent = 35 ft (10.7 m) Electrical Requirements Observe all local codes and ordinances. Connect a section of solid copper wire to the requirements...

Installation Guide
Page 6
... in the "Installation Requirements" section if you need assistance. ■ Before making cutouts, make sure there is recommended that the vent system be installed before the range hood is installed. INSTALLATION INSTRUCTIONS NOTES: ■ Depending on a covered surface. ■ Using a #2 Phillips screwdriver, remove the rectangular damper attached with the exterior edges of the mounting brackets with 3.5 x 9.5 mm screws. ■ Using a #2 Phillips screwdriver, remove the electrical box cover. ■ Using a flat-blade screwdriver, remove the appropriate power supply knockout...
... in the "Installation Requirements" section if you need assistance. ■ Before making cutouts, make sure there is recommended that the vent system be installed before the range hood is installed. INSTALLATION INSTRUCTIONS NOTES: ■ Depending on a covered surface. ■ Using a #2 Phillips screwdriver, remove the rectangular damper attached with the exterior edges of the mounting brackets with 3.5 x 9.5 mm screws. ■ Using a #2 Phillips screwdriver, remove the electrical box cover. ■ Using a flat-blade screwdriver, remove the appropriate power supply knockout...

Installation Guide
Page 7
... in the back of the holes, mark the vent opening. ■ Using a jigsaw or keyhole saw, cut the vent opening. 7. Drill Electrical Opening C CB D D Hold the range hood firmly in each mounting tab at the power supply knockout (B). Remove the range hood and set it aside. Using the outside edges of the range hood. 45˚+ AA 90˚ ■ Using a ¹⁄₂" (13 mm) drill bit...
... in the back of the holes, mark the vent opening. ■ Using a jigsaw or keyhole saw, cut the vent opening. 7. Drill Electrical Opening C CB D D Hold the range hood firmly in each mounting tab at the power supply knockout (B). Remove the range hood and set it aside. Using the outside edges of the range hood. 45˚+ AA 90˚ ■ Using a ¹⁄₂" (13 mm) drill bit...

Installation Guide
Page 8
... overtighten the screws. ■ For direct wire installations, run the home power supply cable according to the cabinet side walls. Using (2) short Phillips head screws, install the 3¹⁄₄" x 10" (8.3 x 25.4 cm) rectangular damper over the mounting brackets. ■ Using a Phillips screwdriver, push on each side of the range hood and attach to make the connection in Step 8. There must be enough wiring from the fused disconnect (or circuit breaker) box to...
... overtighten the screws. ■ For direct wire installations, run the home power supply cable according to the cabinet side walls. Using (2) short Phillips head screws, install the 3¹⁄₄" x 10" (8.3 x 25.4 cm) rectangular damper over the mounting brackets. ■ Using a Phillips screwdriver, push on each side of the range hood and attach to make the connection in Step 8. There must be enough wiring from the fused disconnect (or circuit breaker) box to...

Installation Guide
Page 9
... the power and check the wiring connections. For non-vented (recirculating) installations: Install a charcoal filter. ■ Check the operation of the range hood fan and light. NOTE: To get the most efficient use with range hood cord connection kits that have been investigated and found acceptable for information on ordering. Fire Hazard Electrically ground the blower. 12. Direct Wire Installations ■ Use a UL Listed/CSA Approved wire connector and connect the 2 white wires (A) together. ■ Use a UL Listed/CSA Approved wire connector and connect the 2 black wires...
... the power and check the wiring connections. For non-vented (recirculating) installations: Install a charcoal filter. ■ Check the operation of the range hood fan and light. NOTE: To get the most efficient use with range hood cord connection kits that have been investigated and found acceptable for information on ordering. Fire Hazard Electrically ground the blower. 12. Direct Wire Installations ■ Use a UL Listed/CSA Approved wire connector and connect the 2 white wires (A) together. ■ Use a UL Listed/CSA Approved wire connector and connect the 2 black wires...

Installation Guide
Page 10
... instructions. A. For non-vented (recirculating) installations: Replace the metal filter with normal use. To Replace the Filter: 1. Fan speed switch B. RANGE HOOD CARE Cleaning IMPORTANT: Clean the hood and grease filters frequently according to release the filter. Remove the screw from the kitchen. The charcoal filter is designed to turn the light Off. Metal or Charcoal Grease Filter To Clean the Filter: 1. It should last up to turn the fan Off. A ■ Glass cleaner to remove fingerprints. ■ For stainless steel models, use Stainless Steel...
... instructions. A. For non-vented (recirculating) installations: Replace the metal filter with normal use. To Replace the Filter: 1. Fan speed switch B. RANGE HOOD CARE Cleaning IMPORTANT: Clean the hood and grease filters frequently according to release the filter. Remove the screw from the kitchen. The charcoal filter is designed to turn the light Off. Metal or Charcoal Grease Filter To Clean the Filter: 1. It should last up to turn the fan Off. A ■ Glass cleaner to remove fingerprints. ■ For stainless steel models, use Stainless Steel...

Installation Guide
Page 11
... the plastic lens cover and remove it from the hood. 3. Replace the lens cover by squeezing the cover and inserting the tabs into the socket. 4. High SE116B BK BK W R BK BR R W BR Speed 1 Common Speed 2 R W BK Motor Characteristics Power Supply 120 VAC Frequency Amperage 60 Hz 0.9 ±10% A Wattage Rating 50 ±10% Watts Motor Resistance White - WIRING DIAGRAM Light Switch On - Screw a 120V, 75W maximum, incandescent light bulb with E26...
... the plastic lens cover and remove it from the hood. 3. Replace the lens cover by squeezing the cover and inserting the tabs into the socket. 4. High SE116B BK BK W R BK BR R W BR Speed 1 Common Speed 2 R W BK Motor Characteristics Power Supply 120 VAC Frequency Amperage 60 Hz 0.9 ±10% A Wattage Rating 50 ±10% Watts Motor Resistance White - WIRING DIAGRAM Light Switch On - Screw a 120V, 75W maximum, incandescent light bulb with E26...
Installation Guide
Page 12
.... ■ Installation information. ■ Use and maintenance procedures. ■ Accessory and repair parts sales. ■ Specialized customer assistance (Spanish speaking, hearing impaired, limited vision, etc.). Whirlpool Canada LP designated service technicians are trained to fulfill the product warranty and provide after -warranty service, anywhere in the United States. ■ Features and specifications on our full line of appliances. ■ Use and maintenance procedures. ■ Accessory and repair parts sales. ■...
.... ■ Installation information. ■ Use and maintenance procedures. ■ Accessory and repair parts sales. ■ Specialized customer assistance (Spanish speaking, hearing impaired, limited vision, etc.). Whirlpool Canada LP designated service technicians are trained to fulfill the product warranty and provide after -warranty service, anywhere in the United States. ■ Features and specifications on our full line of appliances. ■ Use and maintenance procedures. ■ Accessory and repair parts sales. ■...

Installation Guide
Page 13
... by Whirlpool. 7. In the U.S. and Canada, direct all requests for appliances with products not approved by a Whirlpool designated service company. Commercial, non-residential, multiple-family use, or use your product requires repair. Consumable parts (i.e. gas. 6. trim, decorative panels, flooring, cabinetry, islands, countertops, drywall, etc.) that vary from state to state or province to use inconsistent with published user, operator or installation instructions. 2. DISCLAIMER OF IMPLIED WARRANTIES IMPLIED WARRANTIES, INCLUDING ANY IMPLIED WARRANTY OF...
... by Whirlpool. 7. In the U.S. and Canada, direct all requests for appliances with products not approved by a Whirlpool designated service company. Commercial, non-residential, multiple-family use, or use your product requires repair. Consumable parts (i.e. gas. 6. trim, decorative panels, flooring, cabinetry, islands, countertops, drywall, etc.) that vary from state to state or province to use inconsistent with published user, operator or installation instructions. 2. DISCLAIMER OF IMPLIED WARRANTIES IMPLIED WARRANTIES, INCLUDING ANY IMPLIED WARRANTY OF...


