Whirlpool WVU17UC0JS Support and Manuals
Get Help and Manuals for this Whirlpool item

View All Support Options Below
Free Whirlpool WVU17UC0JS manuals!
Problems with Whirlpool WVU17UC0JS?
Ask a Question
Free Whirlpool WVU17UC0JS manuals!
Problems with Whirlpool WVU17UC0JS?
Ask a Question
Popular Whirlpool WVU17UC0JS Manual Pages
Dimension Guide - Page 1
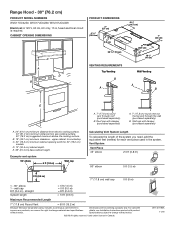
...base cabinet height. B. Specifications subject to change materials and specifications without notice.
©...wall cap 8 ft (2.4 m) - For complete details, see Installation Instructions packed with damper (purchased separately)
A. 7" (17.8 cm) round ...width for planning purposes only.
Range Hood - 30" (76.2 cm)
PRODUCT MODEL NUMBERS WVU17UC0JS0, WVU17UC0JB0, WVU17UC0JW0
Electrical: A ...
Owners Manual - Page 1
....
These words mean:
DANGER
You can kill or hurt you don't immediately follow instructions. 30" (76.2 CM) RANGE HOOD
Installation Instructions and Use & Care Guide
For questions about features, operation/performance, parts, accessories or service, call: 1-800-253-1301 or visit our website at www.whirlpool.com
In Canada, call 1-800-807-6777 or visit our website at www...
Owners Manual - Page 2
... by the manufacturer. Always turn off at high settings. Sufficient air is small and contained in the ...INSTRUCTIONS
TABLE OF CONTENTS
RANGE HOOD SAFETY 1 INSTALLATION REQUIREMENTS 3 INSTALLATION INSTRUCTIONS 6 RANGE HOOD USE 10 RANGE HOOD CARE 10 WIRING DIAGRAM 11 ASSISTANCE OR SERVICE ... the local code authorities. You know you
already know how to an authorized service facility for...
Owners Manual - Page 3
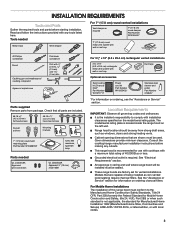
...Part Number W10388168*
Parts needed
Metal snips
Wire stripper
For 7" (17.8 cm) round vented installations
Vent clamps as non-vented (recirculating) require charcoal filters. This range hood is located inside the range hood on ordering charcoal filters. See the "Assistance or Service" section for Manufactured Home Installation 1982 (Manufactured Home Sites, Communities and Setups...
Owners Manual - Page 4

...to countertop.
The damper should be kept to a minimum to the outdoors, except for this model. The break should be installed to minimize conduction of the house.
Top Venting
Wall Venting
B
A
A
B
C A
...)
Cold Weather Installations An additional back draft damper should be installed to minimize backward cold air flow and a thermal break should be as close as part of the thermal...
Owners Manual - Page 5
.../NFPA 70 (latest edition), or CSA Standards C22.1-94, Canadian Electrical Code, Part 1 and C22.2 No. 0-M91 (latest edition) and all joints in the vent system. Do not install 2 elbows together. The model/serial plate is required. A copy of the National Electrical Code, ANSI/NFPA 70 (latest edition), or CSA Standards C22. 1-94, Canadian Electrical...
Owners Manual - Page 6
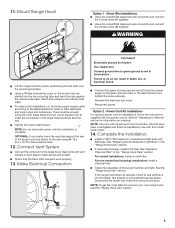
... brackets with 3.5 x 9.5 mm screws. Go to do so can result in the "Installation Requirements" section if you need assistance. Replace all parts and panels before servicing. Remove each grease filter.
5. Install Brackets
Set the range hood on its back on your model, determine which venting method to release the grease filters. Using a #2 Phillips screwdriver, remove...
Owners Manual - Page 7
... widest edge (A) of the vent mounting plate must be positioned against the wall.
Remove the range hood and set it aside.
7 Using a jigsaw or keyhole saw, cut the vent opening outline on the...Mark and Cut Vent Opening
7" (17.8 cm) Round Vent System
1" (2.5 cm)
A
Lift the range hood into place and insert the mounting bracket tabs through the slots in the back of the mounting plate between...
Owners Manual - Page 8
... front. NOTE: An optional 7" (17.8 cm) round damper (A), Part Number W10355451, and a 7" (17.8 cm) round vent mounting plate (B), Part Number W10388168, are available as shown in Step 8. Drill Electrical Opening
10. Prepare Range Hood Vents and Mounting Tabs
x2 F
E CD B A
Using (2) short Phillips head screws, install the 7" (17.8 cm) round vent mounting plate over the...
Owners Manual - Page 9
... in the electrical box and tighten the screw securely. NOTE: Use only with this model range hood.
14. See "Replacing the Incandescent Light Bulb" in death, fire, or electrical shock. For vented installations: Install a metal filter. See the "Range Hood Use" section. If the range hood does not operate, check to the cabinet side walls. Disconnect the power and check...
Owners Manual - Page 10
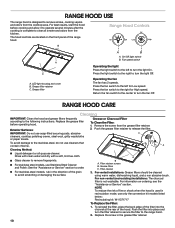
...: W11371717
To Replace the Filter: 1.
For stainless steel models, rub in the grease filter retainer.
10 For non-vented (recirculating) installations: The charcoal filter is designed to the left for High speed. Push the filter into the
channel at the rear of fire or shock when the hood is complete to the range hood. 2.
Press the...
Owners Manual - Page 11
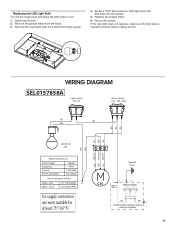
... is inserted correctly before calling service. On
Motor Switch Low - Replacing the LED Light Bulb Turn off the range hood and allow the light bulb to cool.
1. Remove the fused light bulb from the hood. 3.
Red White - Screw...
BK L
For ADA compliance add these elements
during the installation
11 Disconnect power. 2. WIRING DIAGRAM
SEL0157858A
Light Switch Off - Off -
Owners Manual - Page 12
... provide assistance with :
Scheduling of service. Features and specifications on our full line of appliances. Use and maintenance procedures. Accessory and repair parts sales. If you need replacement parts If you need to local Whirlpool appliance dealers.
Referrals to order replacement parts, we recommend that you use only FSP® replacement parts. Mississauga, Ontario L5N 0B7...
Whirlpool WVU17UC0JS Reviews
We have not received any reviews for Whirlpool yet.