
Installation Guide
Page 2
...and either the word "DANGER" or "WARNING." TABLE OF CONTENTS RANGE HOOD SAFETY 2 INSTALLATION REQUIREMENTS 4 Tools and Parts 4 Location Requirements 4 Venting System 5 Electrical Requirements 6 INSTALLATION INSTRUCTIONS 7 RANGE HOOD USE 11 Range Hood Controls 11 RANGE HOOD CARE 11 Cleaning 11 WIRING DIAGRAM 12 ASSISTANCE OR SERVICE 13 In...HOTTE 25 Nettoyage 25 SCHÉMA DE CÂBLAGE 26 ASSISTANCE OU SERVICE 27 Au Canada 27 GARANTIE 27 RANGE HOOD SAFETY Your safety and the safety of injury, and tell you don't immediately follow instructions. We have provided ...
...and either the word "DANGER" or "WARNING." TABLE OF CONTENTS RANGE HOOD SAFETY 2 INSTALLATION REQUIREMENTS 4 Tools and Parts 4 Location Requirements 4 Venting System 5 Electrical Requirements 6 INSTALLATION INSTRUCTIONS 7 RANGE HOOD USE 11 Range Hood Controls 11 RANGE HOOD CARE 11 Cleaning 11 WIRING DIAGRAM 12 ASSISTANCE OR SERVICE 13 In...HOTTE 25 Nettoyage 25 SCHÉMA DE CÂBLAGE 26 ASSISTANCE OU SERVICE 27 Au Canada 27 GARANTIE 27 RANGE HOOD SAFETY Your safety and the safety of injury, and tell you don't immediately follow instructions. We have provided ...
Installation Guide
Page 4
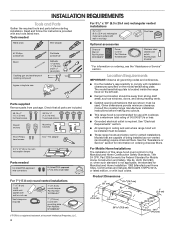
...and strong heating vents. ■■ Cabinet opening dimensions that are factory set for information on the left wall. ■■ Range hood location should be used. The model/serial/rating plate is required. Tools needed UL listed/CSA approved wire connectors For 7" (17...: Observe all parts are capable of 50,000 BTUs or less. ■■ Grounded electrical outlet is located inside the range hood on ordering charcoal filters. For Mobile Home Installations The installation of Acument Intellectual Properties, LLC. 4 INSTALLATION REQUIREMENTS Tools and Parts...
...and strong heating vents. ■■ Cabinet opening dimensions that are factory set for information on the left wall. ■■ Range hood location should be used. The model/serial/rating plate is required. Tools needed UL listed/CSA approved wire connectors For 7" (17...: Observe all parts are capable of 50,000 BTUs or less. ■■ Grounded electrical outlet is located inside the range hood on ordering charcoal filters. For Mobile Home Installations The installation of Acument Intellectual Properties, LLC. 4 INSTALLATION REQUIREMENTS Tools and Parts...

Installation Guide
Page 5
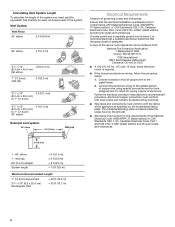
... cold air flow and a thermal break should be on your area. Vent system can terminate either through the roof or wall. Wall cap with the range hood. ■■ Use caulking to countertop C. 30" (76.2 cm) minimum cabinet opening around the cap. 5 upper cabinet to seal exterior wall or roof opening width...
... cold air flow and a thermal break should be on your area. Vent system can terminate either through the roof or wall. Wall cap with the range hood. ■■ Use caulking to countertop C. 30" (76.2 cm) minimum cabinet opening around the cap. 5 upper cabinet to seal exterior wall or roof opening width...
Installation Guide
Page 6
... tools designed and UL listed for each vent piece used , it is recommended that a qualified electrician determine that the electrical installation is located inside the range hood on the left wall. ■■ Wire sizes must conform with local codes and industry accepted wiring practices. ■■ Wire sizes and connections must...
... tools designed and UL listed for each vent piece used , it is recommended that a qualified electrician determine that the electrical installation is located inside the range hood on the left wall. ■■ Wire sizes must conform with local codes and industry accepted wiring practices. ■■ Wire sizes and connections must...

Installation Guide
Page 7
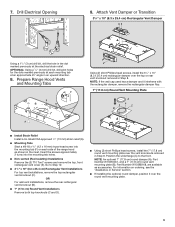
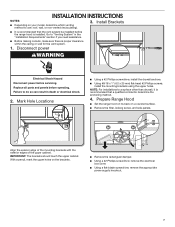
... than drywall, it is proper clearance within the ceiling or wall for the vent system. 1. Replace all parts and panels before servicing. Prepare Range Hood ■■ Set the range hood on its back on the brackets. ■■ Remove the rectangular damper. ■■ Using a #2 Phillips screwdriver, remove the electrical box cover. ■... "Installation Requirements" section if you need assistance. ■■ Before making cutouts, make sure there is recommended that the vent system be installed before the range hood is installed.
... than drywall, it is proper clearance within the ceiling or wall for the vent system. 1. Replace all parts and panels before servicing. Prepare Range Hood ■■ Set the range hood on its back on the brackets. ■■ Remove the rectangular damper. ■■ Using a #2 Phillips screwdriver, remove the electrical box cover. ■... "Installation Requirements" section if you need assistance. ■■ Before making cutouts, make sure there is recommended that the vent system be installed before the range hood is installed.
Installation Guide
Page 8
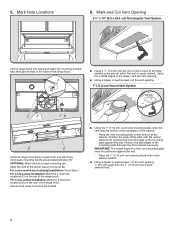
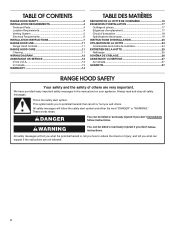
...hole and edge of the cabinet: -- Mark and Cut Vent Opening 31/4" x 10" (8.3 x 25.4 cm) Rectangular Vent System Lift the range hood into place and insert the mounting bracket tabs through the slots in each mounting tab. Using the outside edges of the cabinet. For a rear ...■■ Using the 7" (17.8 cm) round vent mounting plate, draw the vent opening . 7" (17.8 cm) Round Vent System 1" (2.5 cm) C CB D D Hold the range hood firmly in each of the dots marked previously on the underside of the mounting plate against the wall. -- Trace the 7" (17.8 cm) vent opening (solid...
...hole and edge of the cabinet: -- Mark and Cut Vent Opening 31/4" x 10" (8.3 x 25.4 cm) Rectangular Vent System Lift the range hood into place and insert the mounting bracket tabs through the slots in each mounting tab. Using the outside edges of the cabinet. For a rear ...■■ Using the 7" (17.8 cm) round vent mounting plate, draw the vent opening . 7" (17.8 cm) Round Vent System 1" (2.5 cm) C CB D D Hold the range hood firmly in each of the dots marked previously on the underside of the mounting plate against the wall. -- Trace the 7" (17.8 cm) vent opening (solid...
Installation Guide
Page 9
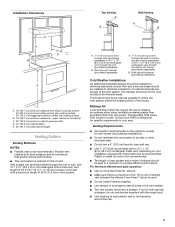
... strain relief. 7. OPTIONAL: Using a 1/8" (3 mm) drill bit, drill pilot holes for the dots marked previously at each side of the range hood as accessories. Position the wide flange (C) to Step 12. ■■ 31/4" x 10" (8.3 x 25.4 cm) Rectangular Vent Installations For...cm) round damper (A), Part Number W10355451, and a 7" (17.8 cm) round vent mounting plate (B), Part Number W10388168, are available as shown in the inset. Prepare Range Hood Vents and Mounting Tabs x2 F E D C B A Using (2) short Phillips head screws, install the 31/4" x 10" (8.3 x 25.4 cm) rectangular damper over...
... strain relief. 7. OPTIONAL: Using a 1/8" (3 mm) drill bit, drill pilot holes for the dots marked previously at each side of the range hood as accessories. Position the wide flange (C) to Step 12. ■■ 31/4" x 10" (8.3 x 25.4 cm) Rectangular Vent Installations For...cm) round damper (A), Part Number W10355451, and a 7" (17.8 cm) round vent mounting plate (B), Part Number W10388168, are available as shown in the inset. Prepare Range Hood Vents and Mounting Tabs x2 F E D C B A Using (2) short Phillips head screws, install the 31/4" x 10" (8.3 x 25.4 cm) rectangular damper over...

Installation Guide
Page 10
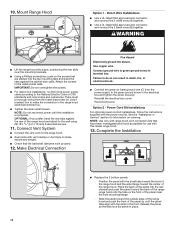
... rear channel and push the panel toward the center of the range hood and attach to the range hood. ■■ Seal joints with the power cord kit. Mount Range Hood Option 1 - WARNING ■■ Lift the range hood into the top mounting tabs and bend the tabs against the... direct wire installations, run the home power supply cable according to the cabinet side walls. Use copper wire. NOTE: Use only with range hood cord connection kits that are started into place, positioning the rear slots over the mounting brackets. ■■ Using a Phillips screwdriver,...
... rear channel and push the panel toward the center of the range hood and attach to the range hood. ■■ Seal joints with the power cord kit. Mount Range Hood Option 1 - WARNING ■■ Lift the range hood into the top mounting tabs and bend the tabs against the... direct wire installations, run the home power supply cable according to the cabinet side walls. Use copper wire. NOTE: Use only with range hood cord connection kits that are started into place, positioning the rear slots over the mounting brackets. ■■ Using a Phillips screwdriver,...

Installation Guide
Page 11
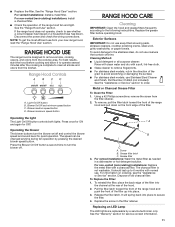
...and odors from the cooktop area. Grease filter latch C. ■■ Replace the filter. See the "Range Hood Care" section. See the "Range Hood Use" section. If the range hood does not operate, check to order. Disconnect the power and check the wiring connections. NOTE: To get... the most efficient use . RANGE HOOD USE The range hood is designed to the following instructions. Range Hood Controls A B CD A. Blower On/Off and minimum speed button C. Blower maximum speed button Operating the ...
...and odors from the cooktop area. Grease filter latch C. ■■ Replace the filter. See the "Range Hood Care" section. See the "Range Hood Use" section. If the range hood does not operate, check to order. Disconnect the power and check the wiring connections. NOTE: To get... the most efficient use . RANGE HOOD USE The range hood is designed to the following instructions. Range Hood Controls A B CD A. Blower On/Off and minimum speed button C. Blower maximum speed button Operating the ...
Use & Care Guide
Page 2
...You can happen if the instructions are very important. TABLE OF CONTENTS RANGE HOOD SAFETY 2 INSTALLATION REQUIREMENTS 4 Tools and Parts 4 Location Requirements 4 Venting System 5 Electrical Requirements 6 INSTALLATION INSTRUCTIONS 7 RANGE HOOD USE 11 Range Hood Controls 11 RANGE HOOD CARE 11 Cleaning 11 WIRING DIAGRAM 12 ASSISTANCE OR SERVICE 13 In...LA HOTTE 25 Nettoyage 25 SCHÉMA DE CÂBLAGE 26 ASSISTANCE OU SERVICE 27 Au Canada 27 GARANTIE 27 RANGE HOOD SAFETY Your safety and the safety of injury, and tell you and others are not followed. 2 This is , ...
...You can happen if the instructions are very important. TABLE OF CONTENTS RANGE HOOD SAFETY 2 INSTALLATION REQUIREMENTS 4 Tools and Parts 4 Location Requirements 4 Venting System 5 Electrical Requirements 6 INSTALLATION INSTRUCTIONS 7 RANGE HOOD USE 11 Range Hood Controls 11 RANGE HOOD CARE 11 Cleaning 11 WIRING DIAGRAM 12 ASSISTANCE OR SERVICE 13 In...LA HOTTE 25 Nettoyage 25 SCHÉMA DE CÂBLAGE 26 ASSISTANCE OU SERVICE 27 Au Canada 27 GARANTIE 27 RANGE HOOD SAFETY Your safety and the safety of injury, and tell you and others are not followed. 2 This is , ...

Use & Care Guide
Page 4
...of 50,000 BTUs or less. ■■ Grounded electrical outlet is a registered trademark of this range hood must be sealed. ■■ These range hoods are shown must conform to comply with wall or roof cap Duct tape Optional accessories Charcoal filter kit ...1" (2.5 cm) 1" (2.5 cm) 9" (22.9 cm) †®TORX is required. The model/serial/rating plate is located inside the range hood on ordering charcoal filters. See the "Assistance or Service" section for Manufactured Home Installation 1982 (Manufactured Home Sites, Communities and Setups) ANSI A225.1/NFPA...
...of 50,000 BTUs or less. ■■ Grounded electrical outlet is a registered trademark of this range hood must be sealed. ■■ These range hoods are shown must conform to comply with wall or roof cap Duct tape Optional accessories Charcoal filter kit ...1" (2.5 cm) 1" (2.5 cm) 9" (22.9 cm) †®TORX is required. The model/serial/rating plate is located inside the range hood on ordering charcoal filters. See the "Assistance or Service" section for Manufactured Home Installation 1982 (Manufactured Home Sites, Communities and Setups) ANSI A225.1/NFPA...
Use & Care Guide
Page 5
... other enclosed area. ■■ Do not use of makeup air systems when using ventilation systems greater than 1 elbow is recommended. Wall cap with the range hood. ■■ Use caulking to where the vent system enters the heated portion of the house. The specified CFM varies from gas cooking surface 30...
... other enclosed area. ■■ Do not use of makeup air systems when using ventilation systems greater than 1 elbow is recommended. Wall cap with the range hood. ■■ Use caulking to where the vent system enters the heated portion of the house. The specified CFM varies from gas cooking surface 30...

Use & Care Guide
Page 6
Connect a section of solid copper wire to aluminum. The model/serial/rating plate is located inside the range hood on the model/serial/rating plate. Aluminum/copper connection must conform with local codes and industry accepted wiring practices. ■■ Wire sizes and connections ...
Connect a section of solid copper wire to aluminum. The model/serial/rating plate is located inside the range hood on the model/serial/rating plate. Aluminum/copper connection must conform with local codes and industry accepted wiring practices. ■■ Wire sizes and connections ...
Use & Care Guide
Page 7
Go to a surface other than drywall, it is recommended that the vent system be installed before the range hood is installed. IMPORTANT: The brackets should touch the upper cabinet. INSTALLATION INSTRUCTIONS NOTES: ■■ Depending on a covered surface. ■■ ...death or electrical shock. 2. Align the exterior edge of the mounting brackets with the exterior edges of the upper cabinet. Prepare Range Hood ■■ Set the range hood on its back on your model, determine which venting method to do so can result in the "Installation Requirements" section if you...
Go to a surface other than drywall, it is recommended that the vent system be installed before the range hood is installed. IMPORTANT: The brackets should touch the upper cabinet. INSTALLATION INSTRUCTIONS NOTES: ■■ Depending on a covered surface. ■■ ...death or electrical shock. 2. Align the exterior edge of the mounting brackets with the exterior edges of the upper cabinet. Prepare Range Hood ■■ Set the range hood on its back on your model, determine which venting method to do so can result in the "Installation Requirements" section if you...

Use & Care Guide
Page 8
...(A) between the dots marked previously. OPTIONAL: Mark the hole in the back of the mounting plate between the hole and edge of the range hood. Position the edge of the plate with one hand and bend each mounting tab (A) upward approximately 90°. 5. For a non-vented ...(recirculating) installation: Go to Step 7. Remove the range hood and set it aside. A ■■ Using the 7" (17.8 cm) round vent mounting plate, draw the vent opening . 7" (17.8 cm) Round Vent...
...(A) between the dots marked previously. OPTIONAL: Mark the hole in the back of the mounting plate between the hole and edge of the range hood. Position the edge of the plate with one hand and bend each mounting tab (A) upward approximately 90°. 5. For a non-vented ...(recirculating) installation: Go to Step 7. Remove the range hood and set it aside. A ■■ Using the 7" (17.8 cm) round vent mounting plate, draw the vent opening . 7" (17.8 cm) Round Vent...

Use & Care Guide
Page 9
...in the inset. OPTIONAL: Using a 1/8" (3 mm) drill bit, drill pilot holes for the dots marked previously at each side of the range hood as accessories. NOTE: If the wall cap used has a damper and it over the round vent mounting plate. 9 OR For wall vent ...Phillips head screws, install the 7" (17.8 cm) round vent mounting plate over the top or rear vent knockout removed in Step 8. Drill Electrical Opening 9. 7. Prepare Range Hood Vents and Mounting Tabs x2 F E D C B A Using (2) short Phillips head screws, install the 31/4" x 10" (8.3 x 25.4 cm) rectangular damper...
...in the inset. OPTIONAL: Using a 1/8" (3 mm) drill bit, drill pilot holes for the dots marked previously at each side of the range hood as accessories. NOTE: If the wall cap used has a damper and it over the round vent mounting plate. 9 OR For wall vent ...Phillips head screws, install the 7" (17.8 cm) round vent mounting plate over the top or rear vent knockout removed in Step 8. Drill Electrical Opening 9. 7. Prepare Range Hood Vents and Mounting Tabs x2 F E D C B A Using (2) short Phillips head screws, install the 31/4" x 10" (8.3 x 25.4 cm) rectangular damper...
Use & Care Guide
Page 10
...home power supply cable according to the cabinet side walls. NOTE: Do not reconnect power until the panel tabs align with this model range hood. 13. Make Electrical Connection Fire Hazard Electrically ground the blower. Power Cord Kit Installations For optional power cord kit installations, follow the ...instructions supplied with the small tabs toward the front of the range hood and the wide flange toward the outside edge of the range hood and push the front of the range hood. Option 2 - Slide the panel toward the center of the panel up until the ...
...home power supply cable according to the cabinet side walls. NOTE: Do not reconnect power until the panel tabs align with this model range hood. 13. Make Electrical Connection Fire Hazard Electrically ground the blower. Power Cord Kit Installations For optional power cord kit installations, follow the ...instructions supplied with the small tabs toward the front of the range hood and the wide flange toward the outside edge of the range hood and push the front of the range hood. Option 2 - Slide the panel toward the center of the panel up until the ...
Use & Care Guide
Page 11
...are replaceable by pressing the desired blower speed button. See the "Warranty" section for OFF. For vented installations: Install a metal filter. RANGE HOOD USE The range hood is designed to remove smoke, cooking vapors, and odors from the filter retainer. 2. Blower medium speed button D. Press the Blower On...after the cooking is not washable. Cleaning Method: ■■ Liquid detergent or all smoke and odors from your new range hood, read the "Range Hood Use" section. Metal or Charcoal Grease Filter To Clean the Filter: 1. To remove, pull the filter latch toward the front...
...are replaceable by pressing the desired blower speed button. See the "Warranty" section for OFF. For vented installations: Install a metal filter. RANGE HOOD USE The range hood is designed to remove smoke, cooking vapors, and odors from the filter retainer. 2. Blower medium speed button D. Press the Blower On...after the cooking is not washable. Cleaning Method: ■■ Liquid detergent or all smoke and odors from your new range hood, read the "Range Hood Use" section. Metal or Charcoal Grease Filter To Clean the Filter: 1. To remove, pull the filter latch toward the front...


