
Use and Care Guide
Page 1
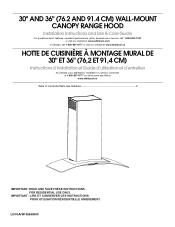
..." (76.2 AND 91.4 CM) WALL-MOUNT CANOPY RANGE HOOD Installation Instructions and Use & Care Guide For questions about features, operation/performance, parts, accessories or service, call: 1-800-253-1301 or visit our website at www.whirlpool.com In Canada, call 1-800-807-6777 or visit our...d'utilisation et d'entretien Au Canada, pour assistance, installation ou service, composer le 1-800-807-6777 ou visiter notre site Web à www.whirlpool.ca Table of Contents/Table des matières 2 IMPORTANT: READ AND SAVE THESE INSTRUCTIONS. IMPORTANT : LIRE ET CONSERVER CES INSTRUCTIONS. FOR ...
..." (76.2 AND 91.4 CM) WALL-MOUNT CANOPY RANGE HOOD Installation Instructions and Use & Care Guide For questions about features, operation/performance, parts, accessories or service, call: 1-800-253-1301 or visit our website at www.whirlpool.com In Canada, call 1-800-807-6777 or visit our...d'utilisation et d'entretien Au Canada, pour assistance, installation ou service, composer le 1-800-807-6777 ou visiter notre site Web à www.whirlpool.ca Table of Contents/Table des matières 2 IMPORTANT: READ AND SAVE THESE INSTRUCTIONS. IMPORTANT : LIRE ET CONSERVER CES INSTRUCTIONS. FOR ...
Use and Care Guide
Page 2
... Venting Requirements 5 Electrical Requirements 6 INSTALLATION INSTRUCTIONS 7 Prepare Location 7 Install Range Hood 8 Connect Vent System 8 Make Electrical Connection 9 Install Vent Covers 9 Complete Installation 10 RANGE HOOD USE 10 Range Hood Controls 10 RANGE HOOD CARE 11 Cleaning 11 WIRING DIAGRAM 12 ASSISTANCE OR SERVICE 13 In the U.S.A...Nettoyage 24 SCHÉMA DE CÂBLAGE 25 ASSISTANCE OU SERVICE 26 Au Canada 26 Accessoires 26 GARANTIE 27 RANGE HOOD SAFETY Your safety and the safety of injury, and tell you what the potential hazard is the safety alert symbol....
... Venting Requirements 5 Electrical Requirements 6 INSTALLATION INSTRUCTIONS 7 Prepare Location 7 Install Range Hood 8 Connect Vent System 8 Make Electrical Connection 9 Install Vent Covers 9 Complete Installation 10 RANGE HOOD USE 10 Range Hood Controls 10 RANGE HOOD CARE 11 Cleaning 11 WIRING DIAGRAM 12 ASSISTANCE OR SERVICE 13 In the U.S.A...Nettoyage 24 SCHÉMA DE CÂBLAGE 25 ASSISTANCE OU SERVICE 26 Au Canada 26 Accessoires 26 GARANTIE 27 RANGE HOOD SAFETY Your safety and the safety of injury, and tell you what the potential hazard is the safety alert symbol....
Use and Care Guide
Page 3
... IN THE EVENT OF A RANGE TOP GREASE FIRE, OBSERVE THE FOLLOWING:a ■ SMOTHER FLAMES with a close fitting lid, cookie sheet, or metal tray, then turn hood ON when cooking at high heat or when flambeing food (i.e. Follow the heating equipment manufacturer's guideline and safety standards such as a tag, to prevent power...
... IN THE EVENT OF A RANGE TOP GREASE FIRE, OBSERVE THE FOLLOWING:a ■ SMOTHER FLAMES with a close fitting lid, cookie sheet, or metal tray, then turn hood ON when cooking at high heat or when flambeing food (i.e. Follow the heating equipment manufacturer's guideline and safety standards such as a tag, to prevent power...
Use and Care Guide
Page 4
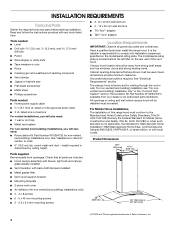
...- 5 x 45 mm mounting screws ■ 2 - 3.5 x 9.5 mm mounting screws Location Requirements IMPORTANT: Observe all parts are included. ■ Hood canopy assembly with blower, light bulb and canopy glass already installed ■ Vent transition with back draft dampers installed ■ Metal grease filter ■ Vent... screwdriver Parts needed ■ Level ■ Drill with local codes. See "Electrical Requirements" section. The canopy hood is required. Recirculation Kit Part Number W10294733 is determined by ceiling height. Grounded electrical outlet is factory set for non...
...- 5 x 45 mm mounting screws ■ 2 - 3.5 x 9.5 mm mounting screws Location Requirements IMPORTANT: Observe all parts are included. ■ Hood canopy assembly with blower, light bulb and canopy glass already installed ■ Vent transition with back draft dampers installed ■ Metal grease filter ■ Vent... screwdriver Parts needed ■ Level ■ Drill with local codes. See "Electrical Requirements" section. The canopy hood is required. Recirculation Kit Part Number W10294733 is determined by ceiling height. Grounded electrical outlet is factory set for non...
Use and Care Guide
Page 5
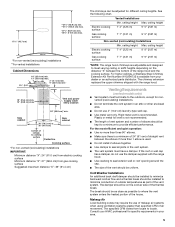
... ■ Vent system must have a damper. If the roof or wall cap has a damper, do not use the damper supplied with the range hood. Side cabinet 30" (76.2 cm) or 36" (91.4 cm) Side cabinet "X" bottom of canopy to where the vent system enters the heated... the bottom of the house. ceiling height Electric cooking surface 7' 4" (2.23 m) 9' 9" (2.97 m) Gas cooking surface 7' 7" (2.31 m) 9' 9" (2.97 m) *NOTE: The range hood chimneys are adjustable and designed to locale. For the most efficient and quiet operation: ■ Use no more than specified CFM of the thermal break...
... ■ Vent system must have a damper. If the roof or wall cap has a damper, do not use the damper supplied with the range hood. Side cabinet 30" (76.2 cm) or 36" (91.4 cm) Side cabinet "X" bottom of canopy to where the vent system enters the heated... the bottom of the house. ceiling height Electric cooking surface 7' 4" (2.23 m) 9' 9" (2.97 m) Gas cooking surface 7' 7" (2.31 m) 9' 9" (2.97 m) *NOTE: The range hood chimneys are adjustable and designed to locale. For the most efficient and quiet operation: ■ Use no more than specified CFM of the thermal break...
Use and Care Guide
Page 6
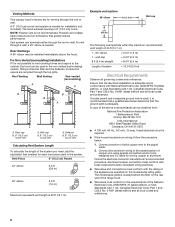
...in the system. Ensure that the ground path is adequate. Connect the aluminum wiring to the added section of the above the hood. The hood exhaust opening is needed . Wall cap B. 6" (15.2 cm) round vent A. Aluminum/copper connection must conform with local... codes and industry accepted wiring practices. ■ Wire sizes and connections must conform to the outside, the hood can be installed immediately above code standards can terminate either through the top grille. Roof Venting Wall Venting Non-vented (recirculating) A A B...
...in the system. Ensure that the ground path is adequate. Connect the aluminum wiring to the added section of the above the hood. The hood exhaust opening is needed . Wall cap B. 6" (15.2 cm) round vent A. Aluminum/copper connection must conform with local... codes and industry accepted wiring practices. ■ Wire sizes and connections must conform to the outside, the hood can be installed immediately above code standards can terminate either through the top grille. Roof Venting Wall Venting Non-vented (recirculating) A A B...
Use and Care Guide
Page 7
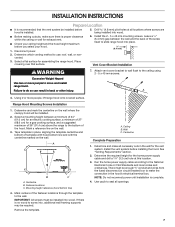
...NOTE: Do not reconnect power until installation is proper clearance within the ceiling or wall for exhaust vent. ■ Check your hood. 1. Disconnect power. 6. Select a flat surface for the vent system. Centerline B. Centerline Complete Preparation 1. See "Venting Requirements".... 2. A 4. Fastener locations C. Wall C. Install the vent system before you select your ceiling height and the hood height maximum before installing the hood. Use caulk to the wall. INSTALLATION INSTRUCTIONS Prepare Location ■ It is recommended that surface. Leave a ¹...
...NOTE: Do not reconnect power until installation is proper clearance within the ceiling or wall for exhaust vent. ■ Check your hood. 1. Disconnect power. 6. Select a flat surface for the vent system. Centerline B. Centerline Complete Preparation 1. See "Venting Requirements".... 2. A 4. Fastener locations C. Wall C. Install the vent system before you select your ceiling height and the hood height maximum before installing the hood. Use caulk to the wall. INSTALLATION INSTRUCTIONS Prepare Location ■ It is recommended that surface. Leave a ¹...
Use and Care Guide
Page 8
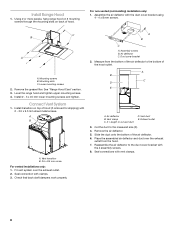
... back of the air deflector. 6. Assemble the air deflector with 2 - 3.5 x 9.5 mm sheet metal screws. Install Range Hood 1. For non-vented (recirculating) installation only: 1. Connect Vent System 1. A B A. Seal connection with clamps. 3. A B X C D E A. X = length to the bottom of hood (if removed for shipping) with the duct cover bracket using 4 - 4 x 8 mm screws. Cut the duct to...
... back of the air deflector. 6. Assemble the air deflector with 2 - 3.5 x 9.5 mm sheet metal screws. Install Range Hood 1. For non-vented (recirculating) installation only: 1. Connect Vent System 1. A B A. Seal connection with clamps. 3. A B X C D E A. X = length to the bottom of hood (if removed for shipping) with the duct cover bracket using 4 - 4 x 8 mm screws. Cut the duct to...

Use and Care Guide
Page 9
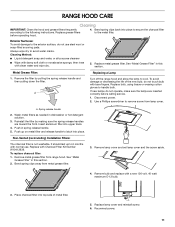
... relief, into terminal box. Failure to do so can result in terminal box using both upper and lower vent covers, push lower cover down onto hood and lift upper cover to hide slots. Install terminal box cover. 10. A B C D Electrical Shock Hazard Electrically ground blower. NOTE: For vented installations, the upper vent...
... relief, into terminal box. Failure to do so can result in terminal box using both upper and lower vent covers, push lower cover down onto hood and lift upper cover to hide slots. Install terminal box cover. 10. A B C D Electrical Shock Hazard Electrically ground blower. NOTE: For vented installations, the upper vent...
Use and Care Guide
Page 10
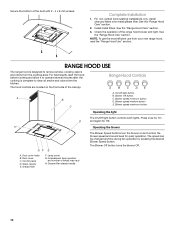
... side of the duct with 2 - 4 x 8 mm screws. NOTE: To get the most efficient use from the cooktop area. For best results, start the hood before cooking and allow it to operate several minutes after the cooking is designed to clear all smoke and odors from the kitchen. Range... Hood Controls A B C D E A. The speed can be changed anytime during fan operation by pressing the desired Blower Speed button. Complete Installation 1. Press once for On D...
... side of the duct with 2 - 4 x 8 mm screws. NOTE: To get the most efficient use from the cooktop area. For best results, start the hood before cooking and allow it to operate several minutes after the cooking is designed to clear all smoke and odors from the kitchen. Range... Hood Controls A B C D E A. The speed can be changed anytime during fan operation by pressing the desired Blower Speed button. Complete Installation 1. Press once for On D...
Use and Care Guide
Page 11
See "Metal Grease Filter" in this section. Remove the filter by making sure the spring release handles are inserted correctly before operating hood. 4. Use a Phillips screwdriver to the exterior surface, do not use . Push up to 6 months with bare fingers. Replace with a new 120 volt, ...bulb and replace with Charcoal Filter Kit Number W10412939. Exterior Surfaces: To avoid damage to remove screw from lamp cover. A Turn off the range hood and allow the lamp to avoid water marks. If new lamps do not touch bulb with normal use steel wool or soap-filled scouring pads...
See "Metal Grease Filter" in this section. Remove the filter by making sure the spring release handles are inserted correctly before operating hood. 4. Use a Phillips screwdriver to the exterior surface, do not use . Push up to 6 months with bare fingers. Replace with a new 120 volt, ...bulb and replace with Charcoal Filter Kit Number W10412939. Exterior Surfaces: To avoid damage to remove screw from lamp cover. A Turn off the range hood and allow the lamp to avoid water marks. If new lamps do not touch bulb with normal use steel wool or soap-filled scouring pads...


