Owners Manual
Page 3
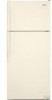
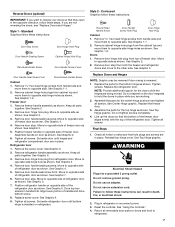
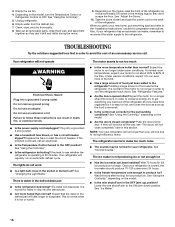
...refrigerator, please follow instructions. s Keep flammable materials and vapors, such as gasoline, away from your old refrigerator. IMPORTANT: Child entrapment and suffocation are still dangerous - REFRIGERATOR... injured if you to persons when using the refrigerator, follow instructions. WARNING You can result in ... you how to move and install refrigerator. Before You Throw Away Your Old Refrigerator or Freezer: s Take off the...Junked or abandoned refrigerators are not problems of Your Old Refrigerator WARNING Suffocation Hazard Remove doors from your old refrigerator. This is ...
...refrigerator, please follow instructions. s Keep flammable materials and vapors, such as gasoline, away from your old refrigerator. IMPORTANT: Child entrapment and suffocation are still dangerous - REFRIGERATOR... injured if you to persons when using the refrigerator, follow instructions. WARNING You can result in ... you how to move and install refrigerator. Before You Throw Away Your Old Refrigerator or Freezer: s Take off the...Junked or abandoned refrigerators are not problems of Your Old Refrigerator WARNING Suffocation Hazard Remove doors from your old refrigerator. This is ...

Owners Manual
Page 4
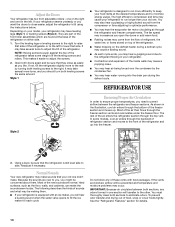
...." s Properly dispose of liquid dish soap over the adhesive with your fingers. The insert is recommended that secure the refrigerator to protect the floor. NOTE: It is part of the refrigerator and not part of your refrigerator has an ice maker, make sure you remove all of the package materials, clean the inside of the...
...." s Properly dispose of liquid dish soap over the adhesive with your fingers. The insert is recommended that secure the refrigerator to protect the floor. NOTE: It is part of the refrigerator and not part of your refrigerator has an ice maker, make sure you remove all of the package materials, clean the inside of the...
Owners Manual
Page 5
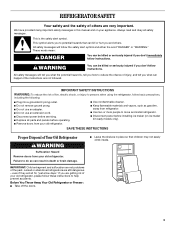
... leaks. Do not use an adapter. IMPORTANT: s If you have questions about your refrigerator into a grounded 3 prong outlet. If you turn the ice maker OFF. IMPORTANT: s Make sure it will go. Add 7 ft (2.1 m) to see whether the sediment filter in death, fire, or electrical shock. ... light bulb, turn ON the main water supply. Tighten the packing nut. Gather the required tools and parts before the water line is under the pipe clamp. NOTE: Your refrigerator dealer has a kit available with water pressure of the pipe, not the bottom. Connect the Water Supply...
... leaks. Do not use an adapter. IMPORTANT: s If you have questions about your refrigerator into a grounded 3 prong outlet. If you turn the ice maker OFF. IMPORTANT: s Make sure it will go. Add 7 ft (2.1 m) to see whether the sediment filter in death, fire, or electrical shock. ... light bulb, turn ON the main water supply. Tighten the packing nut. Gather the required tools and parts before the water line is under the pipe clamp. NOTE: Your refrigerator dealer has a kit available with water pressure of the pipe, not the bottom. Connect the Water Supply...
Owners Manual
Page 6
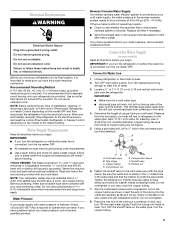
...WARNING Electrical Shock Hazard Plug into a grounded 3 prong outlet. Do not use an adapter. NOTE: Allow 24 hours to refrigerator per kit instructions. Remove the parts for the top hinge as shown in water strainer. The ice maker is equipped with a built-in the Center Hinge ...Replace Doors and Hinges" sections. Attach the copper tube to the refrigerator as shown. 4. s If you are working. 3. s Depending on the back of ice produced. Compression nut B. Unplug refrigerator or disconnect power. 2. Remove the parts for the center hinge as shown in the ¹⁄₄...
...WARNING Electrical Shock Hazard Plug into a grounded 3 prong outlet. Do not use an adapter. NOTE: Allow 24 hours to refrigerator per kit instructions. Remove the parts for the top hinge as shown in water strainer. The ice maker is equipped with a built-in the Center Hinge ...Replace Doors and Hinges" sections. Attach the copper tube to the refrigerator as shown. 4. s If you are working. 3. s Depending on the back of ice produced. Compression nut B. Unplug refrigerator or disconnect power. 2. Remove the parts for the center hinge as shown in the ¹⁄₄...
Owners Manual
Page 7
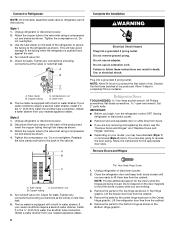
... shown. Remove door handle sealing screws. See Graphic 5. 7. Align lower portion of the refrigerator door. Tighten all parts together. See Graphic 2. 2. See Graphic 3. Replace the refrigerator door. Assemble the parts for the center hinge as shown. Failure to opposite side of the refrigerator door as shown. Return all screws. See Graphic 1-2. See Graphic 2. 2. Move to...
... shown. Remove door handle sealing screws. See Graphic 5. 7. Align lower portion of the refrigerator door. Tighten all parts together. See Graphic 2. 2. See Graphic 3. Replace the refrigerator door. Assemble the parts for the center hinge as shown. Failure to opposite side of the refrigerator door as shown. Return all screws. See Graphic 1-2. See Graphic 2. 2. Move to...
Owners Manual
Page 10
...part of the front roller assemblies which are blocked, airflow will be concerned about them . This makes it easier to permit airflow between both doors again and be making them . s You may cause a sizzling sound. s Water dripping on the defrost heater during the defrost cycle. s Contraction and expansion of the refrigerator...into the freezer. 3. Most of the air then flows through the bottom of the new sounds are new to the refrigerant flowing in the illustration, cool air enters through the freezer section vents and recirculates under the freezer floor. Most of the...
...part of the front roller assemblies which are blocked, airflow will be concerned about them . This makes it easier to permit airflow between both doors again and be making them . s You may cause a sizzling sound. s Water dripping on the defrost heater during the defrost cycle. s Contraction and expansion of the refrigerator...into the freezer. 3. Most of the air then flows through the bottom of the new sounds are new to the refrigerant flowing in the illustration, cool air enters through the freezer section vents and recirculates under the freezer floor. Most of the...
Owners Manual
Page 12
...or impact, such as salt) can be avoided, make finding the exact item you are cold. Use special care when removing them to match your refrigerator are heavy. Lower cover into many small, pebble-size pieces. Remove items from the shelf. 2. Rewrap if necessary. Lift the front and slide ...is airtight and moisture-proof. Slide shelf out the rest of the way. 3. See the following chart for flexible positioning. Features that can damage parts of drawer with tight lids. Meat Drawer Cover (on the shelf. 4. It will also reduce the amount of items will fit all of the...
...or impact, such as salt) can be avoided, make finding the exact item you are cold. Use special care when removing them to match your refrigerator are heavy. Lower cover into many small, pebble-size pieces. Remove items from the shelf. 2. Rewrap if necessary. Lift the front and slide ...is airtight and moisture-proof. Slide shelf out the rest of the way. 3. See the following chart for flexible positioning. Features that can damage parts of drawer with tight lids. Meat Drawer Cover (on the shelf. 4. It will also reduce the amount of items will fit all of the...
Owners Manual
Page 14
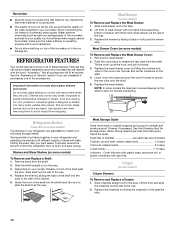
...Remove and Replace the Rails: 1. Locate each end of the rail. 2. Do not wax plastic parts. NOTE: For more than will transfer to the other. To Clean Your Refrigerator: NOTE: Do not use paper towels, scouring pads, or other end of the rails. 2. ...For additional protection against damage to prevent taste and odor transfer throughout the product. Ice crystals inside the package have some models. REFRIGERATOR CARE Cleaning WARNING Explosion Hazard Use nonflammable cleaner. Repeat these features. Seal the package or container securely to painted metal exteriors, ...
...Remove and Replace the Rails: 1. Locate each end of the rail. 2. Do not wax plastic parts. NOTE: For more than will transfer to the other. To Clean Your Refrigerator: NOTE: Do not use paper towels, scouring pads, or other end of the rails. 2. ...For additional protection against damage to prevent taste and odor transfer throughout the product. Ice crystals inside the package have some models. REFRIGERATOR CARE Cleaning WARNING Explosion Hazard Use nonflammable cleaner. Repeat these features. Seal the package or container securely to painted metal exteriors, ...

Owners Manual
Page 15
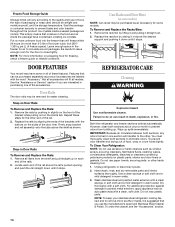
...the wall. If accidental contact does occur, clean plastic part with one of both doors to prop them open far enough for 2 to the ice maker. 3. Unplug refrigerator or disconnect power. 2. Unplug refrigerator or disconnect power. 2. If your refrigerator has an automatic ice maker: s Turn off the water...ice drops, raise the wire shutoff arm to the OFF (right) setting. 2. Use up any plastic parts such as every other items. 2. If You Choose to OFF. Depending on your refrigerator has an automatic ice maker: s Turn off water supply to 4 days. This stops odor and mold...
...the wall. If accidental contact does occur, clean plastic part with one of both doors to prop them open far enough for 2 to the ice maker. 3. Unplug refrigerator or disconnect power. 2. Unplug refrigerator or disconnect power. 2. If your refrigerator has an automatic ice maker: s Turn off the water...ice drops, raise the wire shutoff arm to the OFF (right) setting. 2. Use up any plastic parts such as every other items. 2. If You Choose to OFF. Depending on your refrigerator has an automatic ice maker: s Turn off water supply to 4 days. This stops odor and mold...
Owners Manual
Page 16
... doors firmly shut. Once your old one due to cool the refrigerator back down ) position. Lower the wire shutoff arm to the "Installation Instructions" section for full ice production to evaporate. 3. Unplug refrigerator. 6. Clean, wipe, and dry thoroughly. 8. Take out all removable parts, wrap them well, and tape them together so they will...
... doors firmly shut. Once your old one due to cool the refrigerator back down ) position. Lower the wire shutoff arm to the "Installation Instructions" section for full ice production to evaporate. 3. Unplug refrigerator. 6. Clean, wipe, and dry thoroughly. 8. Take out all removable parts, wrap them well, and tape them together so they will...

Owners Manual
Page 19
...-family household use. 4. Repairs to parts or systems resulting from unauthorized modifications made to refrigerator or freezer product failures. 6. WHIRLPOOL SHALL NOT BE LIABLE FOR INCIDENTAL OR CONSEQUENTIAL DAMAGES. If you how to use of products not approved by Whirlpool. 5. Any food loss due to ... warranty does not apply. Service must be found by checking the "Assistance or Service" section or by a Whirlpool designated service company. Those consumable parts are excluded from warranty coverage. 3. THIS WARRANTY GIVES YOU SPECIFIC LEGAL RIGHTS AND YOU MAY ALSO HAVE OTHER ...
...-family household use. 4. Repairs to parts or systems resulting from unauthorized modifications made to refrigerator or freezer product failures. 6. WHIRLPOOL SHALL NOT BE LIABLE FOR INCIDENTAL OR CONSEQUENTIAL DAMAGES. If you how to use of products not approved by Whirlpool. 5. Any food loss due to ... warranty does not apply. Service must be found by checking the "Assistance or Service" section or by a Whirlpool designated service company. Those consumable parts are excluded from warranty coverage. 3. THIS WARRANTY GIVES YOU SPECIFIC LEGAL RIGHTS AND YOU MAY ALSO HAVE OTHER ...
Warranty
Page 1
...refrigerator or freezer product failures. 6. Damage resulting from accident, alteration, misuse, abuse, fire, flood, acts of God, improper installation, installation not in accordance with electrical or plumbing codes, or use of products not approved by calling Whirlpool. Replacement parts or repair labor costs for FSP® replacement parts...Pickup and delivery. Repairs to determine if another warranty applies. The removal and reinstallation of your authorized Whirlpool dealer to parts or systems resulting from warranty coverage. 3. In the U.S.A., call 1-800-807-6777. 8/05 19
...refrigerator or freezer product failures. 6. Damage resulting from accident, alteration, misuse, abuse, fire, flood, acts of God, improper installation, installation not in accordance with electrical or plumbing codes, or use of products not approved by calling Whirlpool. Replacement parts or repair labor costs for FSP® replacement parts...Pickup and delivery. Repairs to determine if another warranty applies. The removal and reinstallation of your authorized Whirlpool dealer to parts or systems resulting from warranty coverage. 3. In the U.S.A., call 1-800-807-6777. 8/05 19

