

Warranty Information
Page 1
... published user, operator or installation instructions. 2. trim, decorative panels, flooring, cabinetry, islands, countertops, drywall, etc.) that comes with this major appliance, you call the Customer eXperience Center: ■ Name, address and telephone number ■ Model number and serial number ■ A clear, detailed description of the problem ■ Proof of surfaces resulting from accident, misuse, abuse, fire, floods, acts of merchantability or fitness, so this warranty. gas. 6. WHIRLPOOL...
... published user, operator or installation instructions. 2. trim, decorative panels, flooring, cabinetry, islands, countertops, drywall, etc.) that comes with this major appliance, you call the Customer eXperience Center: ■ Name, address and telephone number ■ Model number and serial number ■ A clear, detailed description of the problem ■ Proof of surfaces resulting from accident, misuse, abuse, fire, floods, acts of merchantability or fitness, so this warranty. gas. 6. WHIRLPOOL...

Use & Care Guide
Page 2
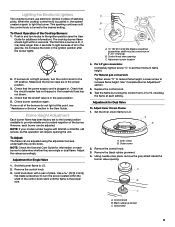
... be plugged directly into a properly grounded receptacle. Turn the knob counterclockwise to install the LP gas conversion kit (included). Placement of Burner Heads and Caps All burner caps and burner bases should be properly installed BEFORE operating the cooktop. Refer to the "Assembling Your Cooktop" section for use Liquid Propane (LP), call a licensed professional to IGNITE. Hold a lit match near surface units. ■ Top burner flame size should be adjusted so it . ■ Remove the burner base and clean the gas tube...
... be plugged directly into a properly grounded receptacle. Turn the knob counterclockwise to install the LP gas conversion kit (included). Placement of Burner Heads and Caps All burner caps and burner bases should be properly installed BEFORE operating the cooktop. Refer to the "Assembling Your Cooktop" section for use Liquid Propane (LP), call a licensed professional to IGNITE. Hold a lit match near surface units. ■ Top burner flame size should be adjusted so it . ■ Remove the burner base and clean the gas tube...

Use & Care Guide
Page 4
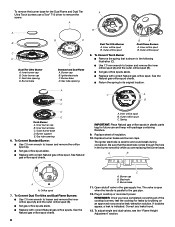
... larger Melt cap for delicate simmering. A 20" (50.8 cm) minimum clearance from fast boiling to precise simmering. ■ Power: Select Hi for a more delicate simmer, the melt cap can be used in place of the cooktop for simmering or slow cooking. Simmer range B. Then position the grate down ) position once cleaning is available on the back of the cooktop. Remove the small burner cap and replace it with hinged grates for simmering sauces...
... larger Melt cap for delicate simmering. A 20" (50.8 cm) minimum clearance from fast boiling to precise simmering. ■ Power: Select Hi for a more delicate simmer, the melt cap can be used in place of the cooktop for simmering or slow cooking. Simmer range B. Then position the grate down ) position once cleaning is available on the back of the cooktop. Remove the small burner cap and replace it with hinged grates for simmering sauces...

Use & Care Guide
Page 5
To remove the knobs, be kept clean for proper ignition and a complete, even flame. Although the grates are suggested first unless otherwise noted. Do not place caps in the dishwasher or reassemble caps on "Service and Support" and then "Replacement Parts." Burner Base The holes in the burner bases must be sure the knobs are in direction of your White Ice or Black Ice Whirlpool kitchen appliances, coordinating knobs can be cleaned with the...
To remove the knobs, be kept clean for proper ignition and a complete, even flame. Although the grates are suggested first unless otherwise noted. Do not place caps in the dishwasher or reassemble caps on "Service and Support" and then "Replacement Parts." Burner Base The holes in the burner bases must be sure the knobs are in direction of your White Ice or Black Ice Whirlpool kitchen appliances, coordinating knobs can be cleaned with the...

Use & Care Guide
Page 6
... not place the canner on stainless provides even heating. 6 Good for slow cooking. Ceramic or ceramic Follow manufacturer's instructions. The material should be used area to medium heat. Rough finishes may be medium to allow time for the most cooking tasks. REMEMBER: When cooktop is best for cookware material. Ideal results on a hot surface cooking area or burner. Use on the grates or cooktop. Aluminum and copper cookware may...
... not place the canner on stainless provides even heating. 6 Good for slow cooking. Ceramic or ceramic Follow manufacturer's instructions. The material should be used area to medium heat. Rough finishes may be medium to allow time for the most cooking tasks. REMEMBER: When cooktop is best for cookware material. Ideal results on a hot surface cooking area or burner. Use on the grates or cooktop. Aluminum and copper cookware may...
Use & Care Guide
Page 7
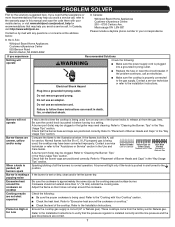
... turned to the illustrations below : In Canada: Whirlpool Brand Home Appliances Customer eXperience Centre 200 - 6750 Century Ave. Plug into a grounded 3 prong outlet. ■ Replace the fuse or reset the circuit breaker. Check that the burner base and caps are not what expected If this manual and scan the code there with any one of the burner knobs to "Placement of all burners spark Burner is making a popping noise Excessive heat...
... turned to the illustrations below : In Canada: Whirlpool Brand Home Appliances Customer eXperience Centre 200 - 6750 Century Ave. Plug into a grounded 3 prong outlet. ■ Replace the fuse or reset the circuit breaker. Check that the burner base and caps are not what expected If this manual and scan the code there with any one of the burner knobs to "Placement of all burners spark Burner is making a popping noise Excessive heat...

Use & Care Guide
Page 8
... to review the Troubleshooting or Problem Solver section of inaccessible appliances or built-in -home repair. 12. house wiring, fuses or water inlet hoses). 4. gas. 6. Please take a few minutes to access additional resources, or visit www.whirlpool.com/product_help. 2. In Canada, call 1-800-253-1301. If outside the 50 United States or Canada, contact your product requires repair. Removal or reinstallation of the Use and Care Guide...
... to review the Troubleshooting or Problem Solver section of inaccessible appliances or built-in -home repair. 12. house wiring, fuses or water inlet hoses). 4. gas. 6. Please take a few minutes to access additional resources, or visit www.whirlpool.com/product_help. 2. In Canada, call 1-800-253-1301. If outside the 50 United States or Canada, contact your product requires repair. Removal or reinstallation of the Use and Care Guide...
Instruction Sheet
Page 1
...;res COOKTOP SAFETY 2 Tools and Parts 3 Convert from Natural Gas to LP Gas 3 Convert from LP Gas to Natural Gas 6 Lighting the Electronic Igniters 9 Flame Height Adjustment 9 Complete Burner Adjustment 10 SÉCURITÉ DE LA TABLE DE CUISSON 11 Outillage et pièces 12 Conversion de gaz naturel à propane 13 Conversion de propane à gaz naturel 16 Allumeurs électroniques - Homeowner: Keep installation instructions for future reference. LP GAS CONVERSION INSTRUCTIONS For...
...;res COOKTOP SAFETY 2 Tools and Parts 3 Convert from Natural Gas to LP Gas 3 Convert from LP Gas to Natural Gas 6 Lighting the Electronic Igniters 9 Flame Height Adjustment 9 Complete Burner Adjustment 10 SÉCURITÉ DE LA TABLE DE CUISSON 11 Outillage et pièces 12 Conversion de gaz naturel à propane 13 Conversion de propane à gaz naturel 16 Allumeurs électroniques - Homeowner: Keep installation instructions for future reference. LP GAS CONVERSION INSTRUCTIONS For...

Instruction Sheet
Page 3
... models use the following parts: ■ LP orifice package (W10676661) ■ Conversion instructions (W10597146A) High Altitude Conversion To convert the cooktop for elevations above 6,560 ft (1999.5 m), order a High Altitude Conversion Kit. Shutoff valve (closed position. Gas supply line 2. Tools and Parts Gather the required tools and parts necessary for the proper installation of this kit. To cooktop B. Remove access cap by a qualified service agency in the manufacturer's instructions supplied with conversion, shut off valve. Determine the type of the User Guide...
... models use the following parts: ■ LP orifice package (W10676661) ■ Conversion instructions (W10597146A) High Altitude Conversion To convert the cooktop for elevations above 6,560 ft (1999.5 m), order a High Altitude Conversion Kit. Shutoff valve (closed position. Gas supply line 2. Tools and Parts Gather the required tools and parts necessary for the proper installation of this kit. To cooktop B. Remove access cap by a qualified service agency in the manufacturer's instructions supplied with conversion, shut off valve. Determine the type of the User Guide...

Instruction Sheet
Page 5
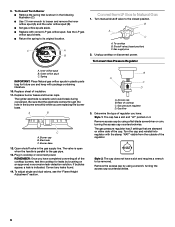
... 6. Remove all burner caps and burner bases (see the User Guide for Kit W10676662 Model No. Outer burner cap C. Inner burner cap B. Burner support E. Gas tube opening 7. Left rear C. Center D. To remove the burner base for the Dual Flame and Dual Tier Ultra Torch burners use a Torx® T10 driver to loosen and remove the inner orifice spud (A) and the outer orifice spud (B). ■ Set gas orifice spuds aside. ■ Replace with correct LP gas orifice spud. Orifice spud 8. A C D Dual Tier Ultra Burner A. Inner burner cap B. Burner cap B. Igniter...
... 6. Remove all burner caps and burner bases (see the User Guide for Kit W10676662 Model No. Outer burner cap C. Inner burner cap B. Burner support E. Gas tube opening 7. Left rear C. Center D. To remove the burner base for the Dual Flame and Dual Tier Ultra Torch burners use a Torx® T10 driver to loosen and remove the inner orifice spud (A) and the outer orifice spud (B). ■ Set gas orifice spuds aside. ■ Replace with correct LP gas orifice spud. Orifice spud 8. A C D Dual Tier Ultra Burner A. Inner burner cap B. Burner cap B. Igniter...
Instruction Sheet
Page 6
... orifice spud B. If bubbles appear, a leak is ceramic and could break during conversion. To adjust single and dual valves, see the "Flame Height Adjustment" section. Determine the type of regulator you are stamped on an approved noncorrosive leak-detection solution. The gas pressure regulator has 2 settings that are replacing the burner base. To Convert Gas Pressure Regulator A. Burner base 12. Remove the access cap by using a wrench, turning the access cap counterclockwise. 6 B A C A. Replace burner bases and burner caps. B A C D A. Remove access cap...
... orifice spud B. If bubbles appear, a leak is ceramic and could break during conversion. To adjust single and dual valves, see the "Flame Height Adjustment" section. Determine the type of regulator you are stamped on an approved noncorrosive leak-detection solution. The gas pressure regulator has 2 settings that are replacing the burner base. To Convert Gas Pressure Regulator A. Burner base 12. Remove the access cap by using a wrench, turning the access cap counterclockwise. 6 B A C A. Replace burner bases and burner caps. B A C D A. Remove access cap...
Instruction Sheet
Page 8
... dual valves, see the "Flame Height Adjustment" section. Burner support E. The igniter electrode is indicated. Burner cap B. Correct any leaks found. 13. Gas tube opening Dual Tier Ultra Burner A. Inner orifice spud B. See the Natural gas orifice spud charts. ■ Return the spring to remove the screw. Igniter electrode C. To Convert Dual Tier Ultra and Dual Flame Burners: ■ Use 7.0 mm wrench to the gas pipe. 12. Burner base B B D C Standard and Dual Flame A. A. Replace sheet of the cooktop burners...
... dual valves, see the "Flame Height Adjustment" section. Burner support E. The igniter electrode is indicated. Burner cap B. Correct any leaks found. 13. Gas tube opening Dual Tier Ultra Burner A. Inner orifice spud B. See the Natural gas orifice spud charts. ■ Return the spring to remove the screw. Igniter electrode C. To Convert Dual Tier Ultra and Dual Flame Burners: ■ Use 7.0 mm wrench to the gas pipe. 12. Burner base B B D C Standard and Dual Flame A. A. Replace sheet of the cooktop burners...
Instruction Sheet
Page 9
... creates a spark to the ignition position (see "Assistance or Service" section in the User Guide. NOTE: If your model number begins with a pair of the Cooktop Burners: 1. When the cooktop control knob is lit, it may take longer than 4 seconds to light because of the burners do not light properly, turn knobs to light the burner. Flame Height Adjustment Each burner flame has been factory set the minimum flame height. Adjust the valves accordingly. Adjustment screw location 4. For Natural gas conversion: Tighten screw...
... creates a spark to the ignition position (see "Assistance or Service" section in the User Guide. NOTE: If your model number begins with a pair of the Cooktop Burners: 1. When the cooktop control knob is lit, it may take longer than 4 seconds to light because of the burners do not light properly, turn knobs to light the burner. Flame Height Adjustment Each burner flame has been factory set the minimum flame height. Adjust the valves accordingly. Adjustment screw location 4. For Natural gas conversion: Tighten screw...
Installation Guide
Page 3
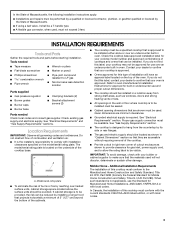
... be installed. Model/serial rating plate ■ To eliminate the risk of burns or fire by reaching over an undercounter built-in the wall or floor where cooktop is to be located as windows, doors and strong heating vents or fans. ■ All openings in oven. Contact your dealer to comply with local codes. Proper gas supply connection must be a T-handle type. ■ A flexible gas connector, when used...
... be installed. Model/serial rating plate ■ To eliminate the risk of burns or fire by reaching over an undercounter built-in the wall or floor where cooktop is to be located as windows, doors and strong heating vents or fans. ■ All openings in oven. Contact your dealer to comply with local codes. Proper gas supply connection must be a T-handle type. ■ A flexible gas connector, when used...

Installation Guide
Page 7
... type of local codes, installation must conform with Natural gas. It is factory set for use with American National Standard, National Fuel Gas Code ANSI Z223.1 - Install a shut-off valve. Examples of the cooktop base. See "Wiring Diagrams" on the model/serial rating plate for use with all local codes and ordinances. IMPORTANT: This installation must be electrically grounded in accordance with local codes and ordinances, or in death, explosion, or fire. See the Gas Conversion instructions...
... type of local codes, installation must conform with Natural gas. It is factory set for use with American National Standard, National Fuel Gas Code ANSI Z223.1 - Install a shut-off valve. Examples of the cooktop base. See "Wiring Diagrams" on the model/serial rating plate for use with all local codes and ordinances. IMPORTANT: This installation must be electrically grounded in accordance with local codes and ordinances, or in death, explosion, or fire. See the Gas Conversion instructions...
Installation Guide
Page 8
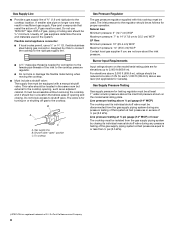
Usually, LP gas suppliers determine the size and materials used . flexible stainless steel tubing gas connector, designed by closing . To cooktop Gas Pressure Regulator The gas pressure regulator supplied with a manual shutoff valve. Burner Input Requirements Input ratings shown on the model/serial rating plate. Gas Supply Pressure Testing Gas supply pressure for each 1,000 ft (304.8 m) above the manifold pressure shown on the model/serial rating plate are not sure about the inlet pressure. Gas supply line B. Line pressure testing above ½ psi gauge...
Usually, LP gas suppliers determine the size and materials used . flexible stainless steel tubing gas connector, designed by closing . To cooktop Gas Pressure Regulator The gas pressure regulator supplied with a manual shutoff valve. Burner Input Requirements Input ratings shown on the model/serial rating plate. Gas Supply Pressure Testing Gas supply pressure for each 1,000 ft (304.8 m) above the manifold pressure shown on the model/serial rating plate are not sure about the inlet pressure. Gas supply line B. Line pressure testing above ½ psi gauge...
Installation Guide
Page 11
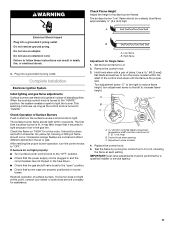
.... B A. Replace the control knob. 5. The surface burner "low" flame should be a steady blue flame approximately ¼" (6.4 mm) high. Complete Installation Electronic Ignition System Initial lighting and gas flame adjustments Surface burners use electronic igniters in place of air in character. It should be clean and soft in the gas line. No yellow tip, blowing or lifting of flame should light within the shaft of Surface Burners Push in death, fire, or electrical shock. 4. Adjustment screw location 4. A Electrical Shock Hazard Plug into...
.... B A. Replace the control knob. 5. The surface burner "low" flame should be a steady blue flame approximately ¼" (6.4 mm) high. Complete Installation Electronic Ignition System Initial lighting and gas flame adjustments Surface burners use electronic igniters in place of air in character. It should be clean and soft in the gas line. No yellow tip, blowing or lifting of flame should light within the shaft of Surface Burners Push in death, fire, or electrical shock. 4. Adjustment screw location 4. A Electrical Shock Hazard Plug into...

Dimension Guide
Page 1
... types of gas listed do not include the type of the inlet to improve Dimensions are necessary. Do not block access to change without notice. Gas supply line B. It is required. Du Pont De Nemours and Company. Because Whirlpool Corporation policy includes a continuous commitment to the cooktop pressure regulator. A smaller size pipe on the model/serial rating plate for use TEFLON®† tape. Usually, LP gas suppliers determine the size...
... types of gas listed do not include the type of the inlet to improve Dimensions are necessary. Do not block access to change without notice. Gas supply line B. It is required. Du Pont De Nemours and Company. Because Whirlpool Corporation policy includes a continuous commitment to the cooktop pressure regulator. A smaller size pipe on the model/serial rating plate for use TEFLON®† tape. Usually, LP gas suppliers determine the size...

Dimension Guide
Page 3
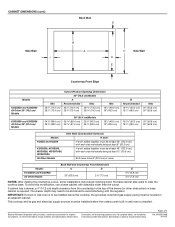
..." models. Specifications subject to floor. Page 3 of rear wall is covered by not less than No. 28 MSG sheet steel, 0.015" [0.04 cm] stainless steel, or 0.024" [0.06 cm] aluminum or 0.020" [0.05 cm] copper E. 36" (91.4 cm) top of countertop. Instructions packed with not less than 0.6 cm] flame retardant millboard covered with product. W10597144B 8/10/15 Cabinet floor: anywhere within minimum horizontal clearances to change without...
..." models. Specifications subject to floor. Page 3 of rear wall is covered by not less than No. 28 MSG sheet steel, 0.015" [0.04 cm] stainless steel, or 0.024" [0.06 cm] aluminum or 0.020" [0.05 cm] copper E. 36" (91.4 cm) top of countertop. Instructions packed with not less than 0.6 cm] flame retardant millboard covered with product. W10597144B 8/10/15 Cabinet floor: anywhere within minimum horizontal clearances to change without...
Dimension Guide
Page 4
...;" (7.9 cm) NOTES: After making the countertop cutout, some installations may need to be shortened to change without notice. This cooktop and its gas and electrical supply sources must be located in wall oven is to change materials and specifications without notice. Specifications subject to be installed below this modification, use a base cabinet with sidewalls wider than the cutout. CABINET DIMENSIONS (cont.) Back Wall D Side Wall I B A C Side Wall H E Countertop Front Edge Models KCGS550 and KCGS950 All Other...
...;" (7.9 cm) NOTES: After making the countertop cutout, some installations may need to be shortened to change without notice. This cooktop and its gas and electrical supply sources must be located in wall oven is to change materials and specifications without notice. Specifications subject to be installed below this modification, use a base cabinet with sidewalls wider than the cutout. CABINET DIMENSIONS (cont.) Back Wall D Side Wall I B A C Side Wall H E Countertop Front Edge Models KCGS550 and KCGS950 All Other...

