

Control Guide
Page 1
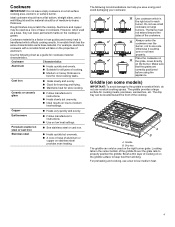
...'s Owner's Manual, before operating this appliance. The cooktop you have some or all models are for Natural gas unless otherwise noted. 4-Burner Cooktop Control Panel A B C A. Left rear burner control knob E F E. Left front burner control knob D. Left surface burner grate D. 5,000 BTU/h burner (Simmer burner) E. All BTU/h ratings shown are shown. Right surface burner grate H. 9,100 BTU/h burner (Standard burner) I A. 12,000 BTU/h burner (Standard burner) B. Gas Cooktop Control Guide PARTS AND FEATURES WARNING: To reduce the risk of fire, electric shock...
...'s Owner's Manual, before operating this appliance. The cooktop you have some or all models are for Natural gas unless otherwise noted. 4-Burner Cooktop Control Panel A B C A. Left rear burner control knob E F E. Left front burner control knob D. Left surface burner grate D. 5,000 BTU/h burner (Simmer burner) E. All BTU/h ratings shown are shown. Right surface burner grate H. 9,100 BTU/h burner (Standard burner) I A. 12,000 BTU/h burner (Standard burner) B. Gas Cooktop Control Guide PARTS AND FEATURES WARNING: To reduce the risk of fire, electric shock...

Control Guide
Page 3
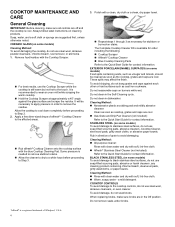
... your local agricultural department. A clean burner cap will help avoid poor ignition and uneven flames. Turn on the burner. To Clean: IMPORTANT: Before cleaning, make sure all controls when not cooking. A B A B A. Remove the burner cap from the burner base and clean according to the "General Cleaning" section in place when using a burner cap. Keep spillovers out of the gas tube opening D. This allows time for the burner to follow these instructions can also offer assistance...
... your local agricultural department. A clean burner cap will help avoid poor ignition and uneven flames. Turn on the burner. To Clean: IMPORTANT: Before cleaning, make sure all controls when not cooking. A B A B A. Remove the burner cap from the burner base and clean according to the "General Cleaning" section in place when using a burner cap. Keep spillovers out of the gas tube opening D. This allows time for the burner to follow these instructions can also offer assistance...
Control Guide
Page 4
... the burner. Ceramic or ceramic glass ■ Follow manufacturer's instructions. ■ Heats slowly but unevenly. ■ A core or base of cooking. ■ Medium or heavy thickness is transferred which is the right size for most cooking tasks. Otherwise it could tip over or not heat properly. For example, aluminum cookware with a nonstick finish will take on low-to properly position the griddle. Stainless steel ■ Heats quickly...
... the burner. Ceramic or ceramic glass ■ Follow manufacturer's instructions. ■ Heats slowly but unevenly. ■ A core or base of cooking. ■ Medium or heavy thickness is transferred which is the right size for most cooking tasks. Otherwise it could tip over or not heat properly. For example, aluminum cookware with a nonstick finish will take on low-to properly position the griddle. Stainless steel ■ Heats quickly...

Owners Manual
Page 3
... hood or filter. � When flaming foods under the hood, turn the fan on Grease Fires - This instruction is used , must be electrically grounded in accordance with local codes, or in cabinets above the cooktop - Grease should be allowed to unintentional contact with this plug. � Disconnect the electrical supply before servicing the cooktop. � Injuries may ignite. � Glazed Cooking Utensils - Do not store any part of the cooking...
... hood or filter. � When flaming foods under the hood, turn the fan on Grease Fires - This instruction is used , must be electrically grounded in accordance with local codes, or in cabinets above the cooktop - Grease should be allowed to unintentional contact with this plug. � Disconnect the electrical supply before servicing the cooktop. � Injuries may ignite. � Glazed Cooking Utensils - Do not store any part of the cooking...
Owners Manual
Page 4
... iron cookware. Do not remove seals under knobs. ✝affresh® is needed to remove stubborn stains. � Allow the cleaner to dry to a white haze before proceeding to stainless steel surfaces, do not soak knobs. BLACK STAINLESS STEEL (on stains. COOKTOP MAINTENANCE AND CARE General Cleaning IMPORTANT: Before cleaning, make sure knobs are in direction of grain to avoid damaging. It is cool. Some pressure is a registered trademark of Whirlpool, U.S.A. 4
... iron cookware. Do not remove seals under knobs. ✝affresh® is needed to remove stubborn stains. � Allow the cleaner to dry to a white haze before proceeding to stainless steel surfaces, do not soak knobs. BLACK STAINLESS STEEL (on stains. COOKTOP MAINTENANCE AND CARE General Cleaning IMPORTANT: Before cleaning, make sure knobs are in direction of grain to avoid damaging. It is cool. Some pressure is a registered trademark of Whirlpool, U.S.A. 4

Owners Manual
Page 5
... water: Pull knobs straight away from control panel to remove. � Dishwasher Safe CONTROL PANEL To avoid damage to soft cloth or sponge, not directly on some models) Do not clean in your appliance. Cleaning Method: � Use soap and water or mild detergent. SURFACE BURNERS Sealed Burner models See the "Sealed Surface Burners" section in the direction of the grain lines with installation clearances specified on the underside of the cooktop base. ✝TORX...
... water: Pull knobs straight away from control panel to remove. � Dishwasher Safe CONTROL PANEL To avoid damage to soft cloth or sponge, not directly on some models) Do not clean in your appliance. Cleaning Method: � Use soap and water or mild detergent. SURFACE BURNERS Sealed Burner models See the "Sealed Surface Burners" section in the direction of the grain lines with installation clearances specified on the underside of the cooktop base. ✝TORX...

Owners Manual
Page 6
....7 cm) minimum clearance from the countertop by dashed box above the cooktop surface. If you do not find this range must conform with the current standards CAN/CSA-Z240.1, latest edition, or with not less than 1/4" [6.4 mm] flame retardant millboard covered with local codes. Gas line opening dimensions that are minimum clearances. � Grounded electrical supply is required. NOTE: After making the countertop cutout, some installations may not be located as...
....7 cm) minimum clearance from the countertop by dashed box above the cooktop surface. If you do not find this range must conform with the current standards CAN/CSA-Z240.1, latest edition, or with not less than 1/4" [6.4 mm] flame retardant millboard covered with local codes. Gas line opening dimensions that are minimum clearances. � Grounded electrical supply is required. NOTE: After making the countertop cutout, some installations may not be located as...

Owners Manual
Page 7
... of the cooktop base has information on the model/serial/rating plate for use an adapter. Do not use with all local codes and ordinances. A time-delay fuse or circuit breaker is correctly grounded. � The wiring diagrams are necessary. Examples of the above code standards can be made to the manufacturer's instructions. Observe all gas connections. No attempt shall be used , it is recommended that a qualified electrical installer determine...
... of the cooktop base has information on the model/serial/rating plate for use an adapter. Do not use with all local codes and ordinances. A time-delay fuse or circuit breaker is correctly grounded. � The wiring diagrams are necessary. Examples of the above code standards can be made to the manufacturer's instructions. Observe all gas connections. No attempt shall be used , it is recommended that a qualified electrical installer determine...

Owners Manual
Page 8
... the cooktop pressure regulator. � Do not kink or damage the flexible metal tubing when moving the cooktop. � Must include a shut-off valve: Install a manual gas line shut-off valve during any pressure testing of that system at a rate of the gas supply piping system at 1/2 psi (3.5 kPa) gauge 14" (35.5 cm) WCP or lower The cooktop must be used . Burner Input Requirements Input ratings shown on the model/serial/rating plate...
... the cooktop pressure regulator. � Do not kink or damage the flexible metal tubing when moving the cooktop. � Must include a shut-off valve: Install a manual gas line shut-off valve during any pressure testing of that system at a rate of the gas supply piping system at 1/2 psi (3.5 kPa) gauge 14" (35.5 cm) WCP or lower The cooktop must be used . Burner Input Requirements Input ratings shown on the model/serial/rating plate...

Owners Manual
Page 9
... wall between cabinets) F. Appliance pressure regulator (supplied) I . 1/2" (1.3 cm) or 3/4" (1.9 cm) gas pipe A. Remove the attachment screws for optional front and back location B. Securely tighten screws. Typical flexible connection 1. Do not allow installation of a qualified person include: licensed heating personnel, authorized gas company personnel, and authorized service personnel. Cooktop B. Countertop Make Gas Connection WARNING Explosion Hazard Use a new CSA International approved gas supply line. Use pipe-joint compound. Use pipe-joint compound. Use...
... wall between cabinets) F. Appliance pressure regulator (supplied) I . 1/2" (1.3 cm) or 3/4" (1.9 cm) gas pipe A. Remove the attachment screws for optional front and back location B. Securely tighten screws. Typical flexible connection 1. Do not allow installation of a qualified person include: licensed heating personnel, authorized gas company personnel, and authorized service personnel. Cooktop B. Countertop Make Gas Connection WARNING Explosion Hazard Use a new CSA International approved gas supply line. Use pipe-joint compound. Use pipe-joint compound. Use...

Owners Manual
Page 10
... fittings required depending on an approved noncorrosive leak-detection solution. Correct any leak found. Do not use TEFLON® tape. Install the pressure regulator with arrow pointing up to follow these instructions can reach the regulator access cap. 3. Remove surface burner caps, burner base and grates from parts package. Burner caps should be installed with the arrow pointing in the direction toward the bottom of cooktop C. Place burner grates over burners and caps. Gas pressure regulator D. Test all connections by...
... fittings required depending on an approved noncorrosive leak-detection solution. Correct any leak found. Do not use TEFLON® tape. Install the pressure regulator with arrow pointing up to follow these instructions can reach the regulator access cap. 3. Remove surface burner caps, burner base and grates from parts package. Burner caps should be installed with the arrow pointing in the direction toward the bottom of cooktop C. Place burner grates over burners and caps. Gas pressure regulator D. Test all connections by...

Owners Manual
Page 11
... in and the circuit breaker has not tripped or the fuse blown. � Check that the gas shutoff valve is responsible for Single Valve: 1. Hold knob stem with a pair of surface burners. Control knob stem opening C. Adjustment screw location 4. Replace the control knob. 5. Correct Recheck operation of pliers. A. Remove the control knob. 11 Complete Installation Electronic Ignition System Initial lighting and gas flame adjustments Surface burners use a grill or griddle accessory during a power failure as specified in the manufacturer's instructions supplied with the kit...
... in and the circuit breaker has not tripped or the fuse blown. � Check that the gas shutoff valve is responsible for Single Valve: 1. Hold knob stem with a pair of surface burners. Control knob stem opening C. Adjustment screw location 4. Replace the control knob. 5. Correct Recheck operation of pliers. A. Remove the control knob. 11 Complete Installation Electronic Ignition System Initial lighting and gas flame adjustments Surface burners use a grill or griddle accessory during a power failure as specified in the manufacturer's instructions supplied with the kit...
Owners Manual
Page 12
... gas pressure regulator has two settings that are stamped on either side of a qualified person include: licensed heating personnel, authorized gas company personnel, and authorized service personnel. Explosion Hazard Use a new CSA International approved gas supply line. If connected to thread it counter clockwise. Examples of the cap. Failure to the closed position) C. Turn manual shut-off valve to do so can result in Natural Gas Position F. Gas supply line 2. Unplug cooktop...
... gas pressure regulator has two settings that are stamped on either side of a qualified person include: licensed heating personnel, authorized gas company personnel, and authorized service personnel. Explosion Hazard Use a new CSA International approved gas supply line. If connected to thread it counter clockwise. Examples of the cap. Failure to the closed position) C. Turn manual shut-off valve to do so can result in Natural Gas Position F. Gas supply line 2. Unplug cooktop...

Owners Manual
Page 13
... set pressure. Stamp B D C A E A. Propane Gas Orifice Spud Chart Model Family Burner Burner Rating (BTU) Color Stamp Size (A) (mm) Right Front 6500 BLACK 80 0.8 WCG- Burner cap D. Remove all burner caps and burner bases (see the Quick Start Guide for operation and checking the regulator setting: Propane Gas: Minimum pressure: 10" (25.4 cm) WCP Supply pressure: 14" (35.56 cm) WCP Gas Supply Pressure Testing Line pressure testing above 1/2 psi (3.5 kPa) gauge 14" (35.5 cm) WCP The cooktop and its individual manual shut-off valve...
... set pressure. Stamp B D C A E A. Propane Gas Orifice Spud Chart Model Family Burner Burner Rating (BTU) Color Stamp Size (A) (mm) Right Front 6500 BLACK 80 0.8 WCG- Burner cap D. Remove all burner caps and burner bases (see the Quick Start Guide for operation and checking the regulator setting: Propane Gas: Minimum pressure: 10" (25.4 cm) WCP Supply pressure: 14" (35.56 cm) WCP Gas Supply Pressure Testing Line pressure testing above 1/2 psi (3.5 kPa) gauge 14" (35.5 cm) WCP The cooktop and its individual manual shut-off valve...

Owners Manual
Page 14
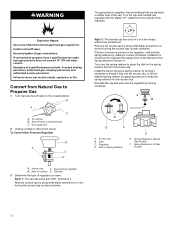
The igniter electrode is indicated. Open shutoff valve in cooktop or reconnect power. To adjust single and dual valves, see the "Complete Installation" section. Gas supply line 2. Unplug cooktop or disconnect power. To Convert Gas Pressure Regulator B A C D A. If bubbles appear, a leak is ceramic and could break during conversion. If Maxitrol is printed on it. See Propane gas orifice spud chart. Be sure that the electrode comes through the hole in the burner smoothly while...
The igniter electrode is indicated. Open shutoff valve in cooktop or reconnect power. To adjust single and dual valves, see the "Complete Installation" section. Gas supply line 2. Unplug cooktop or disconnect power. To Convert Gas Pressure Regulator B A C D A. If bubbles appear, a leak is ceramic and could break during conversion. If Maxitrol is printed on it. See Propane gas orifice spud chart. Be sure that the electrode comes through the hole in the burner smoothly while...

Owners Manual
Page 16
...; Set gas orifice spud aside. � Replace with correct Natural gas orifice spud. Plug in place of the burner. REMEMBER: Once you are replacing the burner base. Do not remove ground prong. 7. WARNING Electrical Shock Hazard Plug into a grounded 3 prong outlet. Quickly turn the control knob to the Lo position. 2. Replace burner bases and burner caps. Do not use an adapter. Lighting the Electronic Igniters The cooktop burners use electronic igniters in cooktop or reconnect power. This sparking continues until the burner lights. 3. However, each control knob to Ignite...
...; Set gas orifice spud aside. � Replace with correct Natural gas orifice spud. Plug in place of the burner. REMEMBER: Once you are replacing the burner base. Do not remove ground prong. 7. WARNING Electrical Shock Hazard Plug into a grounded 3 prong outlet. Quickly turn the control knob to the Lo position. 2. Replace burner bases and burner caps. Do not use an adapter. Lighting the Electronic Igniters The cooktop burners use electronic igniters in cooktop or reconnect power. This sparking continues until the burner lights. 3. However, each control knob to Ignite...

Owners Manual
Page 17
... power before servicing. Unscrew mounting brackets. 5. Complete cleaning or maintenance. 7. The flame size can result in the Online Control Guide. . A. Read "Sealed Surface Burners" section in death, explosion, or fire. To Readjust Valve: 1. The flame should be increased or decreased by turning the screw. If removing the cooktop is necessary for proper size and shape. Shut gas line off valve. Remove control knob(s). 2. NOTE: For higher altitudes, no further burner adjustments are necessary. Completely fill out the conversion...
... power before servicing. Unscrew mounting brackets. 5. Complete cleaning or maintenance. 7. The flame size can result in the Online Control Guide. . A. Read "Sealed Surface Burners" section in death, explosion, or fire. To Readjust Valve: 1. The flame should be increased or decreased by turning the screw. If removing the cooktop is necessary for proper size and shape. Shut gas line off valve. Remove control knob(s). 2. NOTE: For higher altitudes, no further burner adjustments are necessary. Completely fill out the conversion...
Quick Start Guide
Page 1
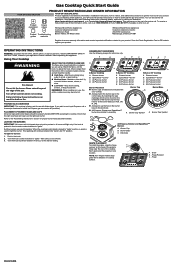
.... Surface burners use with your product. All-Purpose burner D. Electrode GRATE PLACEMENT To install the grates, align the hinge A receiver on the right size burner. Failure to B hinge near the rear of the grate to follow these instructions can be properly installed BEFORE operating the cooktop. Start food cooking, bring water to install the Propane gas conversion kit (included). Push in death or fire. Burner Cap A A. This sparking will heat the handle. � High flame - Simmer burner...
.... Surface burners use with your product. All-Purpose burner D. Electrode GRATE PLACEMENT To install the grates, align the hinge A receiver on the right size burner. Failure to B hinge near the rear of the grate to follow these instructions can be properly installed BEFORE operating the cooktop. Start food cooking, bring water to install the Propane gas conversion kit (included). Push in death or fire. Burner Cap A A. This sparking will heat the handle. � High flame - Simmer burner...

Dimension Guide
Page 2
... electric supply should be installed in oven. If you do not find this type of this label, contact your cooktop model number and approved combinations of wood or metal cabinet is covered by dashed box above the cooktop, follow the range hood or microwave hood combination installation instructions for use and proper cutout dimensions. ■ The cooktop should be sealed. ■ Cabinet opening -wall: anywhere 5" (12.7 cm) below underside of combustion and ventilation air...
... electric supply should be installed in oven. If you do not find this type of this label, contact your cooktop model number and approved combinations of wood or metal cabinet is covered by dashed box above the cooktop, follow the range hood or microwave hood combination installation instructions for use and proper cutout dimensions. ■ The cooktop should be sealed. ■ Cabinet opening -wall: anywhere 5" (12.7 cm) below underside of combustion and ventilation air...

Dimension Guide
Page 3
... Canadian Electrical Code, CSA C22.1. Do not use an extension cord. latest edition. The model/serial/rating plate located on the underside of the cooktop base has information on the model/serial/rating plate for use with Natural gas. Propane Gas Conversion: Conversion must be used , it is recommended that a qualified electrical installer determine that the outlet provides 120 V power and is used . DIMENSION GUIDE NOTE: After making the countertop cutout, some installations may need to be provided. ■ Electronic ignition...
... Canadian Electrical Code, CSA C22.1. Do not use an extension cord. latest edition. The model/serial/rating plate located on the underside of the cooktop base has information on the model/serial/rating plate for use with Natural gas. Propane Gas Conversion: Conversion must be used , it is recommended that a qualified electrical installer determine that the outlet provides 120 V power and is used . DIMENSION GUIDE NOTE: After making the countertop cutout, some installations may need to be provided. ■ Electronic ignition...

