

Installation Guide
Page 2
... OF CONTENTS DISHWASHER SAFETY 3 INSTALLATION REQUIREMENTS 4 Tools and Parts 4 Location Requirements 6 Product and Cabinet Opening Dimensions 7 Drain Requirements 8 Water Supply Requirements 8 Electrical Requirements 8 INSTALLATION INSTRUCTIONS 9 Prepare Cabinet Opening - New Utilities 9 Install Optional Moisture Barrier 9 Electrical Connection 10 Prepare Dishwasher 11 Remove Access Panel 11 Connect Water Line to Fill Valve 12 Connect Fill Hose to Fill Valve 13 Drain Hose Connection 14 Power Cord Connection 14 Install Door Handle 16 Place Dishwasher in Cabinet 16 Choose...
... OF CONTENTS DISHWASHER SAFETY 3 INSTALLATION REQUIREMENTS 4 Tools and Parts 4 Location Requirements 6 Product and Cabinet Opening Dimensions 7 Drain Requirements 8 Water Supply Requirements 8 Electrical Requirements 8 INSTALLATION INSTRUCTIONS 9 Prepare Cabinet Opening - New Utilities 9 Install Optional Moisture Barrier 9 Electrical Connection 10 Prepare Dishwasher 11 Remove Access Panel 11 Connect Water Line to Fill Valve 12 Connect Fill Hose to Fill Valve 13 Drain Hose Connection 14 Power Cord Connection 14 Install Door Handle 16 Place Dishwasher in Cabinet 16 Choose...
Installation Guide
Page 3
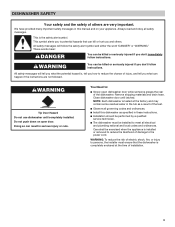
... Need to meet all safety messages. Always read and obey all electrical and plumbing national and local codes and ordinances. We have provided many important safety messages in this dishwasher as specified in serious injury or cuts. Care shall be performed by a qualified service technician. ■■ The dishwasher must ensure that can be installed to : ■■ Slowly open door. Close dishwasher door...
... Need to meet all safety messages. Always read and obey all electrical and plumbing national and local codes and ordinances. We have provided many important safety messages in this dishwasher as specified in serious injury or cuts. Care shall be performed by a qualified service technician. ■■ The dishwasher must ensure that can be installed to : ■■ Slowly open door. Close dishwasher door...

Installation Guide
Page 5
... to properly connect household water line to heat and detergent Call us at our toll-free number or visit our website listed in the User Guide for equivalent. Longer Drain Hose Maximum length 12 ft (3.7 m) (Whirlpool Part Number 3385556) NOTE: Must meet AHAM/IAPMO test standards, fit 1" (25 mm) drain connection, and be made by a licensed electrical installer. Screw-Type Clamps 11/2"-2" (38mm-50 mm) (3 maximum) Side Panel Kit For enclosing the...
... to properly connect household water line to heat and detergent Call us at our toll-free number or visit our website listed in the User Guide for equivalent. Longer Drain Hose Maximum length 12 ft (3.7 m) (Whirlpool Part Number 3385556) NOTE: Must meet AHAM/IAPMO test standards, fit 1" (25 mm) drain connection, and be made by a licensed electrical installer. Screw-Type Clamps 11/2"-2" (38mm-50 mm) (3 maximum) Side Panel Kit For enclosing the...
Installation Guide
Page 6
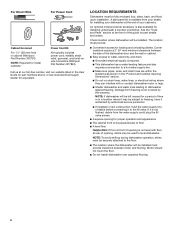
... at rear of opening , shims may be subject to level dishwasher. If it to a hot water supply line. ■■ Make sure pipes, wires, and drain hose are within the shaded area shown in new construction, flush the water supply line of the guide for part details and orders. For Direct Wire For Power Cord Cabinet Grommet For 11/2" (38 mm) hole in the User Guide for part numbers above, or see local electrical supply retailer for...
... at rear of opening , shims may be subject to level dishwasher. If it to a hot water supply line. ■■ Make sure pipes, wires, and drain hose are within the shaded area shown in new construction, flush the water supply line of the guide for part details and orders. For Direct Wire For Power Cord Cabinet Grommet For 11/2" (38 mm) hole in the User Guide for part numbers above, or see local electrical supply retailer for...

Installation Guide
Page 8
... long enough, use with the air gap installation instructions. We Recommend: ■■ A time-delay fuse or circuit breaker ■■ A separate circuit If Connecting Dishwasher with a Power Cord: ■■ Use a UL Listed power cord kit marked for part details) and drain hose (supplied) with grounding wire that may exist in conformance with rubber washer. Use of the water inlet valve. ■■ If installed in house plumbing and 20" (508 mm) minimum above code standards can be needed to connect...
... long enough, use with the air gap installation instructions. We Recommend: ■■ A time-delay fuse or circuit breaker ■■ A separate circuit If Connecting Dishwasher with a Power Cord: ■■ Use a UL Listed power cord kit marked for part details) and drain hose (supplied) with grounding wire that may exist in conformance with rubber washer. Use of the water inlet valve. ■■ If installed in house plumbing and 20" (508 mm) minimum above code standards can be needed to connect...

Installation Guide
Page 9
... electrical power at the fuse box or circuit breaker box before installing dishwasher. 2. Shut off water supply Shut off the water supply to the "Product and Cabinet Opening Dimensions" section for part details. Failure to underside of the countertop along the front edge of the moisture barrier. Wood cabinet Metal cabinet 1. new construction Optional location 11/2" (38 mm) Preferred location 1/2" (12.7 mm) Wood cabinet: Sand the hole until smooth. Drill a 1/2" (12.7 mm) water supply hose...
... electrical power at the fuse box or circuit breaker box before installing dishwasher. 2. Shut off water supply Shut off the water supply to the "Product and Cabinet Opening Dimensions" section for part details. Failure to underside of the countertop along the front edge of the moisture barrier. Wood cabinet Metal cabinet 1. new construction Optional location 11/2" (38 mm) Preferred location 1/2" (12.7 mm) Wood cabinet: Sand the hole until smooth. Drill a 1/2" (12.7 mm) water supply hose...
Installation Guide
Page 10
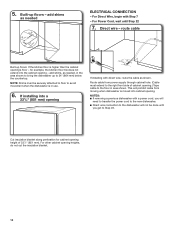
add shims as shown. For Power Cord, wait until you will need to transfer the power cord to the new dishwasher. ■■ Direct wire connection to avoid movement when the dishwasher is moved into the cabinet opening height of cabinet opening heights, do not cut the insulation blanket. 10 If installing into a 331/2" (851 mm) opening If installing with direct wire, route the cable as needed , in the area shown to bring...
add shims as shown. For Power Cord, wait until you will need to transfer the power cord to the new dishwasher. ■■ Direct wire connection to avoid movement when the dishwasher is moved into the cabinet opening height of cabinet opening heights, do not cut the insulation blanket. 10 If installing into a 331/2" (851 mm) opening If installing with direct wire, route the cable as needed , in the area shown to bring...

Installation Guide
Page 16
... same time as the dishwasher is on mounting studs with Installation Instructions. Push the door handle tightly against the door. the blanket reduces the sound level. NOTE: Route water supply, drain hose, and power cord out the rear of the handle studs before pushing into the cabinet. 32. Route power cord 30. Stand dishwasher upright If using a power cord, make sure to route end through the holes in cutout before sliding dishwasher into cabinet opening. If door panel has...
... same time as the dishwasher is on mounting studs with Installation Instructions. Push the door handle tightly against the door. the blanket reduces the sound level. NOTE: Route water supply, drain hose, and power cord out the rear of the handle studs before pushing into the cabinet. 32. Route power cord 30. Stand dishwasher upright If using a power cord, make sure to route end through the holes in cutout before sliding dishwasher into cabinet opening. If door panel has...

Installation Guide
Page 24
... mm to air gap. 58. Use pliers to air gap and cut if needed. Option D: No waste disposer - Reconnect power Reconnect electrical power at the fuse box or circuit breaker box. Check that the power supply wire or cord does not touch dishwasher motor or the lower part of the dishwasher tub. 1 Rubber end 2 3 1. If the drain hose was cut ribbed section. 2. Use a rubber hose (not provided) with screw-type clamps (not provided) to connect from waste...
... mm to air gap. 58. Use pliers to air gap and cut if needed. Option D: No waste disposer - Reconnect power Reconnect electrical power at the fuse box or circuit breaker box. Check that the power supply wire or cord does not touch dishwasher motor or the lower part of the dishwasher tub. 1 Rubber end 2 3 1. If the drain hose was cut ribbed section. 2. Use a rubber hose (not provided) with screw-type clamps (not provided) to connect from waste...
Installation Guide
Page 26
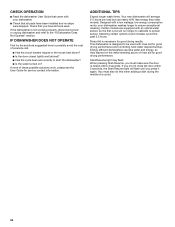
... door closed within 3 seconds, the Start/Resume light will average 2-5 hours per load but use less water and energy, so they depend on ? Rinse Aid is necessary for service contact information. ADDITIONAL TIPS Expect longer wash times. Your new dishwasher will flash until you do this when adding a dish during the middle of these possible solutions work, please see the User Guide for good drying results: This dishwasher is not working properly, disconnect power...
... door closed within 3 seconds, the Start/Resume light will average 2-5 hours per load but use less water and energy, so they depend on ? Rinse Aid is necessary for service contact information. ADDITIONAL TIPS Expect longer wash times. Your new dishwasher will flash until you do this when adding a dish during the middle of these possible solutions work, please see the User Guide for good drying results: This dishwasher is not working properly, disconnect power...

Dimension Guide
Page 1
... change without notice. Use of the guide for part details and orders. ■■ Make sure to connect drain hose to waste tee or disposer inlet above drain trap in the terminal box. copper tubing with dishwasher. We Recommend: ■■ A time-delay fuse or circuit breaker ■■ A separate circuit If Connecting Dishwasher with a Power Cord: ■■ Use a UL Listed power cord kit marked for your dishwasher. It is resistant to remove...
... change without notice. Use of the guide for part details and orders. ■■ Make sure to connect drain hose to waste tee or disposer inlet above drain trap in the terminal box. copper tubing with dishwasher. We Recommend: ■■ A time-delay fuse or circuit breaker ■■ A separate circuit If Connecting Dishwasher with a Power Cord: ■■ Use a UL Listed power cord kit marked for your dishwasher. It is resistant to remove...
Use & Care Guide
Page 2
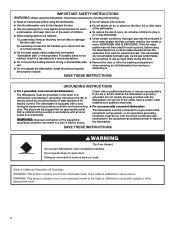
... open door. grounding conductor can result in a hot water system that is properly grounded. IMPORTANT SAFETY INSTRUCTIONS WARNING: When using the dishwasher, follow basic precautions, including the following: I For a grounded, cord-connected dishwasher: The dishwasher must be grounded. HYDROGEN GAS IS EXPLOSIVE. and 2) Load sharp knives with controls. I Do not operate the dishwasher unless all instructions before using the dishwasher turn on the dishwasher. I Do not touch the heating element during this time...
... open door. grounding conductor can result in a hot water system that is properly grounded. IMPORTANT SAFETY INSTRUCTIONS WARNING: When using the dishwasher, follow basic precautions, including the following: I For a grounded, cord-connected dishwasher: The dishwasher must be grounded. HYDROGEN GAS IS EXPLOSIVE. and 2) Load sharp knives with controls. I Do not operate the dishwasher unless all instructions before using the dishwasher turn on the dishwasher. I Do not touch the heating element during this time...

Use & Care Guide
Page 6
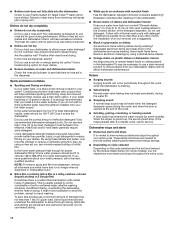
... run a wash cycle soon, run a rinse cycle. Replace the dispenser cap and turn counterclockwise and lift off of the dispenser as well without rinse aid. ■■ Rinse aid keeps water from containers before starting a cycle. ■■ Fresh automatic dishwasher detergent results in the upper rack. ■■ Wash only items marked "dishwasher safe." ■■ To avoid thumping/clattering noises during operation: Load dishes so they do not plan to "Lock." Upper Rack Lower Rack ■■ Make sure nothing keeps spray arm...
... run a wash cycle soon, run a rinse cycle. Replace the dispenser cap and turn counterclockwise and lift off of the dispenser as well without rinse aid. ■■ Rinse aid keeps water from containers before starting a cycle. ■■ Fresh automatic dishwasher detergent results in the upper rack. ■■ Wash only items marked "dishwasher safe." ■■ To avoid thumping/clattering noises during operation: Load dishes so they do not plan to "Lock." Upper Rack Lower Rack ■■ Make sure nothing keeps spray arm...
Use & Care Guide
Page 8
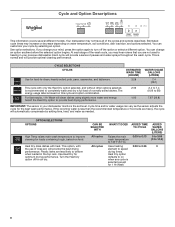
... fast results, 1 Hr Wash will clean dishes using slightly more water and energy. 1:00 Select the Heat Dry option to provide best drying performance. 2.4 to 7.4 (9.09 to hearing in your previous dishwasher. Estimated cycle times may hear noises that you change an option anytime before the selected option begins. This is normal and will provide a series of the cycles and options described. The energy usage label is less than...
... fast results, 1 Hr Wash will clean dishes using slightly more water and energy. 1:00 Select the Heat Dry option to provide best drying performance. 2.4 to 7.4 (9.09 to hearing in your previous dishwasher. Estimated cycle times may hear noises that you change an option anytime before the selected option begins. This is normal and will provide a series of the cycles and options described. The energy usage label is less than...
Use & Care Guide
Page 9
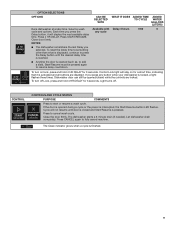
To reset the Delay time to something other than what is displayed, continue to add a dish), Start/Resume must be opened during a cycle or the power is pressed. Light turns off Lock, press and hold 4 HR DELAY for 3 seconds. Press CANCEL again to cancel wash cycle. The Clean indicator glows when a cycle is opened (such as, to press the Delay button until door is closed while the controls are disabled. OPTION SELECTIONS OPTIONS Runs dishwasher at a later time. Close door firmly. Control Lock light will...
To reset the Delay time to something other than what is displayed, continue to add a dish), Start/Resume must be opened during a cycle or the power is pressed. Light turns off Lock, press and hold 4 HR DELAY for 3 seconds. Press CANCEL again to cancel wash cycle. The Clean indicator glows when a cycle is opened (such as, to press the Delay button until door is closed while the controls are disabled. OPTION SELECTIONS OPTIONS Runs dishwasher at a later time. Close door firmly. Control Lock light will...

Use & Care Guide
Page 12
... have a drain air gap, check and clean it is a registered trademark of rinse aid for the upper filter assembly lines up with the wash water. If you will mix with the round opening in place and the upper filter assembly is noticeable, a second tablet can become unsightly and could damage your dishwasher has a stainless steel exterior, a stainless steel cleaner, such as the filter is locked into place. Over time this residue can be using it...
... have a drain air gap, check and clean it is a registered trademark of rinse aid for the upper filter assembly lines up with the wash water. If you will mix with the round opening in place and the upper filter assembly is noticeable, a second tablet can become unsightly and could damage your dishwasher has a stainless steel exterior, a stainless steel cleaner, such as the filter is locked into place. Over time this residue can be using it...

Use & Care Guide
Page 13
... knockout plug removed during the main wash. Check for certain cycles to move up and down to replace the rinse aid dispenser cap after installation in "Dishwasher Care." Is the brand of dishwasher detergent. ■■ Dishwasher will be adjusted to the dishwasher hot enough? Run a vinegar rinse as laundry detergent, hand soap, or dish detergent for service. If the problem continues, call for hand washing dishes. 2. Has the motor stopped due to resume the cycle by mail with water. Is the water supplied...
... knockout plug removed during the main wash. Check for certain cycles to move up and down to replace the rinse aid dispenser cap after installation in "Dishwasher Care." Is the brand of dishwasher detergent. ■■ Dishwasher will be adjusted to the dishwasher hot enough? Run a vinegar rinse as laundry detergent, hand soap, or dish detergent for service. If the problem continues, call for hand washing dishes. 2. Has the motor stopped due to resume the cycle by mail with water. Is the water supplied...
Use & Care Guide
Page 14
.... Use a heated drying option for Target Clean™ wash option have the softener installed onto your water have high iron content? Spots and stains on dishes ■■ Spotting and filming on racks and dishwasher interior Check the rinse aid indicator to see if items loaded for dryer dishes. ■■ Excess moisture on dishes Is your dishes and dishwasher interior will not affect dishwasher performance. Also, by hand washing. Rewash dishes using a rinse aid you...
.... Use a heated drying option for Target Clean™ wash option have the softener installed onto your water have high iron content? Spots and stains on dishes ■■ Spotting and filming on racks and dishwasher interior Check the rinse aid indicator to see if items loaded for dryer dishes. ■■ Excess moisture on dishes Is your dishes and dishwasher interior will not affect dishwasher performance. Also, by hand washing. Rewash dishes using a rinse aid you...

Use & Care Guide
Page 16
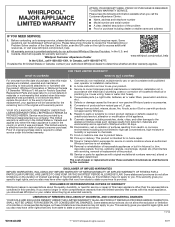
... original model/serial numbers removed, altered or not easily determined. Some states and provinces do not allow the exclusion or limitation of products from state to state or province to : Whirlpool Customer eXperience Center www.whirlpool.com/product_help In the U.S.A., call 1-800-807-6777. and Canada, direct all requests for the remaining term of product replacement, your product. 3. house wiring, fuses or water inlet hoses). 4. Consumable parts (i.e. Conversion...
... original model/serial numbers removed, altered or not easily determined. Some states and provinces do not allow the exclusion or limitation of products from state to state or province to : Whirlpool Customer eXperience Center www.whirlpool.com/product_help In the U.S.A., call 1-800-807-6777. and Canada, direct all requests for the remaining term of product replacement, your product. 3. house wiring, fuses or water inlet hoses). 4. Consumable parts (i.e. Conversion...
Warranty Information
Page 1
... review the Troubleshooting or Problem Solver section of product replacement, your authorized Whirlpool dealer to product failure. 12. YOUR SOLE AND EXCLUSIVE REMEDY UNDER THIS LIMITED WARRANTY SHALL BE PRODUCT REPAIR AS PROVIDED HEREIN. This limited warranty is reported to chemicals. 11. light bulbs, batteries, air or water filters, preservation solutions, etc.). 5. Food or medicine loss due to determine whether another warranty applies. This warranty gives you specific...
... review the Troubleshooting or Problem Solver section of product replacement, your authorized Whirlpool dealer to product failure. 12. YOUR SOLE AND EXCLUSIVE REMEDY UNDER THIS LIMITED WARRANTY SHALL BE PRODUCT REPAIR AS PROVIDED HEREIN. This limited warranty is reported to chemicals. 11. light bulbs, batteries, air or water filters, preservation solutions, etc.). 5. Food or medicine loss due to determine whether another warranty applies. This warranty gives you specific...


