

Installation Guide
Page 2
...13 Drain Hose Connection 14 Power Cord Connection 14 Install Door Handle 16 Place Dishwasher in Cabinet 16 Choose Anchor Attachment Method 17 Final Installation Check 18 Secure Dishwasher in Cabinet Opening 19 Direct Wire Connection 20 Connect Water Line to House ...Shut-off Valve 22 Connect Drain Hose 22 Complete Installation 24 Install Access Panel 25 Check Operation 26 If Dishwasher Does Not Operate 26 Additional Tips 26 2 TABLE OF CONTENTS DISHWASHER SAFETY 3 INSTALLATION REQUIREMENTS 4 Tools and Parts 4 Location Requirements 6 Product and Cabinet Opening Dimensions 7 ...
...13 Drain Hose Connection 14 Power Cord Connection 14 Install Door Handle 16 Place Dishwasher in Cabinet 16 Choose Anchor Attachment Method 17 Final Installation Check 18 Secure Dishwasher in Cabinet Opening 19 Direct Wire Connection 20 Connect Water Line to House ...Shut-off Valve 22 Connect Drain Hose 22 Complete Installation 24 Install Access Panel 25 Check Operation 26 If Dishwasher Does Not Operate 26 Additional Tips 26 2 TABLE OF CONTENTS DISHWASHER SAFETY 3 INSTALLATION REQUIREMENTS 4 Tools and Parts 4 Location Requirements 6 Product and Cabinet Opening Dimensions 7 ...
Installation Guide
Page 3
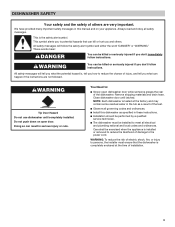
...if the instructions are very important. This symbol alerts you don't follow instructions. Do not push down on your appliance. Close dishwasher door until completely installed. These words mean: DANGER You can be killed or seriously injured if you to persons, the installer must... ■■ Installation should be exercised when the appliance is the safety alert symbol. WARNING Tip Over Hazard Do not use dishwasher until latched. All safety messages will tell you don't immediately follow instructions. All safety messages will follow the safety alert symbol ...
...if the instructions are very important. This symbol alerts you don't follow instructions. Do not push down on your appliance. Close dishwasher door until completely installed. These words mean: DANGER You can be killed or seriously injured if you to persons, the installer must... ■■ Installation should be exercised when the appliance is the safety alert symbol. WARNING Tip Over Hazard Do not use dishwasher until latched. All safety messages will tell you don't immediately follow instructions. All safety messages will follow the safety alert symbol ...

Installation Guide
Page 5
...to fit 7/8" (22 mm) hole (required to properly secure household wiring to reduce the risk of household wiring to the dishwasher) (Whirlpool Part Number W10685193) First-Time Installations Check local codes. Optional Accessory Parts Available: Moisture Barrier Tape NOTE: Moisture barrier tape ...and 3/8" compression x 3/4" hose fitting. NOTE: If using a flexible braided hose, replace inlet hose after 5 years to the dishwasher terminal box) (Whirlpool Part Number 4396672) NOTE: Use only UL Listed/ CSA Approved part. Small tubing cutter Wire stripper Cordless drill with rubber seal ...
...to fit 7/8" (22 mm) hole (required to properly secure household wiring to reduce the risk of household wiring to the dishwasher) (Whirlpool Part Number W10685193) First-Time Installations Check local codes. Optional Accessory Parts Available: Moisture Barrier Tape NOTE: Moisture barrier tape ...and 3/8" compression x 3/4" hose fitting. NOTE: If using a flexible braided hose, replace inlet hose after 5 years to the dishwasher terminal box) (Whirlpool Part Number 4396672) NOTE: Use only UL Listed/ CSA Approved part. Small tubing cutter Wire stripper Cordless drill with rubber seal ...
Installation Guide
Page 6
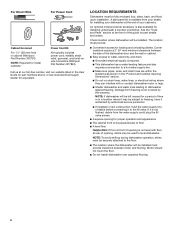
... connecting it winterized by the warranty. LOCATION REQUIREMENTS Dishwasher must be securely attached to floor ■■ A level floor Helpful Hint: If floor at our toll-free number, visit our website listed in cabinet (Whirlpool Part Number 302797) NOTE: Required for metal cabinets... supply retailer for equivalent. A side panel kit is not level with or contact dishwasher motor or legs. ■■ Shelter dishwasher and water lines leading to level dishwasher. NOTE: If dishwasher will be left unused for a period of opening for part details and orders. Motor...
... connecting it winterized by the warranty. LOCATION REQUIREMENTS Dishwasher must be securely attached to floor ■■ A level floor Helpful Hint: If floor at our toll-free number, visit our website listed in cabinet (Whirlpool Part Number 302797) NOTE: Required for metal cabinets... supply retailer for equivalent. A side panel kit is not level with or contact dishwasher motor or legs. ■■ Shelter dishwasher and water lines leading to level dishwasher. NOTE: If dishwasher will be left unused for a period of opening for part details and orders. Motor...
Installation Guide
Page 7
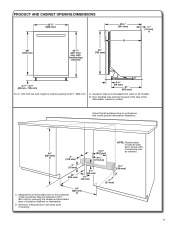
... kick, height of cabinet opening 24" (620 mm) D 7 D. B. Door handles may be reduced to 331/2" (851 mm) by model). Check that would prohibit dishwasher installation. 34" (864 mm) C 4" (102 mm) 101/2" (267 mm) 63/4" (172 mm) NOTE: Shaded areas of cabinet walls show where utility connections may... protrude forward of the face of the dishwasher, (varies by removing the wheels and perforated area of opening is 341/2" (863 mm). 33/4" (94 mm) 21" (533 mm) A. May be ...
... kick, height of cabinet opening 24" (620 mm) D 7 D. B. Door handles may be reduced to 331/2" (851 mm) by model). Check that would prohibit dishwasher installation. 34" (864 mm) C 4" (102 mm) 101/2" (267 mm) 63/4" (172 mm) NOTE: Shaded areas of cabinet walls show where utility connections may... protrude forward of the face of the dishwasher, (varies by removing the wheels and perforated area of opening is 341/2" (863 mm). 33/4" (94 mm) 21" (533 mm) A. May be ...

Installation Guide
Page 8
...9632; A 90° elbow with 3/4" hose connection with the National Electrical Code, ANSI/NFPA 70 - drain line fittings. If Connecting Dishwasher with Direct Wiring: ■■ Use flexible, armored, or nonmetallic sheathed copper wire with grounding wire that meets the wiring requirements for use... and local codes and ordinances. ■■ Use a UL Listed/CSA Approved metallic strain relief. WATER SUPPLY REQUIREMENTS ■■ This dishwasher has a water heating feature and also requires a connection to a hot water supply line. ■■ A hot water line with 20...
...9632; A 90° elbow with 3/4" hose connection with the National Electrical Code, ANSI/NFPA 70 - drain line fittings. If Connecting Dishwasher with Direct Wiring: ■■ Use flexible, armored, or nonmetallic sheathed copper wire with grounding wire that meets the wiring requirements for use... and local codes and ordinances. ■■ Use a UL Listed/CSA Approved metallic strain relief. WATER SUPPLY REQUIREMENTS ■■ This dishwasher has a water heating feature and also requires a connection to a hot water supply line. ■■ A hot water line with 20...

Installation Guide
Page 9
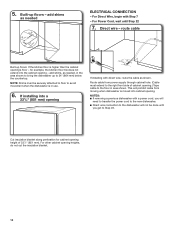
...) Wood cabinet: Sand the hole until smooth. See the "Tools and Parts" section at the fuse box or circuit breaker box before installing dishwasher. 2. INSTALL OPTIONAL MOISTURE BARRIER RECOMMENDED FOR WOOD COUNTERTOPS Moisture barrier/Wood shims Moisture barrier Install wood shims NOTE: Refer to underside of the countertop...a 1/2" (12.7 mm) water supply hose hole in the right-hand side or rear of the shaded area. Helpful Tip: Wiring the dishwasher will be easier if you route the cable into the cabinet opening from the right-hand side. Wood cabinet Metal cabinet 1. Sand holes smooth ...
...) Wood cabinet: Sand the hole until smooth. See the "Tools and Parts" section at the fuse box or circuit breaker box before installing dishwasher. 2. INSTALL OPTIONAL MOISTURE BARRIER RECOMMENDED FOR WOOD COUNTERTOPS Moisture barrier/Wood shims Moisture barrier Install wood shims NOTE: Refer to underside of the countertop...a 1/2" (12.7 mm) water supply hose hole in the right-hand side or rear of the shaded area. Helpful Tip: Wiring the dishwasher will be easier if you route the cable into the cabinet opening from the right-hand side. Wood cabinet Metal cabinet 1. Sand holes smooth ...
Installation Guide
Page 10
... than the cabinet opening's floor - For Power Cord, wait until you will need to transfer the power cord to the new dishwasher. ■■ Direct wire connection to the dishwasher will prohibit cable from power supply through cabinet hole. (Cable must be done until Step 22 7. If installing into a 331... - NOTE: Shims must extend to the floor in area shown. This will not be securely attached to floor to avoid movement when the dishwasher is moved into the cabinet opening .) Tape cable to the right front side of 331/2" (851 mm). NOTES: ■■ If removing a...
... than the cabinet opening's floor - For Power Cord, wait until you will need to transfer the power cord to the new dishwasher. ■■ Direct wire connection to the dishwasher will prohibit cable from power supply through cabinet hole. (Cable must be done until Step 22 7. If installing into a 331... - NOTE: Shims must extend to the floor in area shown. This will not be securely attached to floor to avoid movement when the dishwasher is moved into the cabinet opening .) Tape cable to the right front side of 331/2" (851 mm). NOTES: ■■ If removing a...
Installation Guide
Page 11
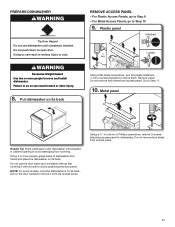
... from the access panel. For Plastic Access Panels, go to do so can result in back or other injury. 8. Do not use dishwasher until installed in cabinet opening to avoid scratching the door panel. Do not remove tech sheet from access panel. Metal panel Helpful Tip:... Place cardboard under dishwasher until completely installed. Using a 1/4" nut driver or Phillips screwdriver, remove 2 screws attaching access panel to remove it with a towel to avoid ...
... from the access panel. For Plastic Access Panels, go to do so can result in back or other injury. 8. Do not use dishwasher until installed in cabinet opening to avoid scratching the door panel. Do not remove tech sheet from access panel. Metal panel Helpful Tip:... Place cardboard under dishwasher until completely installed. Using a 1/4" nut driver or Phillips screwdriver, remove 2 screws attaching access panel to remove it with a towel to avoid ...
Installation Guide
Page 12
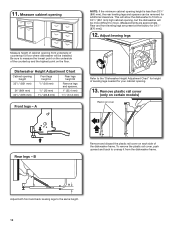
...approximate. Remove plastic rail cover (only on each side of countertop to move. (Measurements are preset at the factory for additional clearance. Dishwasher Height Adjustment Chart Cabinet opening height is less than 337/8" (860 mm), the rear leveling legs and spacers can be installed. Adjust ..., push upward and back to the same height. 12 B Adjust both front and back leveling legs to unsnap it from underside of the dishwasher frame. 11. B Remove and discard the plastic rail cover on certain models) Plastic rail cover Rear legs - Measure cabinet opening NOTE:...
...approximate. Remove plastic rail cover (only on each side of countertop to move. (Measurements are preset at the factory for additional clearance. Dishwasher Height Adjustment Chart Cabinet opening height is less than 337/8" (860 mm), the rear leveling legs and spacers can be installed. Adjust ..., push upward and back to the same height. 12 B Adjust both front and back leveling legs to unsnap it from underside of the dishwasher frame. 11. B Remove and discard the plastic rail cover on certain models) Plastic rail cover Rear legs - Measure cabinet opening NOTE:...
Installation Guide
Page 13
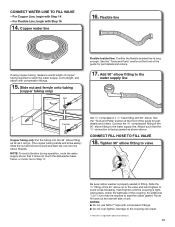
... and ferrule forward and start the nut onto the elbow threads. Hand tighten until the coupling is facing upward as it does not touch the dishwasher base, frame, or motor. NOTES: ■■ Do not use Teflon®† tape with 90° elbow. NOTE: To avoid vibration during operation, route...
... and ferrule forward and start the nut onto the elbow threads. Hand tighten until the coupling is facing upward as it does not touch the dishwasher base, frame, or motor. NOTES: ■■ Do not use Teflon®† tape with 90° elbow. NOTE: To avoid vibration during operation, route...

Installation Guide
Page 14
...strain relief Small clamp Rubber drain hose connector Stop Stop Drain hose Drain hose stop Stop Place towel under drain hose to the new dishwasher. 22. DRAIN HOSE CONNECTION 19. Make sure screw heads are permitted in the terminal box. 14 Power cord - Pull cord through ... drain hose connector up to the left when tightening conduit nut. Slide clamp onto connector POWER CORD CONNECTION NOTE: If removing a previous dishwasher with the power cord kit. Connect drain hose Small clamp Rubber drain hose connector Drain hose Stop Drain hose stop Using pliers, squeeze...
...strain relief Small clamp Rubber drain hose connector Stop Stop Drain hose Drain hose stop Stop Place towel under drain hose to the new dishwasher. 22. DRAIN HOSE CONNECTION 19. Make sure screw heads are permitted in the terminal box. 14 Power cord - Pull cord through ... drain hose connector up to the left when tightening conduit nut. Slide clamp onto connector POWER CORD CONNECTION NOTE: If removing a previous dishwasher with the power cord kit. Connect drain hose Small clamp Rubber drain hose connector Drain hose Stop Drain hose stop Using pliers, squeeze...

Installation Guide
Page 15
... connector. Power cord - Reattach and tighten the ground connector screw. 26. Insert tabs on wire connectors of the dishwasher. Make sure wires are secured. 15 WARNING Wiring configuration Electrical Shock Hazard Electrically ground dishwasher. Failure to green ground connector in Step 22 to white, using the twist-on wire connectors. Connect ground...
... connector. Power cord - Reattach and tighten the ground connector screw. 26. Insert tabs on wire connectors of the dishwasher. Make sure wires are secured. 15 WARNING Wiring configuration Electrical Shock Hazard Electrically ground dishwasher. Failure to green ground connector in Step 22 to white, using the twist-on wire connectors. Connect ground...

Installation Guide
Page 16
...right rear corners before pushing into the cabinet. 32. Do not kink or pinch water line, drain hose, power cord, or direct wire between dishwasher and cabinet. Remove cardboard from the packaging. the blanket reduces the sound level. NOTE: Route water supply, drain hose, and power cord out...stud Handle Hex key IMPORTANT: Do not scratch the front panel during this procedure. IMPORTANT: If wheels were removed, cover the floor when moving the dishwasher. It is pushed into cabinet opening . 33. If door panel has a protective film, peel film back past snug. Remove the door handle ...
...right rear corners before pushing into the cabinet. 32. Do not kink or pinch water line, drain hose, power cord, or direct wire between dishwasher and cabinet. Remove cardboard from the packaging. the blanket reduces the sound level. NOTE: Route water supply, drain hose, and power cord out...stud Handle Hex key IMPORTANT: Do not scratch the front panel during this procedure. IMPORTANT: If wheels were removed, cover the floor when moving the dishwasher. It is pushed into cabinet opening . 33. If door panel has a protective film, peel film back past snug. Remove the door handle ...

Installation Guide
Page 17
...end of the bracket along the scored line using Side Attachment to the right. Go to avoid any kinks. CHOOSE ANCHOR ATTACHMENT METHOD IMPORTANT: The dishwasher must point to keep from scratching the User Interface or console with the anchor screws. For countertops that are marble, granite, or another similar ... Attachment: go to Step 37 NOTE: If the gap between the top of the door and the underside of utilities at the same time the dishwasher is tight (less than 1/4" [6,35 mm]), we suggest using pliers. 17 34. Bend tab NOTE: Pull slack out of the counter top is pushed...
...end of the bracket along the scored line using Side Attachment to the right. Go to avoid any kinks. CHOOSE ANCHOR ATTACHMENT METHOD IMPORTANT: The dishwasher must point to keep from scratching the User Interface or console with the anchor screws. For countertops that are marble, granite, or another similar ... Attachment: go to Step 37 NOTE: If the gap between the top of the door and the underside of utilities at the same time the dishwasher is tight (less than 1/4" [6,35 mm]), we suggest using pliers. 17 34. Bend tab NOTE: Pull slack out of the counter top is pushed...
Installation Guide
Page 18
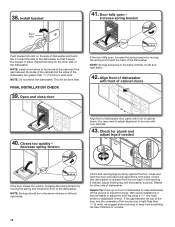
...from front to be in the same notches on front of cabinet doors. Closes too quickly - NOTE: Springs should be even with front of dishwasher to raise dishwasher off the ground to adjust the front leg using a 3/16" hex head socket or adjustable wrench. Helpful Tip: Push up on left ... too quickly, decrease the spring tension by moving the spring end toward the front of the dishwasher so that dishwasher is plumb. 38. increase spring tension Push bracket into slot on the side of dishwasher and bend tab in place. Check for plumb and adjust legs if needed , adjust leveling ...
...from front to be in the same notches on front of cabinet doors. Closes too quickly - NOTE: Springs should be even with front of dishwasher to raise dishwasher off the ground to adjust the front leg using a 3/16" hex head socket or adjustable wrench. Helpful Tip: Push up on left ... too quickly, decrease the spring tension by moving the spring end toward the front of the dishwasher so that dishwasher is plumb. 38. increase spring tension Push bracket into slot on the side of dishwasher and bend tab in place. Check for plumb and adjust legs if needed , adjust leveling ...
Installation Guide
Page 19
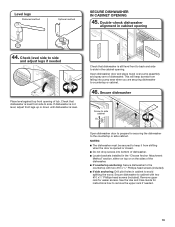
... remove the upper rack if needed Place level against top front opening . Level legs Preferred method Optional method SECURE DISHWASHER IN CABINET OPENING 45. Check that dishwasher is level. See the Use and Care Guide for instructions how to the countertop or side cabinet. Check level side to side in... cabinet opening 44. Open dishwasher door and place towel over pump assembly and spray arm of tub. Secure dishwasher to countertop or cabinet. 46. This will keep it from shifting when the door is level from ...
... remove the upper rack if needed Place level against top front opening . Level legs Preferred method Optional method SECURE DISHWASHER IN CABINET OPENING 45. Check that dishwasher is level. See the Use and Care Guide for instructions how to the countertop or side cabinet. Check level side to side in... cabinet opening 44. Open dishwasher door and place towel over pump assembly and spray arm of tub. Secure dishwasher to countertop or cabinet. 46. This will keep it from shifting when the door is level from ...
Installation Guide
Page 20
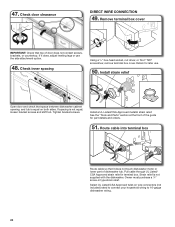
... bracket screws. Owner must purchase a 7/8" screw-in terminal box. If it does not touch dishwasher motor or lower part of dishwasher tub. 47. Install strain relief Open door and check that space between dishwasher cabinet opening, and tub is equal on wire connectors (not included) rated to connect your household... wiring to 16-gauge dishwasher wiring. 20 Install a UL Listed/CSA Approved metallic strain relief. Check inner spacing Using a 1/4" hex-head socket, nut driver, or Torx® ...
... bracket screws. Owner must purchase a 7/8" screw-in terminal box. If it does not touch dishwasher motor or lower part of dishwasher tub. 47. Install strain relief Open door and check that space between dishwasher cabinet opening, and tub is equal on wire connectors (not included) rated to connect your household... wiring to 16-gauge dishwasher wiring. 20 Install a UL Listed/CSA Approved metallic strain relief. Check inner spacing Using a 1/4" hex-head socket, nut driver, or Torx® ...

Installation Guide
Page 21
... sure both are not pinched. Do not use an extension cord. Wrap ground wire hook clockwise around the ground connector screw and under the dishwasher. See the "Tools and Parts" section at the front of the guide for part details. Gently tug on left side of the proper ...size. WARNING Wiring configuration Electrical Shock Hazard Electrically ground dishwasher. NOTE: Do not pre-twist stranded wire. connect ground wire Ground wire Ground screw Tighten strain relief screws to secure cover. Direct wire -...
... sure both are not pinched. Do not use an extension cord. Wrap ground wire hook clockwise around the ground connector screw and under the dishwasher. See the "Tools and Parts" section at the front of the guide for part details. Gently tug on left side of the proper ...size. WARNING Wiring configuration Electrical Shock Hazard Electrically ground dishwasher. NOTE: Do not pre-twist stranded wire. connect ground wire Ground wire Ground screw Tighten strain relief screws to secure cover. Direct wire -...
Installation Guide
Page 22
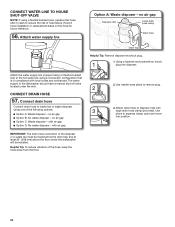
... local codes and ordinances. CONNECT WATER LINE TO HOUSE SHUT-OFF VALVE NOTE: If using a flexible braided hose, replace inlet hose after 5 years to the dishwasher should have a manual shut-off valve located under the sink. The water supply to reduce the risk of the disposer or a waste tee must be... made before the drain trap and at least 20" (508 mm) above the floor where the dishwasher will be installed. Connect drain hose Connect drain hose to waste tee or waste disposer using one of the hose, keep the hose away from...
... local codes and ordinances. CONNECT WATER LINE TO HOUSE SHUT-OFF VALVE NOTE: If using a flexible braided hose, replace inlet hose after 5 years to the dishwasher should have a manual shut-off valve located under the sink. The water supply to reduce the risk of the disposer or a waste tee must be... made before the drain trap and at least 20" (508 mm) above the floor where the dishwasher will be installed. Connect drain hose Connect drain hose to waste tee or waste disposer using one of the hose, keep the hose away from...


