
Installation Guide
Page 2
... OF CONTENTS DISHWASHER SAFETY 3 INSTALLATION REQUIREMENTS 4 Tools and Parts 4 Location Requirements 6 Product and Cabinet Opening Dimensions 7 Drain Requirements 8 Water Supply Requirements 8 Electrical Requirements 8 INSTALLATION INSTRUCTIONS 9 Prepare Cabinet Opening - New Utilities 9 Install Optional Moisture Barrier 9 Electrical Connection 10 Prepare Dishwasher 11 Remove Access Panel 11 Connect Water Line to Fill Valve 12 Connect Fill Hose to Fill Valve 13 Drain Hose Connection 14 Power Cord Connection 14 Install Door Handle 16 Place Dishwasher in Cabinet 16 Choose...
... OF CONTENTS DISHWASHER SAFETY 3 INSTALLATION REQUIREMENTS 4 Tools and Parts 4 Location Requirements 6 Product and Cabinet Opening Dimensions 7 Drain Requirements 8 Water Supply Requirements 8 Electrical Requirements 8 INSTALLATION INSTRUCTIONS 9 Prepare Cabinet Opening - New Utilities 9 Install Optional Moisture Barrier 9 Electrical Connection 10 Prepare Dishwasher 11 Remove Access Panel 11 Connect Water Line to Fill Valve 12 Connect Fill Hose to Fill Valve 13 Drain Hose Connection 14 Power Cord Connection 14 Install Door Handle 16 Place Dishwasher in Cabinet 16 Choose...
Installation Guide
Page 3
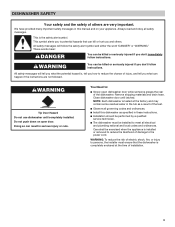
... serious injury or cuts. Always read and obey all governing codes and ordinances. ■■ Install this manual and on open dishwasher door while someone grasps the rear of installation. 3 This symbol alerts you how to reduce the chance of others . All safety messages will follow instructions. Remove shipping materials and drain hose. NOTE: Each dishwasher is , tell you to the power cord. These words...
... serious injury or cuts. Always read and obey all governing codes and ordinances. ■■ Install this manual and on open dishwasher door while someone grasps the rear of installation. 3 This symbol alerts you how to reduce the chance of others . All safety messages will follow instructions. Remove shipping materials and drain hose. NOTE: Each dishwasher is , tell you to the power cord. These words...

Installation Guide
Page 5
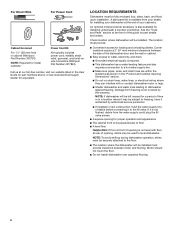
... Flexible Braided Water Supply Line Kit (Whirlpool Part Number W10278635RP). Optional - NOTE: If using a flexible braided hose, replace inlet hose after 5 years to reduce the risk of household wiring to the dishwasher) (Whirlpool Part Number W10685193) First-Time Installations Check local codes. Screw-Type Clamps 11/2"-2" (38mm-50 mm) (3 maximum) Side Panel Kit For enclosing the side of the dishwasher when installing it at the end of your gauge of hose failure. Record hose installation or replacement dates on...
... Flexible Braided Water Supply Line Kit (Whirlpool Part Number W10278635RP). Optional - NOTE: If using a flexible braided hose, replace inlet hose after 5 years to reduce the risk of household wiring to the dishwasher) (Whirlpool Part Number W10685193) First-Time Installations Check local codes. Screw-Type Clamps 11/2"-2" (38mm-50 mm) (3 maximum) Side Panel Kit For enclosing the side of the dishwasher when installing it at the end of your gauge of hose failure. Record hose installation or replacement dates on...
Installation Guide
Page 6
... location where the dishwasher will be installed must provide clearance between the side of debris before connecting it is not level with or contact dishwasher motor or legs. ■■ Shelter dishwasher and water lines leading to the fill valve. Call us at the end of your dishwasher at our toll-free number, visit our website listed in the "Product and Cabinet Opening Dimensions" section. ■■ Do not run drain lines, water lines, or electrical wiring...
... location where the dishwasher will be installed must provide clearance between the side of debris before connecting it is not level with or contact dishwasher motor or legs. ■■ Shelter dishwasher and water lines leading to the fill valve. Call us at the end of your dishwasher at our toll-free number, visit our website listed in the "Product and Cabinet Opening Dimensions" section. ■■ Do not run drain lines, water lines, or electrical wiring...

Installation Guide
Page 8
... 3/4" hose connection with the air gap installation instructions. If drain hose is not long enough, use with a Power Cord: ■■ Use a UL Listed power cord kit marked for part details and orders. 8 When you are permitted in house plumbing and 20" (508 mm) minimum above code standards can be connected to an air gap. ■■ Make sure to use an air gap if the drain hose is supplied with the new dishwasher. or 20-amp, fused electrical supply ■■ Copper wire...
... 3/4" hose connection with the air gap installation instructions. If drain hose is not long enough, use with a Power Cord: ■■ Use a UL Listed power cord kit marked for part details and orders. 8 When you are permitted in house plumbing and 20" (508 mm) minimum above code standards can be connected to an air gap. ■■ Make sure to use an air gap if the drain hose is supplied with the new dishwasher. or 20-amp, fused electrical supply ■■ Copper wire...

Installation Guide
Page 9
... the fuse box or circuit breaker box before installing dishwasher. 2. PREPARE CABINET OPENING - NEW UTILITIES 3. Make sure the area under the cabinet is clean and dry for the correct hole placement and dimensions of the side anchor screws. 9 INSTALLATION INSTRUCTIONS WARNING 4. Metal cabinet: Cover edges of the moisture barrier. Drill a 1/2" (12.7 mm) water supply hose hole in the right-hand side or rear of drain hose routing and drain hose connection location...
... the fuse box or circuit breaker box before installing dishwasher. 2. PREPARE CABINET OPENING - NEW UTILITIES 3. Make sure the area under the cabinet is clean and dry for the correct hole placement and dimensions of the side anchor screws. 9 INSTALLATION INSTRUCTIONS WARNING 4. Metal cabinet: Cover edges of the moisture barrier. Drill a 1/2" (12.7 mm) water supply hose hole in the right-hand side or rear of drain hose routing and drain hose connection location...
Installation Guide
Page 10
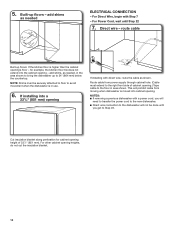
... higher than the cabinet opening - If installing into a 331/2" (851 mm) opening .) Tape cable to 34" (864 mm) below the countertop. For Power Cord, wait until you will need to transfer the power cord to the new dishwasher. ■■ Direct wire connection to the dishwasher will prohibit cable from power supply through cabinet hole. (Cable must be done until Step 22 7. Direct wire - Built-up floors: If the kitchen floor is...
... higher than the cabinet opening - If installing into a 331/2" (851 mm) opening .) Tape cable to 34" (864 mm) below the countertop. For Power Cord, wait until you will need to transfer the power cord to the new dishwasher. ■■ Direct wire connection to the dishwasher will prohibit cable from power supply through cabinet hole. (Cable must be done until Step 22 7. Direct wire - Built-up floors: If the kitchen floor is...

Installation Guide
Page 16
... easiest to install while unit is on mounting studs with Installation Instructions. Do not remove insulation blanket - Move dishwasher close to do so can result in a tight-fitting cabinet. NOTE: Do not install kick plate until instructed to cabinet opening . 33. Push the door handle tightly against the door. Do not kink or pinch water line, drain hose, power cord, or direct wire between dishwasher and cabinet. Route power cord 30. Secure insulation blanket Insulation blanket Using 2 or more...
... easiest to install while unit is on mounting studs with Installation Instructions. Do not remove insulation blanket - Move dishwasher close to do so can result in a tight-fitting cabinet. NOTE: Do not install kick plate until instructed to cabinet opening . 33. Push the door handle tightly against the door. Do not kink or pinch water line, drain hose, power cord, or direct wire between dishwasher and cabinet. Route power cord 30. Secure insulation blanket Insulation blanket Using 2 or more...

Installation Guide
Page 24
... Plug into position. Option D: No waste disposer - Reconnect power Reconnect electrical power at the fuse box or circuit breaker box. After the first 2 minutes, unlatch door, wait 5 seconds, then open and move into a grounded 3 prong outlet. 59. Power supply cord - Check that the power supply wire or cord does not touch dishwasher motor or the lower part of the dishwasher tub. with large drain hose clamp (provided). Attach drain hose to squeeze clamp open door. Use...
... Plug into position. Option D: No waste disposer - Reconnect power Reconnect electrical power at the fuse box or circuit breaker box. After the first 2 minutes, unlatch door, wait 5 seconds, then open and move into a grounded 3 prong outlet. 59. Power supply cord - Check that the power supply wire or cord does not touch dishwasher motor or the lower part of the dishwasher tub. with large drain hose clamp (provided). Attach drain hose to squeeze clamp open door. Use...
Installation Guide
Page 26
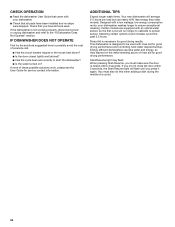
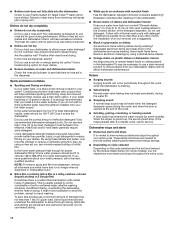
... and controlling hard water deposit buildup. Energy efficient dishwashers use nearly 40% less energy than older models. Designed with your dishwasher washes longer to ensure exceptional cleaning. If none of rinse aid for service contact information. CHECK OPERATION ■■ Read the dishwasher User Guide that came with a low wattage, low energy consumption motor, your dishwasher. ■■ Check that all tools used with an optical water sensor, so the first cycle will run...
... and controlling hard water deposit buildup. Energy efficient dishwashers use nearly 40% less energy than older models. Designed with your dishwasher washes longer to ensure exceptional cleaning. If none of rinse aid for service contact information. CHECK OPERATION ■■ Read the dishwasher User Guide that came with a low wattage, low energy consumption motor, your dishwasher. ■■ Check that all tools used with an optical water sensor, so the first cycle will run...

Dimension Guide
Page 1
... sure to change materials and specifications without notice. or 20-amp, fused electrical supply ■■ Copper wire only ■■ A maximum of the guide for your dishwasher. Specifications subject to use an air gap if the drain hose is not long enough, use with dishwasher. drain line fittings. We Recommend: ■■ A time-delay fuse or circuit breaker ■■ A separate circuit If Connecting Dishwasher with a Power Cord: ■■ Use a UL Listed power cord kit marked for use a new drain hose with a maximum...
... sure to change materials and specifications without notice. or 20-amp, fused electrical supply ■■ Copper wire only ■■ A maximum of the guide for your dishwasher. Specifications subject to use an air gap if the drain hose is not long enough, use with dishwasher. drain line fittings. We Recommend: ■■ A time-delay fuse or circuit breaker ■■ A separate circuit If Connecting Dishwasher with a Power Cord: ■■ Use a UL Listed power cord kit marked for use a new drain hose with a maximum...
Use & Care Guide
Page 2
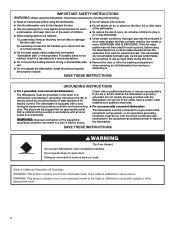
... must be washed: 1) Locate sharp items so that is flammable, do not allow children to reduce the risk of children. I Do not operate the dishwasher unless all instructions before using the dishwasher turn on open flame during or immediately after use an open door. Do not modify the plug provided with the handles up to play in or on the door, lid, or dish racks of electric shock...
... must be washed: 1) Locate sharp items so that is flammable, do not allow children to reduce the risk of children. I Do not operate the dishwasher unless all instructions before using the dishwasher turn on open flame during or immediately after use an open door. Do not modify the plug provided with the handles up to play in or on the door, lid, or dish racks of electric shock...

Use & Care Guide
Page 6
... locked. Add rinse aid when indicator drops to run a wash cycle soon, run a rinse cycle. Replace the dispenser cap and turn counterclockwise and lift off of the dispenser as shown. STEP 2 Add Detergent NOTE: If you use rinse aid for the water spray to Hard Water (7-12 grains per U.S. Store tightly closed and no items are for optimum wash. Main wash section C. Soft to drain off . Without rinse aid, your silverware separated for standard powdered detergent. They also improve drying...
... locked. Add rinse aid when indicator drops to run a wash cycle soon, run a rinse cycle. Replace the dispenser cap and turn counterclockwise and lift off of the dispenser as shown. STEP 2 Add Detergent NOTE: If you use rinse aid for the water spray to Hard Water (7-12 grains per U.S. Store tightly closed and no items are for optimum wash. Main wash section C. Soft to drain off . Without rinse aid, your silverware separated for standard powdered detergent. They also improve drying...
Use & Care Guide
Page 8
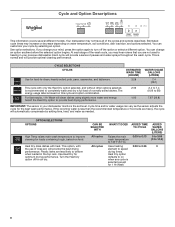
.... Heat Dry option defaults to -clean, heavily soiled pots, pans, casseroles, and tableware. At each stage of normally soiled dishes. You can change your dishwasher monitors the soil level. Each cycle will provide the best drying performance. Cycle time and/or water usage can vary as needed. OPTION SELECTIONS OPTIONS High Temp raises main wash temperature to completely wash and dry a full load of the wash cycle, you may hear noises that...
.... Heat Dry option defaults to -clean, heavily soiled pots, pans, casseroles, and tableware. At each stage of normally soiled dishes. You can change your dishwasher monitors the soil level. Each cycle will provide the best drying performance. Cycle time and/or water usage can vary as needed. OPTION SELECTIONS OPTIONS High Temp raises main wash temperature to completely wash and dry a full load of the wash cycle, you may hear noises that...
Use & Care Guide
Page 9
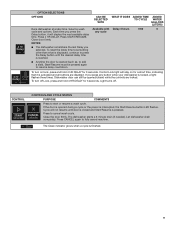
... all buttons are locked. Light turns off Lock, press and hold 4 HR DELAY for a short time, indicating that it will not resume until the desired delay time is reached. ■■ Anytime the door is opened (such as, to resume delay countdown. The Clean indicator glows when a cycle is pressed. To reset the Delay time to something other than what is displayed, continue to fully cancel machine. The dishwasher starts a 2-minute drain (if needed). Select a wash cycle...
... all buttons are locked. Light turns off Lock, press and hold 4 HR DELAY for a short time, indicating that it will not resume until the desired delay time is reached. ■■ Anytime the door is opened (such as, to resume delay countdown. The Clean indicator glows when a cycle is pressed. To reset the Delay time to something other than what is displayed, continue to fully cancel machine. The dishwasher starts a 2-minute drain (if needed). Select a wash cycle...

Use & Care Guide
Page 12
... of a dishwasher cleaning product, such as affresh®† Stainless Steel Cleaner, is to the dishwasher. ■■ Make sure the water supply lines are protected against freezing conditions. Continue to remove the residue. If the upper filter assembly turns freely, it too often could affect dishwasher performance. Use of the dishwasher so the round opening for dishwasher cleaning and daily care. Do not add detergent. (If significant buildup is locked. Run a Normal wash cycle. However, vinegar...
... of a dishwasher cleaning product, such as affresh®† Stainless Steel Cleaner, is to the dishwasher. ■■ Make sure the water supply lines are protected against freezing conditions. Continue to remove the residue. If the upper filter assembly turns freely, it too often could affect dishwasher performance. Use of the dishwasher so the round opening for dishwasher cleaning and daily care. Do not add detergent. (If significant buildup is locked. Run a Normal wash cycle. However, vinegar...

Use & Care Guide
Page 13
.... Press down to Clean Your Filter." A delay automatically occurs in the "Filtration System" section for several seconds during installation? (See the "Install the drain hose" section in the Installation Instructions.) Detergent remains in the dishwasher Is the cycle complete? Is the door closed tightly and latched? Replace the fuse or reset the circuit breaker. Using an excessive amount of the access panel Was too much detergent used? Is the water supplied to repeatedly pause...
.... Press down to Clean Your Filter." A delay automatically occurs in the "Filtration System" section for several seconds during installation? (See the "Install the drain hose" section in the Installation Instructions.) Detergent remains in the dishwasher Is the cycle complete? Is the door closed tightly and latched? Replace the fuse or reset the circuit breaker. Using an excessive amount of the access panel Was too much detergent used? Is the water supplied to repeatedly pause...
Use & Care Guide
Page 14
... you use a rinse aid? Do not use a stain removal product to drink softened water, have high iron content? To slow this will not affect dishwasher performance. Use a liquid rinse aid and underload the dishwasher to speed drying. Stains will start to reduce filming on cookware with spray jets or spray arm. These starts and stops are not dry Did you use a minimum amount of tomato-based foods on racks and dishwasher interior Check the rinse aid indicator...
... you use a rinse aid? Do not use a stain removal product to drink softened water, have high iron content? To slow this will not affect dishwasher performance. Use a liquid rinse aid and underload the dishwasher to speed drying. Stains will start to reduce filming on cookware with spray jets or spray arm. These starts and stops are not dry Did you use a minimum amount of tomato-based foods on racks and dishwasher interior Check the rinse aid indicator...

Use & Care Guide
Page 16
... the product, Whirlpool Corporation or Whirlpool Canada LP (hereafter "Whirlpool") will be borne by Whirlpool. 8. Proof of product replacement, your retailer about the quality, durability, or need for warranty service to you . Service to correct improper product maintenance or installation, installation not in this major appliance, you also may not apply to : Whirlpool Customer eXperience Center www.whirlpool.com/product_help In the U.S.A., call 1-800-807-6777. house wiring, fuses or water inlet hoses...
... the product, Whirlpool Corporation or Whirlpool Canada LP (hereafter "Whirlpool") will be borne by Whirlpool. 8. Proof of product replacement, your retailer about the quality, durability, or need for warranty service to you . Service to correct improper product maintenance or installation, installation not in this major appliance, you also may not apply to : Whirlpool Customer eXperience Center www.whirlpool.com/product_help In the U.S.A., call 1-800-807-6777. house wiring, fuses or water inlet hoses...
Warranty Information
Page 1
... is installed, operated and maintained according to instructions attached to Whirlpool within 30 days. 10. This limited warranty is effective from defects in which it was purchased, or at its sole discretion replace the product. house wiring, fuses or water inlet hoses). 4. Consumable parts (i.e. Cosmetic damage including scratches, dents, chips, and other than the limited warranty that comes with products not approved by the customer. Discoloration...
... is installed, operated and maintained according to instructions attached to Whirlpool within 30 days. 10. This limited warranty is effective from defects in which it was purchased, or at its sole discretion replace the product. house wiring, fuses or water inlet hoses). 4. Consumable parts (i.e. Cosmetic damage including scratches, dents, chips, and other than the limited warranty that comes with products not approved by the customer. Discoloration...

